
Barrhaven: Best Tools for Clay Soil Digging This Fall
Quick Digging Tips for Barrhaven Clay:
- Barrhaven clay is dense, drains poorly, and compacts easily, requiring specific tools.
- **Essential Hand Tools:** Pointed digging shovel, border spade, digging fork. Mattock for very tough ground.
- **Power Equipment:** Rototillers help for large areas but use cautiously on clay (avoid over-tilling wet soil).
- **Fall Amendment:** Crucial step! Mix 2-4 inches of compost/organic matter into loosened soil. *Do not add sand.*
- **Tool Care:** Clean tools immediately after use, dry thoroughly, and oil metal parts to prevent rust.
Facing tough clay? Let us handle the hard work! Request Your Free Quote Today!
Introduction: Wrestling with Barrhaven's Clay Soil This Fall? You're Not Alone!
Ah, fall in Barrhaven! Crisp air, colourful leaves, and... *that* soil. If your shovel has ever made that *thud* sound followed by an impossible suction noise when trying to plant tulip bulbs, you know the struggle is real. Barrhaven's famous clay soil can feel like wrestling sticky peanut butter one minute and chipping away at concrete the next, especially with Ottawa's typical fall mix of rain and dropping temperatures. Trying to get those essential fall gardening chores done – like amending soil or planting shrubs before the ground freezes solid – can feel like a serious workout.
You are definitely not alone in this annual landscaping duel! Across Ottawa, from Barrhaven to parts of Nepean, homeowners know the challenge of heavy clay. But fear not! Giving up isn't the answer (though sometimes tempting, right?). This guide is here to help you gear up properly. We're going to explore the *best digging tools* specifically suited for slicing through and lifting that stubborn clay, making your fall projects much smoother. Let's find the right tools so you can conquer the clay and actually enjoy those beautiful autumn days in the yard.
For more general gardening advice in our climate, check out the resources from the Friends of the Central Experimental Farm.
Understanding the Beast: Why Barrhaven Clay Needs Special Attention
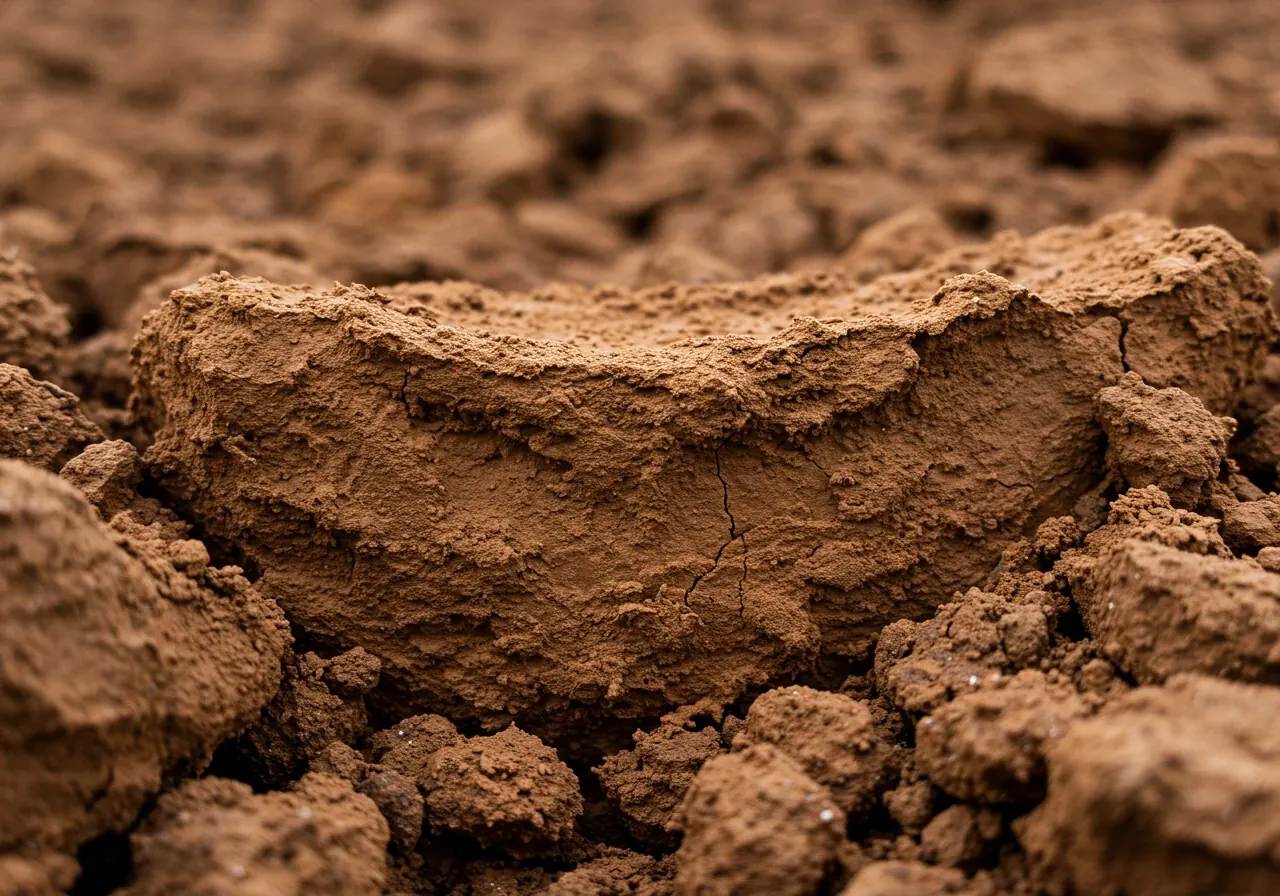
So, what *is* the deal with this famous Barrhaven clay? If you've moved here from an area with sandy soil, you might be in for a bit of a shock. Think of soil particles like tiny building blocks. Sandy soil is like a jar of marbles – lots of space between them for water and air to move. Clay soil, common not just in Barrhaven but across Ottawa and areas like Greely too, is more like a stack of microscopic plates or cards.
When these tiny plates get wet, like during our lovely fall rains, they stick together *really* tightly. This is why clay gets that sticky, muddy texture that tries to steal your boots! It holds onto water like a champ, which *can* be good because it also holds onto nutrients plants love. That's the "pro" side.
But here comes the "con" list, especially for fall gardening:
- Poor Drainage: Because the particles are packed so tight, water doesn't drain through easily. This can lead to soggy roots, which most plants hate. It can even cause puddles that might interfere with lawn equipment or create issues if you're trying to fix sprinkler issues before winter.
- Compaction City: Foot traffic, rain, and even just time can pack clay down hard. It becomes tough for roots to push through, and air can't get in either. Think concrete block versus fluffy cake.
- Temperature Tantrums: Clay soil is slow to warm up in the spring and can turn brick-hard during dry spells or freeze solid quickly in late fall. This makes timing your fall planting and landscaping projects tricky.
- Heavy Lifting: It's just plain heavy and difficult to dig, especially when it's either super wet or bone dry.
This unique structure impacts everything from planting simple bulbs to bigger projects. For instance, getting the base right is crucial for hardscaping; poorly drained clay can wreak havoc underneath otherwise beautiful Barrhaven patio design ideas. Even deciding where to place features needs consideration – you wouldn't want water pooling constantly around your cozy setup after reading up on fall fire pit design tips for Ottawa. And while clay holds water, understanding *how* it does affects your watering strategy; you might need different approaches than suggested in general summer irrigation tips to save water, adapting for clay's slow absorption and potential for runoff.
Working with clay isn't impossible, but it does demand respect and the right approach. If wrestling with the soil sounds less like fun and more like frustration, exploring professional landscaping services can be a great way to get the beautiful yard you want without the backache. Our Google Business Profile shows reviews from many happy Ottawa clients!
The Hand-to-Hand Combat Tools: Your Manual Arsenal Against Clay
Okay, let's ditch those flimsy plastic trowels and budget-bin shovels that bend if you look at them wrong. Barrhaven clay laughs at those! When you're going toe-to-toe with compacted, sticky soil, you need tools built for the challenge. Think of this as equipping yourself for a gardening battle where your opponent is heavy, stubborn, and currently occupying your future flower bed. Here’s your essential manual arsenal:
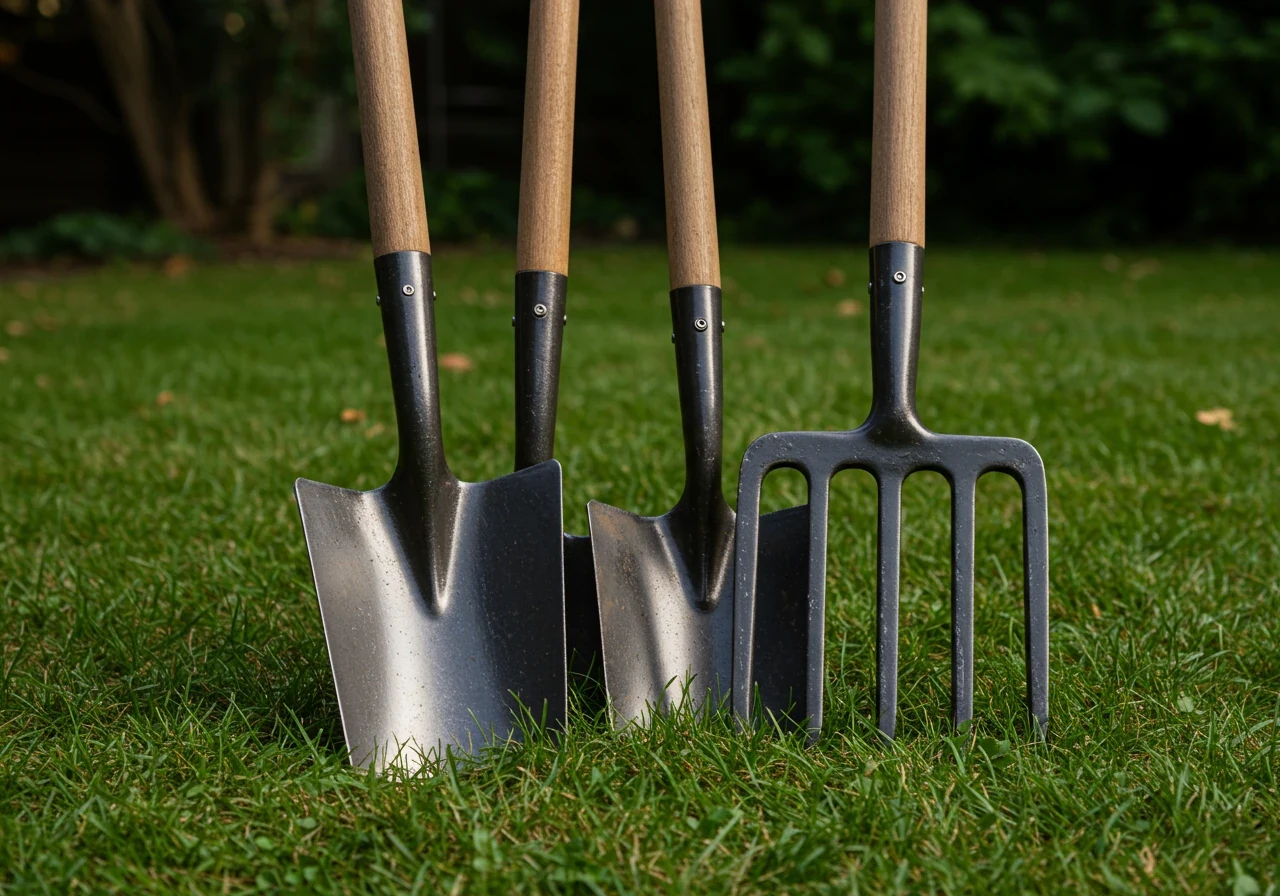
1. The Pointed Digging Shovel & The Border Spade: Your Slicing Specialists
Forget those wide, flat shovels meant for scooping snow or mulch. For clay, you need penetration power!
- Why they work: A pointed shovel blade acts like a knife, slicing into dense clay more easily than a flat edge. A border spade, with its typically flatter, sharper, and often narrower blade, is excellent for creating clean edges for beds or trenches and slicing through compacted layers or tough roots.
- What to look for: Go for forged steel heads – they are way stronger than stamped steel. Look for a solid connection between the head and the handle (rivets or a solid socket). A fibreglass or hardwood handle is best for durability. A D-handle grip gives you better control, and a turned step or foot ledge on top of the blade saves your boot and adds leverage.
- How to use them: Don't try to lift a massive chunk of clay at once. Use the pointed shovel to cut the outline of the area you want to dig. Use the spade to make clean vertical cuts. Then, use your leg power on the foot ledge to drive the blade down. Pry back gently to loosen the soil, taking smaller scoops. Scrape sticky clay off the blade frequently – a bucket of water nearby can help. These tools are crucial for everything from planting shrubs to preparing for a full fall yard cleanup in Barrhaven.
2. The Digging Fork (or Garden Fork): The Clay Buster
This isn't your grandpa's pitchfork for hay! A digging fork is built tough for breaking ground.
- Why it works: Those strong, usually square or flattened tines are fantastic for breaking up compacted clay *after* you've initially sliced into it. It helps aerate the soil and is much better than a shovel for separating heavy clods. It's also great for mixing in compost or other amendments.
- What to look for: Again, forged steel is key! The tines should be thick and strong, not easily bent. A comfortable D-handle is a must for leverage and control when wrestling with heavy soil. Ensure the tines are securely attached to the handle socket.
- How to use it: Plunge the fork into the loosened soil. Instead of just lifting, rock the handle back and forth to fracture the clay block. Lift smaller sections. This tool is a lifesaver when amending soil, a common task for landscaping projects in heavy clay. Many homeowners across Ottawa, whether they're tackling tough soil in areas like Metcalfe or closer to the city centre, find these forks indispensable.
3. The Mattock or Pickaxe: The Heavy Artillery
When you hit a layer that feels like actual rock, or you're dealing with severely compacted ground or large roots, it's time to bring out the big guns.
- Why they work: A pickaxe usually has a sharp point on one side (for breaking) and a chisel on the other. A mattock typically has an "adze" end (like a horizontal axe blade) for chopping and digging, and either a pick or a cutter blade on the other side for roots. They use weight and leverage to break through what shovels and forks can't.
- What to look for: A solid head weight (around 5 lbs is common for gardening use) and a strong handle (fibreglass absorbs shock well, hickory is traditional). Ensure the head is securely fitted.
- How to use them: *Safety first!* Ensure you have clear space around you. Use a controlled swinging motion, letting the tool's weight do the work. Use the pick end to fracture hardpan clay and the adze or chisel end to scrape, dig, or chop through roots. Be mindful when digging near boundaries; you don't want heavy clay ending up where it shouldn't, potentially requiring something like clearing heavy debris from city-adjacent property.
Having the right *digging tools* transforms clay soil work from utterly exhausting to merely challenging. Remember to clean your tools after use, especially with sticky clay, to prevent rust and keep them ready for the next round. If wrestling with heavy soil sounds like more backache than you signed up for, exploring professional landscaping and yard work services can save you time and effort. We share these tips freely, but rest assured, when you contact us for help, we handle your information with care, as detailed in our privacy policy.
Tool Types: Hand vs. Power
Pros & Cons of Hand Tools for Clay
Pros: More control, better for smaller areas or established beds, less risk of damaging soil structure, good workout!
Cons: Slower, physically demanding for large areas, can be difficult on extremely compacted or dry clay.
Best For: Planting individual shrubs/perennials, amending smaller garden beds, working around existing plants, edging beds (using a border spade).
Remember the key players: Pointed Shovel, Digging Fork, Border Spade, Mattock (for tough spots).
Pros & Cons of Power Equipment (Tillers) for Clay
Pros: Much faster for large areas, excellent for incorporating large amounts of amendments evenly, breaks up compacted soil effectively.
Cons: Can pulverize soil structure if overused or used when too wet, difficult to control in heavy/rocky soil, requires careful handling and safety precautions, rental costs.
Best For: Breaking ground for new large garden beds or lawns, incorporating amendments over a wide area before planting.
Always check soil moisture before tilling clay!
Hand Tools vs. Power Tiller: At a Glance
| Feature | Hand Tools (Shovel, Fork, Spade) | Power Tiller |
|---|---|---|
| Best Use | Small-medium areas, planting, precise work | Large new beds, breaking large compacted areas |
| Speed | Slow | Fast |
| Effort | High physical effort | Moderate-high effort (control) |
| Soil Structure Impact | Minimal risk | Higher risk if misused (pulverizing) |
| Cost | Lower initial cost (purchase) | Higher cost (purchase or rental) |
Bringing in the Big Guns: Power Equipment for Larger Clay Battles
Okay, so you've tried the shovels, the forks, maybe even wrestled with a mattock, but your patch of Barrhaven clay is looking more like a future archaeological dig site than a garden bed. If you're tackling a large area, like establishing a new lawn, creating extensive gardening beds, or overhauling a significant chunk of your yard, sometimes you need to call in the reinforcements. We're talking about power equipment – the big guns for those bigger clay battles!
The main champion in this category is the *rototiller* (sometimes called a cultivator, though cultivators are often smaller). Think of it as a motorized digging fork on steroids.
Why Use a Tiller on Clay? (The Good Stuff)
- Speed and Efficiency: It can break up and mix soil far faster than you can by hand. Essential for large landscaping projects.
- Mixing Power: It's fantastic for incorporating large amounts of compost or other amendments deep into the soil, which is crucial for improving clay structure. Proper soil amendment is a cornerstone of good garden maintenance.
- Breaking Compacted Ground: A powerful rear-tine tiller can chew through moderately compacted clay, saving your back.
Why Be Cautious with Tillers on Clay? (The Heads-Up)
- The Pulverizing Problem: Clay's tiny particles can be tricky. Over-tilling, especially when wet, can actually break the soil structure down *too* much, turning it into fine dust that compacts even *worse* later. Aim for crumbly, not powdery.
- The Wrong Moisture: Tilling sticky, wet clay is a recipe for frustration and giant, unmanageable clumps. Tilling bone-dry, brick-hard clay is nearly impossible and very hard on the machine (and you!). Slightly moist is the sweet spot.
- The Workout: Don't be fooled; wrestling a tiller through heavy Ottawa clay, especially a powerful rear-tine model, can still be physically demanding. It’s less digging, more guiding-a-bucking-bronco sometimes!
Renting vs. Buying in Ottawa
Unless you're constantly breaking new ground on a large property (maybe out towards Manotick or Greely), renting a tiller often makes more sense than buying. Many tool rental places in and around Ottawa offer daily or weekend rentals. Just be sure to ask for operating instructions and understand their terms – we respect your data, and while rental places have their own rules, you can review our terms and conditions and privacy policy to see how we handle yours.
Safety First, Always!
- Clear the area of rocks, large roots, toys, hoses – anything the tines could hit or get tangled in.
- Wear sturdy shoes (steel toes are ideal), long pants, gloves, and eye protection. Clay can spit rocks!
- Keep pets and children far away while operating.
- Know how to turn it off quickly. Never leave it running unattended.
Taming the Tiller: A Quick Guide for Clay
- Check Moisture: Squeeze a handful of soil. If it forms a sticky ball, it's too wet. If it's rock hard and dusty, it's too dry (water a day or two beforehand). Aim for soil that crumbles when squeezed.
- Spread Amendments: Lay down your compost, aged manure, or other organic matter *before* you till.
- Start Shallow: Set the tiller depth gauge to a shallow setting for the first pass.
- Go Slow: Engage the tines and walk slowly, letting the machine pull itself forward (rear-tine) or controlling its forward motion (front-tine). Overlap your passes slightly.
- Make Multiple Passes: Gradually increase the depth on subsequent passes until you reach your desired depth (usually 6-8 inches for garden beds).
- Clean Up: Once done, *carefully* clean the soil and any tangled roots off the tines (ensure the machine is OFF and the spark plug disconnected first!).
Using power equipment can make a huge difference on large clay soil projects. However, if operating heavy machinery isn't your cup of tea, or the scale of the job feels overwhelming, remember professional help is available. Whether it's a full seasonal makeover like our Ottawa yard cleanup service or tackling a specific challenge like heavy soil in more rural areas covered by our Marionville property cleanup service, sometimes calling in the pros is the smartest move.
Visualizing Soil Amendment Impact (Illustrative)
Note: Chart shows conceptual improvement in soil workability and drainage with consistent organic matter addition. Actual results vary.
Beyond Digging: Amending Your Barrhaven Clay This Fall for Spring Success
Okay, you've battled the Barrhaven clay, dug your beds, maybe even tamed a tiller. High five! But hold on, don't put those gardening gloves away just yet. The real secret weapon against concrete-like clay isn't just brute force; it's *amending* the soil, and fall is the absolute best time to do it here in Ottawa. Think of it like marinating tough meat – giving those amendments all winter to work their magic with the freeze-thaw cycles makes a *huge* difference. By spring, your soil will be much more welcoming to plant roots, making your future landscaping efforts much easier.
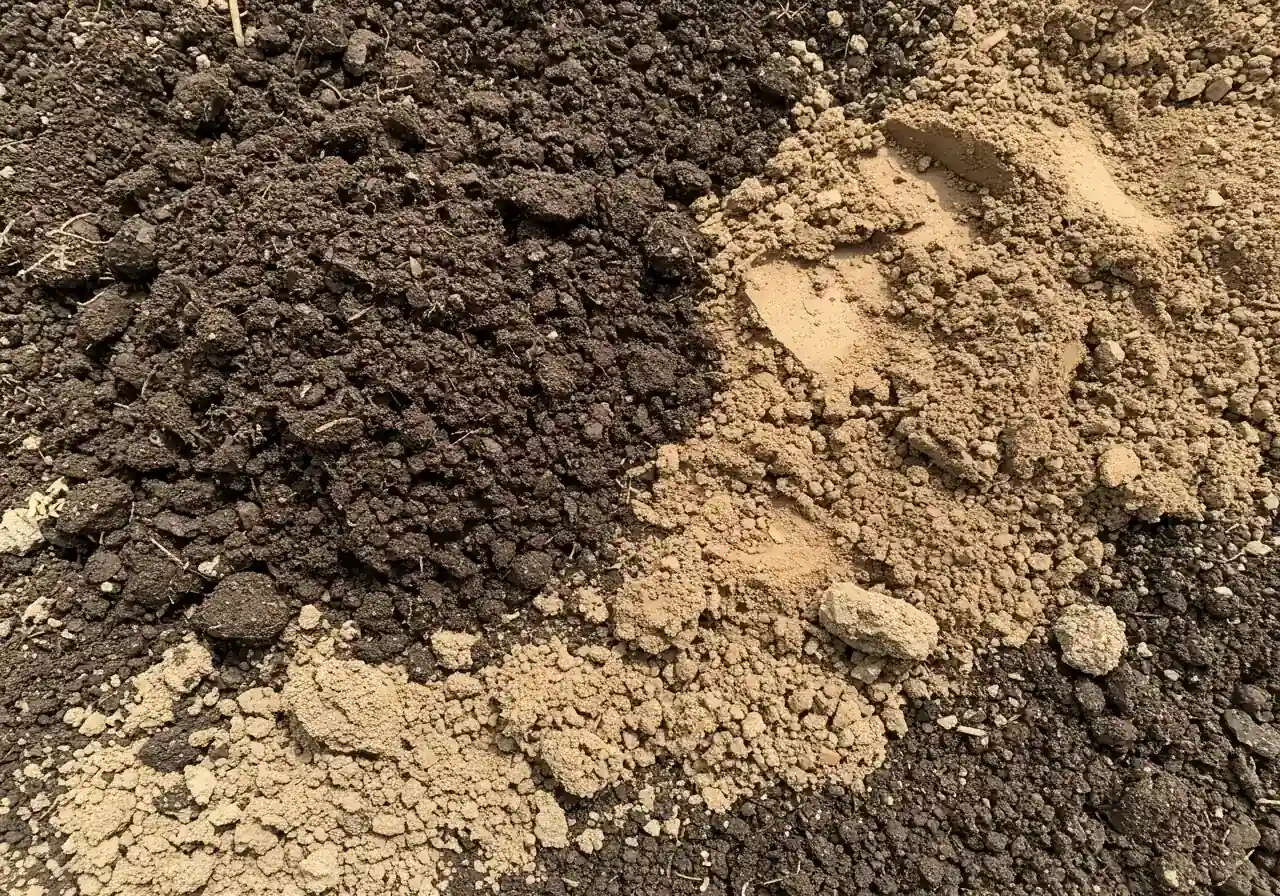
So, what's the magic ingredient? Forget fancy potions; it’s good old *organic matter*. This is the superhero your clay soil desperately needs. Compost is king – nutrient-rich and fantastic for improving structure. Well-rotted manure (make sure it's aged, not fresh!) adds nutrients too. Even shredded leaves from your fall cleanup are golden! Seriously, don't just curse the leaves falling in your Nepean backyard; shred 'em and use 'em! If gathering leaves feels overwhelming, maybe after using a local city garden clean up service, ask them to leave the shredded pile behind for your garden beds. Adding organic matter helps separate those tiny, sticky clay particles. This improves drainage (less sogginess!) and aeration (more air for roots!), making it easier for roots to breathe and grow. This step is fundamental; proper soil preparation techniques for Ottawa gardens always emphasize incorporating plenty of organic material.
Ready to apply this goodness? Spread a generous layer (think 2-4 inches thick) of your chosen amendment over the prepared soil surface. Gently work it into the top 6-8 inches using a digging fork or maybe a light pass with a tiller (remember the caution about not over-tilling wet clay!). Don't worry about making it perfectly smooth like a cake top; leaving the surface a bit rough helps catch winter snow and rain, reducing runoff. *Now, let's bust a very persistent myth!* Someone, somewhere, might tell you to "just add sand" to loosen clay soil. *Please, please don't do this!* Adding sand to heavy clay doesn't create lovely loam; it basically creates homemade concrete or adobe brick. It makes drainage and compaction *worse*, not better. Stick with organic matter – it's the tried-and-true solution for homeowners across the region. Choosing the right amendment is also important; if you're buying compost, our tips on selecting the best materials for landscaping can ensure you get quality stuff that benefits your soil.
Here’s a quick Fall Soil Amendment Checklist for your Barrhaven yard:
- Clear leftover annual plants and weeds from the garden bed.
- Loosen the top 6-8 inches of clay (using those tough tools we talked about earlier!).
- Spread 2-4 inches of good quality compost, well-rotted manure, or finely shredded leaves.
- Gently mix the amendments into the loosened soil – don't pulverize it!
- Definitely do not add sand. Resist the urge!
- Leave the amended soil surface slightly uneven or rough.
- Relax and let winter’s freeze-thaw cycles integrate everything.
Investing this time and organic matter in the fall truly sets the stage for incredible spring success. It’s the foundational work behind those stunning garden transformations you admire around the neighbourhood. Your plants (and probably your back!) will thank you profusely next gardening season.
For specific composting advice tailored to Ottawa, visit the City of Ottawa's Composting page.
Ideal Fall Clay Soil Workflow Timeline
Early Fall (Late Sept/Early Oct)
Assess areas needing digging/amending. Remove summer annuals & weeds. Acquire tools & amendments like compost. Ideal time for digging while soil isn't too wet or frozen.
Mid-Fall (October)
Perform the main digging and soil loosening. Spread compost/organic matter generously (2-4 inches). Gently incorporate amendments into the top 6-8 inches with a fork. This is crucial for soil preparation.
Late Fall (Late Oct/Early Nov)
Plant any fall bulbs (tulips, daffodils) into amended soil. Do final garden cleanup. Clean and store tools properly. Cover sensitive perennials if needed after the first light frost. Prep for services like city yard cleanup service before snow.
Winter (Dec-March)
Let nature work! Freeze-thaw cycles help break down clay and integrate organic matter. Relax and plan your spring garden. Browse our blog for more ideas!
Tool TLC: Keeping Your Clay-Fighting Gear Ready for Action
Okay, you’ve wrestled that stubborn Barrhaven clay and emerged victorious (mostly!). But look at your trusty shovel and fork – they probably look like they went ten rounds with a mud monster and lost. Don't just lean them against the garage and forget 'em until spring! Giving your gardening tools a little TLC after battling heavy soil is crucial, especially here in Ottawa where moisture loves to turn neglected metal into rusty relics. Think of it as a quick, essential property clean up just for your gear. Taking care of them now saves you hassle, heartache, and maybe even needing replacements later.
Here’s how to keep your clay-fighting arsenal in fighting shape:
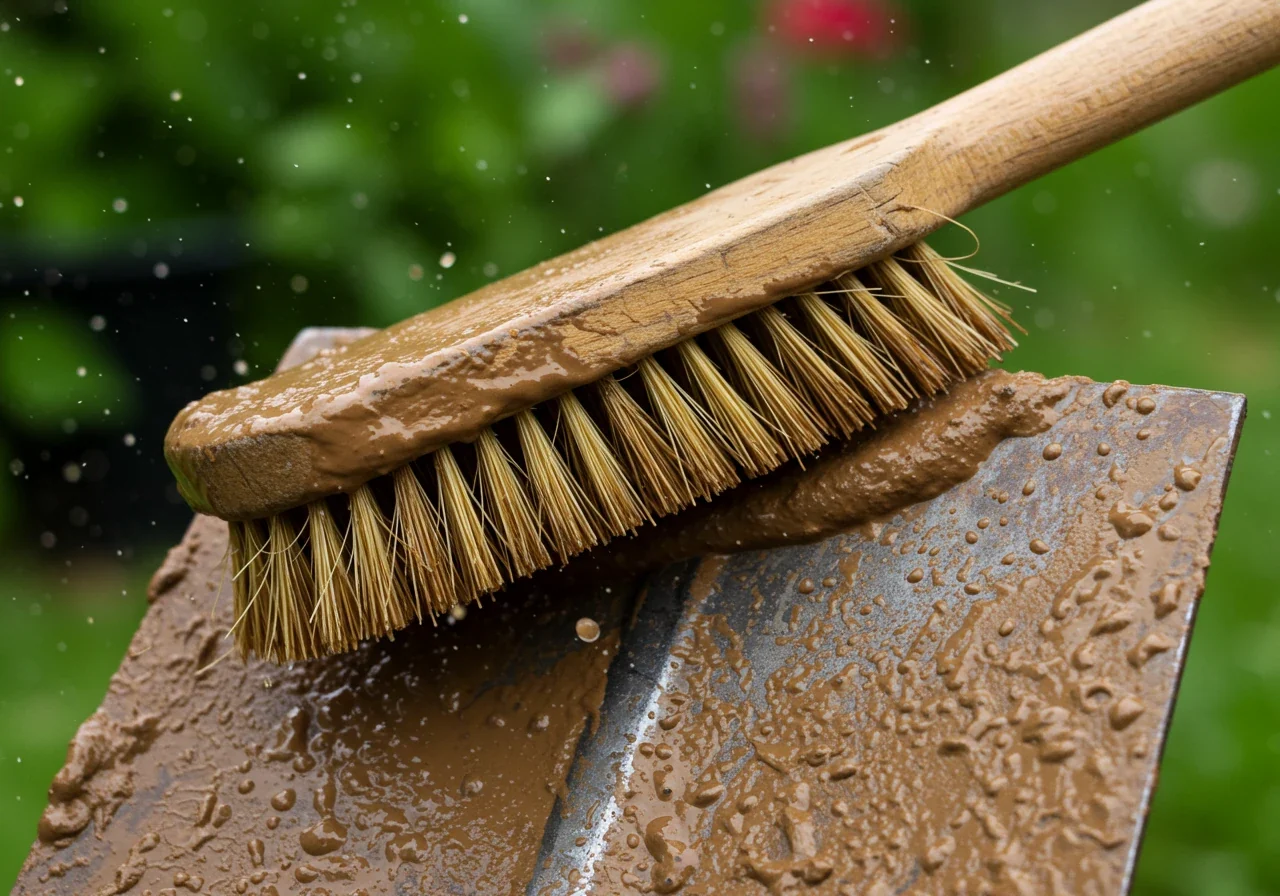
- Scrape and Scrub, Stat! Don't let that clay dry – it hardens like concrete and becomes *much* harder to remove. Use a putty knife, an old piece of wood, or even the edge of another tool to scrape off the thickest clumps right away. Then, grab a stiff brush (a wire brush works wonders) and some water (a hose nozzle with decent pressure helps) to scrub away the rest. Get into all the nooks and crannies where the handle meets the blade or tines.
- Dry, Dry, Dry: This step is *super important* for preventing rust, especially with Ottawa's damp falls and snowy winters. Wipe the tools down thoroughly with an old rag or towel. If it’s a sunny day, letting them air dry completely in the sun works too. Just make sure *all* moisture is gone before the next step.
- Oil 'Em Up: Once completely dry, give the metal parts a light coat of preventative oil. You can use a spray lubricant like WD-40, penetrating oil, or even rub them down with an oily rag dipped in boiled linseed oil or motor oil. This thin barrier shields the metal from moisture and inhibits rust formation. Your tools will practically send you a thank you message next spring when they're rust-free and ready to go.
- Handle with Care: Check wooden handles for roughness or splinters. A quick sanding can smooth them out. Applying a bit of boiled linseed oil helps preserve the wood and prevent cracking. For fibreglass handles, just ensure they're clean and free of caked-on dirt.
- Sharpen Up (Optional but Recommended): While you’re at it, check the edges of your shovels and spades. A few minutes with a file can restore a sharp edge, making future digging significantly easier. This is especially helpful if you're planning a new garden installation next season – sharp tools make cleaner cuts and require less effort.
- Store Smart: Don't leave your clean, dry, oiled tools lying on the damp ground or exposed to the elements. Hang them up in a dry shed, garage, or basement. Storing them off the floor keeps them drier and safer, especially important through the winter months out in areas like Osgoode.
A little effort now ensures your landscaping tools are ready the moment inspiration (or necessity!) strikes next season. If tool maintenance feels like one chore too many, or if your tools are simply too far gone after years of neglect, remember that professional help is always an option – sometimes calling in a city yard cleanup service is the best way to tackle a big project without fighting rusty gear.
Highlight Box: Barrhaven Clay Conqueror's Cheat Sheet
Got that stubborn Barrhaven clay blues? Don't sweat it (too much)! Here are the absolute must-know tips to make working with Ottawa's tricky soil less of a wrestling match and more of a landscaping win this fall. Keep this cheat sheet handy!
- Get Tough Tools: Forget flimsy shovels that buckle under pressure! Barrhaven clay laughs at weaklings. You need strong, forged steel tools. Your go-to heroes are a *pointed digging shovel* (for slicing in) and a *digging fork* (for breaking up clumps). A sturdy *border spade* is also fantastic for making clean cuts, perfect if you're planning sharp mulching and edging next spring to define your garden beds. For really big jobs, *maybe* consider renting a tiller, but use it carefully on clay!
- Feed the Beast (with Compost!): The *absolute secret weapon* against rock-hard or sticky Ottawa clay isn't more muscle, it's *organic matter*! The best time to add it is *now, in the fall*. Mix generous amounts (think several inches deep) of good compost, well-rotted manure, or even shredded leaves into your soil. Let winter's freeze-thaw cycles work their magic. Seriously, *never, ever* add sand hoping to loosen clay – you'll basically create concrete. Stick with the good stuff! Consistent soil improvement is a cornerstone of any effective city garden maintenance service plan.
- Timing is Everything (Moisture Matters!): Ever tried digging clay that’s brick-hard dry? Or lost a boot in sticky, wet goo? Neither is fun or effective! The "just right" moment to work clay soil is when it's *slightly moist*. Grab a handful – it should crumble easily when squeezed, not form a slick ball or puff up like dust. Digging at the right moisture level makes everything easier, whether you're planting bulbs, amending beds, or prepping for a future lawn upgrade with new sod installation.
- Clean Your Gear! (Seriously!): Don't let that clay dry onto your tools like cement – it's a pain to remove later and invites rust. After *every* use, scrape off the muck, give the tools a good rinse, and *dry them thoroughly*. A quick wipe-down with an oily rag or a shot of spray lubricant on the metal parts prevents rust and keeps them ready for your next gardening adventure. Well-maintained tools make any job smoother, preventing small tasks from feeling like a major Metcalfe garden clean up service operation!
FAQs: Your Barrhaven & Ottawa Clay Soil Questions Answered
Probably! Ottawa has lots of it. Grab a slightly damp handful. If it forms a smooth, sticky ball or ribbon when squeezed, you've hit clay gold (or brown!). Sandy soil feels gritty and falls apart; loam feels slightly gritty but holds together loosely. It dictates your gardening approach, from planting to drainage solutions.
Definitely avoid digging when it's super wet (like sticky mud) or bone-dry and brick-hard. Wet clay compacts horribly, destroying structure. Dry clay is like concrete! Aim for "slightly moist and crumbly." If unsure about tackling a big dig, you can always get professional advice; our clients often provide valuable Estimate Feedback on project scope and timing.
Some plants are clay champs! Think Coneflower, Black-Eyed Susan, Hostas, Daylilies, and many ornamental grasses. Amending helps *hugely*, but tough plants give you an edge. This applies across Ottawa, whether in Barrhaven or out towards Marionville where similar soil challenges exist. Proper planting is key! Consider our Marionville Yard Cleanup Service if you need help prepping beds in that area.
Sometimes, but it's not a magic bullet for Ottawa clay. Gypsum *can* help improve structure in certain *specific* high-sodium clay types by causing particles to clump. However, our local clay usually benefits far more from consistent additions of *organic matter* like compost. Focus on compost first for your landscaping beds!
It's tempting, but often creates problems! You get a "bathtub effect" where water hits the clay layer underneath the topsoil and just sits there, drowning roots. It's much better to *amend* the existing clay by mixing in lots of organic matter. For bigger projects needing significant soil work, consider getting help from an Ottawa Property Cleanup Service to ensure it's done right.
Take a deep breath! Start by clearing debris and dead plant matter. Assess the soil's moisture. Once it's workable (not too wet!), gently loosen compacted areas and add more compost. A thorough spring Ottawa Garden Clean Up Service can tackle the initial overwhelm, setting you up for successful planting and gardening throughout the season.
Conclusion: Get Ready to Dig In and Transform Your Barrhaven Yard!
Okay, Barrhaven soil warriors, you're now officially armed and dangerous (against dirt, anyway!). Tackling that infamous Ottawa clay doesn't have to feel like an epic battle ending in muddy defeat. Remember the essentials we covered: gear up with *tough digging tools* fit for the job, make friends with *organic matter* like compost (fall amending is your secret weapon!), and show your tools some love with proper cleaning and care. Your future gardening and landscaping projects already look much less daunting!
Working with clay takes patience, but the rewards – healthier plants and an easier-to-manage yard – are totally worth it. Maybe your patch of earth seems particularly challenging, requiring a strategy like those needed for a full Metcalfe Property Cleanup Service. Or perhaps you'd rather focus on enjoying your yard, leaving the heavy lifting and ongoing upkeep like professional Lawn Care to someone else. If prepping specific beds feels overwhelming, similar to needing a targeted Marionville Garden Clean Up Service, we get it.
Want to know more about the folks ready to help you conquer the clay? You can learn more About Us and our commitment to transforming Ottawa yards. Don't let stubborn soil stand between you and the beautiful outdoor space you envision. Reach out today via our Contact Us page, and let's get ready to dig in and make your Barrhaven yard shine!
Ready to Tackle Your Yard Challenges?
Whether it's fighting clay soil, needing a seasonal cleanup, or dreaming up a new garden design, Clean Yards is here to help homeowners in Barrhaven, Ottawa, Metcalfe, Marionville, and surrounding areas. We offer a range of services to make your yard beautiful and manageable.
Check our Terms and Conditions and Privacy Policy for more details.
