
Vernon: Spring Care for New Plants Prevents Costly Loss
Planning your spring planting? Get expert help from the start!
Request a Quote TodayQuick Spring Planting Tips:
- Choose plants suited for Zone 5 and your specific site conditions (sun, soil).
- Plant at the correct depth – root flare level with or slightly above ground.
- Water deeply but less frequently to encourage strong root growth.
- Apply 2-3 inches of organic mulch, keeping it away from plant stems.
- Remove weeds early before they compete with new plants.
Introduction: Welcome to Spring Planting in Vernon (and Beyond!)
Ah, spring in Vernon! Can you feel it? That glorious moment when the snow finally retreats (mostly!), and the urge to get back into the garden becomes irresistible. Whether you're right here in Vernon, over in nearby Osgoode, or anywhere across the wider Ottawa region, the excitement for new growth is real. We picture lush flower beds bursting with color, healthy new shrubs filling out the landscape, and perhaps a sturdy young tree taking root for the future.
But, let's face it, our beloved Ottawa spring can be a bit of a trickster – hello, surprise late frost after a week of warmth! It’s truly heartbreaking (and let's not forget, expensive!) to lovingly plant new perennials, shrubs, or trees only to watch them struggle or fail soon after they go into the ground. This common frustration is exactly why we've created this guide.
Consider this your friendly handbook for successful spring planting. We’ll walk you through essential care tips designed to give your new green additions the best possible start. We'll cover everything from smart soil preparation and proper planting techniques to crucial watering advice and how to protect your tender investments from those unpredictable chilly nights. Let's work together to make sure your landscaping efforts flourish this season!
Why Spring is Crucial (and Tricky!) for New Plants in the Ottawa Area
Spring in Ottawa is a season of incredible potential for our gardens. After a long winter, we're eager to introduce new life! But while established plants often shrug off spring's quirks, new additions – fresh perennials, shrubs, or trees – find it a *very* challenging time. Think of them as the new kids in school, trying to find their footing in unpredictable circumstances.
So, what makes spring planting here so tricky?
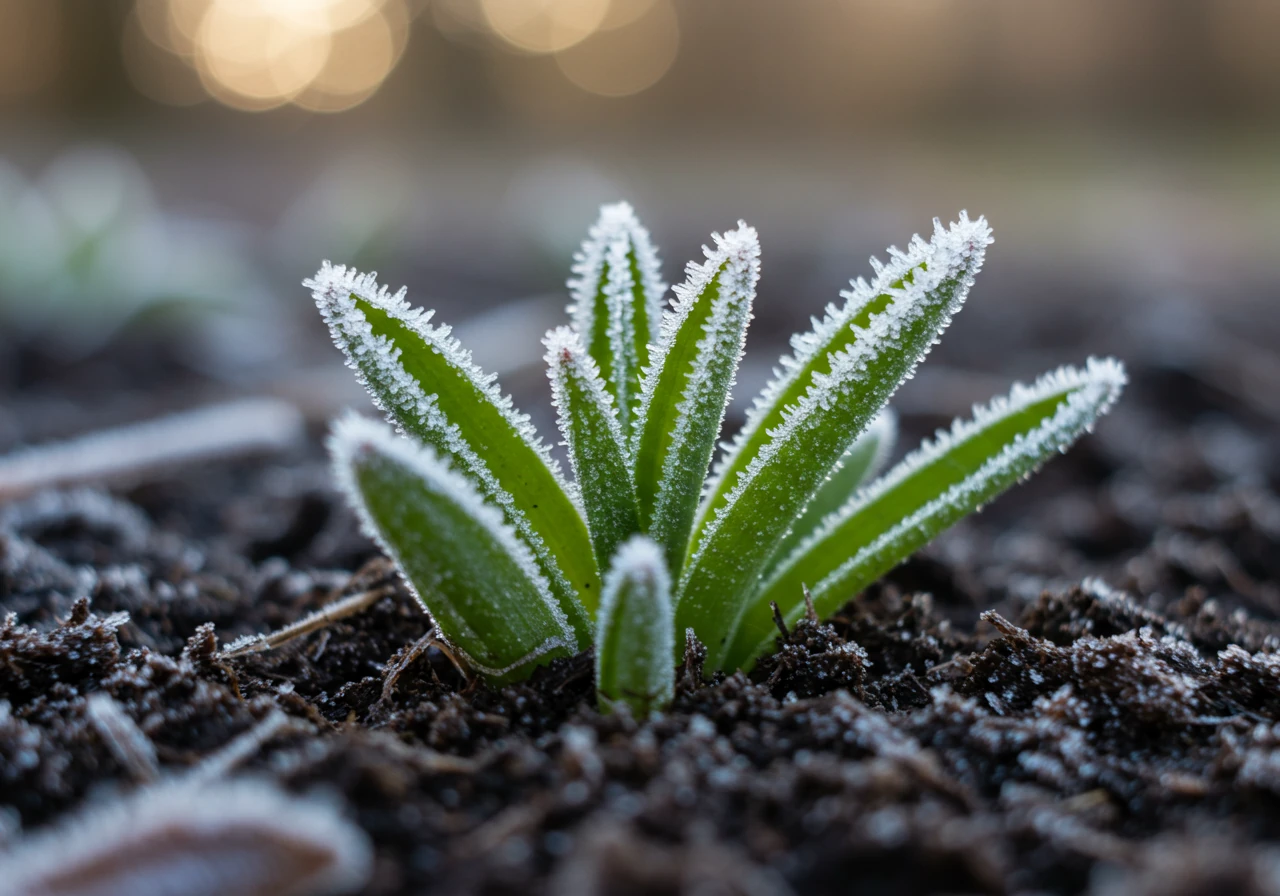
- Mother Nature's Mood Swings: Ottawa springs are famous for their temperature rollercoasters. Warm, sunny days can be followed by surprise late frosts, which can damage or kill tender new growth. This is especially hard on plants that haven't had time to toughen up.
- The Freeze-Thaw Cycle: Even when temperatures stay above freezing during the day, nights can dip below zero. This constant freezing and thawing of the soil can heave new, shallow-rooted plants right out of the ground, exposing their delicate roots.
- Water Woes: Spring precipitation is all over the map. We might get weeks of soggy, cold rain, or sudden dry spells. New plants haven't developed deep root systems yet, making them vulnerable to both waterlogged soil (leading to root rot) and drought stress. Trying to establish them now is key to avoiding issues later, like those covered in our guide to a Vernon Plant Health Care Plan for Summer Stress.
- Transplant Shock: Just the act of moving a plant from its cozy nursery pot to the garden bed is stressful. Add in our erratic spring weather, and "transplant shock" becomes a major hurdle. Plants might wilt, drop leaves, or just fail to thrive as they struggle to adapt.
- Soil Specifics: Our local soil plays a big role. Areas like Nepean or Barrhaven often deal with heavy clay soil, which stays cold and wet longer in spring, hindering root growth. Conversely, sandy loam near Manotick drains quickly, meaning new plants might dry out faster during surprise warm spells. Understanding your soil helps tailor your spring care. You can check resources from the Rideau Valley Conservation Authority (RVCA) for general information about regional soil types.
Navigating these challenges during early spring (ground thaw, mud season!), mid-spring (active growth begins, but frost *still* possible), and late spring (warming trend, less frost risk) is crucial. Good site preparation and careful planting now minimize future problems, setting the stage for an easier Vernon Fall Cleanup and Ottawa Winter Prep. What you choose and how you plant it also shapes your garden's long-term look, a concept we explore in our Vernon Fall Garden Planning Logs. Ensuring your new plants overcome these spring hurdles contributes directly to their health later in the year, making something like a Vernon Fall Plant Health Scan for Garden Color much more rewarding.
It sounds like a lot, but don't worry! With the right approach (which we'll cover next!), you can give your new plants a fighting chance. And if tackling these tricky spring conditions feels like too much, remember that professional Landscaping and Yard Care Services are always an option to help your garden thrive.
Choosing Wisely: Setting Your Plants Up for Success from the Start

Alright, let's talk about the fun part – picking out your new plant buddies! Choosing the right plant for the right place is *the* most important step you can take to guarantee gardening success and avoid future headaches. Think of it like matchmaking: you want a pairing that’s built to last, not one that ends in heartbreak (for you *and* the plant!).
Know Your Zone & Site
Know Your Zone (It's Not About Parking!): First things first: Ottawa is generally smack-dab in Canadian Hardiness Zone 5a or 5b. What does this mean? Simply put, plants rated for Zone 5 or lower (like Zone 4 or 3) have proven they can handle our chilly winters without needing a tiny parka. Always check the plant tag for its hardiness zone – choosing a Zone 6 plant is basically gambling against Old Man Winter, and the odds usually aren't in your favour.
Become a Site Sleuth: Sun, Soil, and Space: Before you even *think* about hitting the nursery, grab a notepad and observe your planting spot like a detective.
- Sun Exposure: Does the spot get blazing afternoon sun for 6+ hours (full sun), gentle morning sun and afternoon shade (part sun/part shade), or mostly shade all day (full shade)? Don't guess! Watch it throughout the day. Planting a sun-lover in shade (or vice-versa) is a recipe for a sad, struggling plant. Understanding your sun patterns also helps plan for future care, influencing watering needs often managed through professional City Garden Maintenance Service.
- Soil Smarts: Is your soil heavy clay like in parts of Nepean, sandy like near Manotick, or somewhere in between? Does water drain well after rain, or does it sit in puddles? Most plants prefer well-draining soil. Improving your soil *before* planting is key. Sometimes, getting a site ready involves clearing out old debris or weeds, a task similar to needing a Vernon Yard Cleanup Service to create a clean slate.
- Space Cadet: Check that plant tag again! It tells you the *mature* size. That cute little shrub might eventually grow 6 feet wide. Give your plants enough elbow room to reach their full potential without crowding each other out. Proper spacing prevents disease and means less pruning later. Planning space correctly is crucial whether it's a small garden bed or managing larger areas potentially needing City Property Cleanup Service for overgrowth down the road.
Go Native! (They Belong Here)
Consider adding native plants! These are species that naturally evolved in Eastern Ontario. They’re already adapted to our climate and soil, often require less fuss, and provide vital food and habitat for local pollinators and wildlife. Plus, they look fantastic! You can find great resources at websites like Ontario Native Plants. Some local champs include:
- Purple Coneflower (Echinacea purpurea) - Sunny spots
- Black-Eyed Susan (Rudbeckia hirta) - Sunny spots
- Serviceberry (Amelanchier species) - Small tree/shrub, sun/part shade
- Joe Pye Weed (Eutrochium maculatum) - Tall, loves sun & moisture
- Foamflower (Tiarella cordifolia) - Lovely groundcover for shade
Integrating natives contributes to beautiful and sustainable Garden Makeovers and Transformations.
Sun vs. Shade Stars for Richmond & Metcalfe Gardens
Here's a quick cheat sheet for hardy perennials suitable for Zone 5 gardens in areas like Richmond or Metcalfe:
Sun Lovers (Need 6+ hours direct sun):
- Daylily (Hemerocallis): Tough, reliable, many colours.
- Sedum 'Autumn Joy': Great structure, fall interest, drought tolerant once established.
- Peony (Paeonia): Classic beauties, long-lived, fragrant blooms.
Shade Tolerant (Happy with <4 hours direct sun or dappled light):
- Hosta: King of foliage, huge variety in size, colour, and texture.
- Astilbe: Feathery plumes in pink, red, white; prefers moist shade.
- Coral Bells (Heuchera): Valued for colourful foliage (purple, lime, bronze), delicate flowers.
Choosing suitable plants is fundamental for long-term Garden Maintenance success.
Nursery Know-How: Picking Healthy Plants
Okay, *now* you can go shopping! When choosing individual plants:
- Look for vibrant, healthy leaves – no yellowing, brown spots, or signs of pests.
- Gently slide the plant out of its pot (if possible) to check the roots. You want to see healthy, white-ish roots, not a solid, circling mass (root-bound) or dark, mushy ones.
- Check for sturdy stems and a balanced shape.
- Resist buying plants already flowering heavily if they look stressed – they might struggle more after transplanting.
Choosing the right plants isn't just about survival; it's the first step towards creating those stunning garden transformations you dream about. If deciphering soil types or assessing sun exposure feels overwhelming, remember that help is available through comprehensive Landscaping and Yard Care Services.
Need help choosing the perfect plants or preparing your garden beds?
Explore Our Planting ServicesPlanting Power: Giving Your New Arrivals the Best Welcome
Alright, plant parents, you’ve done the hard work of choosing your perfect green additions. Now comes the moment of truth: getting them settled into their new home! Don't sweat it; planting isn't rocket science, but doing it right gives your trees, shrubs, and perennials the VIP welcome they deserve. Think of it as rolling out the green carpet! Here’s how to plant like a pro:
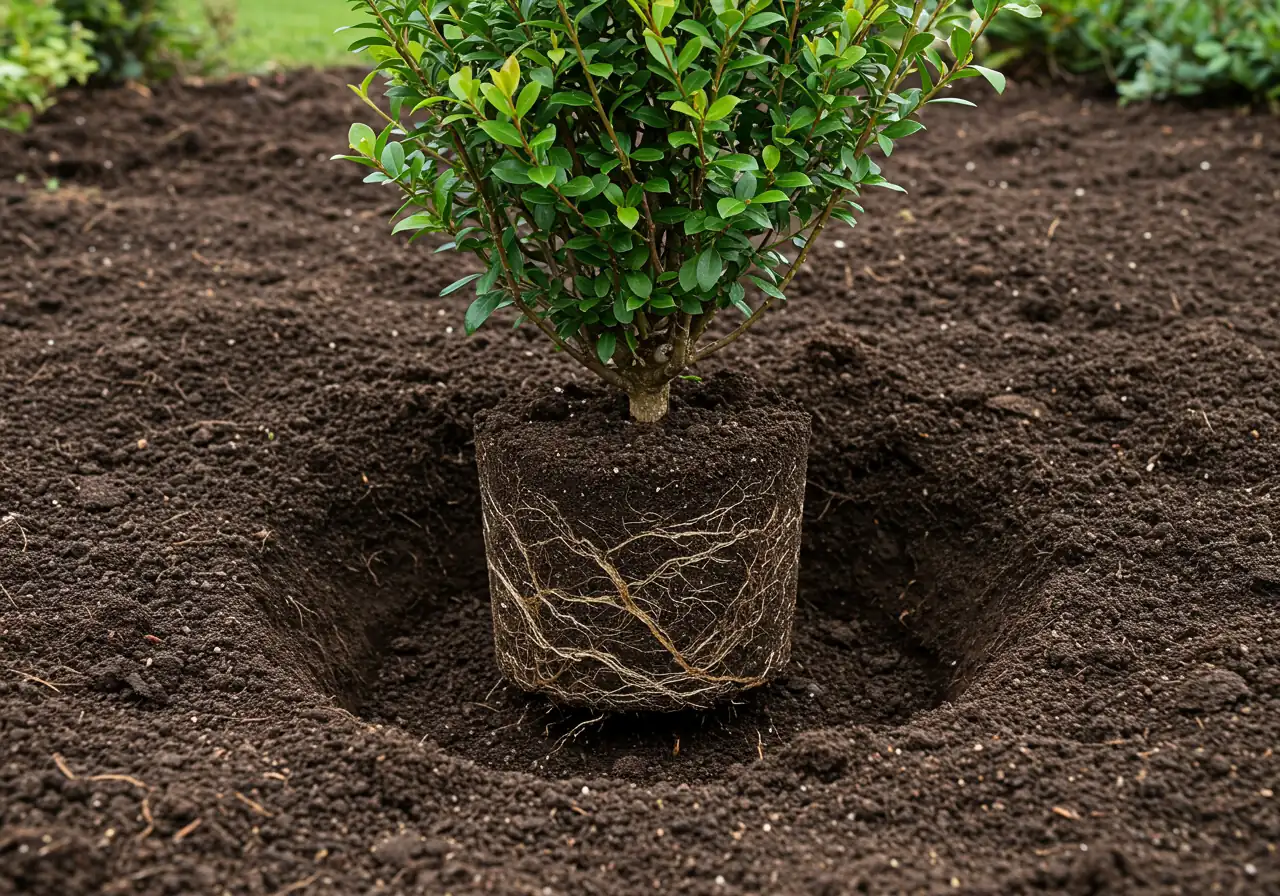
Step 1: Dig That Hole (But Not *Too* Deep!)
This is where many well-meaning gardeners stumble. Your goal is a hole that's *wider* than the plant's root ball (about 2-3 times wider is great), but *no deeper* than the root ball itself. Seriously, measure it! Planting too deep is a major cause of plant failure down the road. Digging wider gives the roots room to spread out easily into the surrounding soil. Make the sides slope gently, like a shallow bowl, not straight down like a bucket.
Step 2: Give the Soil Some Love
Take the soil you dug out and put it in a wheelbarrow or on a tarp. Now, let's improve it a bit, especially if you're dealing with heavy clay soil like often found around Greely. Mix in some good quality compost – about one part compost to two or three parts of your original soil is a good starting point. This adds organic matter, improves drainage (in clay) or water retention (in sand), and gives roots a nutrient boost. *Important:* Mix this amended soil well. Avoid creating a pocket of pure compost in the hole surrounded by heavy clay, as this can act like a bathtub and drown roots. Improving soil across a larger area sometimes takes more effort, similar to the work involved in a thorough Metcalfe Property Cleanup Service for neglected spots.
Step 3: Handle with Care
Gently remove your new plant from its pot. Tip the pot sideways, support the base of the plant, and slide it out. Please, *please* don't yank it out by the stem! Once it's out, take a look at the roots. Are they circling tightly around the root ball (pot-bound)? If so, gently tease the outer roots apart with your fingers. If they're really dense, you can even make a few shallow vertical cuts with a clean knife – this encourages roots to grow outwards instead of continuing to circle.
Step 4: The Height is Right!
Place your plant in the center of the hole. Now, double-check the depth. The spot where the plant's main stem(s) emerges from the soil (the root flare on trees/shrubs, or the crown on perennials) should sit *level with or slightly higher* than the surrounding ground. Lay a shovel handle or a straight stick across the hole to check the level accurately. Planting too deep smothers the plant – aim for level or slightly proud!
Step 5: Backfill Gently
Start adding your amended soil back into the hole around the root ball. Gently firm the soil with your hands as you go to remove large air pockets. Don't pack it down super hard – roots need air too! Once the hole is filled, you can create a small ridge or "berm" of soil around the outer edge of the planting area. This little moat helps hold water right where the roots need it most.
Step 6: Drink Up! The First Watering
Water your newly planted friend *thoroughly* right away. Give it a good, long drink until the water has soaked deep into the root zone. This helps settle the soil around the roots and eliminates remaining air pockets. Consistent watering is crucial for the first few weeks as the plant establishes. Depending on the weather, you might need to water every few days. This kind of regular attention is often part of a good City Garden Maintenance Service.
Step 7: The Staking Question
Most perennials and shrubs won't need staking. Trees, especially taller ones or those planted in windy spots (like some open areas near Kars or Winchester), might benefit from temporary staking for the first year. If you do stake, use two or three stakes placed outside the root ball and soft, flexible ties (like webbing or old hose) in a figure-eight loop. Make sure the ties are loose enough to let the trunk sway a bit, which helps it build strength. *Crucially*, remove the stakes and ties after one growing season! Leaving them on too long can damage the tree.
There you have it! Your new plant is tucked in and ready to grow. Keep an eye on its watering needs, add a layer of mulch around (but not touching) the base to conserve moisture and suppress weeds, and get ready to enjoy its beauty. Got specific questions about planting in your unique Ottawa soil or situation? Feel free to Contact Us – we're always happy to chat about plants! You can find us on Google here: Clean Yards Google Business Profile. When you reach out, your details are kept safe as outlined in our Privacy Policy. We look forward to hearing from you and sending a virtual Thank You for getting in touch! Happy planting!
Watering Wisdom: Quenching Thirst Without Drowning Roots
Okay, let's talk about the lifeblood of your new plants: water! Giving your newly planted trees, shrubs, and perennials the right amount of water is super important, especially during their first few weeks in the ground. Think of it like this: you wouldn't chug a gallon of water right after a workout, nor would you just take tiny sips all day. Plants are similar – they need the *right* amount at the *right* time. Getting this balance correct is key to avoiding stressed plants that might eventually need extensive help, perhaps even requiring a broad City Yard Cleanup Service if neglect leads to decline.
Why Deep Soaks Beat Little Sprinkles
When you first plant something, its roots are mostly contained within the original root ball. Our goal is to encourage those roots to grow *out* and *down* into the surrounding soil, creating a strong, resilient foundation. Shallow, frequent watering only wets the top inch or two of soil. This teaches roots to stay near the surface, making the plant much more vulnerable during dry spells.
Instead, aim for deep, less frequent watering. Water slowly and thoroughly, allowing the water to soak down several inches. This encourages roots to follow the moisture downwards, anchoring the plant better and helping it find water even when the surface soil dries out. This is especially important in areas with varying soil types, like the quicker-draining soils sometimes found near Manotick compared to heavier clays elsewhere.
How Often Should I Water? The "It Depends" Answer
There's no single magic number, because Mother Nature loves to keep us guessing! Here are the key factors:
- Right After Planting: Water deeply immediately after planting.
- The First Few Weeks: This is crucial. Check the soil every 1-2 days. If the top inch or two feels dry, it's time to water deeply again.
- Weather: Hot, sunny, windy days? Plants lose moisture faster, so you'll water more often. Cool, cloudy, or rainy days? You'll water much less, maybe not at all. Don't water if the soil is already damp!
- Soil Type: Sandy soil drains fast and needs more frequent watering. Clay soil holds moisture longer, so wait longer between waterings. Check out City of Ottawa water restrictions for guidelines.
The Finger Test: Your Best Friend
Forget fancy gadgets. The best way to know if your plant needs water is the good old finger test. Stick your finger into the soil near the base of the plant, about 2-3 inches deep.
- If it feels damp, hold off on watering.
- If it feels dry, it's time for a good soak.
Uh Oh! Signs of Watering Woes
- Under-watering: Wilting leaves (that don't perk up in the evening), dry or crispy leaf edges, slow growth.
- Over-watering: Yellowing leaves (especially lower ones), mushy stems, droopy leaves even when the soil is wet (roots are suffocating!), potential root rot. It’s often harder to save an over-watered plant than an under-watered one! Consistent good practices avoid the need for drastic interventions, like needing a focused cleanup for stressed areas, akin to a Marionville Property Cleanup Service addressing specific problem zones.
Watering Best Practices
- Morning Magic: Water early in the morning if possible. This gives leaves time to dry before evening, reducing the risk of fungal diseases. It also minimizes water loss through evaporation during the heat of the day.
- Aim Low: Water the soil at the base of the plant, directly over the root zone. Avoid spraying the foliage constantly, as wet leaves invite disease.
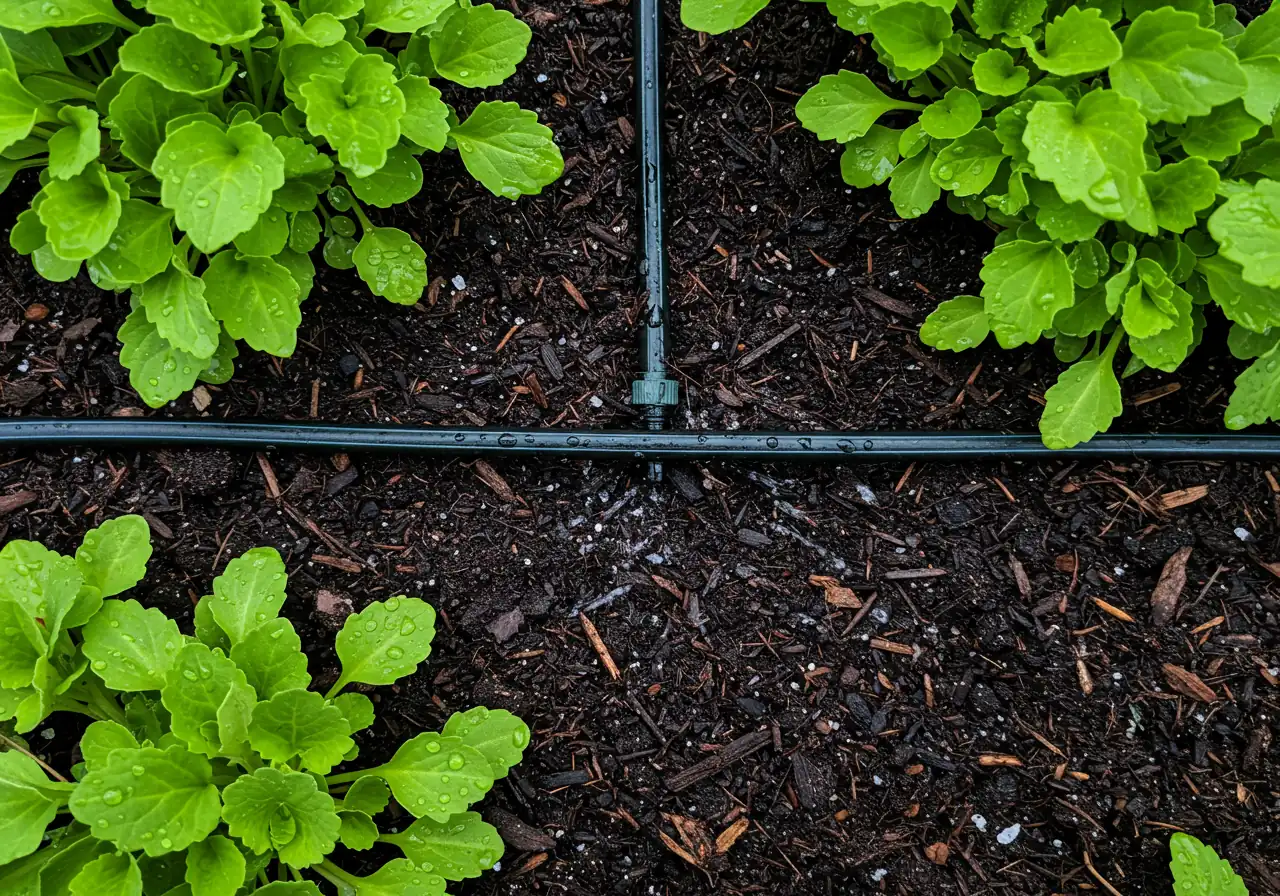
- Go Slow: Apply water slowly so it can soak in rather than run off. Soaker hoses or drip irrigation are fantastic for this.
- Mulch Matters: Applying a layer of organic mulch is a game-changer. Combining smart watering with proper Mulching and Edging helps keep the soil cool, suppresses weeds, and significantly reduces water evaporation. Just make sure the mulch doesn't touch the plant stems. The right kind of mulch is part of good overall Material Selection for a healthy garden.
- Be Water Wise: Remember, especially during dry Ottawa summers, that water is a precious resource. Follow municipal guidelines on water usage. Deep, efficient watering is not only best for your plants but also helps conserve water.
Taking watering seriously helps your new plants thrive. From all of us, we want to say Thank You for investing time in learning how to care for your garden investments properly!
Spring Planting Timeline Highlights
Early Spring (Thaw - April)
Soil often wet & cold. Focus on cleanup, planning, and soil prep *if* workable. Too early for most planting.
Mid-Spring (Late April - Mid May)
Soil warming. Good time for hardy trees, shrubs, and some tough perennials. *Still watch for frost!*
Late Spring (Late May - Early June)
Frost risk decreases significantly. Ideal for planting most perennials and waiting for tender annuals.
Establishment (First Few Weeks)
Critical period after planting. Focus on consistent, deep watering and monitoring for stress.
Mulch Magic & Weed Woes: Protecting Your Investment
Okay, you've planted your beautiful new shrubs and perennials. High five! But the work isn't *quite* done. Now we need to protect that investment, and two key players here are mulch and weeding – think of them as your garden's dynamic duo, fighting off stress and villains (aka, weeds!). Ignoring these steps is like buying a fancy new car and never changing the oil – things might look okay for a bit, but trouble is brewing!
Mulch: Your Garden's Best Friend
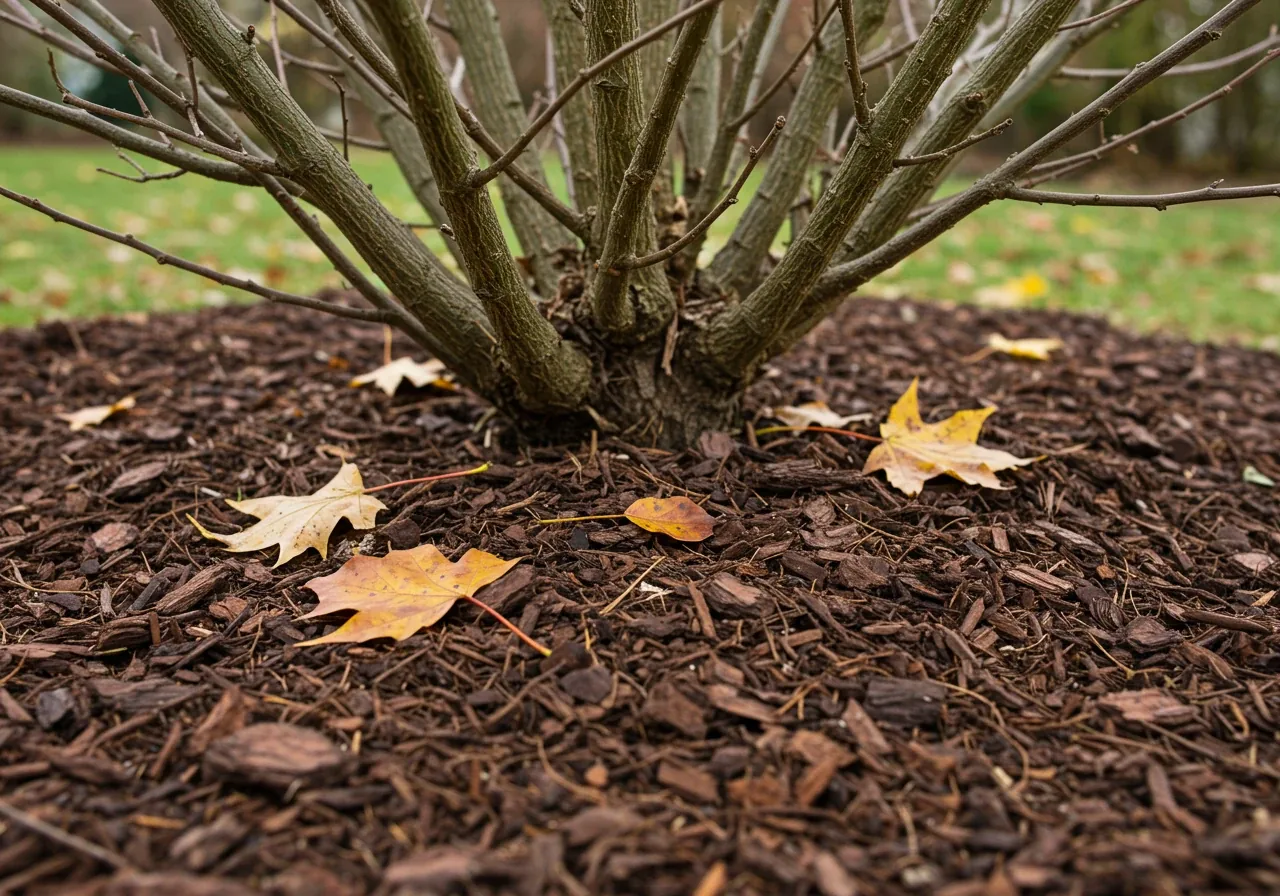
Applying a good layer of organic mulch (like shredded bark, cedar, composted leaves, or wood chips) is one of the best things you can do for your new plants and garden beds. It's pure garden magic because it:
- Keeps Moisture In: Acts like a lid on the soil, drastically reducing water evaporation. This means you water less often, saving time, water, and money. Your plants stay consistently hydrated, reducing stress.
- Regulates Temperature: Insulates the soil, keeping roots cooler during Ottawa's summer heatwaves and warmer during unexpected cool snaps. Less temperature stress equals happier roots.
- Smothers Weeds: A good mulch layer blocks sunlight, preventing many weed seeds from germinating. Fewer weeds mean less competition for your precious plants. Huzzah!
- Improves Soil: As organic mulch slowly breaks down, it adds valuable organic matter and nutrients right where plants need them, improving soil structure over time.
How to Apply Mulch Like a Pro:
It's easy! Spread a layer about 2-3 inches (5-7.5 cm) deep around your new plants. Don't skimp, but don't overdo it either. Extend the mulch out over the entire root zone – imagine the width of the plant's branches, and go at least that wide. *Crucially*, pull the mulch back an inch or two from the base of plant stems or tree trunks. Please, *no mulch volcanoes!* Piling mulch right up against the plant traps moisture, invites rot and disease, and can provide cover for pesky rodents or insects. Getting this right is a core part of professional Mulching and Edging, ensuring your garden beds look sharp and your plants stay healthy.
Weed Woes: Nip 'Em in the Bud!
Weeds are the uninvited, resource-hogging party crashers of the garden world. They compete fiercely with your lovely new plants for water, sunlight, and nutrients, potentially stunting their growth. Tackling them *early* in the spring, especially around vulnerable new plantings in areas like Russell or Embrun, is absolutely essential before they get established and spread like wildfire. A few minutes of weeding now saves hours of back-breaking work later. Let weeds run rampant, and you might find yourself facing a much larger task, potentially needing a comprehensive Ottawa Yard Cleanup Service or even a full-scale Ottawa Property Cleanup Service for larger, seriously neglected areas down the road like those sometimes seen in Metcalfe or Marionville.
Gentle Weeding Tactics for New Plantings:
- Hand-Pull Power: This is often the safest method around delicate new roots. The best time is after a good rain when the soil is moist – the whole root slides out much easier. Make like a dentist and aim for a clean extraction!
- Hoe Gently: For tiny emerging weeds away from the plant base, use a sharp hoe to slice them off just below the soil surface. Be super careful not to dig deep or disturb your new plant's roots.
- Stay Vigilant: Make it a habit to do a quick weed patrol once a week. Catching them when they're small is infinitely easier.
Consistent weeding is fundamental to good Garden Maintenance. If that initial spring weed explosion around your garden beds feels overwhelming, remember that a dedicated Ottawa Garden Clean Up Service (or a more localized City Garden Clean Up Service, Metcalfe Garden Clean Up Service, or Marionville Garden Clean Up Service) can help tackle the invaders and give you a clean slate to maintain. A little effort with mulch and timely weeding goes a remarkably long way in keeping your new green investments happy, healthy, and thriving!
Key Insights: Spring Survival Checklist
Help your new plants thrive in Ottawa's fickle spring! Key tips:
- Right Plant, Right Place: Choose Zone 5 plants suited for *your* specific sun and soil (critical in spots like Barrhaven!). Match the plant's needs to your garden's reality.
- Plant Level: Hole wide, not too deep. Keep plant base level or slightly *above* soil – planting too deep is a common mistake! Considering help? Professional Garden Installation Services ensure it's done right from the start.
- Water Deeply: Soak well, but less often, encouraging deep roots. Always check soil moisture 2-3 inches down before watering again.
- Mulch Magic: Apply 2-3 inches of organic mulch, avoiding direct contact with stems. This essential step for moisture retention and weed suppression differs significantly from prepping for new Ottawa Sod Installation.
- Weed Early: Beat competitors before they get established! Staying on top of weeding avoids needing a major Ottawa Garden Clean Up Service later. Remember this focused garden work is separate from general Ottawa Lawn Care. Know your plant needs and any service details, like applicable Terms and Conditions, for best results. We value your feedback on our services!
Ottawa Gardener FAQs: Spring Planting Edition
Ah, the million-dollar question! Officially, the last average frost date is around mid-May. But *safe* often means waiting until the risk of a hard frost has truly passed, usually late May. Hardy perennials and shrubs can often go in a bit earlier (early-to-mid May) once the soil is workable and night temps stay consistently above freezing. Always check the long-range forecast – better safe than sorry (and potentially replacing frozen plants!).
Clay soil *is* tricky, no doubt about it! The key is improving drainage. Avoid digging when it's soaking wet, as this compacts it further. Mix generous amounts of compost into the planting hole and the surrounding area – this helps break up the clay structure. Planting slightly high ("on a small mound") can also help keep roots from sitting in water. If you're dealing with a large area of difficult soil, sometimes a broader Property Clean Up and Soil Amendment strategy is needed to really improve the site before planting.
Don't panic! You can protect your vulnerable plants overnight. Grab some old sheets, burlap, buckets, or even plastic jugs with the bottoms cut off (makeshift cloches!). Drape or place these covers loosely over the plants before sunset, securing edges with rocks if needed. This traps ground heat. Just remember to uncover them promptly in the morning so they don't overheat! Consistent care, including protecting plants and maintaining surrounding areas with Expert Lawn Care Services, contributes to overall yard health.
Welcome to the club! For sunny spots, you can't go wrong with Daylilies (Hemerocallis), many Hostas (surprisingly sun-tolerant types exist!), Sedum 'Autumn Joy', or classic Peonies. They’re hardy and quite forgiving. For shadier gardens, Hostas reign supreme, alongside feathery Astilbe and colourful Coral Bells (Heuchera). Choosing tough plants makes gardening way more fun! If you need help preparing the beds, a dedicated City Garden Clean Up Service can clear out old debris and weeds first.
Easy does it on the fertilizer! New plants usually don't need feeding right away, especially if you mixed compost into the soil during planting (which is the best start!). Let them focus their energy on establishing strong roots first. Fertilizing too soon can push leafy growth the roots can't support. Wait at least several weeks, maybe even until next season for trees and shrubs. Proper watering is much more critical initially. Curious about our less-is-more approach sometimes? You can learn More About Our Team and Philosophy on our site.
You *can*, but timing is everything! Hardy perennials (like Coneflowers or Hostas) are tougher and can handle cooler soil and a light chill, so they can often be planted earlier, maybe mid-to-late May. Those beautiful but tender annuals (like Petunias, Impatiens, Marigolds) absolutely hate frost. It's best to wait until all danger of frost has passed and the soil has warmed up, usually early June in the Ottawa area, before putting them in the ground. Patience pays off!
Conclusion: Grow Happy, Save Money!
So, what's the big secret to successful spring planting in Ottawa? Turns out, it's mostly about giving your new green buddies a little extra TLC right from the start! Choosing the right plant for your spot, planting it carefully (not too deep!), watering wisely, and adding that magical layer of mulch isn't just about making plants happy. It's smart economics! Think of it this way: a little effort now saves you the frustration *and* the cost of replacing sad, struggling plants later. Investing time upfront means less plant loss, less work down the road, and more money left in your pocket – plus, you get the joy of a thriving garden!
Feeling inspired to get your hands dirty? Awesome! Put these tips into action, channel your inner garden guru, and watch your landscape flourish. It’s incredibly satisfying to see plants you nurtured take off.
But hey, we get it – sometimes life is busy, or maybe you'd just prefer an expert touch. If you're in Vernon, Manotick, Greely, or surrounding areas and want professional help with planting, mulching, or general landscaping to guarantee success, we're here for you! Check out our comprehensive list of Landscaping and Yard Care Services or contact us today to see how we can help your garden dreams come true. Happy planting!
Ready for a beautiful, thriving garden this year?
Get a Free Estimate!