
Embrun Tool Care: Sharp Blades Prevent Plant Disease
Quick Summary:
- Dull garden tools crush plant tissue, creating entry points for diseases common in the Ottawa region.
- Sharp tools make clean cuts that heal quickly, reducing plant stress and infection risk.
- Dirty tools spread pathogens (fungi, bacteria) between plants via cross-contamination.
- Regular cleaning, sharpening, and disinfecting are essential for tool longevity and plant health.
- Seasonal tool care ensures your equipment is always ready for Embrun gardening tasks.
Need expert help keeping your Embrun garden healthy? Request Your Free Quote Today!
Introduction: Give Your Embrun Garden the Edge!
Ever feel like you're performing minor surgery with a butter knife when trying to prune that stubborn rose bush? You hack, you saw, you wrestle... and the poor plant ends up looking less 'trimmed' and more 'chewed by a beaver'. We've all been there! Here in Embrun, and across the lovely communities nearby like Russell and even out towards Ottawa, we take pride in our yards. Whether it's nurturing vibrant flower beds or managing larger landscaping features, we want our plants to thrive.
But here’s a little secret many gardeners overlook: those ragged cuts from dull tools are like rolling out the welcome mat for plant diseases. Think about it – a clean cut heals quickly, minimizing stress and infection risk for your plant. A torn, messy wound? That's an open invitation for fungi and bacteria to move right in.
This guide is all about giving your Embrun garden the *edge* it deserves – quite literally! We'll dig into why keeping your pruning shears, loppers, and even your trusty shovel sharp is one of the simplest, yet most effective, ways to promote robust plant health, prevent nasty diseases, and frankly, make your gardening chores a whole lot less frustrating. Let's sharpen up our knowledge (and our tools!) for healthier, happier gardens.
Why Sharp Blades are Your Garden's Best Friend (Especially in Ottawa!)
Okay, let's dig into why keeping your garden tools sharp isn't just about making your life easier – it's about being a true friend to your plants! Think of it like this: would you rather have surgery with a sharp scalpel or a rusty spoon? (Hopefully, the scalpel!) Your plants feel the same way about pruning.
Why the Fuss About Sharpness? It’s Biology, Baby!
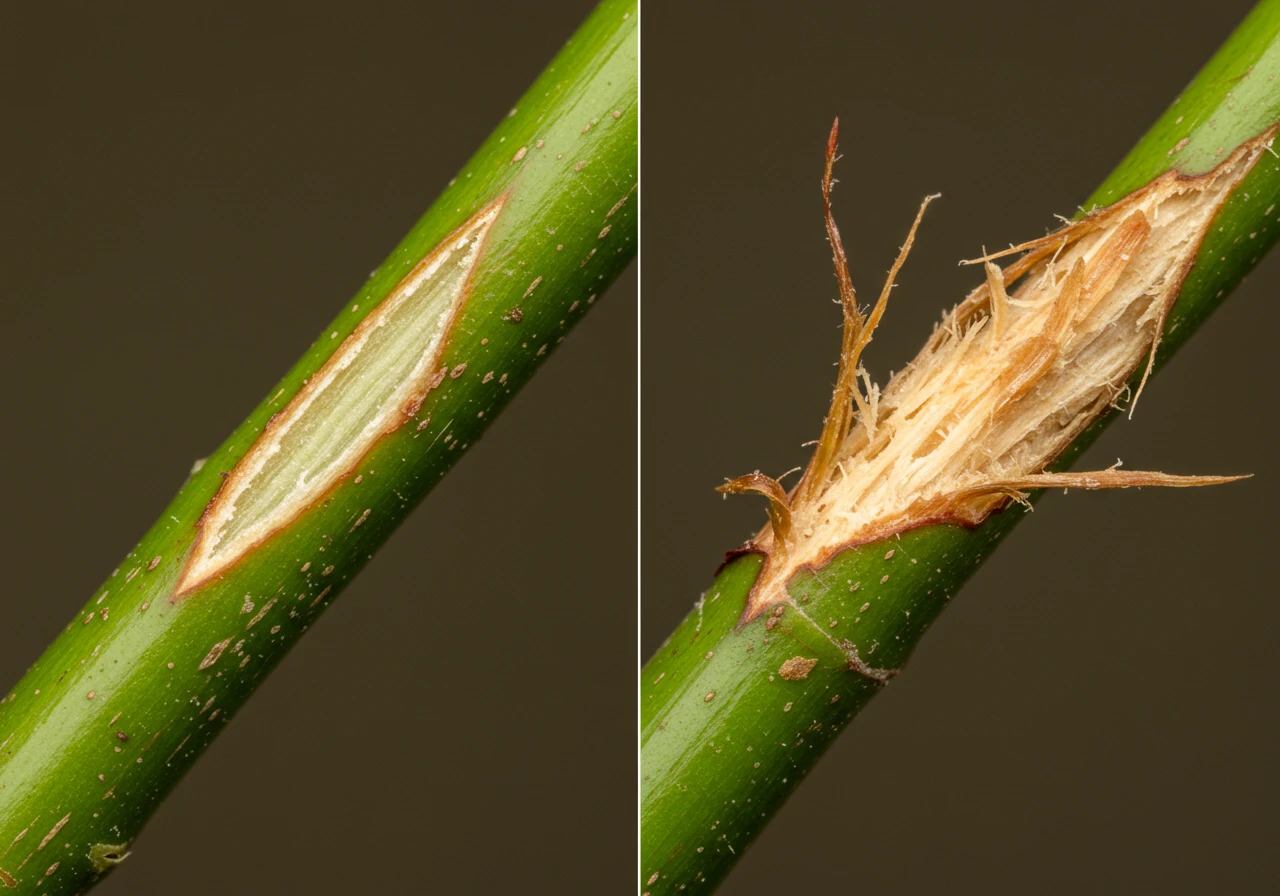
Inside every plant stem or branch are vital tissues, kind of like tiny highways, carrying water and nutrients up and down. When you use a sharp blade – whether on pruning shears, loppers, or even a hedge trimmer – you make a *clean slice*. This does minimal damage to the surrounding cells. The plant can then quickly seal off the wound (a process called callusing) much like your skin heals a clean cut. This quick healing means:
- Less Stress: The plant uses less energy to repair the damage, leaving more resources for growth, flowering, and fighting off other problems.
- Faster Recovery: A clean wound closes faster, minimizing the time it's vulnerable.
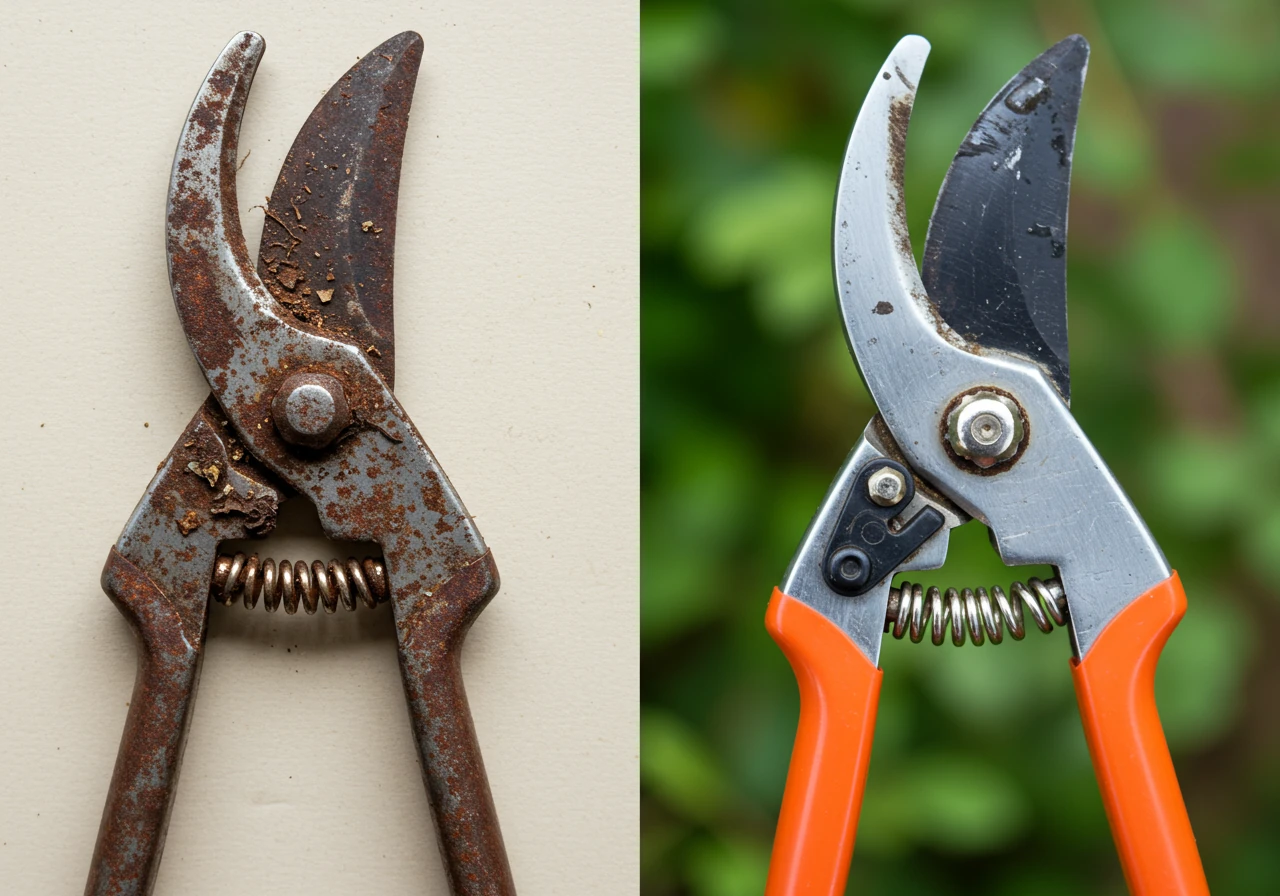
The Nightmare of Dull Blades
Now, let's picture those dull, maybe slightly rusty secateurs you forgot to clean last fall. Instead of slicing cleanly, they *crush and tear* the plant's tissues. This creates a ragged, mangled wound. Why is this so bad?
- More Damage: Crushed cells die off, creating more decaying matter right at the wound site.
- Open Invitation for Disease: That rough, torn surface is like a jagged canyon wall – perfect for nasty bacteria and fungal spores to grab onto and set up shop. The dying tissue provides an easy food source for them.
- Slower Healing: The plant has a much harder time sealing such a messy wound, leaving it exposed to infection and moisture loss for longer. This uses up way more energy, stressing the plant significantly.
Especially Important in Ottawa!
Our lovely Ottawa climate throws some extra curveballs. We often get humid summers, which are practically a spa day for many common fungal diseases like powdery mildew and black spot – especially on susceptible plants like roses or lilacs often found in gardens from Barrhaven to Manotick. A ragged cut from a dull blade in humid conditions is like putting out a buffet for these pathogens! For reliable gardening tips specific to our region, check out resources like the Master Gardeners of Ottawa-Carleton.
Furthermore, our sometimes dramatic temperature swings, especially during the shoulder seasons (spring/fall freeze-thaw cycles), can worsen the damage on poorly cut stems. A clean cut made with sharp tools is far more resilient. Healthy, unstressed plants are naturally better at handling whatever our unique climate throws at them. Good soil health is also a major factor in plant resilience, which is why understanding things like the Importance of Embrun Lawn Aeration for Soil Health can benefit your entire yard, including your shrubs and perennials. Managing tricky conditions like heavy soil is also crucial; learning about Embrun Fall Plant Care & Clay Soil Solutions can make a real difference.
The Sharp Takeaway
Using sharp blades is one of the simplest, most effective ways to promote plant health and prevent disease in your garden. It leads to faster healing, less stress, and makes your plants less vulnerable, particularly during Ottawa's humid spells. It’s a fundamental part of good garden care, right up there with understanding your local conditions – for more on that, explore these Embrun Garden Care Microclimate Management Secrets.
Remember, sharp blades benefit everything from your delicate roses to your lawn mower! A clean cut helps turfgrass heal quickly too, preventing disease and promoting vigorous growth, which works hand-in-hand with techniques like Embrun Overseeding for a Thicker Lawn. If keeping all your tools perfectly honed feels like a chore you'd rather skip, professional Clean Yards Landscaping Services can handle the pruning (and other tasks!) to ensure your garden gets the expert care it deserves. Give your plants the gift of a clean cut – they’ll thank you with vibrant health!
The Enemy Within: How Dull, Dirty Tools Spread Disease Like Gossip
Okay, let's talk about the sneaky villains lurking in your garden shed: your own tools! It sounds dramatic, but dull *and* dirty tools can be real troublemakers, spreading plant diseases faster than juicy gossip flies around a Nepean coffee shop.
Think about it. You prune a rose bush that has a touch of black spot (a common issue here in Ottawa, thanks to our sometimes humid summers). Microscopic fungal spores, invisible to the eye, cling to your pruner blades. Then, you move on to trim a perfectly healthy neighbouring shrub *without cleaning your tool*. Uh oh. You've just played taxi driver for those nasty spores, delivering them right to a fresh, open wound on the healthy plant. This is called *cross-contamination*, and it's how diseases like powdery mildew, fire blight, black spot, and various bacterial infections can hop from plant to plant, turning your beautiful garden into a sad sick bay. More information on identifying common plant problems can sometimes be found via resources like the City of Ottawa's tree health page.
It’s not just the pruning tools, either. Shovels and trowels can be culprits too! Digging around a plant with root rot? Soil-borne fungi and bacteria can hitch a ride on the dirty metal. Then, if you use that same shovel to plant some lovely new perennials or prepare the ground for fresh sod installation, you risk introducing those pathogens into the clean soil. Yikes!
The Gossip Analogy: Spreading Bad News
Imagine your dirty secateurs are like someone hearing a rumour (the disease spores on Plant A). Moving to Plant B without cleaning is like repeating that rumour directly into Plant B's ear (the fresh cut). Dull blades make it worse because they create a bigger, messier wound – like shouting the rumour through a megaphone, making it even harder for the plant to ignore or recover from! The plant is already stressed from the ragged cut, making it much more susceptible to the 'bad news' the dirty tool delivered.
Sharp & Clean vs. Dull & Dirty: A Quick Look
Here’s a simple breakdown:
| Feature | Sharp & Clean Tools | Dull & Dirty Tools |
|---|---|---|
| The Cut | Clean slice, minimal tissue damage | Ragged tear, crushes cells, extensive damage |
| Healing | Fast, plant seals wound quickly | Slow, difficult for plant to seal |
| Disease Risk | Low, minimizes entry points, no pathogens present | High, provides easy entry, transfers pathogens |
| Plant Stress | Minimal | Significant |
| Outcome | Healthy plant recovery, reduced disease spread | Stressed plant, high infection risk, disease spread |
Keeping it Clean: Simple Steps
Don't worry, keeping your tools from becoming disease vectors isn't complicated:
- Sharpen Regularly: We covered why sharp is crucial. Make it a habit!
- Clean After Each Use: Knock off loose soil and debris. A stiff brush helps.
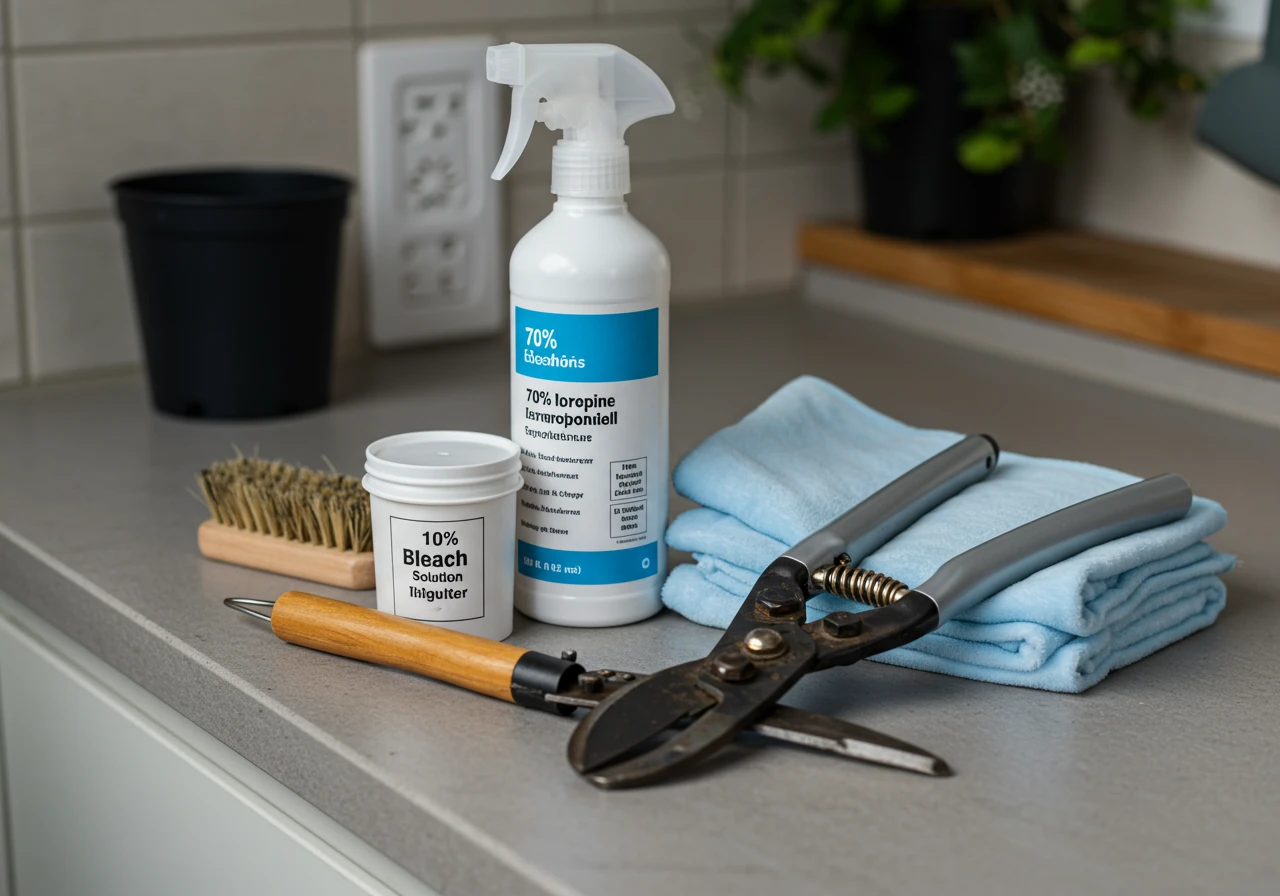
- Disinfect Between Plants (Especially if disease is suspected): This is key to stopping cross-contamination. Wipe blades with rubbing alcohol (isopropyl alcohol 70%+) or a 10% bleach solution (1 part bleach to 9 parts water). Let them air dry briefly before the next cut. Bleach can be corrosive, so rinse/oil metal tools after using bleach solution at the end of your gardening session.
- End-of-Season Care: Give tools a thorough cleaning and oiling before storing them for winter.
Taking these simple steps is a fundamental part of responsible gardening. It complements other good practices like proper watering, soil care, and timely yard maintenance. If tackling tool maintenance and other garden chores feels overwhelming, remember that professional help is available. Services ranging from a seasonal Embrun Yard Cleanup Service to more involved tasks like professional mulching and edging often include the use of properly maintained equipment. A full thorough property clean-up can also get your yard back into shape, reducing potential disease reservoirs. For a comprehensive approach, consider exploring reliable Clean Yards Landscaping Services. Don't let your own tools become the enemy within – keep 'em sharp and clean!
Sharpening Your Tools
Regular sharpening makes cutting easier and promotes plant health. Use a file for major reshaping and a stone or diamond file for honing the edge. Always match the blade's existing bevel angle (usually 20-30 degrees). Focus on smooth, consistent strokes away from your body. Remove the burr from the flat side afterwards. Essential tools include files/stones, safety gear, and oil.
Your Cleaning Routine
Clean tools after every use! Scrape off mud and soil. Use a wire brush for stubborn sap or rust. Wash with soapy water if needed, but *always* dry thoroughly afterwards to prevent rust. Cleaning removes debris that can harbor pathogens and allows disinfectants to work effectively. This simple habit extends tool life significantly.
Disinfecting Best Practices
Disinfecting kills invisible pathogens. Wipe clean blades with 70%+ isopropyl alcohol (quick and easy between plants) or dip/wipe with a 10% bleach solution (1 part bleach: 9 parts water - rinse and oil after use). Household disinfectant wipes can work in a pinch. Crucially, disinfect *between* plants, especially if you suspect disease, to prevent cross-contamination.
Get Your Edge Back: Essential Sharpening Toolkit & Simple Steps
Okay, let's roll up our sleeves and get those tools gleaming! You don't need a blacksmith's forge in your backyard – just a few simple items can turn your dull blades into precision cutting machines. Think of it as a little spa day for your hard-working garden gear. It makes your landscaping chores easier and, as we've learned, keeps your plants much happier.
Your Essential Sharpening Toolkit:
Getting started is easier and cheaper than you might think. You can find most of these goodies at local hardware stores or garden centres around Ottawa.
- Safety First! Always:
- Sturdy Gloves: Protect those fingers! Leather or heavy-duty work gloves are ideal.
- Eye Protection: Safety glasses or goggles are a must. Metal filings can fly!
- The Sharpeners:
- Mill Bastard File: Sounds grumpy, but it's your best friend for quickly removing nicks and reshaping a really dull edge. Get one with a handle.
- Diamond File or Sharpening Stone (Whetstone): These are for honing that edge to razor sharpness. Diamond files work fast; stones often need water or honing oil (check the instructions). A medium grit is usually fine for garden tools.
- Cleaning Crew:
- Clean Rags: For wiping down blades before, during, and after.
- Wire Brush: Good for scrubbing off stubborn rust or sap.
- Lubricating Oil (like 3-in-1): To protect the metal and keep moving parts smooth.
- Disinfectant: Rubbing alcohol or bleach solution (as mentioned before) for preventing disease spread.
Simple Steps to Sharpen Bypass Pruners or Loppers:
Bypass tools have one sharp, bevelled blade that slices past a thicker, non-cutting hook (like scissors). We only sharpen the bevelled blade. Let’s get that edge back!
- Safety Gear ON! Gloves and eye protection – no excuses!
- Clean Your Tool: Get rid of dirt, sap, and any rust. Soap, water, and a wire brush work wonders. Dry it thoroughly.
- Secure the Tool: Open the pruners. If you can, clamp the handle firmly in a vise. If not, hold it very securely against a stable surface like a workbench or sturdy table. *Make sure it can't slip!*
- Find the Bevel: Look closely at the cutting blade. You'll see an angled edge (the bevel) on one side. That's the *only* side you'll sharpen with the file or stone. The other side should stay flat.
- File/Stone It: Place your file or stone against the bevel, matching the *existing angle*. It’s usually around 20-30 degrees. With firm, even pressure, push the sharpener *away* from you, moving from the base of the blade towards the tip, following the curve. Lift, return to the base, and repeat. Don't saw back and forth! Usually, 5-10 good strokes are enough, depending on how dull it is. You're trying to create a nice, clean edge.
- Check for a Burr: Gently feel the *flat* back side of the blade (careful!). You might feel a tiny ridge of metal pushed over the edge – that's called a burr.
- Remove the Burr: Lay your stone or diamond file *flat* against the back side of the blade and make one or two light passes just to knock off that burr. Don't overdo it or create a new bevel here! Keep it flat.
- Clean & Oil: Wipe the blade clean with a rag. Apply a few drops of lubricating oil to the blade and especially to the pivot joint. Work the tool open and closed a few times to spread the oil.
- Test Cut: Find a small twig (about pencil thickness) and make a cut. It should be clean and easy!
That's it! Your pruners are ready for action. Doing this regularly, maybe before a big seasonal tidying session like a Comprehensive Property Clean-Up, makes a huge difference. Sharp tools are also vital for tasks like trimming roots when undertaking a new Expert Garden Installation.
Of course, tool maintenance isn't everyone's cup of tea. If you're in the surrounding areas and prefer to leave it to the pros, services like the dedicated Metcalfe Property Cleanup Service or the Marionville Property Cleanup Service ensure all equipment used on your property is sharp and ready. If you ever have questions about tool care or need help with bigger landscaping projects, feel free to Contact Us – we're always happy to chat!
Beyond Sharp: Cleaning & Disinfecting for Ultimate Plant Protection
Okay, so your tools are sharp enough to slice a tomato mid-air (please don't actually try that). Fantastic! But hold your pruners, garden warrior – there's another crucial step for ultimate plant protection: cleaning *and* disinfecting. Think of it like washing your hands (cleaning off the dirt) versus using hand sanitizer (killing the germs). Both are important, especially when you're basically performing plant surgery!
Cleaning vs. Disinfecting: What's the Dirt?
It might seem like splitting hairs, but cleaning and disinfecting do different jobs for your tools and your plants, especially here in Ottawa where humid days can encourage disease.
- Cleaning: This is all about removing the physical stuff – dirt, mud, sticky plant sap, maybe even a bit of rust. Think of it as wiping the slate clean. If you don’t get rid of this gunk, two bad things happen: 1) The dirt itself can harbor nasty little microbes (bacteria, fungi spores). 2) That layer of grime can act like a shield, preventing your disinfectant from actually reaching and killing the germs underneath. Sneaky!
- Disinfecting: This is the germ warfare part. After cleaning, disinfecting actually *kills* those microscopic baddies – the bacteria, viruses, and fungal spores that cause common garden diseases like black spot, powdery mildew, or fire blight.
You need *both* for truly healthy plants. A clean but germy tool can still spread disease, and disinfectant can't work properly on a dirty tool.
Getting Down to Clean Business:
Cleaning doesn't require fancy potions. It's usually pretty straightforward:
- Scrape Off the Big Stuff: Use a putty knife, a sturdy stick, or even an old screwdriver to knock off clumps of soil and mud from shovels, trowels, and cultivators.
- Brush Away Grit & Sap: A wire brush is your best friend for scrubbing off dried-on sap, dirt clinging in joints, and light rust. Get into those crevices!
- Wash If Needed: For really grimy tools (especially after heavy digging or dealing with sticky sap), a wash with warm, soapy water does wonders. Dish soap is perfectly fine.
- Dry Thoroughly: *Crucial step!* Water invites rust. Wipe tools completely dry with a clean rag or let them air dry fully in the sun before storing or disinfecting. Consistent cleaning is a cornerstone of good Garden Maintenance.
Disinfecting: Banishing the Bad Guys
Once your tool is clean, it's time to disinfect. This is *especially* important if you know you've been working on a diseased plant, or if you're moving between different plant types (like roses to lilacs). Here are some options:
- Rubbing Alcohol (Isopropyl Alcohol): Grab a bottle of 70% or higher isopropyl alcohol. Simply wipe down the blades or tool surfaces with a soaked rag or cotton ball. It evaporates quickly, making it great for disinfecting pruners *between plants* as you work your way around the garden in, say, Greely or Osgoode.
- Bleach Solution (Handle with Care!): A 10% bleach solution (1 part regular household bleach to 9 parts water) is very effective.
- Method: Dip the clean tool blades/parts into the solution for a few minutes, or wipe thoroughly with a soaked rag.
- SAFETY FIRST! Bleach is corrosive. Wear gloves and eye protection. Mix in a well-ventilated area (outdoors is best). *Never* mix bleach with other cleaners (especially ammonia – dangerous fumes!). Rinse the tool with clean water after disinfecting with bleach, then dry thoroughly to prevent corrosion. Oil metal parts afterwards.
- Household Disinfectant Wipes: Some commercial disinfectant wipes (like Lysol or Clorox wipes) can work in a pinch, especially for quick wipe-downs between plants. Check the label to ensure they kill bacteria and fungi/viruses.
- Ethanol-Based Sprays: Similar to rubbing alcohol, sprays containing at least 70% ethanol can be effective and convenient.
The Golden Rule: Disinfect Between Plants!
Seriously, this is key. If you prune a diseased rose, then immediately trim your healthy hydrangea without disinfecting, you've just potentially doomed your hydrangea. Get in the habit of wiping down those pruner blades with alcohol or your chosen disinfectant *before* moving to the next plant, especially if disease is present or suspected. It might seem tedious, but it's way less work than dealing with a widespread garden infection later, which might even require a professional Ottawa Yard Cleanup Service to fully remedy.
Keeping tools clean and disinfected is standard practice for professionals offering services ranging from specific neighborhood help like the Marionville Yard Cleanup Service (distinct from the Marionville Property Cleanup Service but both relevant) to broader municipal work handled by a City Property Cleanup Service. Even if you just need a hand with a seasonal spruce-up via a City Garden Clean Up Service, ensuring tool hygiene is part of the quality process. Similar services like the Ottawa Garden Clean Up Service also prioritize this. Check our reputation on Google!
So, remember the mantra: Sharp, Clean, *and* Disinfected. Your plants will thank you with vibrant health!
Estimated Disease Reduction with Proper Tool Care
*Illustrative data showing potential impact. Actual results vary based on plant type, disease pressure, and environmental conditions.
Your Ottawa Seasonal Tool Care Calendar: Stay Sharp Year-Round!
Okay, let's map out your year of tool TLC! Keeping your garden gear in top shape doesn't have to be a chore if you break it down by season. Here’s a simple calendar tailored for our unique Ottawa gardening rhythm, from Nepean backyards to sprawling Manotick gardens:
Late Spring (May - June): The Grand Awakening!
Action: Big sharpen time! Sharpen mower blades, shovels, hoes, shears, loppers. Check for winter rust.
Tips: Clean off old debris. Lubricate moving parts. Test tools before heavy use. Like prep for a City Garden Clean Up Service – start right!
Summer (July - August): Mid-Season Maintenance
Action: Keep up with quick cleans after use, especially with soil/sap contact. Wipe down metal to prevent rust in Ottawa humidity.
Tips: Touch-up sharpening for frequently used tools (pruners). Continue disinfecting between plants if disease is spotted. Good tools from proper Material Selection last longer.
Fall (Sept - Nov): The Big Tidy-Up
Action: Most crucial care! Thoroughly clean *every* tool. Scrape mud, scrub sap, ensure dryness.
Tips: Sharpen blades *now* for spring readiness. Apply light oil to metal surfaces for winter rust prevention. Essential before storing after jobs like a Marionville Yard Cleanup Service or Marionville Garden Clean Up Service.
Winter (Dec - April): Rest, Repair, and Plan
Action: Store tools properly – dry place, hanging or off damp floors.
Tips: Ideal time for major repairs or tool replacement decisions. Plan next year's garden! Book services like Ottawa Garden Clean Up Service early for spring.
Stick to this simple schedule, and your tools will stay sharp, clean, and ready for whatever your Ottawa garden throws at them, season after season!
Pro Tips for Tool Longevity & Performance
Q: What's the biggest mistake storing tools over Ottawa winters?
A: Leaving them dirty/damp! Always clean, dry, lightly oil metal, and store off the floor to prevent rust. Want reliable help? Learn more about us.
Q: How often *really* should I clean my garden tools?
A: Wipe after each use; dirt holds moisture causing rust. Deep clean before storing – detail matters, like in a pro Metcalfe garden clean-up service.
Q: Sharpening feels like a chore. How often is *enough*?
A: Sharpen when cuts get ragged. A quick touch-up prevents bigger jobs, vital for efficient work like a Marionville garden clean-up service.
Q: Oil seems messy. Is lubricating tools really necessary?
A: Yes! Oil pivots for smooth action and rust prevention. It boosts performance, essential for jobs like a Metcalfe yard cleanup service.
Q: My wooden handles look sad. Any tips?
A: Sand smooth and apply linseed oil seasonally to prevent cracks. Handle care matters, even for a big Ottawa property cleanup service.
FAQs: Your Embrun Tool Care Questions Answered
Oh, definitely putting them away dirty or damp! That’s like inviting rust to a winter-long party on your favourite shovel. Before storing, *always* clean off all the soil and gunk, make sure tools are bone dry, then wipe metal parts with a light oil. Store them off cold, damp concrete floors. This ensures they’re ready for action come spring, maybe even before a big professional Ottawa property clean-up service gets your yard truly sparkling! See our transformations for examples of what a clean start looks like.
Great question! For active gardeners like you near Russell, a quick wipe-down after *every* use is ideal. Just knocking off the soil prevents moisture buildup, which causes rust. Think of it like wiping your kitchen counter! Then, do a more thorough cleaning and disinfecting session periodically, especially before storing. Clean tools also help prevent spreading diseases between plants, contributing to overall garden and comprehensive lawn care strategies.
We hear you – sharpening isn't always fun! You don't need a rigid schedule. The best time to sharpen is when you *notice* it's needed. Are cuts becoming ragged or crushing stems instead of slicing cleanly? That's your cue! A quick touch-up often prevents a bigger sharpening job later. Sharp tools make gardening easier and are vital for healthy plants and even efficient effective soil preparation methods when dealing with roots or tough soil. Our City yard cleanup service ensures sharp tools are always used.
It absolutely makes a difference! Think of oil as preventative medicine for your tools. A few drops on pivot points and springs keep pruners and loppers moving smoothly – no more wrestling! It also creates a barrier against rust, especially after cleaning. Taking these small protective steps matters, just like how businesses should carefully handle data – you can review our privacy policy to see how we approach protecting information and adhere to our terms and conditions.
Definitely! Give those handles some love. First, lightly sand away any roughness or splintery bits for a smoother grip. Then, wipe them down with boiled linseed oil (available at hardware stores). Let it soak in, then wipe off any excess. Doing this once or twice a season prevents cracking and keeps them feeling good in your hands. Happy handles make happy gardeners! Maintaining equipment is part of providing quality city garden maintenance services.
Ugh, sticky sap and rusty spots are annoying! For sap, try a solvent like turpentine, WD-40, or even hand sanitizer on a rag. For light rust, a wire brush or steel wool often works. For heavier rust, soaking the metal parts in white vinegar overnight can help loosen it before scrubbing. Always clean, dry, and oil the tool after treating rust or using solvents! We appreciate feedback on how we do things, see our estimate feedback page.
Conclusion: Sharp Tools, Healthy Gardens, Happy You!
Well, folks, we’ve dug deep into the world of tool care! It turns out, giving your garden tools a little TLC isn't just about making *your* life easier (though trust us, slicing through that branch like butter *is* satisfying!). It's about showing your plants some serious love. Sharp, clean blades mean quicker healing, less stress for your beloved perennials and shrubs, and a much smaller chance of nasty diseases gate-crashing your garden party. Dull, dirty tools? They’re like tiny villains spreading trouble from your prize-winning roses to your trusty tomato plants.
Remember the simple secrets:
- Clean off dirt and sap after use.
- Sharpen those edges when cuts get ragged.
- Disinfect wisely, especially between plants if you suspect illness.
Whether you’re cultivating a cozy corner in Embrun or managing a larger landscape out in Greely, these steps make a huge difference. Healthy plants are happy plants, and happy plants make for a much happier gardener – that’s you! We aim for happy customers, just like on our thank you page.
Feeling like your tools need more than a quick wipe-down, or perhaps you’d rather spend your time enjoying your beautiful Ottawa garden than sharpening blades? We get it! Professional landscaping services not only take the hard work off your hands but also ensure the *right* tools – sharp, clean, and ready – are used for every job, promoting the best health for your yard. If you're ready to give your garden (and yourself!) a break, reach out to learn how expert care can keep your green spaces thriving. Have more questions or a tip to share? Let us know! Happy gardening!
