{ "@context": "https://schema.org", "@type": "Article", "headline": "Vernon Landscape Layout: Mark Beds Before You Dig Tips", "author": { "@type": "Organization", "name": "Clean Yards", "url": "https://cleanyards.ca/" }, "image": "https://cleanyards.ca/wp-content/uploads/2025/04/Split_image_comparison_photogr_9302.webp", "description": "Essential guide on properly marking out garden beds before starting landscaping projects in the Vernon and Ottawa area. Covers tools, techniques, design tips, and safety.", "mainEntityOfPage": { "@type": "WebPage", "@id": "https://cleanyards.ca/blog/vernon-landscape-layout-mark-beds-before-dig/" } } { "@context": "https://schema.org", "@type": "HowTo", "name": "How to Mark Garden Beds Before Digging", "description": "A step-by-step guide to accurately marking out garden beds for landscaping projects.", "step": [ { "@type": "HowToStep", "name": "Clear the Area", "text": "Remove leaves, sticks, debris, and any obstacles from the area where you plan to mark the bed.", "url": "#step-by-step-guide", "position": 1 }, { "@type": "HowToStep", "name": "Gather Tools & Plan", "text": "Collect your marking tools (paint, flour, hose, or string/stakes) and measuring tape. Refer to your sketch or plan.", "url": "#step-by-step-guide", "position": 2 }, { "@type": "HowToStep", "name": "Draft Outline Loosely", "text": "Use a garden hose or flour to create a rough outline of the bed shape. Adjust as needed for flow and placement.", "url": "#step-by-step-guide", "position": 3 }, { "@type": "HowToStep", "name": "Measure Precisely", "text": "Use a measuring tape to check distances from fixed points, ensure consistent widths, and verify proportions.", "url": "#step-by-step-guide", "position": 4 }, { "@type": "HowToStep", "name": "Make Final Mark", "text": "Create a clear, durable line using marking paint, or set up taut string lines with stakes for straight edges.", "url": "#step-by-step-guide", "position": 5 }, { "@type": "HowToStep", "name": "Walk-Away Test", "text": "Step back and view the marked lines from different angles and distances. Leave it for a while and re-evaluate with fresh eyes.", "url": "#step-by-step-guide", "position": 6 }, { "@type": "HowToStep", "name": "Final Check & Call Ontario One Call", "text": "Confirm lines and measurements. Crucially, contact Ontario One Call (1-800-400-2255) to locate underground utilities BEFORE digging.", "url": "#step-by-step-guide", "position": 7 } ] } { "@context": "https://schema.org", "@type": "FAQPage", "mainEntity": [ { "@type": "Question", "name": "When's the absolute best time to start digging new garden beds in the Ottawa area?", "acceptedAnswer": { "@type": "Answer", "text": "Ideally, aim for spring after the ground has thawed but before the summer heat hits, or in the fall when temperatures cool down again. Digging is much easier when the soil is moist but not soggy. Trying to wrestle with hard, dry clay in July is nobody's idea of fun, and new plants get stressed! Getting the heavy lifting done early is often part of a thorough city garden clean-up service to prep for planting season." } }, { "@type": "Question", "name": "Ottawa clay soil is legendary! How deep do I *really* need to dig for a healthy flower bed?", "acceptedAnswer": { "@type": "Answer", "text": "You don't necessarily need to dig down to China! Focus on loosening the top 6-8 inches thoroughly. The real key with our clay is *improving* it, not just digging deep. Mix in plenty of compost or other organic matter to break up the dense structure and improve drainage. Healthy soil is the foundation for happy plants! Proper soil preparation is key." } }, { "@type": "Question", "name": "I'm carving out a new bed space in Greely. What's the kindest way (for me and the planet) to remove the existing grass?", "acceptedAnswer": { "@type": "Answer", "text": "Great question! You can rent a sod cutter for larger areas, or manually remove the sod with a spade (good workout!). For a no-dig, eco-friendly approach, try sheet mulching: layer cardboard over the grass (overlapping edges), wet it down, and top with compost and mulch. It takes longer, but smothers the grass naturally. Good prep now makes future tasks like applying proper mulching and edging techniques much easier." } }, { "@type": "Question", "name": "My yard slopes quite a bit. Any special tips for digging beds on an incline so my soil doesn't slide down to Manotick?", "acceptedAnswer": { "@type": "Answer", "text": "Absolutely! Try to design and dig your beds *across* the slope rather than straight up and down. This creates mini-terraces that help hold soil and water. You can slightly build up the lower edge with soil or use stones or landscape edging for extra support. Good mulch cover is also essential to prevent erosion. Handling slopes effectively can lead to some truly inspiring landscape transformations." } }, { "@type": "Question", "name": "Do I need a permit just to dig a flower bed? And what's the deal with those utility flags again?", "acceptedAnswer": { "@type": "Answer", "text": "Generally, no city permits are needed in Ottawa for basic garden beds unless you're doing major retaining walls or structures. However, calling Ontario One Call (1-800-400-2255 or visit OntarioOneCall.ca) before *any* digging is **mandatory** and free! They mark underground utilities (gas, hydro, etc.) to prevent dangerous accidents. Always wait for the markings and dig safely away from them. Sometimes, having a professional city yard cleanup service clear the area first makes seeing these locate marks easier. When you contact services like ours, rest assured we protect your details; you can see how we handle your information in our Privacy Policy." } } ] } /* CSS Reset & Base Styles */ *, *::before, *::after { box-sizing: border-box; margin: 0; padding: 0; }:root { --brand-primary: #93C020; /* Lime Green */ --brand-black: #000000; --brand-dark-gray: #2D2C2C; --brand-light-gray: #EBEBEB; --brand-dark-green: #287734; --brand-white: #FFFFFF; --brand-accent: #B7FE00; /* Bright Lime Accent */--text-color: var(--brand-dark-gray); --heading-color: var(--brand-dark); --link-color: var(--brand-dark-green); --link-hover-color: var(--brand-primary); --bg-color: var(--brand-white); --container-bg: var(--brand-white); --border-color: var(--brand-light-gray); --highlight-bg: #f5fcef; /* Light green derived from primary */ --highlight-border: #d5e6a1; /* Darker shade for border */ --button-bg: var(--brand-dark-green); --button-text: var(--brand-white); --button-hover-bg: var(--brand-primary); --button-hover-text: var(--brand-dark-gray); }html { scroll-behavior: smooth; font-size: 16px; /* Base font size */ }body { font-family: system-ui, -apple-system, BlinkMacSystemFont, "Segoe UI", Roboto, Oxygen, Ubuntu, Cantarell, "Open Sans", "Helvetica Neue", sans-serif; line-height: 1.6; color: var(--text-color); background-color: var(--bg-color); -webkit-font-smoothing: antialiased; -moz-osx-font-smoothing: grayscale; }/* Progress Bar */ #progress-bar-container { position: fixed; top: 0; left: 0; width: 100%; height: 5px; background-color: var(--brand-light-gray); z-index: 1000; }#progress-bar { height: 100%; width: 0; background-color: var(--brand-primary); transition: width 0.1s ease-out; }/* Main Article Container - Scopes styles */ .article-container { max-width: 800px; margin: 40px auto 60px auto; /* Increased top margin for progress bar */ padding: 20px; background-color: var(--container-bg); border-radius: 8px; /* box-shadow: 0 2px 10px rgba(0,0,0,0.05); */ overflow: hidden; /* Prevents margin collapse */ }/* Headings */ .article-container h1, .article-container h2, .article-container h3, .article-container h4 { color: var(--heading-color); margin-bottom: 0.8em; margin-top: 1.5em; line-height: 1.3; font-weight: 600; }.article-container h1 { font-size: 2.2rem; /* Responsive font size */ margin-top: 0; /* First element */ margin-bottom: 1em; text-align: center; color: var(--brand-dark-green); }.article-container h2 { font-size: 1.8rem; border-bottom: 2px solid var(--brand-light-gray); padding-bottom: 0.3em; color: var(--brand-dark-gray); }.article-container h3 { font-size: 1.4rem; color: var(--brand-dark-gray); }.article-container h4 { font-size: 1.1rem; font-weight: 500; color: var(--brand-dark-gray); }/* Paragraphs */ .article-container p { margin-bottom: 1.2em; font-size: 1rem; } .article-container p:last-child { margin-bottom: 0; }/* Links */ .article-container a { color: var(--link-color); text-decoration: none; transition: color 0.2s ease; }.article-container a:hover, .article-container a:focus { color: var(--link-hover-color); text-decoration: underline; }/* Lists */ .article-container ul, .article-container ol { margin-bottom: 1.2em; padding-left: 1.5em; /* Indentation */ }.article-container li { margin-bottom: 0.5em; }/* Images & Figures */ .article-container figure { margin: 25px auto; text-align: center; }.article-container img { max-width: 100%; height: auto; border-radius: 5px; display: block; margin-left: auto; margin-right: auto; }.article-container figcaption { font-size: 0.85rem; /* Smaller font size */ color: #777; margin-top: 5px; text-align: center; }/* Highlight Boxes */ .highlight-box { background-color: var(--highlight-bg); border: 1px solid var(--highlight-border); border-left: 5px solid var(--brand-primary); padding: 20px; margin: 30px 0; border-radius: 5px; } .highlight-box h3, .highlight-box h4 { margin-top: 0; color: var(--brand-dark-green); }/* Call to Action (CTA) Buttons */ .cta-button-container { text-align: center; margin: 30px 0; }.cta-button { display: inline-block; background-color: var(--button-bg); color: var(--button-text); padding: 12px 25px; border-radius: 5px; text-decoration: none; font-weight: 600; font-size: 1rem; border: none; cursor: pointer; transition: background-color 0.2s ease, color 0.2s ease, transform 0.1s ease; }.cta-button:hover, .cta-button:focus { background-color: var(--button-hover-bg); color: var(--button-hover-text); text-decoration: none; transform: translateY(-2px); box-shadow: 0 4px 8px rgba(0,0,0,0.1); }/* Back to Top Button */ #back-to-top { position: fixed; bottom: 20px; right: 20px; background-color: var(--brand-dark-gray); color: var(--brand-white); border: none; border-radius: 50%; width: 50px; height: 50px; font-size: 24px; line-height: 50px; /* Center arrow vertically */ text-align: center; cursor: pointer; opacity: 0; visibility: hidden; transition: opacity 0.3s ease, visibility 0.3s ease, background-color 0.2s ease; z-index: 999; }#back-to-top:hover { background-color: var(--brand-primary); color: var(--brand-dark-gray); }#back-to-top.visible { opacity: 1; visibility: visible; }/* Collapsible Sections (FAQ) */ .collapsible-trigger { background-color: var(--brand-light-gray); color: var(--brand-dark-gray); cursor: pointer; padding: 15px 20px; width: 100%; border: none; text-align: left; outline: none; font-size: 1.1rem; font-weight: 600; margin-top: 10px; border-radius: 5px; display: flex; justify-content: space-between; align-items: center; transition: background-color 0.2s ease; }.collapsible-trigger:hover, .collapsible-trigger.active { background-color: #ddd; /* Slightly darker grey on hover/active */ }.collapsible-trigger::after { content: '+'; /* Plus icon */ font-size: 1.3rem; font-weight: bold; color: var(--brand-dark-green); transition: transform 0.3s ease; }.collapsible-trigger.active::after { content: "−"; /* Minus icon */ transform: rotate(180deg); }.collapsible-content { padding: 0 20px; background-color: var(--brand-white); max-height: 0; overflow: hidden; transition: max-height 0.4s ease-out, padding 0.4s ease-out; border-bottom-left-radius: 5px; border-bottom-right-radius: 5px; border: 1px solid var(--border-color); border-top: none; margin-bottom: 10px; /* Space between closed items */ } /* Add padding when content is visible */ .collapsible-content.open { padding: 15px 20px; border-top: none; }/* Tab Interface */ .tab-container { margin: 30px 0; border: 1px solid var(--border-color); border-radius: 5px; overflow: hidden; /* Ensure border radius applies correctly */ }.tab-buttons { display: flex; background-color: var(--brand-light-gray); border-bottom: 1px solid var(--border-color); }.tab-button { padding: 12px 20px; cursor: pointer; border: none; background-color: transparent; font-size: 1rem; font-weight: 500; color: var(--brand-dark-gray); transition: background-color 0.2s ease, color 0.2s ease; border-right: 1px solid var(--border-color); flex-grow: 1; /* Make buttons fill space */ text-align: center; } .tab-button:last-child { border-right: none; }.tab-button:hover { background-color: #e0e0e0; /* Slightly darker grey */ }.tab-button.active { background-color: var(--brand-white); color: var(--brand-dark-green); font-weight: 600; border-bottom: 2px solid var(--brand-primary); /* Active indicator */ margin-bottom: -1px; /* Overlap border */ }.tab-content { display: none; /* Hide content by default */ padding: 25px; background-color: var(--brand-white); animation: fadeIn 0.5s ease; }.tab-content.active { display: block; /* Show active content */ }@keyframes fadeIn { from { opacity: 0; } to { opacity: 1; } }/* Responsive Data Visualization (Bar Chart) */ .chart-container { margin: 40px 0; padding: 20px; border: 1px solid var(--border-color); border-radius: 5px; background-color: var(--brand-white); } .chart-container h3 { text-align: center; margin-top: 0; margin-bottom: 25px; }.bar-chart { display: flex; justify-content: space-around; align-items: flex-end; height: 250px; /* Fixed height for chart area */ border-bottom: 1px solid var(--brand-dark-gray); /* X-axis */ padding-bottom: 5px; }.bar-item { display: flex; flex-direction: column; align-items: center; flex: 1; margin: 0 5px; /* Spacing between bars */ }.bar { width: 70%; /* Relative width */ max-width: 50px; /* Max width */ background-color: var(--brand-dark-green); height: 0; /* Initial height for animation */ transition: height 1s ease-out; border-radius: 3px 3px 0 0; /* Rounded top */ } /* Alternate bar color */ .bar-item:nth-child(even) .bar { background-color: var(--brand-primary); }.bar-label { font-size: 0.85rem; color: var(--text-color); margin-top: 8px; text-align: center; } .bar-value { font-size: 0.8rem; color: var(--brand-dark-gray); opacity: 0; /* Initially hidden */ transition: opacity 0.5s 0.5s ease; /* Fade in after bar animates */ font-weight: bold; } .chart-container.in-view .bar-value { opacity: 1; }/* Timeline Component */ .timeline { position: relative; list-style: none; padding: 20px 0; margin: 40px 0; }/* The vertical line */ .timeline::before { content: ''; position: absolute; top: 0; bottom: 0; left: 50%; width: 3px; background-color: var(--brand-light-gray); margin-left: -1.5px; }.timeline-item { padding: 10px 40px; position: relative; background-color: inherit; width: 50%; margin-bottom: 20px; }/* The circles on the timeline */ .timeline-item::after { content: ''; position: absolute; width: 15px; height: 15px; right: -8.5px; /* Adjust based on width */ background-color: var(--brand-white); border: 4px solid var(--brand-primary); top: 15px; border-radius: 50%; z-index: 1; }/* Place items to the left */ .timeline-item.left { left: 0; }/* Place items to the right */ .timeline-item.right { left: 50%; }/* Fix the circle for right-aligned items */ .timeline-item.right::after { left: -7.5px; /* Adjust based on width */ }/* Arrows pointing towards the timeline */ .timeline-item::before { content: " "; height: 0; position: absolute; top: 18px; width: 0; z-index: 1; border: medium solid var(--brand-white); /* Invisible border */ }/* Right arrow */ .timeline-item.left::before { right: 30px; border-width: 10px 0 10px 10px; border-color: transparent transparent transparent var(--border-color); }/* Left arrow */ .timeline-item.right::before { left: 30px; border-width: 10px 10px 10px 0; border-color: transparent var(--border-color) transparent transparent; }/* Timeline Content Box */ .timeline-content { padding: 15px 20px; background-color: var(--brand-white); position: relative; border-radius: 6px; border: 1px solid var(--border-color); box-shadow: 0 1px 3px rgba(0,0,0,0.05); } .timeline-content h4 { margin-top: 0; margin-bottom: 5px; color: var(--brand-dark-green); } .timeline-content p { font-size: 0.95rem; margin-bottom: 0; }/* Responsive Adjustments */ @media (max-width: 768px) { .article-container h1 { font-size: 1.8rem; } .article-container h2 { font-size: 1.5rem; } .article-container h3 { font-size: 1.2rem; } .article-container p { font-size: 0.95rem; }/* Timeline adjustments for mobile */ .timeline::before { left: 20px; /* Move line to the left */ } .timeline-item { width: 100%; padding-left: 55px; /* Space for line and circle */ padding-right: 15px; left: 0 !important; /* Override inline style */ margin-bottom: 30px; } .timeline-item::after { left: 12.5px; /* Position circle on the line */ } .timeline-item::before { /* Adjust arrows */ left: 40px; border-width: 10px 10px 10px 0; border-color: transparent var(--border-color) transparent transparent; } .timeline-item.right::before, .timeline-item.left::before { left: 40px; border-width: 10px 10px 10px 0; border-color: transparent var(--border-color) transparent transparent; } .timeline-item.right, .timeline-item.left { left: 0%; /* Stack all items */ }/* Tab buttons stack */ .tab-buttons { flex-direction: column; } .tab-button { border-right: none; border-bottom: 1px solid var(--border-color); } .tab-button:last-child { border-bottom: none; } .tab-button.active { border-bottom: none; /* Remove bottom border when active */ border-left: 3px solid var(--brand-primary); /* Use left border as indicator */ margin-left: -1px; /* Overlap */ }/* Bar chart adjustments */ .bar-chart { height: 200px; } .bar-label { font-size: 0.8rem; } }@media (max-width: 480px) { .article-container { margin: 30px auto; padding: 15px; } .article-container h1 { font-size: 1.6rem; } .article-container h2 { font-size: 1.3rem; } .cta-button { padding: 10px 20px; font-size: 0.9rem; } #back-to-top { width: 40px; height: 40px; font-size: 20px; line-height: 40px; } .collapsible-trigger { padding: 12px 15px; font-size: 1rem; } .collapsible-content.open { padding: 12px 15px; } .tab-button { padding: 10px 15px; font-size: 0.9rem;} .tab-content { padding: 15px; } }/* Snippet Summary Styling */ .snippet-summary { background-color: var(--highlight-bg); border: 1px solid var(--highlight-border); border-left: 5px solid var(--brand-primary); padding: 15px; margin: 20px 0; border-radius: 5px; } .snippet-summary h3 { margin-top: 0; margin-bottom: 10px; font-size: 1.2rem; color: var(--brand-dark-green); } .snippet-summary ul { padding-left: 1.2em; margin-bottom: 0; } .snippet-summary li { font-size: 0.95rem; margin-bottom: 5px; }/* Initial CTA Styling */ .initial-cta { background-color: #e8f5e9; /* Light green background */ border: 1px solid #c8e6c9; padding: 15px; margin-bottom: 25px; border-radius: 5px; text-align: center; } .initial-cta p { margin-bottom: 10px; font-size: 1.05rem; }/* Responsive Table styles (Example) */ .responsive-table-wrapper { overflow-x: auto; /* Allows horizontal scroll on small screens */ margin: 20px 0; } .article-container table { width: 100%; border-collapse: collapse; margin-bottom: 1em; } .article-container th, .article-container td { border: 1px solid var(--border-color); padding: 10px 12px; text-align: left; } .article-container th { background-color: var(--brand-light-gray); font-weight: 600; } /* Basic mobile table stacking (Optional - use if needed) */ /* @media (max-width: 600px) { .article-container table, .article-container thead, .article-container tbody, .article-container th, .article-container td, .article-container tr { display: block; } .article-container thead tr { position: absolute; top: -9999px; left: -9999px; } .article-container tr { border: 1px solid #ccc; margin-bottom: 5px; } .article-container td { border: none; border-bottom: 1px solid #eee; position: relative; padding-left: 50%; text-align: right; } .article-container td:before { position: absolute; top: 6px; left: 6px; width: 45%; padding-right: 10px; white-space: nowrap; content: attr(data-label); font-weight: bold; text-align: left; } } */

Vernon Landscape Layout: Mark Beds Before You Dig Tips

Planning a landscape transformation in Vernon? Get it right the first time!

Let us help bring your vision to life. Request Your Free Quote Today

Quick Tips: Mark Before You Dig!

  • Marking garden beds prevents uneven edges and placement errors.
  • Always call Ontario One Call before digging to locate utilities.
  • Use tools like marking paint, flour, hoses, or string/stakes.
  • Measure carefully and consider scale, flow, and plant size.
  • Marking saves time, effort, and ensures a professional result.

Introduction: Dreaming of a New Vernon Landscape? Hold That Shovel!

Ah, that glorious feeling when you start dreaming up a new look for your Vernon landscape! Visions of perfect flower beds, maybe a winding path, or a lush gardening haven dance in your head. Especially after a long Ottawa winter, the urge to grab that shovel and just start digging is strong, right? We get it! You're ready to create your own slice of paradise, maybe even rivaling those stunning yards you've admired driving through nearby Greely or Manotick.

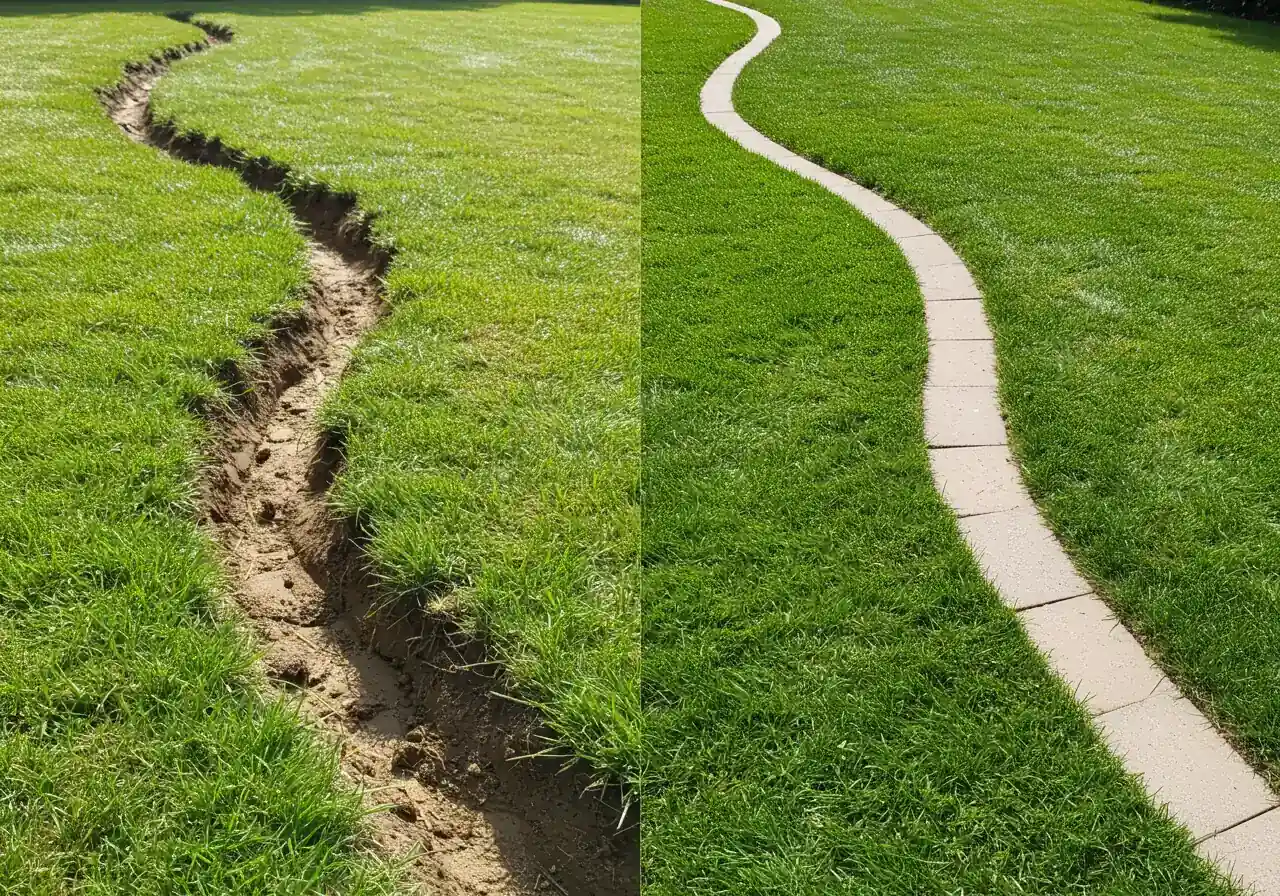
But hold your horticultural horses! Before you go full steam ahead with your landscaping plans and potentially create a border that looks a bit... wobbly... let's talk about the step everyone wants to skip but really shouldn't: properly marking out your garden beds. Seriously, pausing to map things out first prevents those "oops, that's not where I wanted it" moments and ensures your dream design actually fits and flows within your space. Think of it as drawing the lines before you start coloring. Let's get that plan clearly marked on the ground before* the real digging work begins!

Why Winging It Won't Work: The Crucial Case for Marking Beds (Especially Around Ottawa)

A clear visual contrast within a single frame. The left half shows a poorly defined, uneven, and wobbly garden bed edge haphazardly cut into a green lawn. The right half shows a perfectly smooth, crisp, professionally defined curved garden bed edge cut into the same green lawn. The difference in quality should be stark, highlighting the benefit of proper marking. Shot in bright daylight.
Proper marking (right) vs. winging it (left) makes a huge difference.

Okay, let's be honest. When the gardening bug bites, especially after a long Ottawa winter, your first instinct might be to grab the shovel and just start digging that new flower bed or landscape feature you've been dreaming about. It feels faster, more spontaneous, maybe even a little rebellious! But trust us, winging it when creating new bed lines is like trying to bake a fancy cake without measuring the ingredients – the results are usually… interesting, and not always in a good way. Taking a few extra minutes to mark out your garden beds properly is absolutely essential, saving you headaches, heartaches, and maybe even some backaches down the road. Follow our advice on Google for more tips!

So, why is skipping this step such a gamble, particularly around here?

  • The Dreaded Wobbly Border: Ever seen a garden bed edge that looks like it was drawn during an earthquake? Yeah, that often happens when you eyeball it. Freehand digging rarely results in the smooth curves or crisp straight lines you envision. Marking first ensures your border looks professional and intentional, not accidental. A wobbly line can cheapen the whole look of your landscaping project.
  • Utility Line Roulette (A Game You Don't Want to Play!): This is a big one in established areas like Nepean or Barrhaven. Before any digging work begins, you *must* contact Ontario One Call to locate underground utilities. Gas lines, electrical cables, water pipes – hitting one isn't just an "oops," it's a serious safety hazard and can lead to costly repairs. Marking your proposed bed *after* the locates ensures you're digging safely within the cleared zones. Seriously, don't skip the call *and* the marking!
  • Size & Shape Surprises: What looks right in your head might look totally different on the ground. Marking allows you to visualize the actual footprint of your bed. Is it too big for the space? Too small for the plants you want? Does the shape flow nicely with your patio or walkway? It’s much easier to adjust marking paint or twine than it is to re-dig compacted soil. This planning is vital for Protecting Young Plants During Ottawa Winters, as you need to ensure they have adequate space and optimal conditions from the start.
  • Ottawa's Climate Clock is Ticking: Our growing season isn't endless! Wasting precious spring or summer days re-doing poorly placed beds means less time for planting, growing, and actually enjoying your yard. Marking helps you get it right the first time, maximizing your gardening window. Planning efficiently is key, much like doing a thorough Comprehensive Fall Cleanup and Ottawa Winter Prep prepares you for the seasons ahead. If time is tight, remember that professional help is available through options like our Vernon Yard Cleanup Service.
  • Frost Heave Havoc & Soil Shenanigans: From the heavier clay sometimes found in parts of Ottawa to the sandier loams you might find near Manotick, our soils behave differently. Add in our notorious freeze-thaw cycles (hello, frost heave!), and poorly defined edges can shift and disappear over winter. A clearly marked and properly dug edge provides a more stable foundation. Thinking about soil and location is also part of Developing a Plant Health Care Plan for Summer Stress, ensuring plants are in spots where they can thrive. Don't forget proper soil preparation!
  • Work Smarter, Not Harder: Redoing work is frustrating and physically demanding. Marking beds properly means less digging, less moving soil around unnecessarily, and ultimately, less strain on your body. Anything that reduces unnecessary bending and lifting is a win, and it pairs well with advice on Using Ergonomic Garden Tools to Prevent Back Pain.

Think of marking as creating the blueprint for your beautiful new landscape feature. It’s a small investment of time upfront that pays huge dividends in the look, safety, and longevity of your project. Ready to plan but need a hand with the execution?

Your Landscape Layout Arsenal: Tools for Marking Beds

Okay, so we've established that just grabbing a shovel and hoping for the best isn't the path to landscaping glory. You need a plan, and that plan needs to be visible *on the ground* before any digging commences. Think of it like assembling flat-pack furniture – you wouldn't skip the instructions (well, *most* of us wouldn't), and you definitely shouldn't skip marking your beds! Let's dive into the toolbox and see what gear you can use to draw your masterpiece right onto your lawn or soil. Getting this step right makes all the difference between "Wow!" and "Whoops!"

An overhead flat lay composition showcasing various tools used for marking garden beds, arranged neatly on a patch of healthy green grass. Include: an upside-down can of vibrant orange or white landscape marking paint, a coiled section of a standard green garden hose, a ball of natural twine next to three small wooden garden stakes, and a small, distinct pile of white flour. Natural, even lighting.
Tools of the trade: marking paint, hose, twine, stakes, and flour.

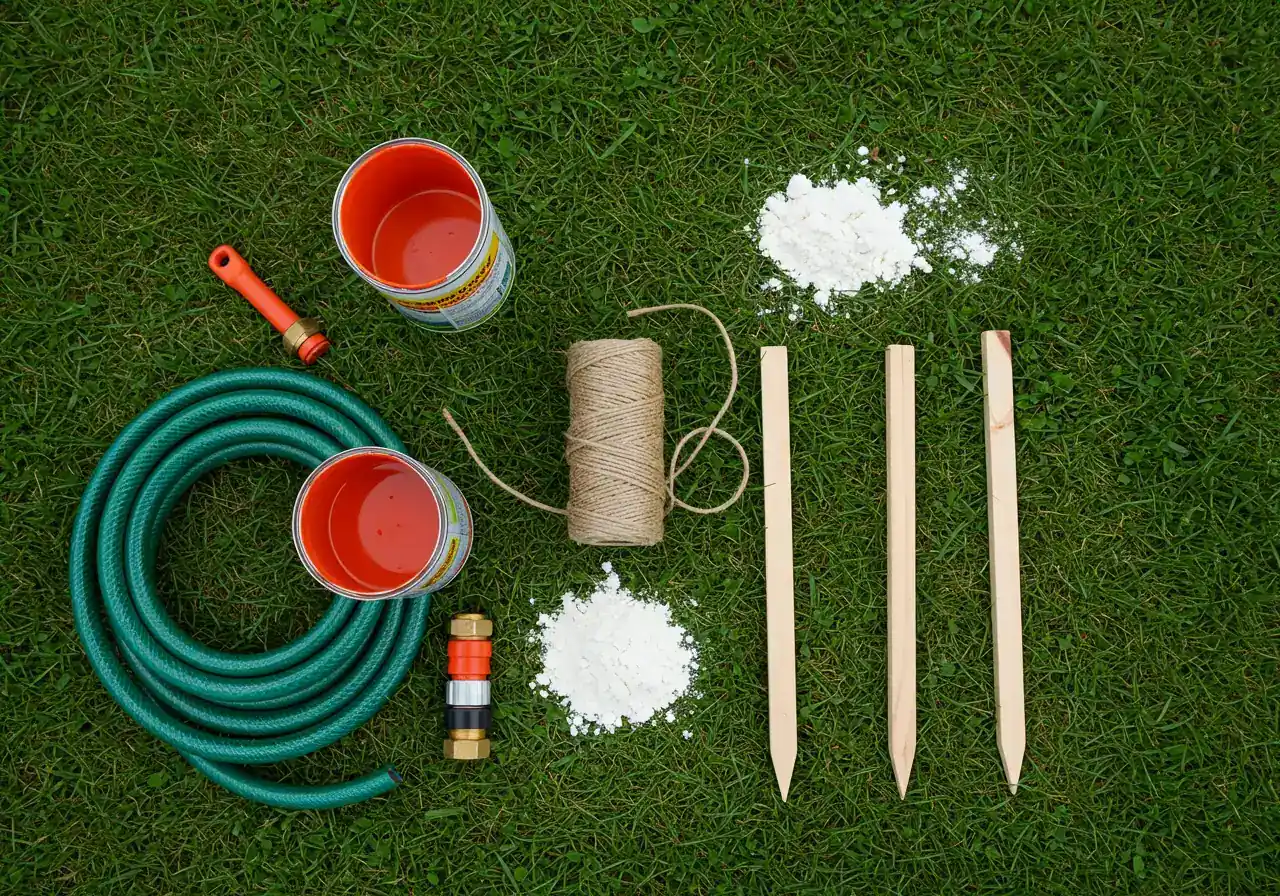
Choosing the right marking tool depends on your project's complexity, the desired shape (curves vs. straight lines), the surface you're marking on, and maybe even how windy it is that day in Ottawa! Here are the main players in your landscape layout arsenal:

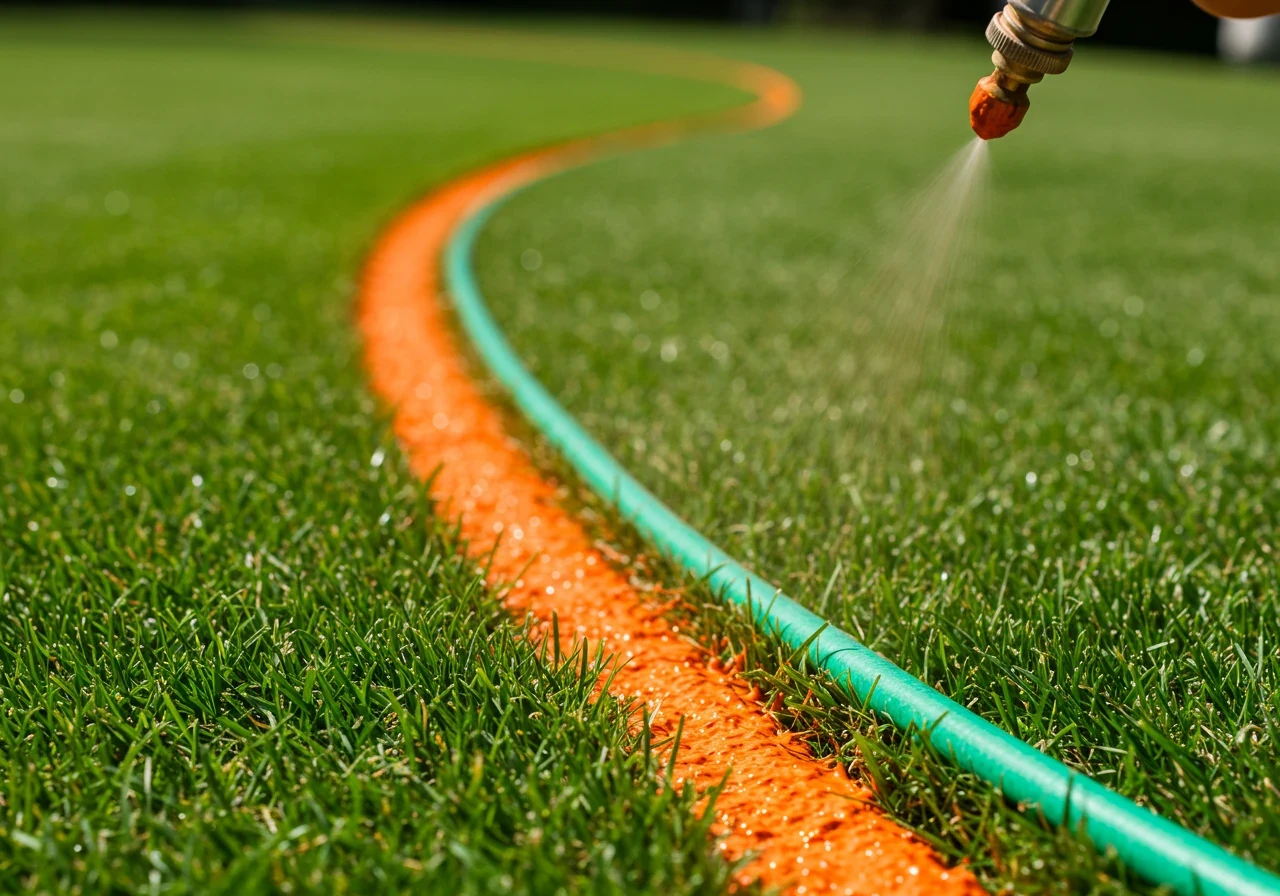
  • Landscaping Marking Paint: This isn't your typical spray paint. It usually comes in a can designed to be sprayed upside down, often fitting into a special wand applicator for easier walking and marking.
    • Pros: Highly visible (bright colours like white, orange, or pink really pop on grass or soil), lasts through light rain and dew, makes creating both curves and straight lines relatively easy, and gives a very clear edge to follow when digging.
    • Cons: Less eco-friendly than other options, can be tricky to remove completely if you change your mind mid-design (it eventually fades or gets mowed off), and represents an ongoing cost if you do a lot of landscaping. Mistakes are semi-permanent for a bit!
  • Flour or Powdered Chalk: Believe it or not, your kitchen pantry or the hardware store's chalk line refill section can supply your marking material. Plain white flour works surprisingly well.
    • Pros: Super inexpensive (or free if you borrow from the baking supplies!), completely non-toxic and biodegradable, and incredibly easy to adjust or "erase" – just scuff it away with your boot or a broom. Perfect for fiddling with shapes until they look *just* right.
    • Cons: Its biggest pro is also a con – it blows away easily in the wind and washes away *instantly* in rain or even heavy dew. Not ideal for marking days before you plan to dig, especially with Ottawa's sometimes unpredictable weather shifts. Visibility can be low on very light, dry soil.
  • The Humble Garden Hose: Sometimes the simplest tools are the best! Laying out your garden hose can give you a great visual.
    • Pros: Excellent for quickly laying out smooth, natural-looking curves. Very easy to reposition and adjust until the flow looks perfect. Most homeowners already have one, so no extra cost.
    • Cons: Not suitable for creating sharp angles or perfectly straight lines. Can be a bit stiff and difficult to manipulate into tight curves, especially on cooler days. You need to mark the line with something else (like paint or flags) before removing the hose to actually start digging.
  • String Line and Stakes/Flags: This is the classic, go-to method for achieving laser-straight edges. You’ll need twine or mason's line and several small stakes or landscape flags.
    • Pros: The undisputed champion for perfectly straight lines. Can be pulled taut between stakes for absolute accuracy. Stakes or flags clearly mark endpoints and corners. Reusable materials.
    • Cons: Setting up curves is tedious, requiring many stakes placed close together to approximate the curve. The string itself can sometimes be hard to see from a distance, depending on its colour and the background. Takes more time to set up than simply spraying paint or laying down a hose.

Landscaping Marking Paint

Best For: High visibility, durability through light weather, clear lines for both curves and straights.

Downside: Environmental impact, cost, semi-permanent mistakes.

Flour / Powdered Chalk

Best For: Eco-friendliness, low cost, easy adjustments, testing shapes.

Downside: Not durable (wind/rain sensitive), potentially low visibility.

Garden Hose

Best For: Quickly visualizing and adjusting smooth curves, zero cost if owned.

Downside: Not for straight lines/angles, temporary (must be replaced with another mark before digging).

String & Stakes

Best For: Achieving perfect straight lines, reusable.

Downside: Tedious for curves, setup time, potentially low visibility of the string itself.

Don't Forget the Sidekicks!
Regardless of your main marking method, always have a reliable measuring tape on hand. This is crucial for ensuring symmetrical shapes, correct distances from structures, and consistent bed widths. Small landscape flags (those little wires with colourful plastic flags) are also incredibly handy, even if you're using paint or a hose. Use them to mark the ends of lines, key points on a curve, or obstacles to avoid.

Local Considerations & Getting Ready:
Here in the Ottawa region, from bustling Barrhaven to the more spacious properties in areas like Metcalfe, think about your specific site. Dense, green grass often benefits from bright marking paint for maximum visibility. If you're working on bare soil, perhaps after a major yard overhaul involving our Metcalf Property Cleanup Service, flour might provide enough contrast for quick sketches. Making eco-friendly choices is important to many homeowners, making flour or reusable string lines appealing options. Remember, deciding on your marking method is an early step in your overall Material Selection process for the project.

Getting these lines accurately marked directly impacts everything that follows – the ease of digging, the final look, and even how simple ongoing Lawn Care will be around the new edges. If your planned bed edges creep near sidewalks or public spaces, ensure you're respecting property lines; sometimes starting with a professional City Property Cleanup Service helps clarify boundaries and provides a clean workspace. A well-marked layout is the foundation for a successful landscaping project, whether you tackle the subsequent work yourself or opt for the comprehensive assistance of an Ottawa Property Cleanup Service for the bigger tasks. And hey, if laying out those lines makes you realize the initial site prep is more than you bargained for, remember that getting a clean slate to work on is easy with support like our Marionville Yard Cleanup Service or City Yard Cleanup Service.

Now, choose your weapon, channel your inner landscape artist, and get those beautiful bed lines marked out!

From Sketch to Soil: A Step-by-Step Guide to Marking Your Beds

A close-up, ground-level action shot focusing on a bright orange line of landscape marking paint being sprayed from an unseen can onto green grass. The paint line precisely follows the gentle curve of a standard garden hose laid out on the lawn as a guide. Focus is sharp on the freshly sprayed paint and grass blades, suggesting the marking process in action.
Use a guide like a hose for smooth curves when marking with paint.

Alright, you’ve dodged the temptation of just winging it, and you’ve got your marking tools ready. Excellent choice! Now, let's translate that brilliant landscaping idea in your head (or on your napkin sketch) onto the actual ground. Think of yourself as a lawn artist for a bit – precision now means less perspiration later. Here’s how to mark out those beds like a pro, step-by-step:

  • Step 1: Clear the Decks

    Rake away leaves, sticks, and debris. A clean canvas is key for accurate marking. Consider a professional cleanup like our Metcalf Yard Cleanup Service if needed.

  • Step 2: Gather Gear & Plan

    Round up your marking tools (paint, flour, hose, string/stakes) and measuring tape. Keep your plan handy.

  • Step 3: Draft Outline Loosely

    Use a hose or flour to sketch the general shape. Adjust placement and curves until the basic form looks right.

  • Step 4: Measure Twice, Mark Once

    Use your measuring tape! Check distances, widths, and overall scale. View from different angles.

  • Step 5: Make Your Final Mark

    Create a clear line with paint, following your guide. For straight lines, use taut string between stakes.

  • Step 6: Take Five (Walk-Away Test)

    Step back, view from windows, maybe even leave it overnight. Fresh eyes spot issues. Adjust as needed, respecting our Terms and Conditions regarding project scope.

  • Step 7: Final Check & *CALL!*

    Confirm lines. Crucially: Contact Ontario One Call (1-800-400-2255 or OntarioOneCall.ca) BEFORE you dig! Wait for utility locates. Need help after a big cleanup? See our Ottawa Yard Cleanup Service.

Phew! You’ve successfully navigated from sketch to soil (well, to clearly marked soil!). Taking the time to mark your beds accurately sets the stage for easier digging, a landscape design you’ll be proud of, and ultimately, simpler ongoing Garden Maintenance. Now, you’re *really* ready for that shovel!

Smarter Beds by Design: Layout Tips for Ottawa Landscapes

Okay, you've meticulously marked out your garden bed lines – bravo! But before you grab that shovel with gusto, let's talk *design*. Just like choosing the right paint colour for a room, the *shape and placement* of your garden beds can dramatically change the whole feel of your Ottawa landscape. Getting this right means creating a space that not only looks fantastic but also functions beautifully and respects our local environment. Let's design some smarter beds!

A visually appealing shot of a well-designed landscape feature. A garden bed edge with a graceful, sweeping curve integrates smoothly with the corner of a natural stone patio or walkway. The bed is neatly filled with dark wood mulch. The clean, defined edge between the lawn, the bed, and the hardscaping is emphasized. Soft, natural lighting, perhaps early morning or late afternoon.
Well-designed beds flow naturally with existing hardscaping and pathways.

Finding Your Flow:

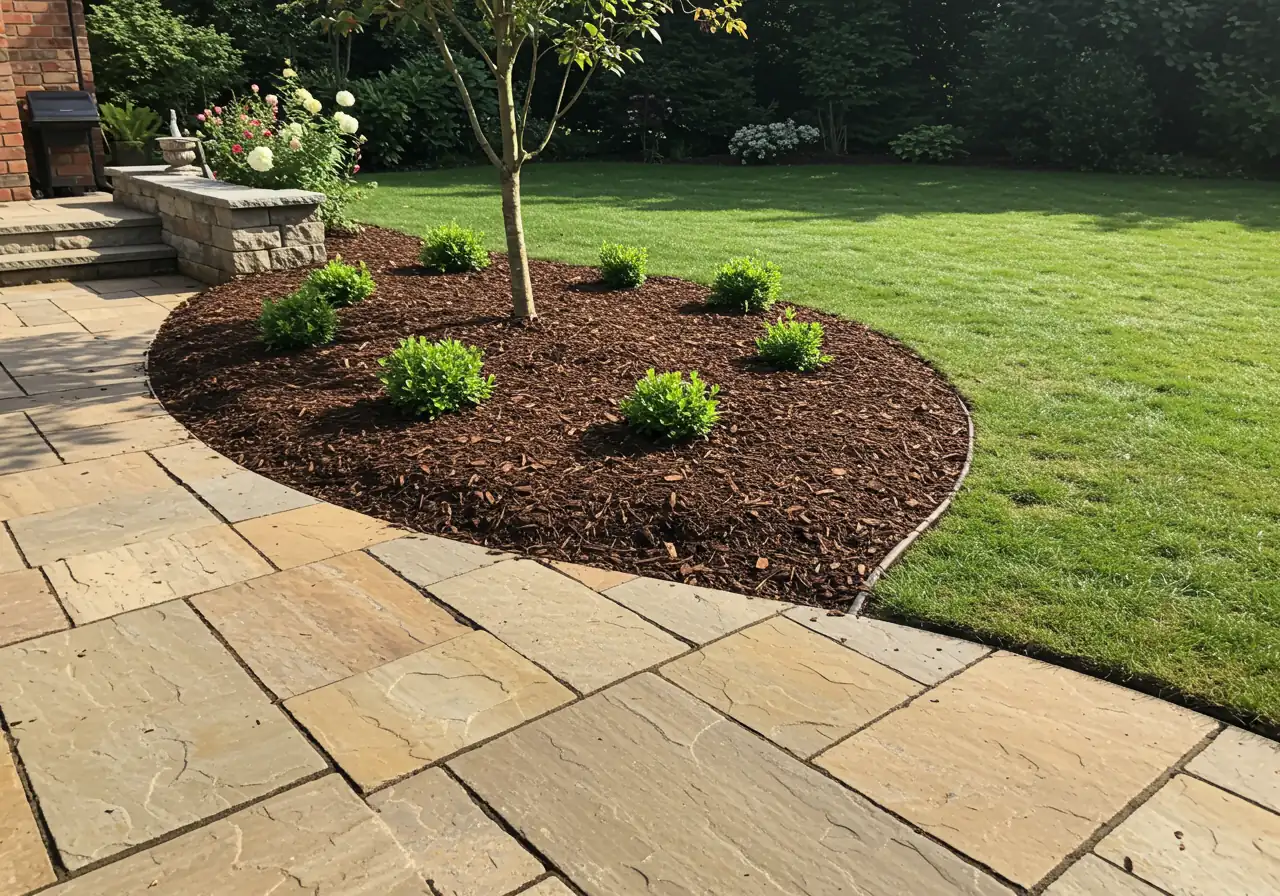
Think about how you move through your yard. Good landscape design uses beds to guide the eye and foot traffic naturally. Gentle curves often feel more relaxed and inviting than sharp angles, leading visitors along a path or towards a focal point like a bench or bird bath. Straight-edged beds can look formal and neat, perfect for defining walkways or framing a patio. The key is *flow* – make sure the bed shapes relate logically to other elements like your deck, driveway, or even that big maple tree. Avoid plopping down random shapes; think connection!

Scale: Size Matters (Especially Out Towards Kars!)

A tiny, intricate bed might look lost on a large property like some you'll find in Kars or Greely, while a massive bed could overwhelm a smaller Barrhaven backyard. Consider the scale of your house and the overall size of your lot. A good rule of thumb? Beds should look proportional. Stand back and visualize – does the size feel balanced? This sense of balance is something we always consider; you can learn more about our approach on our About Us page. If you're unsure about scale after marking, maybe snap a photo – it often helps!

Planning for Plants *Before* You Dig:

It sounds obvious, but think about what you actually want to *plant* in this new bed. Are you dreaming of towering sunflowers or delicate groundcover? Knowing the mature size and spread of your chosen plants *before* you finalize the bed edge is crucial. A bed needs to be wide enough to accommodate root growth and allow plants to reach their full potential without spilling onto the lawn or path immediately. Sketching out rough plant placements within your marked bed can prevent overcrowding later, ensuring successful garden installs.

Harmony with Hardscaping:

Your garden beds shouldn't look like afterthoughts tacked onto your patio or walkway. Integrate them! Allow bed lines to curve gracefully around patio corners or run parallel to walkways for a cohesive look. Use similar materials for edging (if any) that complement your hardscape colours and textures. This integration makes the whole landscape feel planned and unified, avoiding the need for extensive property clean up adjustments later.

Eco-Smart Ottawa Bed Design:

Living in Ottawa means designing with our climate and environment in mind. Here’s how to make your beds greener:

  • Seasonal Smarts: Plan major bed creation for spring or fall. Trying to establish new beds and plants during Ottawa's hot, sometimes dry summers puts unnecessary stress on them (and you!). Thinking seasonally extends to cleanup too; prepping beds after a thorough service like a Marionville Yard Cleanup Service sets you up for success.
  • Water-Wise Shapes: Consider incorporating rain garden principles in lower-lying areas, designing beds to capture runoff from roofs or driveways. Look into resources from the City of Ottawa Water resources page. Even slightly bermed (raised) edges on beds can help retain moisture where plants need it most, reducing the need for constant watering.
  • Go Native!: Prioritize native Ontario plants. They're adapted to our soil, rainfall patterns, and temperature swings (hello, winter!). This means less fuss, less water, and more support for local pollinators. Echinacea (Coneflower), Rudbeckia (Black-eyed Susan), and various native grasses are fantastic choices. Check resources like the CBC Ontario Today segment on native plants for ideas.
  • Shrink the Lawn: Strategically placed garden beds are one of the *best* ways to reduce your lawn footprint. Less lawn means less mowing, less fertilizing, and often less watering. Win-win-win! Replacing turf with diverse plantings is a key principle in sustainable landscaping and can be part of a plan for new sod installation in other areas.

Thinking about these design elements *before* the digging work begins transforms a simple garden bed into a smart, beautiful, and functional part of your Ottawa landscape. It ensures your vision aligns with practicality and local conditions. Have a design idea you'd love professional feedback on? We welcome input on our quotes and plans via our Estimate Feedback form. If you need help bringing these smarter bed designs to life, don't hesitate to Contact Us to discuss your project. Tackling a large-scale bed installation after clearing space, perhaps with help like a Marionville Property Cleanup Service or Metcalf Property Cleanup Service, can truly transform your property. We sincerely appreciate you considering these tips for a more beautiful and sustainable yard – a virtual Thank You for reading!

Pro Tips for Picture-Perfect Bed Edges

Want those new landscape bed edges looking *chef's kiss* perfect? Before that shovel hits the dirt, take a quick pause to refine your layout with these pro pointers. Trust us, future you will appreciate it!

  • Peek from the Windows: Seriously, go inside and look out! How does your marked line flow from your main viewing points, like the kitchen or living room window? Adjust those curves until the view feels just right. You don't want your hard work looking wonky from your favourite armchair.
  • Think Like Your Mower: Will your lawn mower easily follow those curves, or are you setting yourself up for weekly wrestling matches with the line trimmer? Gentle, sweeping curves are your friend for easier lawn maintenance around the beds. Keeping things tidy is simpler when the design works *with* you, not against you – a principle we apply even in our thorough Ottawa Garden Clean Up Service.
  • Give 'Em Room to Grow: Remember those cute little plants will get bigger! Double-check that your bed depth allows enough space for mature plant sizes without them immediately flopping onto the lawn or path. Proper spacing prevents overcrowding and ensures the success of any Garden Install.
  • Pathway Partners: Make sure your bed edges guide foot traffic smoothly and don't create awkward narrow spots next to walkways or patios. Good flow makes your yard feel more inviting and accessible.
  • Local Ottawa Vibe (Embrun/Russell Style!): Consider your surroundings. In Ottawa areas with larger lots, like parts of Embrun or Russell, broad, sweeping bed lines often look more natural and proportional than tiny, intricate curves. See what looks good in nearby yards – maybe someone recently benefited from a Metcalf Garden Clean Up Service or even a Marionville Garden Clean Up Service and their edges look great. A little extra planning now deserves a big Thank You later! Considering the final look can inspire amazing transformations.

Estimated Time Saved by Proper Marking (vs. Redoing Work)

~1 hr Small Bed (5'x10')
~2.5 hrs Medium Bed (10'x20')
~4+ hrs Large/Complex Bed

*Illustrative estimate of time saved by avoiding major reshaping/redigging.

FAQ: Marking and Digging Beds in the Ottawa Region

Ideally, aim for spring after the ground has thawed but before the summer heat hits, or in the fall when temperatures cool down again. Digging is much easier when the soil is moist but not soggy. Trying to wrestle with hard, dry clay in July is nobody's idea of fun, and new plants get stressed! Getting the heavy lifting done early is often part of a thorough city garden clean-up service to prep for planting season.

You don't necessarily need to dig down to China! Focus on loosening the top 6-8 inches thoroughly. The real key with our clay is *improving* it, not just digging deep. Mix in plenty of compost or other organic matter to break up the dense structure and improve drainage. Healthy soil is the foundation for happy plants! Proper soil preparation is key.

Great question! You can rent a sod cutter for larger areas, or manually remove the sod with a spade (good workout!). For a no-dig, eco-friendly approach, try sheet mulching: layer cardboard over the grass (overlapping edges), wet it down, and top with compost and mulch. It takes longer, but smothers the grass naturally. Good prep now makes future tasks like applying proper mulching and edging techniques much easier.

Absolutely! Try to design and dig your beds *across* the slope rather than straight up and down. This creates mini-terraces that help hold soil and water. You can slightly build up the lower edge with soil or use stones or landscape edging for extra support. Good mulch cover is also essential to prevent erosion. Handling slopes effectively can lead to some truly inspiring landscape transformations.

Generally, no city permits are needed in Ottawa for basic garden beds unless you're doing major retaining walls or structures. However, calling Ontario One Call (1-800-400-2255 or visit OntarioOneCall.ca) before *any* digging is **mandatory** and free! They mark underground utilities (gas, hydro, etc.) to prevent dangerous accidents. Always wait for the markings and dig safely away from them. Sometimes, having a professional city yard cleanup service clear the area first makes seeing these locate marks easier. When you contact services like ours, rest assured we protect your details; you can see how we handle your information in our Privacy Policy.

Conclusion: Mark Well, Dig Once, and Enjoy Your Beautiful Ottawa Landscape!

So, there you have it! The not-so-secret-anymore weapon to achieving those dreamy garden beds without the usual "whoops, did I mean to dig *there*?" moment is crystal clear: Mark Well, Dig Once. Taking that extra time upfront to map out your landscape vision saves you headaches, backaches, and ensures your beautiful Ottawa yard – whether you're tending roses in Vernon or planning a pathway in Nepean – looks thoughtfully designed, not accidentally assembled. Think of it as your insurance against wobbly borders!

You've totally got this! Now go forth and create that stunning space you've been envisioning.

But hey, if wrangling marking tools, battling that infamous Ottawa clay, or simply wanting the whole landscaping project handled beautifully feels like the better plan, we're just a call or click away!

  • Ready for professional help? Contact Clean Yards today for expert Bed Creation, precise Edging, beautiful Garden Installation, and thorough Yard Cleanup services right here in Vernon, Ottawa, and nearby communities like Metcalfe and Marionville.
  • Let's stay connected! Follow us on social media [Note: Add actual links/handles if available] for year-round inspiration and local gardening tips.

Mark well, dig smart, and get ready to enjoy your gorgeous landscape!

(function() { // --- Progress Bar --- const progressBar = document.getElementById('progress-bar'); function updateProgressBar() { const scrollTotal = document.documentElement.scrollHeight - document.documentElement.clientHeight; const scrolled = window.scrollY; const progress = (scrolled / scrollTotal) * 100; progressBar.style.width = progress + '%'; } window.addEventListener('scroll', updateProgressBar); window.addEventListener('resize', updateProgressBar); // Recalculate on resize updateProgressBar(); // Initial calculation// --- Back to Top Button --- const backToTopButton = document.getElementById('back-to-top'); function toggleBackToTopButton() { if (window.scrollY > 300) { backToTopButton.classList.add('visible'); } else { backToTopButton.classList.remove('visible'); } } backToTopButton.addEventListener('click', () => { window.scrollTo({ top: 0, behavior: 'smooth' }); }); window.addEventListener('scroll', toggleBackToTopButton); toggleBackToTopButton(); // Initial check// --- Collapsible Sections (FAQ) --- const collapsibleTriggers = document.querySelectorAll('.collapsible-trigger'); collapsibleTriggers.forEach(trigger => { trigger.addEventListener('click', function() { this.classList.toggle('active'); const content = this.nextElementSibling; if (content.style.maxHeight && content.style.maxHeight !== '0px') { // Close content.style.maxHeight = '0px'; content.classList.remove('open'); // Remove padding slightly before animation finishes setTimeout(() => { if (!this.classList.contains('active')) { // Check if still closed content.style.paddingTop = '0'; content.style.paddingBottom = '0'; } }, 350); } else { // Open content.classList.add('open'); content.style.paddingTop = '15px'; // Match CSS padding content.style.paddingBottom = '15px'; // Match CSS padding content.style.maxHeight = content.scrollHeight + "px";} }); // Ensure initial state matches CSS (no padding for closed items) const initialContent = trigger.nextElementSibling; if (!trigger.classList.contains('active')) { initialContent.style.paddingTop = '0'; initialContent.style.paddingBottom = '0'; } });// --- Tab Interface --- const tabContainer = document.querySelector('.tab-container'); if (tabContainer) { const tabButtons = tabContainer.querySelectorAll('.tab-button'); const tabContents = tabContainer.querySelectorAll('.tab-content');tabButtons.forEach(button => { button.addEventListener('click', () => { const targetTabId = button.getAttribute('data-tab');// Deactivate all buttons and content tabButtons.forEach(btn => btn.classList.remove('active')); tabContents.forEach(content => content.classList.remove('active'));// Activate clicked button and corresponding content button.classList.add('active'); const targetContent = document.getElementById(targetTabId); if (targetContent) { targetContent.classList.add('active'); } }); }); }// --- Bar Chart Animation --- const chartContainer = document.getElementById('time-saved-chart'); if (chartContainer) { const bars = chartContainer.querySelectorAll('.bar');const observerOptions = { root: null, // viewport rootMargin: '0px', threshold: 0.5 // Trigger when 50% of the element is visible };const observerCallback = (entries, observer) => { entries.forEach(entry => { if (entry.isIntersecting) { chartContainer.classList.add('in-view'); // Add class for value visibility bars.forEach((bar, index) => { const value = bar.getAttribute('data-value'); // Optional: Add stagger effect // setTimeout(() => { bar.style.height = value + '%'; // }, index * 100); // 100ms delay between bars }); observer.unobserve(entry.target); // Stop observing once animated } }); };const chartObserver = new IntersectionObserver(observerCallback, observerOptions); chartObserver.observe(chartContainer); }// Ensure all initial states are correct on load document.addEventListener('DOMContentLoaded', () => { updateProgressBar(); toggleBackToTopButton(); // Recalculate maxHeight for any potentially open collapsibles on load/resize const activeTriggers = document.querySelectorAll('.collapsible-trigger.active'); activeTriggers.forEach(trigger => { const content = trigger.nextElementSibling; content.style.maxHeight = content.scrollHeight + "px"; }); });})(); // IIFE closing
Share This Article
Facebook
X
Pinterest
Email
Print

Thank you for sharing!

Contact Us Today

To request a quote, kindly fill out the form below.

Where Can we Reach you?
Which Service Do You Require? (Click all that apply)
Provide a Breif Description of The Work You'd Like Done

Before You Go

We’re confident in our services, we offer a 30-day money-back guarantee. Not 100% satisfied? We’ll swiftly refund all labor costs. Your satisfaction is our top priority!

Get in touch today for expert service and satisfaction guaranteed. You won't regret it!

Where Can we Reach you?
Which Service Do You Require? (Click all that apply)
Provide a Breif Description of The Work You'd Like Done
Where Can we Reach you?
Which Service Do You Require? (Click all that apply)
Provide a Breif Description of The Work You'd Like Done
Where Can we Reach you?
Which Service Do You Require? (Click all that apply)
Provide a Breif Description of The Work You'd Like Done