
Revitalize Greely Irises: Fall Division for More Blooms
- **Best Time:** Late August to late September (4-6 weeks before ground freeze).
- **Why Divide:** To rejuvenate crowded clumps, improve blooming, and prevent central die-out.
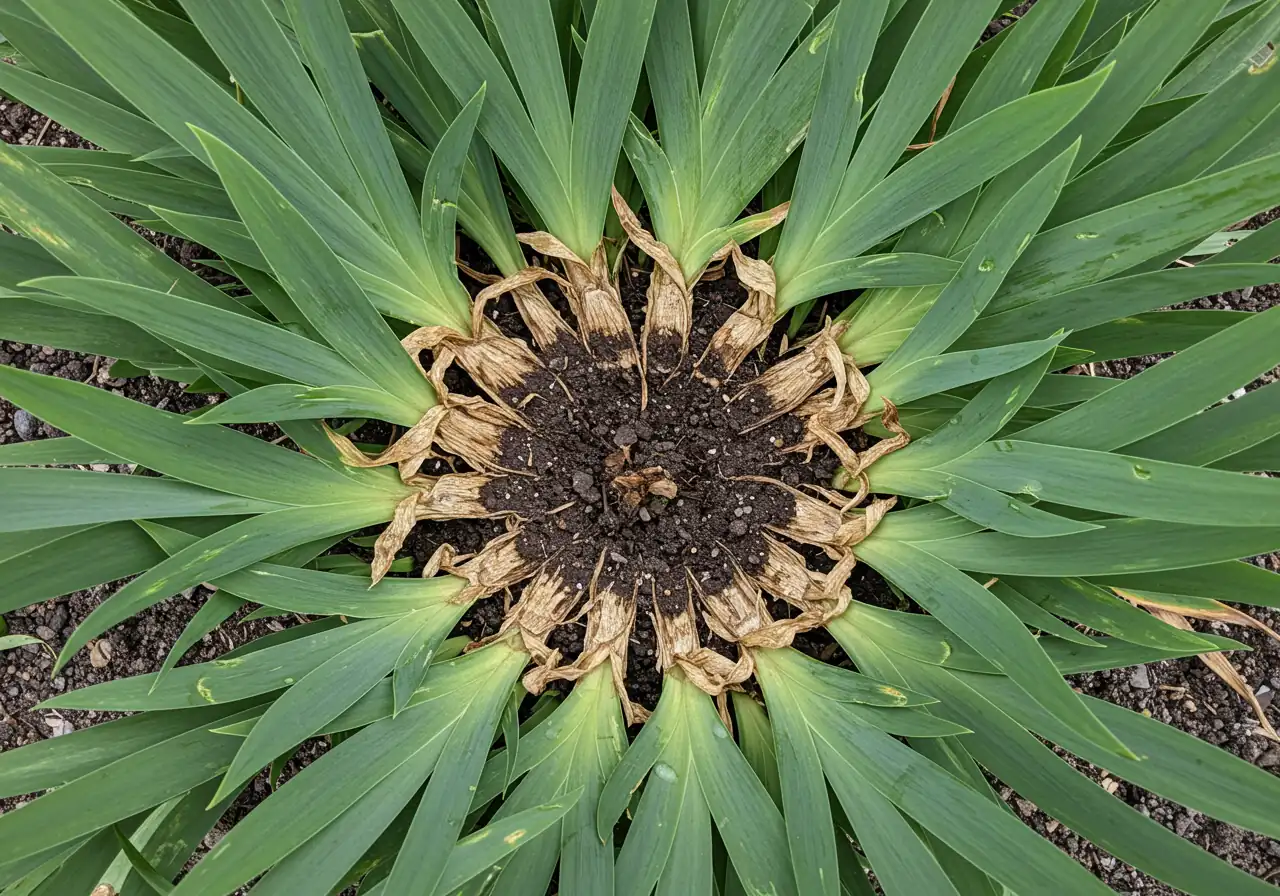
- **Key Sign:** Fewer/smaller blooms, "doughnut" effect (dead center).
- **Crucial Tip:** Plant rhizomes shallowly – top just below or at soil level.
- **Aftercare:** Water well, no fall fertilizer, mulch lightly *after* ground freezes.
Ready to rejuvenate your irises but need a hand? Get professional help tailored to your garden needs.
Request Your Free Estimate TodayIntroduction: Greely's Garden Gems - Giving Your Irises New Life
Hello, fellow Greely garden enthusiasts! Who doesn't love the spectacular show irises put on? Those elegant blooms are true gems in our landscapes, adding bursts of colour and structure. But maybe you've noticed your favourite iris patch isn't quite bursting with vigour like it used to? Perhaps the clumps look dense, a bit tired, almost like a garden party that's gotten *too* crowded and no one can get to the snacks?
Often, the culprit isn't neglect, but simply that your lovely irises need more elbow room! It's a common situation for these reliable perennials as their rhizomes multiply over the years. Thankfully, the solution is straightforward garden care known as dividing. For us here in the Ottawa region, from Greely to nearby neighbourhoods like Manotick or Osgoode, fall (specifically late summer to early fall, usually August to early October) is the perfect season for this task.
Giving your irises this fresh start by dividing them rejuvenates the plants, prevents overcrowding issues that lead to fewer flowers, and sets the stage for abundant, breathtaking blooms next spring. Think of it as hitting the reset button for your plants! Let's explore how you can easily give your Greely garden gems this amazing new lease on life. For broader garden maintenance insights, you might find our guide on general garden maintenance useful.
Is Your Iris Patch Sending Out an SOS? Signs It's Time to Divide
Okay, let's talk about deciphering those iris distress signals! Even the toughest plants, like our beloved irises that brave the Ottawa winters, occasionally need a helping hand. They can’t exactly text you, but they *do* send out some clear signs when their underground living situation gets a bit too cramped. Think of it like a subtle SOS flare from your flower bed. If you spot these clues, it's likely time to grab your spade and give them some breathing room.
So, how do you know if your iris patch is practically begging for division? Here are the tell-tale signs:
- Fewer Flowers Than Usual: This is often the first and most noticeable sign. Remember those glorious blooms that stopped traffic? If year after year, the flower count seems to dwindle, overcrowding is the likely culprit. The older, central parts of the clump just run out of steam and nutrients. It’s a bit like how consistent Osgoode Fall Deadheading Techniques for Garden Plants help encourage future blooms by removing spent ones; dividing rejuvenates the entire plant structure for better flowering.
- The Infamous "Doughnut" Effect: Does your iris clump look suspiciously like a giant, leafy doughnut? You know, green and vigorous around the edges but sparse, weak, or even completely dead in the middle? That central area contains the oldest rhizomes, which have flowered their hearts out and are now exhausted. They can’t support new growth effectively, leaving you with that classic bare patch. It's nature's way of saying, "This middle bit is so last season!"
- Smaller Flower Size: Maybe you are still getting blooms, but they seem noticeably smaller or less impressive than in previous years. This is another sign that the rhizomes are competing too fiercely for water and nutrients in their crowded conditions.
- Weak or Stunted Growth: If the leaves look less vibrant, are shorter, or generally seem less vigorous compared to past performance or neighbouring plants, the clump is likely struggling due to overcrowding. Promoting plant strength is crucial, much like the focus of Kars Summer Plant Care Tips for Vitality.
- Congested, Exposed Rhizomes: Are the rhizomes (those thick, potato-like roots) literally pushing each other up and out of the soil? If they look tangled, crowded, and sit mostly on the soil surface, it’s a definite sign they need dividing. This congestion can also make them more susceptible to pests or diseases, similar to how dense, uncontrolled growth can harbor problems, making tasks like Nepean Invasive Groundcover Control Summer Tips so important elsewhere in the garden.
Observing these signs in your Nepean or Barrhaven garden means your irises are ready for division. It’s not just about aesthetics; it’s about plant health. Dividing rejuvenates the clump, improves air circulation, prevents the depletion of soil nutrients in one spot, and ultimately leads to more and better flowers next season. Think of it like pruning or shaping other plants – maintaining form and health is key, even if it’s not as intricate as following a Barrhaven Topiary Shaping Summer Guide.
If tackling iris division seems a bit overwhelming, or if your garden needs a more comprehensive tidy-up, remember that professional help is available. Check out our Landscaping and Gardening Services for ways we can assist. Keep an eye out for these SOS signals – your irises will thank you for the extra space with a spectacular show next spring!
The Ottawa Fall Shuffle: Pinpointing the Perfect Time to Divide Irises
Alright, let's talk timing! When it comes to dividing irises in Ottawa and surrounding areas like Barrhaven or Metcalfe, timing isn't everything, but it's pretty darn important. Think of it like trying to beat the traffic on the 417 – get it right, and things go smoothly! Get it wrong, and well, you might face some grumpy plants (or drivers).
For our region, the sweet spot for the "iris shuffle" is generally from late August through September, occasionally stretching into early October. Why this specific window? It’s all about giving your newly divided irises the best chance to settle in before winter throws its icy blanket over us.
Mid-Summer
Irises finish blooming. Plant focuses energy away from flowers.
Late Aug - Sept (Ideal Window)
Soil is warm (root growth), air cools (less stress). Divide now!
Early October
Still possible in mild years, but pushing the deadline. Aim to be done by now.
Mid/Late October
First hard ground frost typically arrives. Roots need 4-6 weeks *before* this.
Late Oct / November
Ground freezing. Time for light winter mulch application.
Here’s the scoop:
- Post-Bloom Recovery: Irises generally finish blooming by mid-summer. Dividing them in late summer/early fall allows the plant to recover from flowering and focus its energy on root and leaf development before winter dormancy.
- Warm Soil, Cool Air: During this period, the soil is still warm enough from the summer sun to encourage new root growth. However, the air temperatures are starting to cool down, which is less stressful for the plants (and frankly, more comfortable for us gardeners!). Local resources like the Master Gardeners of Ottawa-Carleton often share seasonal advice.
- Beating the Frost: This is the crucial part for Ottawa gardeners! You want to get those divisions done at least 4 to 6 weeks before the first hard ground-freezing frost typically hits our area (usually mid-to-late October, but Mother Nature likes to keep us guessing!). This gives the new divisions enough time to anchor themselves with new roots, making them much less likely to heave out of the ground during winter's freeze-thaw cycles. Dividing too late is a gamble you don’t want to take.
- Setting Up Spring Success: Giving them this fall window to establish means they'll be ready to leap into action come springtime, rewarding you with those gorgeous blooms we all love.
Dividing irises is a key part of fall garden preparation. It often coincides with other tasks, making it a busy but rewarding season. If your garden feels like it needs more than just iris dividing, perhaps a full refresh, consider looking into professional Ottawa Garden Clean Up Service options. Getting the timing right for dividing is just one piece of the puzzle; managing the overall fall tidying is another. For those in nearby communities, specialized services like Embrun Yard Cleanup Service or even broader options such as Marionville Property Cleanup Service can handle the leaf raking, perennial trimming, and general prep work. Tackling these tasks ensures your whole property, not just the iris bed, is ready for winter. If the whole yard needs attention, a comprehensive Marionville Yard Cleanup Service might be just the ticket. Remember, a little planning and timely action in the fall leads to a healthier, happier garden next year. For a full overview of how professionals can help, check out all our Landscaping and Gardening Services.
So, keep an eye on the calendar and the weather forecast! Aim for that late summer/early fall window, and your irises will thank you for the timely intervention with a spectacular show next season. You can also check local resources like the Ottawa Horticultural Society for timely gardening tips.
Let us handle the heavy lifting! Our expert team can divide your irises and prepare your garden beds for winter.
Get Professional Help With Your Garden CareReady, Set, Divide! Gathering Your Tools and Prepping the Area
Okay, gardeners, let's get down to business! Before you leap into action like a superhero saving your irises from the clutches of overcrowding, let's make sure you have everything you need. Like any good mission, preparation is key. Rushing in without the right gear or a plan is a recipe for a tangled mess (and possibly a sore back!). So, let's gear up for Operation Iris Rescue!
Your Iris Division Toolkit:
First things first, assemble your trusty tools. Having these ready will make the whole process smoother and less frantic. You don't need anything too fancy, just the basics:
- Garden Fork (or Spading Fork): This is your primary lifter. Its tines are great for loosening the soil all around the iris clump and gently prying it up with minimal damage to those precious rhizomes. A sturdy fork is your best friend here.
- Sharp Spade or Shovel: While the fork does the lifting, a spade with a sharp edge is perfect for cutting around the clump initially if the soil is tough, and sometimes for helping lever it out. It can also slice through very dense clumps if needed, though a knife is often better for precision.
- Sharp Knife or Pruners: You'll need something sharp and clean to cut the rhizomes apart. An old serrated kitchen knife works surprisingly well, or a sturdy pair of bypass pruners. The key word here is sharp – clean cuts heal faster.
- Tarp or Wheelbarrow: Trust me on this one! Lifting a big iris clump is dirty work. Having a tarp or wheelbarrow nearby gives you a place to put the whole clump once it's out of the ground. This keeps your lawn cleaner and makes sorting the rhizomes much easier.
- Bucket: Handy for carrying the chosen divisions to their new homes or temporarily holding discarded bits.
- Gloves: Protect your hands! Iris sap can sometimes irritate skin, and digging is just tougher on bare hands.
- Watering Can or Hose: You'll need this for watering your newly planted divisions thoroughly.
Pro Tip on Tool Prep: Before you start slicing and dicing, clean your knife or pruners! Seriously, this is important. Wipe off any old dirt and then give the blades a quick dip or wipe-down with a 10% bleach solution (1 part bleach to 9 parts water) or rubbing alcohol. Let them air dry briefly. This simple step helps prevent spreading any potential plant diseases between cuts or from other garden areas. Think of it as giving your tools a little spa treatment before they perform surgery.
Prepping the Landing Zone:
Now, where are these new iris divisions going? And what about the spot they came from?
- Site Selection: Bearded irises love sun – at least 6 hours of direct sunlight per day is ideal for good blooming. Make sure the new location (and the old one, if you're replanting there) has good drainage. Irises hate having wet feet, especially during our Ottawa winters. Soggy soil leads to rot. If you're in an area like Metcalfe or Manotick known for heavier clay soil, good drainage is doubly important. Check the City of Ottawa's resources on waterwise gardening for drainage tips.
- Clearing the Area: Remove any weeds, grass, or other debris from the spot where you'll be digging and replanting. Give your irises a clean slate. If the whole garden bed needs a refresh while you're at it, tackling that now makes sense. For larger-scale clear-outs, especially if dealing with lots of debris, considering a service like a Metcalf Yard Cleanup Service can save you time and effort.
- Soil Amendment - The Ottawa Clay Challenge: Okay, let's talk dirt. Many of us in the Ottawa region battle clay soil. While it holds nutrients, it can be dense and drain poorly. Before replanting your iris divisions, improve the soil! Dig in some organic matter like compost, well-rotted manure, or leaf mould. This works wonders for improving drainage and aeration, making it easier for those new roots to establish. Aim to work it into the top 6-8 inches of soil. For more in-depth guidance tailored to our local conditions, check out these tips on Soil Preparation. Amending the soil before planting is one of the best things you can do for long-term plant health.
- Material Selection: Choosing quality compost or amendments is key. Find out more about Material Selection for garden projects.
- Eco-Friendly Disposal: What about the old, woody rhizome centres you discard? If they look healthy (no signs of rot or iris borer), you can chop them up and add them to your compost pile. If they look diseased or infested, it’s best to dispose of them in your municipal waste to avoid spreading problems. Need help with yard waste? Check our Property Clean Up services.
Taking these prep steps might seem like extra work, but they set the stage for success. A little effort now means healthier, happier irises later. If you're looking at the size of your iris patch and thinking it might be a bigger job than anticipated, or if you'd like professional help with dividing or soil amending, don't hesitate to Contact Us. We're happy to discuss your project, and rest assured, we handle your information responsibly as outlined in our Privacy Policy. You can even see what others thought of our process by checking out our Estimate Feedback.
Now that you're armed and ready, and the stage is set, let's move on to the main event: lifting and dividing those irises!
The Main Event: Your Step-by-Step Guide to Dividing Irises Like a Pro

Alright, team, gloves on! You’ve gathered your tools, prepped your site (maybe even brewed a fortifying cup of tea?), and now it’s time for the main event. Don't worry, dividing irises isn't complicated, it just requires a bit of muscle and knowing where to cut. Think of it as giving your plants a spa day, complete with exfoliation and a fresh start. Let's break it down:
Step 1: The Great Heave-Ho (Lifting the Clump)
- Grab your garden fork. Start digging about 6-8 inches around the perimeter of the iris clump, not right into the middle.
- Loosen the soil all the way around. Then, gently work the fork tines underneath the clump.
- Pry upwards carefully. You might need to work from a few different angles. Sometimes these clumps are surprisingly heavy and intertwined – it can feel a bit like wrestling a particularly stubborn, leafy octopus out of the ground! A spade can help lever it up if needed.
- Lift the entire clump out of the ground and place it on your tarp or in your wheelbarrow. Phew, the hardest part (physically) is done! Need help with heavy garden tasks? Our City Property Cleanup Service can assist.
Step 2: Shake, Rattle, and Inspect
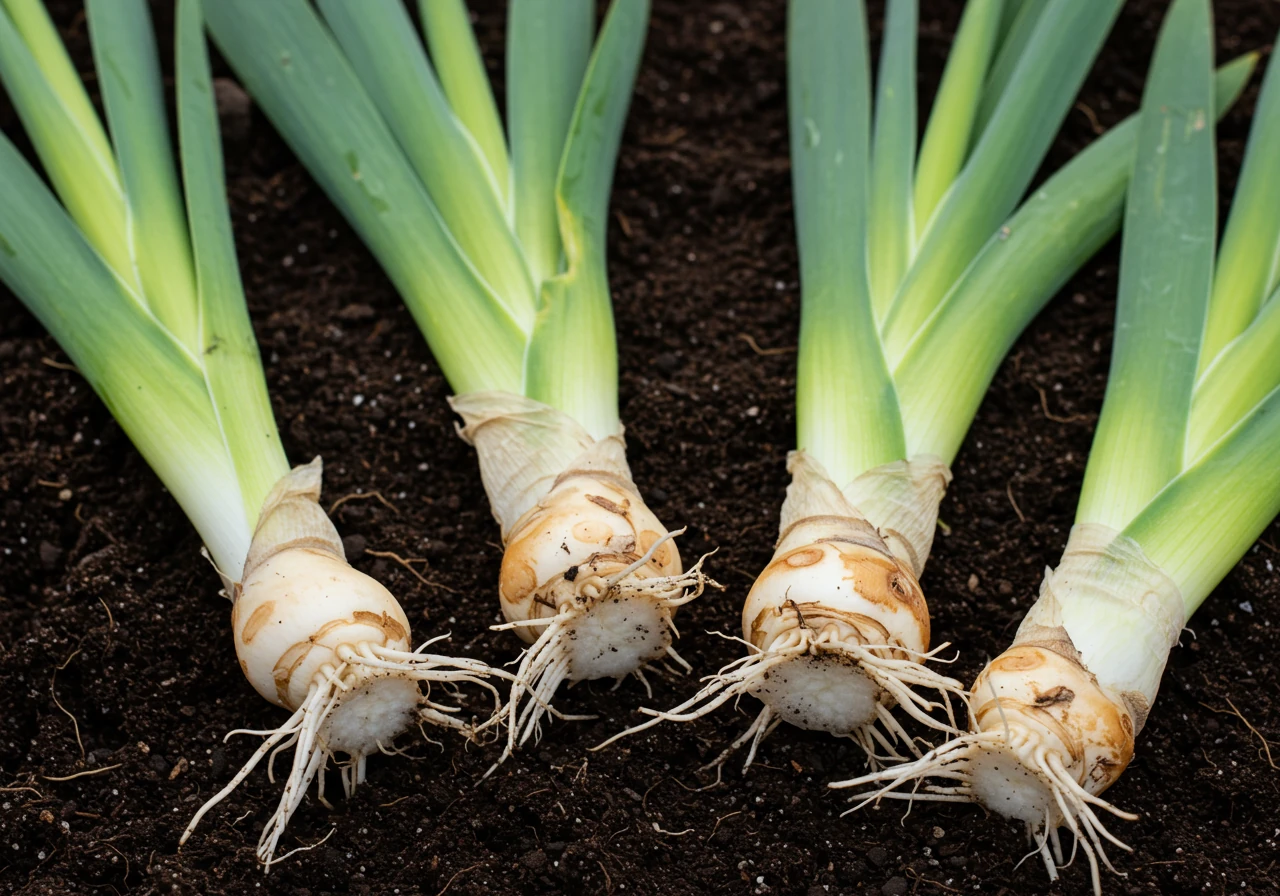
- Gently shake or knock off as much excess soil as you can from the rhizomes (those thick, potato-like roots). A little rinse with a hose can help if they’re really caked in mud, but don't blast them.
- Now, play detective. Look closely at the rhizomes. You're searching for two main culprits:
- Rot: Discard any rhizomes that feel soft, mushy, or look discoloured and rotten. These are goners.
- Iris Borers: These little pests are the bane of iris lovers! Look for small holes in the rhizomes or leaves, tunnels, or even the pinkish caterpillars themselves. Cut away and destroy any infested parts. Healthy rhizomes should feel firm and look creamy white or yellowish inside. Don't replant anything suspicious!
- Break off and discard the old, woody centre sections of the clump that likely have no leaves attached. These have flowered their last and won't be productive.
Step 3: Divide and Conquer
- Now, look for the natural division points. You'll see younger, healthier rhizomes branching off the older parts. Each healthy division should have at least one "fan" of leaves (preferably two) and a network of healthy roots attached to a firm piece of rhizome.
- Often, you can simply break the rhizomes apart with your hands at the joints.
- If they're too tough, use your clean, sharp knife or pruners to make clean cuts. Aim for divisions that are about the thickness of your thumb or slightly larger.
Step 4: The Haircut (Trimming the Foliage)
- Using your pruners or knife, trim the leaves back to about 4-6 inches long. Cut them into a fan shape, sort of mimicking the natural leaf shape but shorter.
- Why do this? It reduces water loss while the plant focuses on establishing new roots, and it makes the divisions less likely to be rocked by wind before they anchor in. Plus, it just looks tidier! Similar principles apply in topiary shaping where controlled cuts improve plant form and health.
Step 5: Prepare the New Digs
- Remember that lovely amended soil we talked about? Now's the time to use it! In the prepared planting spot, dig a shallow hole, maybe 4-5 inches deep – wide enough to accommodate the roots comfortably. For help creating new garden spaces, see our Garden Install services.
- In the centre of the hole, build up a small mound of soil.
Step 6: Planting Time! (The Critical Depth)
- Place the rhizome division on top of the mound, like it's riding a saddle.
- Carefully spread the roots down the sides of the mound.
- Backfill the hole with your amended soil, gently firming it around the roots.
- Crucial Ottawa Tip: Plant bearded irises SHALLOW! The top surface of the rhizome should be just visible or barely covered with about half an inch of soil. Burying them too deep, especially in our climate, invites rot. They need that sun on their backs!
Step 7: Give 'Em Some Space
- Plant your iris divisions about 12 to 18 inches apart. This seems like a lot now, but they'll fill in quickly!
- Point the leaf fans away from the centre of the grouping (if planting in a circle or group) or in the direction you want growth to head. This gives them room to expand outwards.
Step 8: Water Well
- Water your newly planted divisions thoroughly. This settles the soil around the roots and eliminates air pockets.
Step 9: Hold the Mulch! (For Now)
- This might sound counterintuitive for fall planting, but resist the urge to mulch right away. Mulching too early keeps the soil too moist around the shallowly planted rhizomes, increasing rot risk. Proper Mulching and Edging timing is key.
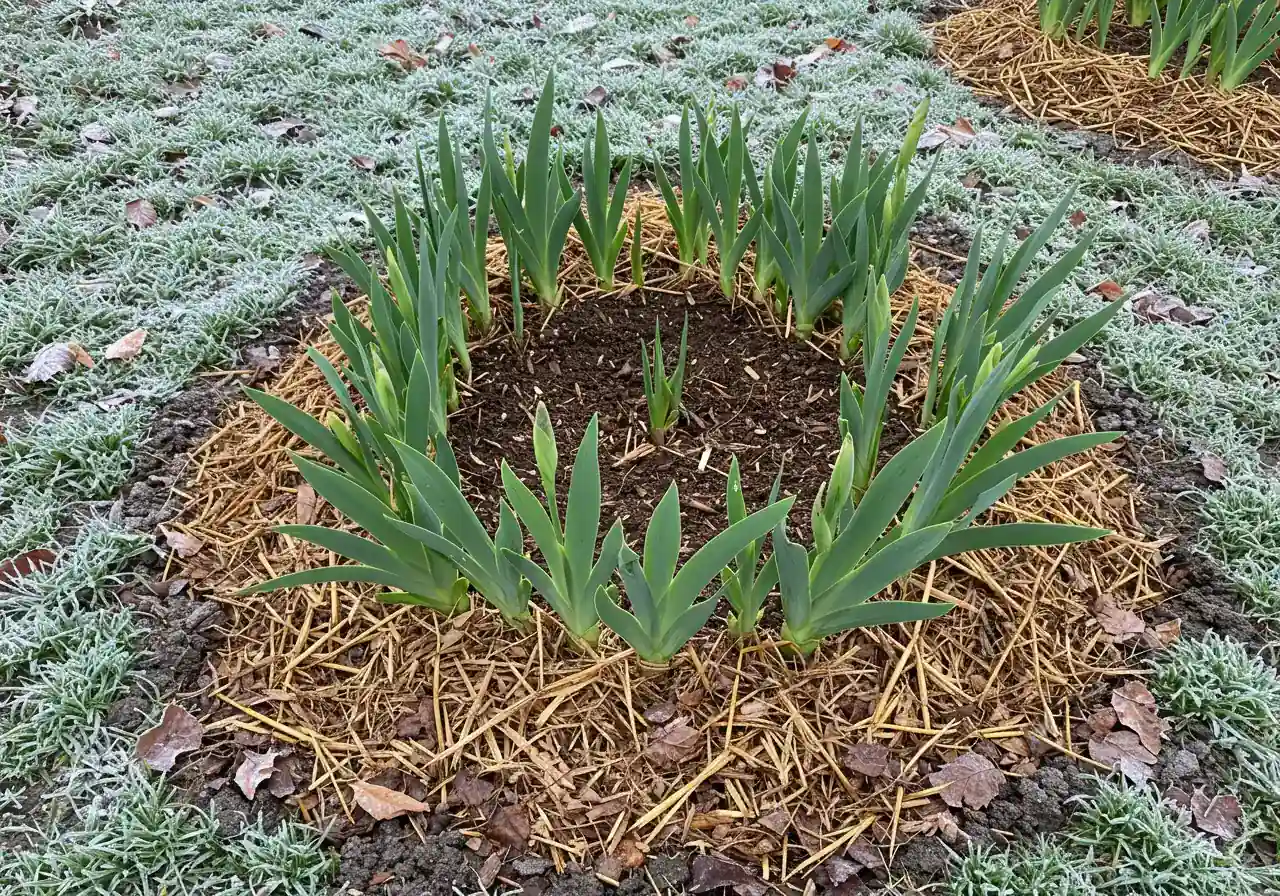
- Wait until *after* the ground has frozen lightly (usually late October or November in Ottawa). Then, apply a light layer (1-2 inches) of straw or shredded leaves. This winter mulch helps prevent the freeze-thaw cycles from heaving the new divisions out of the ground. Remove the mulch gently in early spring as growth starts.
And that’s it! You’ve successfully divided your irises like a seasoned pro. It might feel like a bit of work, but come next spring, when those gorgeous blooms erupt, you'll know it was worth every bit of effort. See examples of garden makeovers in our Transformations gallery!
Feeling proud of your handiwork but looking at the rest of the garden thinking it needs some attention too? If you're in the Metcalfe area and the dividing project was part of a larger garden overhaul, our Metcalf Garden Clean Up Service can help get everything else shipshape. Or perhaps you're inspired to create a whole new bed just for your expanding iris collection? We can help with professional Garden Install services. And for keeping those beauties looking their best year after year, consider ongoing help through a City Garden Maintenance Service. If the whole property needs a tidy, especially after digging and dividing, a Metcalf Property Cleanup Service might be just the ticket. Don't hesitate to Contact Us if you have questions or need a hand!
Post-Division Pampering: Ensuring Your Irises Thrive in the Ottawa Valley
Okay, you did it! The great iris divide is complete. Your back might be slightly protesting, but your iris rhizomes are settled into their new, roomier accommodations. High five! Now, let's talk about the crucial aftercare – the pampering phase – to ensure these garden troopers establish well and survive their first Ottawa Valley winter, ready to dazzle you next spring. Think of it as tucking them in and making sure they have everything they need before the big sleep.
Right after planting, give your new divisions a good, deep drink of water to settle the soil around their roots. For the next few weeks, keep an eye on the soil moisture, especially if we hit a dry spell in late summer or early fall – something we occasionally see even around Manotick. You want the soil consistently moist, but absolutely not waterlogged. Remember, soggy soil is the enemy of iris rhizomes!
Now, here’s a big DON'T for fall care: Do not fertilize your newly divided irises now! Adding fertilizer in the fall encourages tender new leaf growth that won't have time to harden off before our first hard frost. That’s like sending them out in a t-shirt in November – not a recipe for success. Save the feeding for springtime when they naturally start growing again.
What you should focus on is keeping their new space weed-free. Pesky weeds compete for water and nutrients, which your establishing irises desperately need. A quick hand-weeding session now and then makes a big difference. If the surrounding garden area also needs attention to prevent weeds from encroaching, considering a broader tidy-up might be beneficial; expert teams providing a Marionville Garden Clean Up Service can handle that kind of task comprehensively, ensuring your whole garden looks sharp. Keeping the grass trimmed neatly around the bed also helps; good Lawn Care practices complement a tidy garden.
Before winter truly sets in, do one last check for any signs of pests you might have missed, particularly iris borer damage. Then, comes the crucial Ottawa winter prep: mulching, but only after the ground has lightly frozen (usually late October or November). Gently apply a light layer (1-2 inches) of loose mulch like straw or shredded leaves over the bed. This isn't for warmth, but to prevent the freeze-thaw cycles from heaving the shallowly planted rhizomes out of the ground. Proper Mulching and Edging techniques are key for perennial health in our climate.
Come early spring, as the snow melts and you see signs of new growth (hooray!), gently rake away the winter mulch so the sun can warm the soil and the rhizomes. Be patient; they might not put on their biggest flower show the very first year after dividing, but they are busy building a strong root system for years of beauty to come. We really appreciate you taking such great care of your garden gems – Thank You for helping make our communities beautiful! With this post-division pampering, your irises are well on their way to thriving. Find us on Google: Clean Yards Ottawa.
Quick Tips for Iris Success in Ottawa
Alright, feeling inspired to tackle those irises but want the super-quick version? Think of this as your cheat sheet for happy irises in Ottawa! Keeping these points in mind will set you up for glorious blooms.
- Time it Right: Don't wait too long! The sweet spot for dividing irises in Ottawa is late August through September. You need to give them at least 4-6 weeks to settle in before the ground freezes solid. Timing is key!
- Plant 'Em High, Not Shy: This is maybe the most important tip for bearded irises. Plant the rhizomes (those chunky root bits) very shallowly. The top of the rhizome should be just barely covered with soil, or even slightly exposed to the sun. Burying them deep is asking for rot, especially in our sometimes damp conditions.
- Water Wisely, Then Wait: Give newly planted divisions a good soak right after planting to settle the soil. Keep them moderately moist while they establish roots, but never soggy. Once winter approaches, ease up. And definitely no fertilizer in the fall!
- Winter Mulch - After the Freeze: Resist the urge to tuck them in too early! Wait until *after* the ground has lightly frozen (usually late Oct/Nov). Then, apply a light layer (1-2 inches) of loose mulch like straw or shredded leaves. This prevents frost heave. Remove it gently in spring. Getting this right is part of good perennial care; you can explore more about mulching and edging best practices for overall garden health.
- Give Them Space & Keep it Tidy: Plant divisions about 12-18 inches apart – they need room to grow! Keep the area weed-free so they aren't competing for resources. A tidy bed helps prevent pests and diseases too. If the whole yard needs a bit of a spruce-up to help your garden beds shine, consider a comprehensive Ottawa yard cleanup service to get things looking sharp. For city properties, check City Yard Cleanup Service.
- Patience and Helping Hands: Don't be discouraged if blooms are a bit sparse the first spring after dividing. The plants are focusing on root growth. Be patient! And hey, if tackling a big, overgrown iris patch or a major garden refresh feels like too much, remember help is available. You can learn more about our team and the passion we bring to Ottawa gardens. Sometimes a larger project requires more muscle, like a full Ottawa property cleanup service to manage everything from leaves to overgrown areas. And while you're beautifying your garden beds, if the surrounding grass has seen better days, perhaps it's time for improving your lawn with sod installation for that perfect finishing touch!
Why Divide Irises?
Dividing bearded irises every 3-5 years is essential for several reasons:
- Prevents Overcrowding: Rhizomes multiply, leading to competition for nutrients, water, and light.
- Improves Blooming: Reduces competition, allowing plants to put energy into producing more and larger flowers.
- Rejuvenates Plants: Removes old, non-productive rhizomes from the center of the clump.
- Controls Pests/Diseases: Improves air circulation and allows inspection for issues like iris borers or rot.
- Propagates Plants: Gives you more irises to expand your garden or share!
Neglecting division leads to the 'doughnut effect' and declining blooms, impacting the overall health and appearance of your iris patch. Comprehensive garden maintenance includes such essential tasks.
Best Time for Division (Ottawa)
The ideal window in the Ottawa region (including Greely, Manotick, Barrhaven, Metcalfe) is:
- Late Summer to Early Fall: Primarily late August through September.
- Timing Rationale: Allows 4-6 weeks for root establishment before the ground freezes (typically mid-to-late October).
- Soil/Air Temp: Warm soil encourages root growth, while cooler air reduces plant stress.
- Avoid: Spring (disrupts flowering), mid-summer heat (stressful), or too late in fall (risk of winter heave).
Getting this timing right is crucial for successful establishment before winter. Consider professional Metcalf Garden Clean Up if timing is tight.
Common Iris Issues & Solutions
- Iris Borer: Look for holes/tunnels in leaves/rhizomes. Cut out and destroy infested parts. Good fall cleanup helps remove overwintering eggs.
- Rhizome Rot (Bacterial Soft Rot): Mushy, foul-smelling rhizomes. Caused by injury, poor drainage, or planting too deep. Remove and destroy affected parts, improve drainage, ensure shallow planting.
- Leaf Spot (Fungal): Spots on leaves, can weaken plant. Remove affected leaves, ensure good air circulation, avoid overhead watering.
- Poor Blooming: Often due to overcrowding (needs division), too much shade, planting too deep, or excessive nitrogen fertilizer.
Addressing these issues promptly maintains healthy irises. Our Ottawa Garden Clean Up Service includes identifying and managing common garden problems.
Estimated Bloom Improvement After Division
*Illustrative percentages representing potential bloom density improvement.
FAQs: Your Ottawa Iris Division Questions Answered
When is truly the *latest* I can divide my irises in Ottawa before winter?
We really recommend aiming for late August to late September. While you *might* get away with early October in a mild fall, you need 4-6 weeks before a hard ground freeze (usually late Oct/early Nov here). Pushing it later risks the divisions not rooting well enough to survive the winter freeze-thaw cycles common around areas like Osgoode or Metcalfe. Play it safe!
My soil is heavy clay, typical for areas like Russell or Embrun. How does this affect planting depth for my iris divisions?
Great question! With heavy clay soil that drains slower, planting shallow is *extra* important. Ensure the top of the rhizome is barely covered, maybe even slightly exposed. Improving the soil structure with compost when you replant also really helps drainage and prevents rot, which clay soil can encourage. Good soil prep makes a huge difference.
Help! I found iris borers while dividing. What should I do with the infested rhizome parts?
Oh, those pesky borers! Cut away any parts of the rhizome showing tunnels or the borers themselves. Don't compost these bits – put them in your garbage bin to prevent spreading the pests. Inspect the remaining healthy-looking divisions carefully before replanting. Staying vigilant helps keep your iris patch healthy in the long run.
Can I just skip dividing? My irises seem okay, just fewer flowers than my neighbour's in Barrhaven.
You *can*, but you'll likely see fewer and smaller blooms each year as the clump gets overcrowded. The old centre dies out, leaving a "doughnut" shape, and the plants compete too much for nutrients. Dividing rejuvenates the patch, promotes robust growth, and gives you more plants to enjoy or share! Think of it as essential garden care.
What if I divide my irises on time, but then we get a surprise early, hard frost in Ottawa?
Don't panic! If you divided 4-6 weeks *before* that surprise frost, they should have started rooting. The main risk is frost heave. Applying a light winter mulch (straw, shredded leaves) *after* the ground freezes slightly helps insulate and prevent them from being pushed out. You can usually find details about service guarantees in a company's Terms and Conditions if you hired help.
I've divided my irises, but now my garden bed and surrounding area look messy from the digging. Do you offer clean-up help?
Absolutely! Dividing irises can definitely stir things up. We offer garden bed tidying as part of our City Garden Clean Up Service. If the whole yard needs attention after your gardening project, our general Property Clean Up options or a full Ottawa Property Cleanup Service can get everything looking neat and tidy again.
Conclusion: Get Ready for a Spectacular Iris Show in Your Ottawa Garden!
So there you have it – your complete guide to giving your irises a new lease on life! Dividing might seem like a task, but it's truly essential garden care for keeping these stunning perennials happy and blooming beautifully year after year. Think of it less as a chore and more like hitting the refresh button for your flower beds – out with the old, crowded centre and in with vigorous new growth! By following these steps, you're setting the stage for an absolutely spectacular iris show in your Ottawa garden next spring. Imagine those vibrant colours stopping neighbours in their tracks, whether you're tending your patch in Greely or enjoying the blooms in Manotick!
Feeling like your iris patch resembles a botanical wrestling match you'd rather sit out? Or maybe your fall schedule is just too packed with other landscaping to-dos? We get it! If tackling the division yourself isn't feasible, our friendly, experienced team is ready to jump in. We provide professional iris dividing and complete garden care services across Greely, Manotick, Barrhaven, and surrounding Ottawa communities. *Contact us today for a free, no-obligation estimate* and look forward to a gorgeous iris display without the digging!
Curious about other ways to enhance your outdoor space, from seasonal clean-ups to getting those garden beds perfectly prepped for winter? *Explore our full suite of Landscaping and Gardening Services* on our website to discover all the ways we can help your yard thrive!
Explore Our ServicesHere's to happy irises and beautiful Ottawa gardens!
