
After Greely Stump Grinding: Best Plants for Clay Soil
Quick Guide: Greely Stump Spot to Garden Gem
- **Problem:** Stump grinding leaves wood chips & reveals tough Ottawa clay soil.
- **Solution 1 (Soil Prep):** Remove most chips, generously amend clay with compost.
- **Solution 2 (Plant Choice):** Select clay-tolerant plants like Daylilies, Coneflowers, Hostas, Dogwood, Sedum.
- **Key Tip:** Plant slightly high in amended clay & mulch well.
- **Need Help?** Professionals can manage chip removal, soil amendment, and planting. Get a Quote Today!
Ready to transform that post-stump grinding patch? Don't let Ottawa clay intimidate you! Request a free quote from Clean Yards for expert help with soil preparation and planting.
Introduction: From Stumped to Stunning in Greely!
Hey Greely neighbours! So, you finally said goodbye to that stubborn tree stump. Phew! High fives for reclaiming your space! But now... you're looking at the leftover spot – that mix of wood chips and soil – and wondering, "What next?" It can feel a bit messy, maybe even a little overwhelming, especially knowing our lovely Ottawa clay is waiting underneath. Ask anyone gardening in nearby Manotick or Osgoode; working with that heavy soil sometimes feels like wrestling with sticky pottery clay! Find tips for Manotick gardening in our Manotick garden revival spring plan guide.
Don't let that stumped patch get you down, though. Transforming it from stumped to stunning is easier than you might think! This guide is here to help you navigate the aftermath of stump grinding. We're packed with practical landscaping and gardening advice tailored for our area. We'll cover everything from dealing with the leftover wood grindings and improving the soil (so important around here!) to picking perfect plants or prepping the area for lush new lawn. Let's work together to turn that patch into a beautiful Greely garden gem you can be proud of!
Decoding Your Post-Grinding Patch and Ottawa's Clay Conundrum
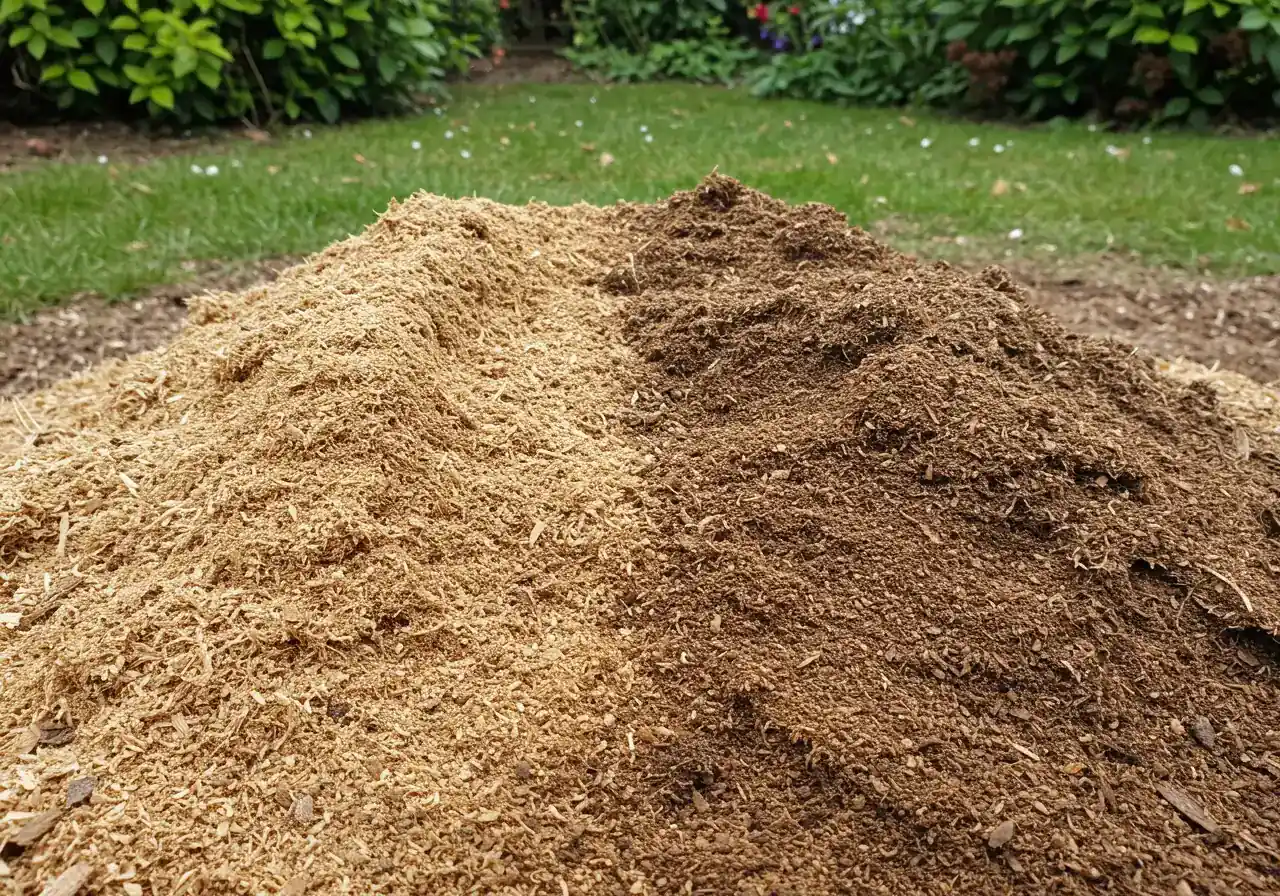
Alright, the noisy part is over! The stump grinder has packed up and rolled away, leaving you with... well, what is that stuff, exactly? Typically, you'll find a fluffy, sometimes deep, mix of wood chips, shavings, sawdust, and the original soil all churned together. It might look a bit like woodsy confetti after a very specific kind of party. But underneath this temporary topping lies the real challenge for many Greely gardeners: our famous (or infamous?) Ottawa clay.
Oh, That Lovely Clay! (Said with Affection... Mostly)
If you've ever tried planting a shrub in Ottawa, you know the deal. Whether you're in established areas like Nepean or growing communities like Metcalfe, heavy clay soil is often part of the package. Why is it tricky?
- It's Dense: Clay particles are tiny and pack together tightly, making it hard for roots, water, and air to penetrate.
- Drainage Drama: It can hold onto water like a sponge after rain (leading to soggy roots!), but bake hard as brick in the summer sun.
- Compaction Concerns: Heavy foot traffic or equipment (like, say, a stump grinder nearby) can squish it down even more. Improving compacted soil is often a key step, similar to what's discussed for lawn care in the Barrhaven soil compaction aeration lawn guide.
Your Quick Post-Grinding Site Check-Up
Before you dream of roses or rye grass, take a quick peek at your patch:
- Depth: How deep did the grinding go? Is the chip mix shallow or several inches deep? This tells you how much you might need to remove or amend.
- Surroundings: What's next to the spot? Existing lawn, delicate garden plants, tree roots you don't want to disturb?
- Sunlight: How many hours of direct sun does the area get? Full sun, partial shade, or mostly shady? This dictates plant choices.
- Slope: Is the ground level or sloped? This affects water runoff and potential erosion.
Beware the Nitrogen Snatcher!
Here’s a vital gardening nugget: Fresh wood chips decomposing in the soil need nitrogen to break down. They pull this nitrogen from the surrounding soil, temporarily making it unavailable for your plants. If you mix lots of fresh grindings into your planting hole, your new greenery might struggle and look yellowish. It's a common headache, sometimes encountered even during landscape recovery like detailed in Barrhaven lawn garden repair after construction scenarios. We want happy plants, not hungry ones!
Eco-Savvy Tip for Those Chips
Don't just bin those wood grindings! They make excellent mulch when used *on top* of the soil elsewhere in your yard. Spread a layer around established trees, shrubs, or in garden beds (just keep it an inch or two away from stems and trunks). This suppresses weeds, conserves moisture, and looks tidy. It’s a fantastic, free resource to incorporate into your seasonal upkeep, like prepping for a Manotick garden revival spring plan. Managing leftover materials effectively is crucial, just as it is when planning an Osgoode garden revival after summer heat stress.
Feeling like the patch analysis or the clean-up itself is a bit much? No worries! Professional help is available to sort out that spot. You can explore various landscaping and garden clean-up services or look into specialized options like an Osgoode garden clean-up service if you're in that area.
Whipping Your Clay Soil into Shape: Amendment Strategies
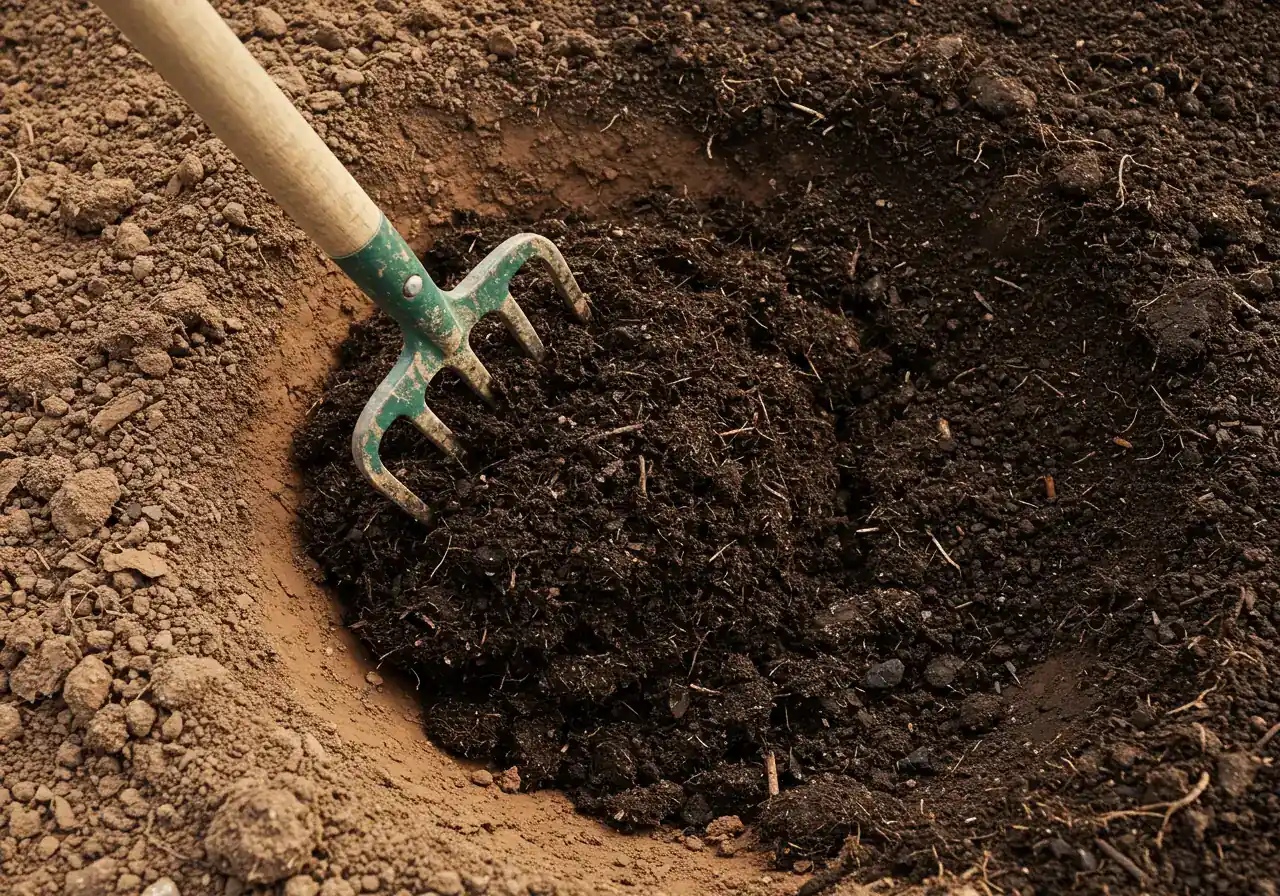
Okay, let's talk dirt. Specifically, that dense, sometimes sticky, sometimes rock-hard clay soil lurking beneath those leftover wood chips. Working with heavy Ottawa clay, whether you're in Greely, Nepean, or out near Richmond, can feel a bit like trying to bake bread with cement mix – frustrating! But don't despair. With the right ingredients, you can transform that challenging patch into a welcoming bed for new plants. It’s all about adding organic matter. This crucial step is covered in our soil preparation guide.
Why Bother Amending? The Magic of Organic Matter
Think of clay soil like a tightly packed crowd. Water has trouble getting through, air can't circulate, and plant roots struggle to push their way in. Organic matter – stuff like compost, aged manure, or leaf mold – acts like a friendly organizer, gently creating space between those tiny clay particles. Adding it helps:
- Improve drainage (less sogginess!)
- Increase aeration (more air for roots!)
- Make the soil easier to work (less back-breaking digging!)
- Provide slow-release nutrients for your future plants.
Your Amendment All-Stars:
- Compost: This is the undisputed champion! Well-rotted compost (from your own bin or bought in bags/bulk) is teeming with microbial life and perfect for improving soil structure. It's like giving your soil a healthy probiotic smoothie.
- Aged Manure: Emphasis on aged! Fresh manure is too strong and can burn plants. Properly composted or aged manure adds nutrients and valuable organic material. Think of it as a vitamin boost for your dirt.
- Leaf Mold: Simply decomposed leaves! It's fantastic for improving water retention and encouraging beneficial fungi. You can make your own by piling leaves and letting them break down for a year or two.
Let's Get Mixing!
Ready to wrestle that clay into submission? Here’s the game plan:
- Clear the Decks: First, remove most of the leftover wood grindings from the surface. You don't want huge amounts mixing deep into the soil, as we learned earlier. If this initial clearing feels like too much heavy lifting, consider getting help; services like an Marionville garden clean-up service can tackle this kind of prep work.
- Loosen Up: Use a sturdy shovel or garden fork to loosen the existing clay soil to a depth of about 6-12 inches. Try to do this when the clay is moist but not soaking wet (if it’s dry, it’s like concrete; if it’s sopping, you get mud pies).
- Spread the Goodness: Add a generous layer (think 3-6 inches) of your chosen amendment(s) – compost is usually the best starting point – right on top of the loosened clay. Don't be shy! Clay needs a lot of organic matter to really change its ways. Sourcing good quality compost or aged manure locally is often possible from garden centers or landscape suppliers near areas like Richmond or Manotick.
- Mix it In: Now, thoroughly blend the amendments into the loosened clay. You want to integrate it well, not just leave it sitting as a separate layer. A shovel or garden fork works well. For larger areas, a rototiller can help, but avoid over-pulverizing wet clay, which can damage its structure. The goal is a well-combined, crumbly mixture ready for planting. This soil preparation is a key step before any new garden installation project.
Getting the soil right lays the foundation for healthy plants. It’s a critical part of turning that stump spot into a lovely garden feature, often included in comprehensive clean-up efforts. For instance, tackling soil amendment could be part of a broader scope, similar to a Marionville yard cleanup service or even a full Marionville property cleanup service.
Improving clay soil takes effort, but the payoff is huge for your future garden's success. We know the local conditions well – check out the Clean Yards About Us page to learn more about our experience. If this whole process sounds like more digging than you bargained for, don't hesitate to reach out and contact Clean Yards – we're happy to help whip your soil into shape!
Clay Busters: Top Plant Choices for Your Ottawa Garden
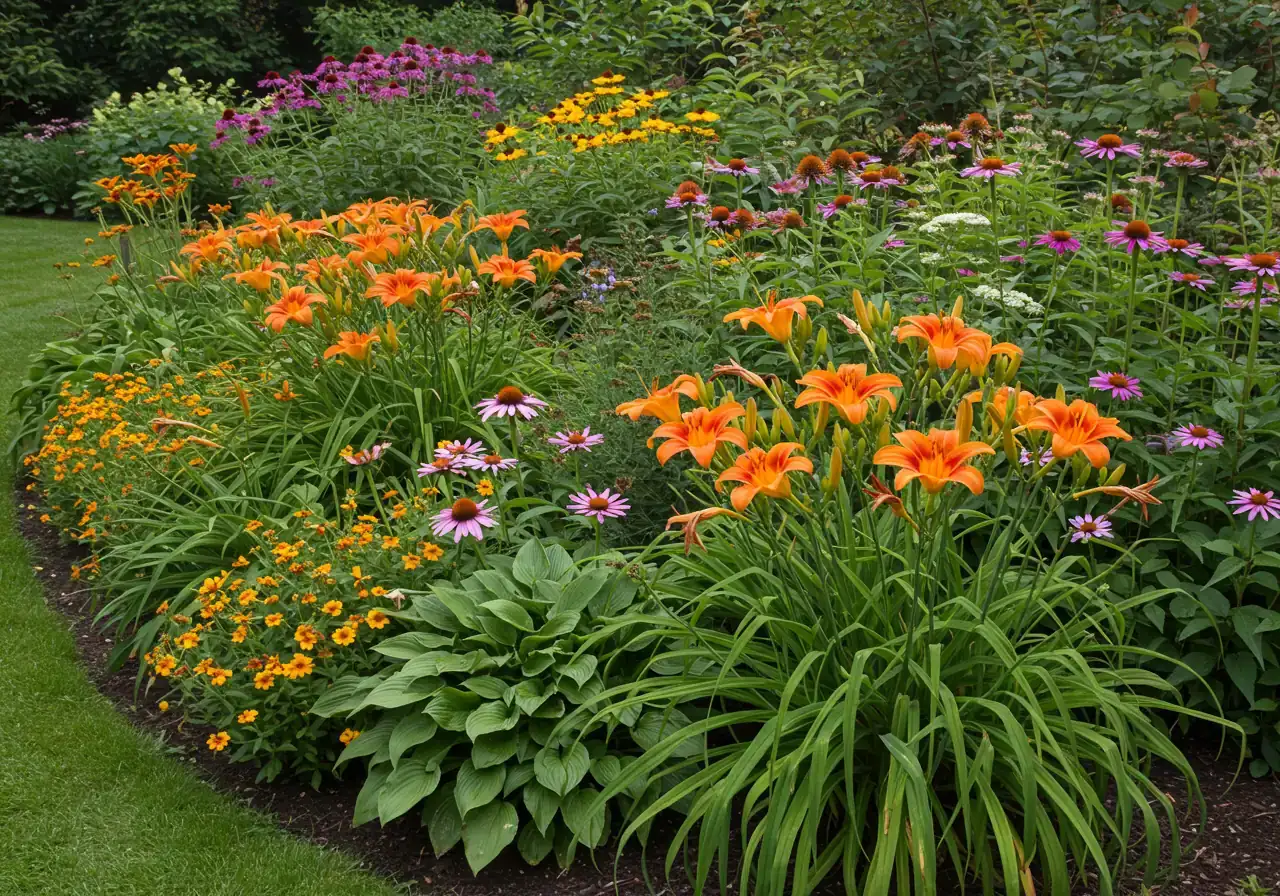
So, you wrestled that Ottawa clay into submission (mostly!) and whipped your post-stump-grinding patch into shape. Give yourself a pat on the back – that's hard work! While amending the soil makes a huge difference, let's be honest: clay soil still has opinions. It holds water, bakes hard, and generally likes plants that aren't too fussy. Think of it as a garden bed with character... lots of dense, heavy character.
Choosing the right plants is key to turning that spot into a thriving part of your landscape, whether you're gardening in Barrhaven or enjoying the space in Russell. You need tough cookies, plants that can handle less-than-perfect drainage and roots that don't mind pushing through denser soil. We call these the "Clay Busters"! Drawing on our experience serving the Ottawa area, you can learn more about our local expertise and trust these suggestions tailored for our region. Find us easily via our Google My Business page.
Perennials: The Comeback Kids
Perennials are fantastic because they die back in winter but return year after year. Plant them once, enjoy them for seasons! Many tough perennials develop strong root systems that can navigate clay.
- Daylilies (Hemerocallis): Practically indestructible! Tons of colours, drought-tolerant once established, clay-tolerant.
- Hostas: Perfect for shadier spots. Love moisture but need improved drainage. Watch for slugs! (Part/Full Shade)
- Coneflowers (Echinacea): Daisy-like natives, attract pollinators. Handle clay if not waterlogged. (Full Sun)
- Black-Eyed Susans (Rudbeckia hirta): Cheerful yellow flowers. Very adaptable to clay soils. (Full Sun)
- Sedum (Stonecrop): Upright varieties like 'Autumn Joy'. Drought-tolerant succulents, handle clay well. (Full Sun)
Shrubs: The Backbone of the Bed
Shrubs provide structure, height, and year-round interest. Choosing clay-tolerant varieties saves headaches later.
- Dogwood (Cornus species): Especially Red Osier Dogwood. Native, tough, bright red winter stems. Thrives in moist conditions and clay. (Sun/Part Shade)
- Potentilla: Small shrubs, bloom all summer. Incredibly hardy, adaptable to clay. Minimal care needed. (Full Sun)
- Spirea:** Many varieties ('Goldflame', 'Little Princess') tolerate clay. Colourful foliage and flowers. (Full Sun/Light Shade)
- Serviceberry (Amelanchier): Multi-season interest (flowers, berries, fall colour). Adaptable to clay. (Sun/Part Shade)
Considering adding shrubs? Explore our garden installation services.
Ornamental Grasses: Movement and Texture
Don't overlook ornamental grasses! They add fine texture and graceful movement, and many are surprisingly tough.
- Feather Reed Grass (Calamagrostis 'Karl Foerster'): Famous upright plumes. Very adaptable, tolerant of heavy soil. Great vertical interest. (Full Sun)
Grasses can add fantastic visual appeal, enhancing the overall look after a clean-up effort like our Ottawa yard cleanup service.
Planting Tip for Clay Soil:
Even with amended soil, sometimes it's wise to plant perennials and shrubs slightly higher than they were in their nursery pots. Create a gentle mound rather than a basin. This helps prevent water from pooling directly around the crown of the plant, especially during our wet springs or heavy downpours. Getting the planting done might be the final step after a thorough site prep, similar to what our Metcalfe yard cleanup service offers for local homeowners.
Choosing the right plants turns a potential problem area into a beautiful feature. Remember, prepping the site correctly, including soil amendment, is key before planting, often part of a comprehensive property clean-up. Sometimes a challenging spot requires a bit more intervention, and exploring solutions like property cleanup services like those in Marionville can provide the necessary groundwork for success. If you ever have questions about how we handle your information when discussing these services, please feel free to review our privacy policy.
We hope this list gives you some great ideas for conquering that clay patch! Planting these tough beauties should reward you with years of enjoyment. We want to extend a big thank you for trusting us with your Ottawa gardening challenges!
Planting Power & Long-Term Love for Your Clay Garden
Alright, you've amended your soil like a champ and picked some tough, clay-busting plants. High five! Now, let's get those roots in the ground and set them up for long-term success in your Ottawa garden. Planting in improved clay still requires a little finesse – think of it as giving your new green friends the VIP treatment they deserve.
Planting Smarts for Clay Homes
Even with added compost, the underlying clay structure still influences things. Here’s how to plant for maximum happiness:
- Dig Wide, Not Just Deep: Forget digging a deep, narrow hole like you're planting a fence post. In clay, that can act like a bathtub, holding water right around the roots. Instead, dig a hole that's two to three times wider than the plant's root ball, but only about as deep as the root ball itself. Loosening the soil outwards encourages roots to spread horizontally, exploring the improved soil you created.
- Plant a Little High: This is a game-changer for clay! Position the plant so the top of its root ball is slightly above the surrounding soil level – maybe an inch or so. Then, gently slope the soil up to meet the base of the plant. This subtle "mound" helps ensure water drains away from the crown (the sensitive base where stem meets roots), preventing rot, especially during wet spells common in Nepean or Manotick springs.
Water Wisely: Think Deep Drinks, Less Often
Clay holds onto water tenaciously. This means you usually don't need to water as frequently as in sandy soil, but when you water, do it thoroughly.
- Check First: Before grabbing the hose, stick your finger a couple of inches into the soil near the plant (but away from the direct stem). If it feels damp, hold off. If it's dry, it's time for a drink.
- Water Deeply: Aim for slow, deep watering that allows moisture to soak down to the root zone, encouraging deeper root growth. Sprinkling lightly just wets the surface. A soaker hose or watering wand on a gentle setting works well.
- Watch Out for Drought: Ottawa summers can bring dry spells. Even clay soil will eventually dry out and bake hard, stressing plants. Keep an eye on your garden during hot, rainless periods. Check out local resources like the City of Ottawa Outdoor Water Use guidelines for tips.
Mulch Magic: Your Soil's Best Friend
Mulching is crucial for clay gardens! Applying a 2-3 inch layer of organic mulch (like shredded bark, compost, or even those well-aged wood chips from earlier – provided they aren't fresh!) offers huge benefits:
- Keeps soil moisture consistent (less watering!).
- Suppresses weeds (hooray!).
- Regulates soil temperature (cooler in summer, warmer in winter).
- Slowly breaks down, further improving the soil over time.
- Choosing the right mulch is part of good thoughtful material selection for your landscape.
- Important: Keep mulch an inch or two away from plant stems to prevent moisture buildup and potential rot. Our mulching and edging services ensure this is done correctly.
From Stump Grind to Garden Thrive: Timeline
Step 1: Assess & Clear
Evaluate the depth of grindings and surrounding area. Remove the bulk of fresh wood chips from the surface.
Step 2: Amend the Clay
Loosen the top 6-12 inches of clay soil. Add a generous 3-6 inch layer of compost or other organic matter and mix thoroughly. See soil prep details.
Step 3: Choose Plants Wisely
Select perennials, shrubs, or grasses known to tolerate clay conditions common in the Ottawa region (e.g., Daylilies, Coneflowers, Dogwood).
Step 4: Plant High
Dig holes wider than deep. Position plants so the top of the root ball is slightly above the surrounding soil level to improve drainage.
Step 5: Mulch & Water
Apply a 2-3 inch layer of organic mulch, keeping it away from stems. Water deeply when the soil begins to dry out.
Step 6: Ongoing Care
Perform seasonal maintenance like weeding, deadheading, and topping up mulch. Consistent garden maintenance is key.
A Simple Seasonal Care Calendar for Your Clay Patch
Gardening is a journey, not a one-time event. Here’s a rough guide for keeping your clay garden happy through the Ottawa seasons:
- Spring: Once the snow melts and the ground isn't soggy, gently rake away any winter debris. Check plants for winter damage. Edge the bed for a tidy look. Top up mulch if needed. This is often the time homeowners consider a thorough city yard cleanup service to get everything looking sharp.
- Summer: Water deeply when needed (check that soil!). Pull weeds before they get established – much easier when they're small! Deadhead spent flowers on perennials like Coneflowers or Daylilies to encourage more blooms. Sit back and enjoy the fruits (or flowers!) of your labor. Want some inspiration for what's possible? Check out how we help homeowners see some inspiring transformations.
- Fall: After a few light frosts but before the ground freezes solid, do a final tidy-up. Cut back dead perennial stems (or leave some for winter interest/wildlife). You can lightly rake fallen leaves *off* the bed (add them to your compost!) or use shredded leaves as extra winter mulch around plant bases, especially for tender perennials. A good fall clean-up sets the stage for next spring and might be part of a larger comprehensive property clean-up. Specific bed maintenance can also be handled by a dedicated city garden clean-up service. Remember that consistent care is part of the gardening adventure; you can always review our terms and conditions for service expectations.
By planting smart, watering wisely, mulching well, and following a simple seasonal rhythm, you'll give your clay garden patch the long-term love it needs to thrive for years to come! Consider Garden Ontario for more local gardening resources.
Highlight Box: Clay Soil Success Secrets
Alright folks, let's boil it down! Working with Ottawa clay, even after you've improved it, has its quirks. It's like that one relative – mostly lovely, but you gotta know how to handle 'em! Here are five quick secrets to keep your garden patch thriving, whether you’re in Barrhaven, Metcalfe, or anywhere else our lovely clay resides:
- Feed the Beast (Generously!): Clay soil loves organic matter. Don't just amend once; make adding compost or aged manure an ongoing affair. Top-dress beds yearly. Think of it as a spa treatment for your soil! Choosing quality compost is part of smart landscaping material selection.
- Plant High, Stay Dry: Remember the bathtub effect? Avoid it! Plant perennials and shrubs so the top of their root ball is slightly above the surrounding soil level. This encourages water to drain away from the crown, preventing soggy feet and rot – a crucial part of basic flower bed and garden maintenance.
- Water Deep, Not Daily: Clay holds moisture well. Instead of frequent shallow sprinkles, give your plants a long, deep drink when the top few inches of soil feel dry. This encourages strong, deep roots. Getting the watering right from the start is just as important as the initial prep, which might even involve hiring a local Metcalfe garden clean-up service to get the bed ready.
- Mulch is Your BFF: Seriously, don't skip the mulch! A 2-3 inch layer of organic mulch (like shredded bark or compost) conserves moisture, keeps weeds down, and slowly improves the soil as it breaks down. It’s a simple step that makes a huge difference in overall yard health, often addressed during a complete Metcalfe property cleanup service.
- Pick the Right Players: Some plants just aren't fans of heavy soil, no matter how much you improve it. Choose "clay tolerant" varieties (like Daylilies, Coneflowers, Dogwood shrubs, or Feather Reed Grass) known to thrive in tougher conditions. Matching plants to place is key for easier upkeep, something often considered by a professional city garden maintenance service.
Keep these secrets in your back pocket, and you'll be well on your way to conquering that clay and creating a gorgeous garden space!
FAQs: Your Post-Stump Grinding Clay Questions Answered
Got questions after the stump grinding dust has settled? You're not alone! Dealing with the aftermath, especially on our lovely Ottawa clay, can bring up a few head-scratchers. Here are some common queries we hear from folks in Greely, Manotick, and beyond:
Hold your horses there! While it's tempting, mixing large amounts of fresh wood grindings deep into your soil isn't ideal. As they decompose, they temporarily steal nitrogen, which your new plants need. The best use? Spread them as mulch on top of the soil in other garden beds or around established trees (keeping them away from stems). This is one of the great mulching and edging techniques to recycle material. If you have way too much, consider hauling it away or composting it separately first.
Probably not enough on its own, unfortunately. Stump grinding removes wood below ground level, and the fluffy chip/soil mix will settle significantly over time, especially after rain. You'll likely need to add more soil – ideally a good mix of topsoil and compost – to bring the area level with the surroundings before you try to plant grass or establish a garden bed. Think of it like topping up after the party cleanup! Adding new soil may be needed before sod installation.
Patience, young grasshopper! It depends a bit on how much woody material is left and how deep it goes. Because of that nitrogen-stealing issue, it's best to remove most of the surface chips first. Then, you absolutely need to amend the soil generously with compost as we discussed earlier. Once the soil is improved, you can usually plant perennials or shrubs relatively soon. For lawn seed, giving the amendments a little time to integrate (maybe a few weeks) can improve success.
Ah, the dreaded patchy yellow lawn syndrome! This often happens for two main reasons after stump grinding on clay: 1) Those pesky wood chips are still decomposing and hogging the nitrogen, leaving the grass hungry (hence the yellowing). 2) You likely didn't add enough good topsoil or compost on top of the amended clay before seeding. Grass needs a good few inches of quality topsoil to establish well. Check out some general lawn care tips for seeding success, but remember amending that base layer is key here. Need help? Our Ottawa garden clean-up service can assist.
You might be onto something! While you can re-establish lawn, it often requires more work on heavy clay – removing chips, adding a good layer of topsoil, and careful watering. Turning it into a small garden bed with clay-tolerant perennials or shrubs (after amending the soil well, of course!) can often be less hassle in the long run. You work with the conditions rather than fighting them. It’s a common choice for homeowners from Barrhaven to Kanata facing similar soil challenges.
Absolutely! Transforming that post-grinding patch, especially dealing with clay soil amendment, can be hard work. If it feels overwhelming, professional help is definitely available. Services like a dedicated Ottawa property clean-up service can handle removing excess grindings, amending the soil correctly, and even planting or seeding for you. Many companies, including options like a broader city property clean-up service, offer estimates for this type of work. We always appreciate when clients provide feedback on our estimates, as it helps us improve!
Conclusion: Grow Forward After Stump Grinding!
So there you have it! Going from a grumpy old stump patch to a gorgeous garden spot or patch of lush lawn in Greely, Manotick, or even out near Osgoode isn't magic, but it is totally doable. We've tackled the mystery mulch (those wood chips!), wrestled with our famous Ottawa clay (it puts up a good fight, eh?), and picked out some champion plants or lawn prep strategies ready to thrive. Remember, the key steps are managing those grindings, giving that heavy soil some serious love with compost and amendments, and choosing greenery that plays well with our local conditions. For more general tips, check the City of Ottawa's gardening page.
Feeling inspired but maybe a little tired just thinking about all that digging and soil improvement? Hey, we get it! Transforming that former stump zone, especially improving compacted soil, takes effort. If it feels like more elbow grease than you bargained for, give Clean Yards a shout. We're pros at whipping tricky soil into shape and getting the right plants or lawn established in places like Nepean and across the region. Let us handle the heavy lifting – contact us today for expert soil amendment, site preparation, and planting services!
Ready to take the next step or just have a few more questions about your specific landscaping challenge? Visit our services page or give us a call to discuss how we can help you grow forward. Happy gardening – here's to enjoying your beautiful, reclaimed, stump-free space!
