
Winterize Greely Garden Tools: Save Money Next Spring
Protect your tools and your wallet this winter! Need help with fall cleanup or tool prep? Request a quote today!
Quick Winterizing Guide:
- Clean Thoroughly: Remove all dirt, sap, and debris from tools.
- Sharpen Edges: Ensure blades on pruners, shovels, mowers, etc., are sharp.
- Lubricate Metal: Apply oil to prevent rust and keep parts moving.
- Store Properly: Keep tools in a dry place, off the ground if possible. Drain hoses and prep power equipment fuel systems/batteries.
- Proper winterization prevents costly repairs or replacements next spring.
Introduction: Don't Let Winter Wreck Your Wallet! Why Greely Gardeners Need to Winterize Tools
Okay Greely neighbours, the vibrant colours of fall are signalling the end of another rewarding gardening season here in the Ottawa area. Before you completely swap your trowel for a toque and settle in for the winter hibernation (we see you, curling up with a good book!), let's talk about something crucial: protecting your wallet!
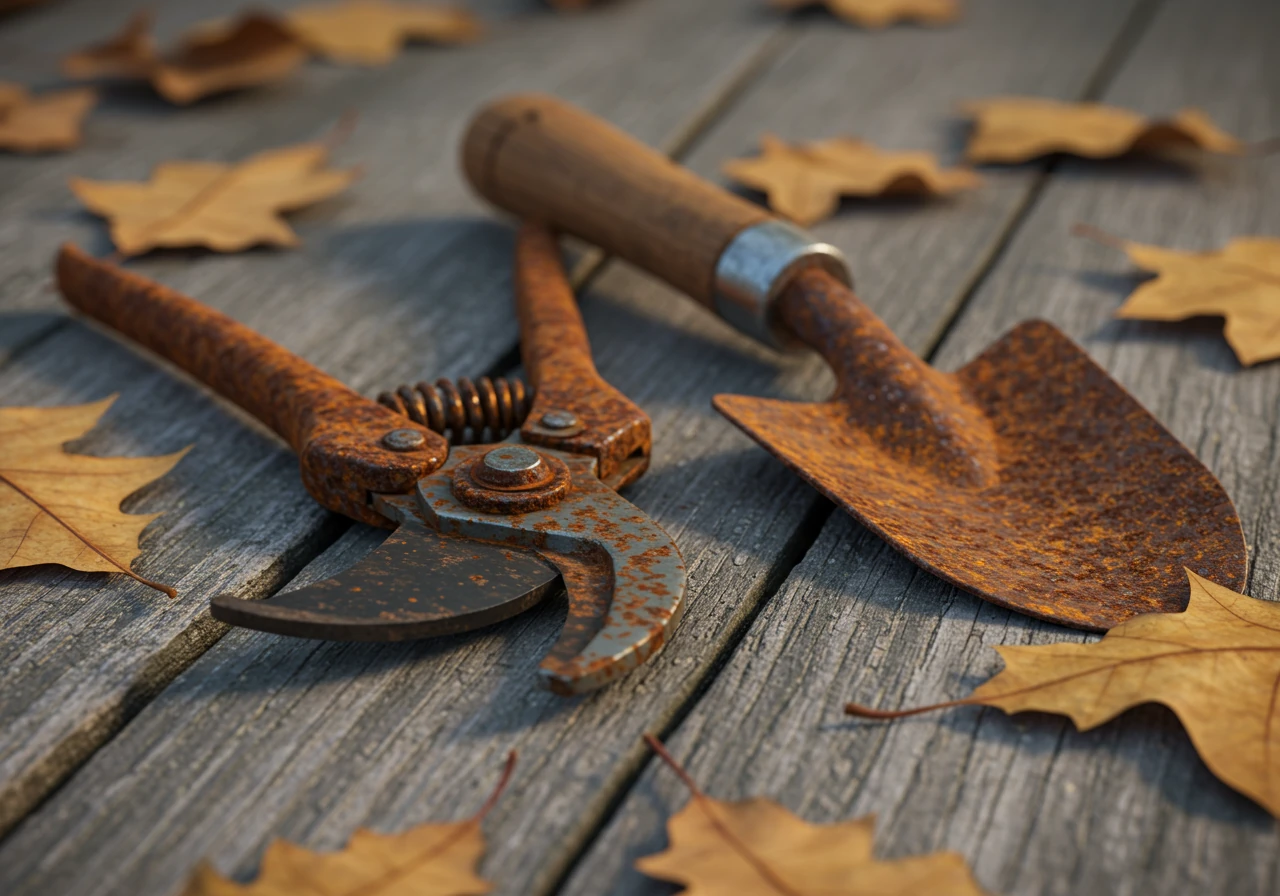
It's tempting to just stash those shovels, pruners, and the trusty lawn mower away and forget about them until spring. But hold on! Ignoring your garden tools now is like leaving cash out in the cold. Our infamous Ottawa winters, delivering freezing temperatures and piles of snow from Greely right across to Manotick, can wreak havoc on your equipment. Think rust on your favourite secateurs, cracked wooden handles on your rake, or even seized engine parts on your mower come springtime. Ouch. Replacing or repairing those tools can put an unexpected dent in your budget.
This guide is your secret weapon against unnecessary spring spending. We’re here to show you why winterizing your garden tools is a money-saving must-do. We'll walk through simple, practical steps for cleaning, maintaining, and properly storing everything – from basic hand tools to more complex landscaping equipment. A little effort before the snow flies means your tools (and your wallet!) will thank you next gardening season. Let's get those tools tucked in safe and sound!
The 'Why Bother?': How Winter Neglect Costs You More Than Just Rust
Okay, let's dive into the nitty-gritty: why should you actually bother with winterizing your tools? It feels like just another chore on the fall clean-up list, right? Especially after a long gardening season here in Ottawa, it's tempting to just shut the shed door and call it a day. But trust us, that “out of sight, out of mind” approach can lead to some serious springtime headaches and wallet aches.
Think of it this way: skipping tool winterization is like skipping your car's oil change. Sure, it runs fine now, but neglect catches up, usually at the most inconvenient time and with a hefty repair bill.
More Than Just a Little Surface Rust:
While rust is the most obvious villain (and nobody wants tetanus shots with their tulips), the damage goes deeper:
- Fuel System Funerals: Leaving fuel in your lawn mower, trimmer, or leaf blower over winter is asking for trouble. Untreated gasoline degrades, gums up carburetors and fuel lines, and makes starting your equipment in the spring a frustrating, pull-cord-yanking nightmare. Repairing or replacing a carburetor? Cha-ching. That's money you could be spending on new perennials.
- Dull Blades Drag You Down: Soil, grit, and plant sap left on blades (think pruners, shovels, mower blades) don't just cause rust; they dull the edges. Starting spring with dull tools makes every task harder, stresses your plants (clean cuts heal faster!), and wears you out faster. Sharpening is way cheaper than replacing. If you’re dealing with the heavy clay soil common in areas like Barrhaven, cleaning that sticky stuff off before storage is extra important! Consider visiting the [City of Ottawa's gardening section](https://ottawa.ca/en/living-ottawa/lawn-and-garden) for soil type information.
- Cracks, Critters, and Calamities: Wooden handles absorb moisture, and Ottawa's freeze-thaw cycles can cause them to swell and crack. Plastic parts can become brittle in the cold and snap. Plus, dirty tools or equipment with leftover grass clippings can become cozy winter condos for unwanted pests.
- Beyond the Shed - Water Woes: Winter neglect extends to your watering systems too! Forgetting about hoses, sprinklers, and irrigation lines is a recipe for disaster. Water left inside will freeze, expand, and crack pipes, nozzles, and valves. If you have an irrigation system, proper blow-out is essential. You can learn more about why Nepean irrigation winterization is crucial to avoid pipe damage. The same goes for decorative elements; check out these Kenmore water feature winterizing fall tips to protect your investment. Even simpler setups aren't immune; ensuring your Embrun fall drip system winterization prevents pipe bursts is key.
Taking a little time now saves you significant money and frustration later. Your tools will perform better, last longer, and be ready to roll the moment spring arrives. It’s all part of smart garden care, just like knowing the right way for Kenmore garden winterization to boost plant health. Think of it as an investment in future you – the one who'd rather be planting than repairing! If tackling it all feels overwhelming, remember there are professional landscaping and yard maintenance services available to help get your tools and yard ready for their winter sleep.
Step 1: The Great Garden Tool Clean-Up - Banish Dirt Before Hibernation
Okay team, let's roll up our sleeves for Step 1! Before your beloved garden tools start dreaming of spring blooms, we need to tackle the grime. Think of it as giving them a spa day before their long winter nap. We call it the Great Garden Tool Clean-Up – banishing that stubborn dirt before hibernation!
Why the fuss? Well, leaving soil clinging to your shovels, trowels, and hoes is like tucking them in with a scratchy, damp blanket. Especially here around Ottawa, where areas like Greely and Metcalfe can have that heavy clay soil – it sticks like glue and holds moisture, becoming a prime spot for rust to party all winter long. Plus, leftover plant bits can harbour diseases or pesky insect eggs. Ew! Cleaning now prevents rust, keeps blades sharper for longer, and stops unwanted critters from moving in. It's a key part of regular garden maintenance that pays off.
Safety First, Always!
Before you even think about cleaning power equipment like lawn mowers or hedge trimmers, remember these crucial safety steps:
- Disconnect the spark plug on gas-powered tools. Seriously, yank that wire off. No accidental starts, please!
- Unplug electric tools completely from the power source. Double-check it’s disconnected.
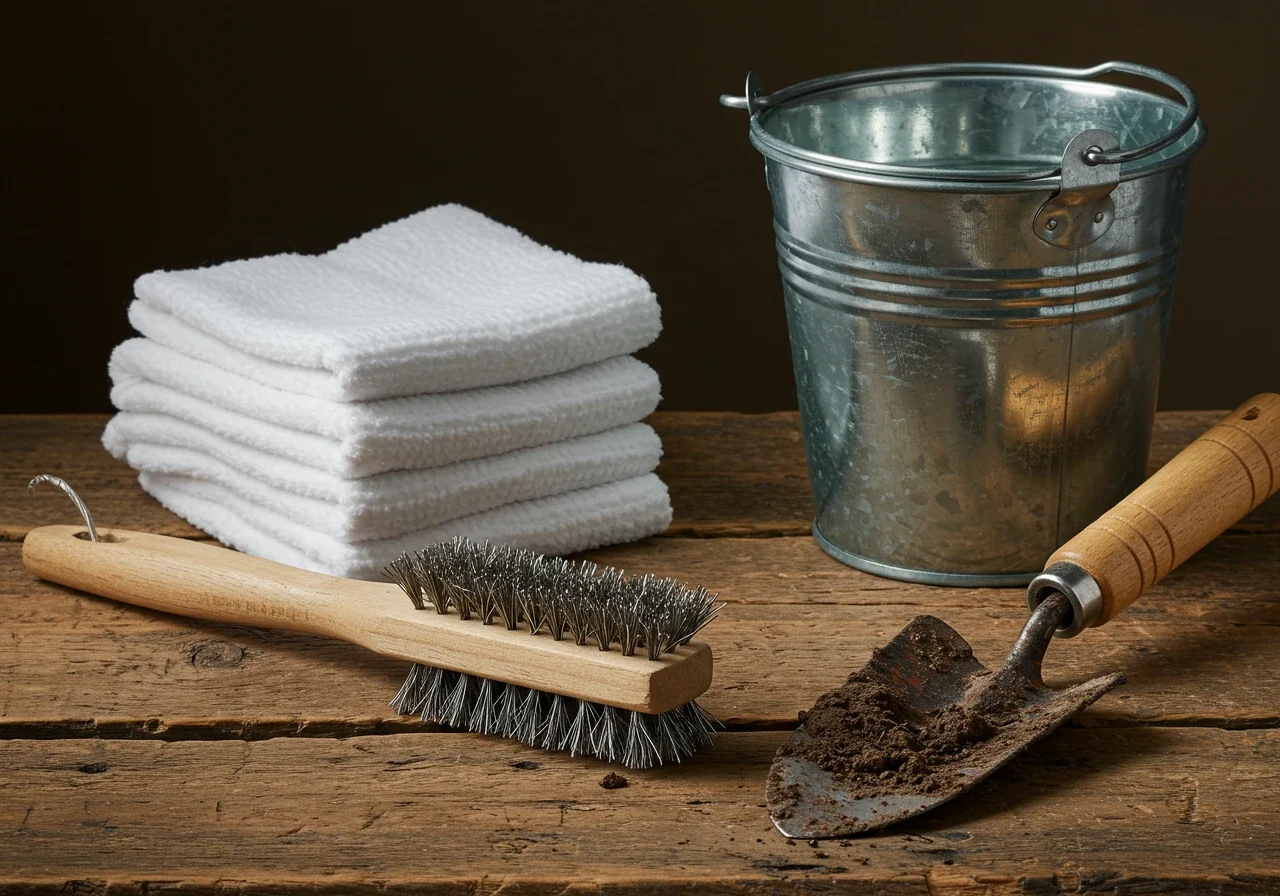
Hand Tool Spa Treatment
Now for the hand tools – your trusty trowels, pruners, rakes, and shovels. Give them the care they deserve:
- Get Rid of the Clumps: First, knock off the loose dirt and mud. Give tools like shovels or hoes a good whack against a sturdy surface (maybe not your neighbour’s prize pumpkin!) or use an old putty knife or wire brush to scrape off the big chunks of caked-on soil.
- Scrub-a-Dub: Grab a bucket of warm, soapy water and a stiff brush (an old dish brush works great). Give every metal and plastic surface a thorough scrub. Pay extra attention to hinges and joints on pruners and loppers where sticky plant sap likes to hide.
- Eco-Friendly Tip: Don't want to use harsh soaps? A simple mix of equal parts white vinegar and water sprayed on and scrubbed works wonders on dirt and rust! Or look for a biodegradable cleaner.
- Rinse Well: Use your garden hose to rinse everything completely. You want to wash away all the soap residue and loosened dirt.
- Dry, Dry, Dry! This step is super important to prevent immediate rusting. Wipe every tool down thoroughly with old rags or towels. For extra protection, let them sit out in the sun for an hour or two or place them near a heat source indoors (not too close!) to ensure they are bone dry before storage.
Power Tool Exterior Wipe-Down
For your larger landscaping equipment like lawn mowers, tillers, or leaf blowers, let's focus on cleaning the outside for this step (we'll tackle engine maintenance in another step):
- Wipe It Down: Use a damp cloth to clean the handles, housing, wheels, and other exterior surfaces.
- Tackle Tough Stuff: For dried-on grass clippings (especially under mower decks – get in there!) or stubborn mud, a stiff brush or a plastic putty knife works well. Scrape gently to avoid scratching paint. Getting the mower deck clean prevents rust and ensures better airflow and performance next spring.
Cleaning might feel like a chore after a long season, but trust us, your future self (and your tools) will thank you. Clean tools are happy tools! If this step alone feels like too much mud wrestling, especially if you have a lot of equipment, remember that professional help is available. Many companies offer comprehensive fall clean-up services that can include tool preparation. Whether you need a full Manotick property cleanup service covering everything or help with specific tasks like a Marionville garden clean-up service, getting assistance is always an option. You can always contact us to say thank you for taking care of the dirty work!
For now, let’s get scrubbing – your tools have earned this TLC before their winter slumber! You can also check out our GMB page for updates Clean Yards on Google.
Step 2: Sharpen Up! Get an Edge on Spring Savings
Okay, so your tools are sparkling clean after their spa day in Step 1. Fantastic! Now, let's talk about giving them an edge – literally. Step 2 is all about sharpening, the secret weapon to making your spring gardening tasks easier and, yes, saving you money and frustration down the road. Dull tools aren't just annoying; they're inefficient and can even damage your precious plants.

Think about it: trying to prune a rose bush with dull secateurs crushes the stem instead of making a clean cut. This opens the door for disease and pests. A dull shovel requires way more muscle to slice through that spring soil, especially if you're working in denser ground sometimes found near places like Richmond. Fighting with dull tools is nobody's idea of garden therapy! Sharpening now means you hit the ground running (or digging!) next spring, ready for anything from basic pruning to preparing for a brand new beautiful garden installation.
Why Sharpen Before Winter?
Besides being ready for spring's first tasks, sharpening before storage has another benefit. Filing or grinding removes tiny nicks and imperfections on the blade edge where rust often gets its first foothold. A smooth, sharp edge, especially when lightly oiled (we'll cover that soon!), is less susceptible to corrosion during the damp Ottawa winter. Local resources like the Master Gardeners of Ottawa-Carleton often have great tips on tool care.
DIY Sharpening: Pruners Example
Feeling handy? Sharpening basic hand tools like pruners (secateurs) is totally doable. Safety first – wear sturdy gloves!
- Clean Up: Make sure the blade is clean (you did this in Step 1, right?).
- Find the Bevel: Look closely at the cutting blade. One side will be flat, and the other will have an angle or bevel. You only sharpen the bevelled side.
- Choose Your Weapon: A simple whetstone (oil or water-lubricated) or a diamond file works great.
- Follow the Angle: Place the stone or file against the bevel, matching the existing angle (usually around 20-30 degrees).
- Smooth Strokes: Push the file or stone away from you, along the bevelled edge, from the base to the tip. Lift and repeat – don't saw back and forth. A few smooth strokes are usually enough.
- Remove the Burr: Gently run the stone or file flat across the back side of the blade once or twice to remove any tiny metal burr created by sharpening.
- Wipe Clean: Wipe off any metal filings. Voila!
Tools That Love a Sharp Edge:
Don't stop at pruners! Other common tools benefit greatly from sharpening:
- Loppers and Hedge Shears
- Shovels, Spades, and Hoes (sharpening the edge makes digging so much easier)
- Lawn Mower Blades (a big one!)
When to Call in the Pros
Let's be honest, not everyone has the time, tools, or confidence for sharpening, especially with trickier items. Lawn mower blades need careful sharpening and balancing to prevent damaging vibrations. Hedge trimmers can be complex. If a blade is severely nicked or damaged, or if you’d simply rather leave it to an expert, professional sharpening is a great option. Many local garden centres or specialized sharpening services, perhaps even near areas like Winchester, can handle this. Tackling tool sharpening is a vital piece of overall fall prep, much like our comprehensive Ottawa garden clean up service covers broader yard needs. Sharp tools ensure effective garden maintenance is a breeze come spring. If you're looking for recommendations or wondering if sharpening can be added to your service, just contact us – we're happy to help! Existing clients might even find scheduling options via the customer portal.
Taking the time to sharpen now sets you up for a smoother, more enjoyable, and ultimately less expensive gardening season next year. Your wrists (and your plants) will thank you!
Hand Tool Winterizing Tips
Focus on cleaning metal parts thoroughly, sharpening cutting edges, and applying a light coat of oil (like linseed oil) to both metal and wooden handles. Store them hanging or upright in oily sand to prevent rust.
Power Tool Winter Prep
Clean exteriors, especially mower decks. Address the fuel system: either use stabilizer in a full tank or drain the fuel completely. Remove batteries and store them indoors in a cool, dry place. Check spark plugs and air filters.
Watering Equipment Winter Care
Drain hoses completely, disconnect from spigots, and coil loosely for storage (indoors if possible). Winterize sprinklers and irrigation systems by blowing out the lines with compressed air to prevent freezing and cracking (Learn more about irrigation winterization).
Step 3: Oil's Well That Ends Well - Lubrication & Protection
Alright, your tools are squeaky clean and razor-sharp after Steps 1 and 2 – nice work! But before they head off for their winter vacation in the shed or garage, we need one final, crucial step: lubrication. Think of it as applying sunscreen before hitting the beach, but instead of UV rays, we're fighting off the damp, rusty villain known as Ottawa winter moisture, especially potent in areas from Nepean to Metcalfe. This step is key for keeping everything working smoothly and preventing that dreaded orange crust from forming while your tools snooze.
So, why the oily business? Lubrication creates a protective barrier on metal surfaces, pushing away any lingering moisture and stopping rust dead in its tracks. It also keeps moving parts on your pruners and loppers gliding like skaters on the Rideau Canal, preventing them from seizing up over the cold months. A little oil now saves a lot of elbow grease (and maybe some colourful language) come spring, ensuring your gardening tools are ready when you are.
Your Lubrication Arsenal:
What should you use? You've got options!
- General Purpose Oils: Things like 3-in-1 oil or specific lubricating oils designed for tools work great for metal parts and joints.
- Spray Lubricants: WD-40 is popular for displacing water initially*, but a silicone spray often provides longer-lasting *protection* against rust.
- Eco-Friendly Choices: Boiled linseed oil is fantastic – it protects metal *and* conditions wooden handles. Camellia oil is another plant-based favourite among woodworkers and gardeners. Even standard vegetable oil can work in a pinch for short-term storage, though it might get a bit sticky over time.
Applying the Protection:
Applying it is easy-peasy:
- Metal Blades & Surfaces: Put a small amount of your chosen oil on a clean rag and wipe a thin, even coat over all metal parts – shovels, trowels, mower blades, axes, you name it. Don't overdo it; a little goes a long way to prevent rust.
- Moving Parts: For tools like pruners, loppers, or hedge shears, apply a drop or two of oil directly into the pivot points, springs, and joints. Open and close the tool a few times to work the oil in thoroughly.
- Wooden Handles: Don't forget the wood! Wipe down clean, dry handles with boiled linseed oil. It soaks in, preventing the wood from drying out, cracking, or splintering during freeze-thaw cycles. Let it sit for 15-20 minutes, then wipe off any excess oil with a clean rag.
Taking these few extra minutes ensures your tools emerge from winter ready for action, whether you're tidying up existing landscaping beds or planning a beautiful new garden installation. It's all part of a smart approach to fall yard care. If the whole fall clean-up and tool prep process feels like too much, especially if you need specific help like a dedicated Metcalf garden clean up service, professional help is always an option. You can learn more about who we are and our commitment to quality service on our About Us page or even see what your neighbours think by checking out our Estimate Feedback. Feeling overwhelmed by the checklist? Don't hesitate to book an estimate and let us handle the slippery slope of tool care for you!
Step 4: Tuck Them In Tight - Smart Storage for Ottawa Winters
Okay, your tools are clean, sharp, and oiled – looking good! Now for the grand finale: tucking them in tight for their long winter nap. Step 4 is all about smart storage, ensuring your gardening gear stays safe and sound through whatever our Ottawa winter throws at us, from light dustings to major snowfalls. Getting this right means less rust, less damage, and less hassle come springtime.
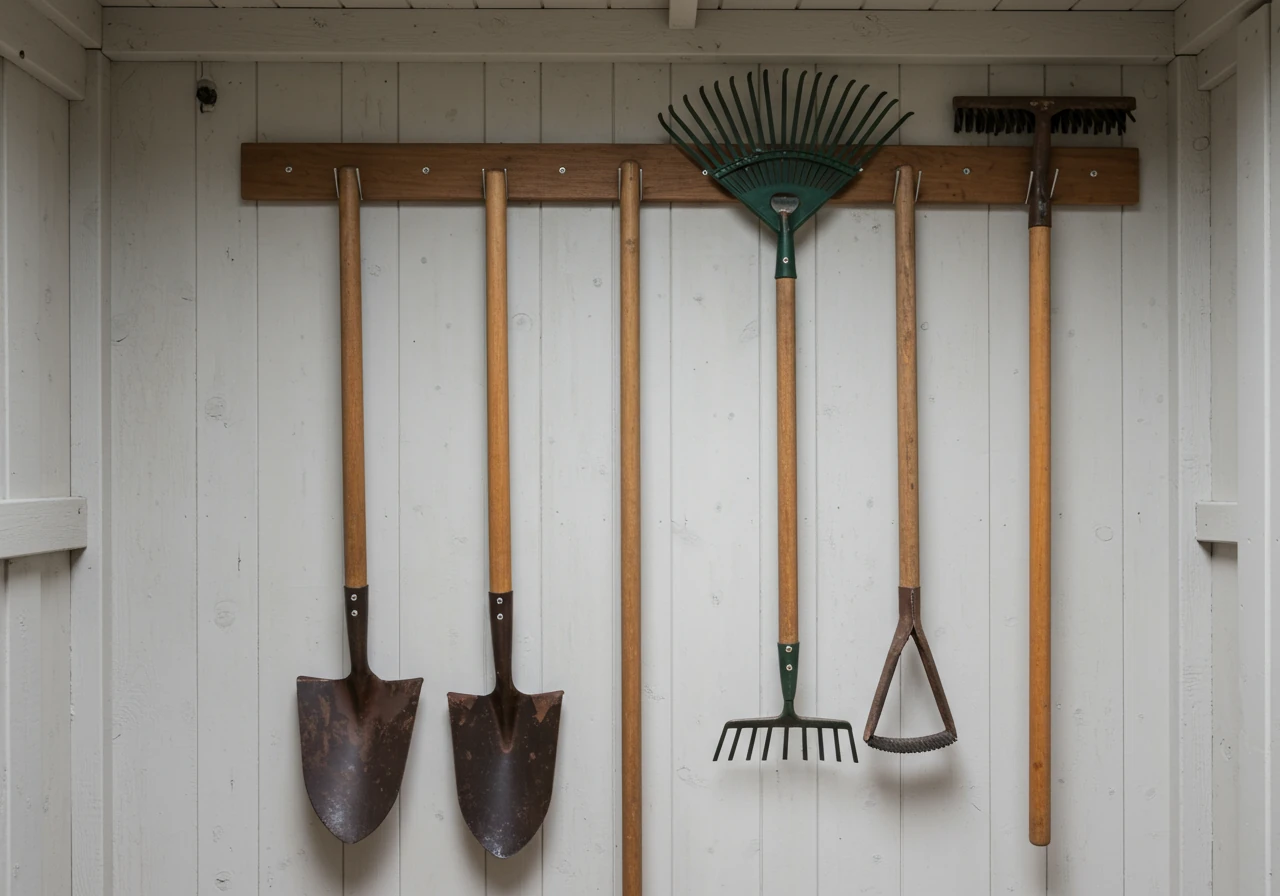
First things first: where to store them? Your shed or garage is the obvious answer, whether you're in Greely, Osgoode, or Kars. The most important thing is finding a spot that's dry. Dampness is the enemy! If your shed floor gets damp, try to store tools off the ground. Hanging tools on pegboards or sturdy hooks is fantastic – it improves air circulation, prevents moisture from getting trapped, and keeps things organized. No more tripping over rakes or battling shed monsters to find your favourite trowel! An organized space makes spring landscaping projects, like prepping for that dream sod installation, much smoother.
Now for specifics:
- Hand Tools: Hang clean, oiled metal tools or store them upright in a bucket filled with sand mixed with a bit of oil for extra protection. Wooden handles appreciate staying dry too.
- Garden Hoses: Oh, the poor garden hose! Drain it completely. Walk the length of it, lifting sections to get every last drop out. Disconnect it from the spigot (important!) and coil it loosely – avoid tight kinks. Store it indoors if possible, or at least in a dry, protected area of the shed or garage, away from direct sunlight. Frozen water = burst hose = sad gardener.
- Power Equipment: For gas-powered tools like mowers or trimmers, either add fuel stabilizer to a full tank and run the engine for a few minutes, or safely drain the fuel tank and carburetor completely (follow manufacturer instructions!). For battery-powered tools, remove the battery pack. Store batteries indoors in a cool, dry place (not freezing!). This ensures your equipment starts reliably for the first session of spring lawn care.
Consider creating a simple fall checklist, maybe tied to Ottawa’s first frost dates, to ensure nothing gets forgotten – from tool storage to final leaf cleanup. Imagine your tidy shed and yard, ready for winter – check out our photo gallery for some inspiration on beautiful, well-maintained properties. If wrapping up the season feels overwhelming, remember that a comprehensive Ottawa property cleanup service or even specific services like Marionville property cleanup service or Metcalf property cleanup service can take the entire process off your hands. Looking for general property clean up information? We have that too!
Storing your tools properly now means less work, less expense, and more gardening joy next year!
Potential Spring Savings
Estimated costs avoided by proper winterization.
Your Winter Tool Care Cheat Sheet
Okay, here's your handy cheat sheet to keep those gardening and landscaping tools happy through the long Ottawa winter! No rusty surprises come spring!
Remember this simple mantra: Clean, Sharpen, Oil, Store!
- Scrub Away Grime: Banish dirt, sap, and those stubborn bits of Greely clay before storing. Dirty tools = rusty tools! Think of it like good soil preparation for your tool shed – clean foundation matters.
- Get Edgy: Sharpen blades on pruners, shovels, and mowers now. Sharp tools work better and resist rust along the edge. A sharp tool makes spring tasks a breeze!
- Oil Up: Apply a thin coat of lubricating oil (like 3-in-1 or boiled linseed oil) to all metal parts and pivot points. This blocks moisture and keeps things moving smoothly. Think of it as understanding the terms and conditions for preventing rust!
- Store Smart: Keep tools dry and off damp floors. Hang them up if you can! Drain hoses completely and store equipment (especially batteries) properly. Proper storage protects your investment, much like thoughtful material selection ensures lasting quality in your garden projects.
Follow these steps, and your tools will be ready for action next season – maybe even looking as good as the yards in our Clean Yards project gallery!
Seasonal Tool Prep Timeline
Early Fall (Post-Harvest)
Start cleaning tools as you finish using them for the season. Tackle major grime on shovels, tillers after final garden cleanup. Sharpen tools used heavily during summer.
Mid-Fall (After Leaf Cleanup)
Focus on lawn mower, leaf blower maintenance. Clean decks, check fuel systems. Drain and store hoses before the first hard freeze. Review services like Ottawa yard cleanup service if needed.
Late Fall (Before Snowfall)
Final check on all tools. Apply protective oil coating. Ensure proper storage location is dry and secure. Winterize irrigation/water features (Kenmore Tips). Service specific areas like Marionville or Metcalfe may have specific timing.
Winter (Mid-Season Check - Optional)
If your storage area is damp, briefly check tools for any signs of rust mid-winter. Re-apply oil if needed. Ensure batteries are still stored correctly.
Greely Gardener FAQs: Winter Tool Care Q&A
Okay, let's tackle some common questions we hear from fellow gardeners around Greely and the wider Ottawa area about keeping those tools in tip-top shape over the winter!
WD-40 is great for displacing water initially, but it's not the best long-term rust preventer for our damp Ottawa winters. For tools sitting idle until spring, apply a light coat of 3-in-1 oil or boiled linseed oil after cleaning. This creates a more durable barrier against moisture, keeping your landscaping tools ready for action.
That sticky sap is stubborn! Try using rubbing alcohol or even hand sanitizer on a rag to dissolve it. For really tough spots, a little paint thinner or mineral spirits works wonders (use gloves and ventilate!). Once clean and dry, oil the blades and joints. Clean tools make spring tasks like precise mulching and edging much easier.
Fuel stabilizer helps a lot*, especially for our extended Ottawa winters! Follow the stabilizer instructions carefully and run the engine for a few minutes to circulate it. However, the absolute safest bet to prevent spring starting issues is draining the fuel system completely. Consider adding tool prep to a professional package, similar to the tasks covered in a Marionville yard clean-up service, if you're unsure.
Good question! Those freeze-thaw cycles are rough on wood. After cleaning and thoroughly drying the handles, wipe them down with boiled linseed oil. Let it soak in for 15-20 minutes, then wipe off the excess. This nourishes the wood and repels moisture, preventing cracking. Consistent care prevents bigger problems, just like how we protect your information as outlined in our Privacy Policy.
Don't panic! Unless it's completely encased in rust, it's likely salvageable. Give it a good clean and sharpen now, even mid-winter. A wire brush and some elbow grease can work wonders. Getting it clean and protected ASAP is key. Think of it as a mini-makeover – sometimes even neglected tools can see amazing garden transformations with a little TLC!
Conclusion: Reap the Rewards Next Spring (Without Breaking the Bank!)
So there you have it! A little bit of elbow grease now truly means reaping the rewards next spring – without breaking the bank on replacement tools. Taking the time to properly clean, sharpen, oil, and store your gardening and landscaping gear isn't just another fall chore; it's your secret weapon against rusty surprises and budget-busting repairs. Imagine greeting the first warm days with tools that are eager and ready to work, letting you focus on the fun parts of gardening! Our notorious Ottawa winters won't stand a chance against your well-prepped equipment.
Following the simple steps we’ve covered sets you up for success. Ready to tackle it yourself? Awesome – you’ve got this! Your future self, happily digging in thawed soil, will thank you.
But hey, life happens, and fall schedules get jam-packed. If tool prep feels like one task too many after a long season, why not let us handle the dirty work? Our fall clean-up crews offer comprehensive services, including expert tool winterization, throughout the area, including Russell, Embrun, and Metcalfe. We'll make sure everything is perfectly prepped and stored, ready for action.
Want a hassle-free transition to winter and a smooth start next spring?
Contact Us Today Book Your Fall Service EstimateLet's get those tools ready for their well-deserved rest.
