Best Time (Ottawa): Late winter/early spring (dormancy) or early fall.
Benefit: Revitalizes plants, improves absorption, allows plants to stay in the same pot longer.
Introduction: Your Plants Feel Trapped in Kars? Time for a Root Rescue!
Hey Kars neighbours! Ever feel like your potted plants are giving you the silent treatment? Maybe they look a bit glum, aren't growing much, or their leaves are yellowing despite your best efforts? It's possible they feel trapped, like they're stuck in their pot and dreaming of wide-open spaces out near Osgoode or Manotick! This common gardening problem is called being pot-bound (or root-bound).
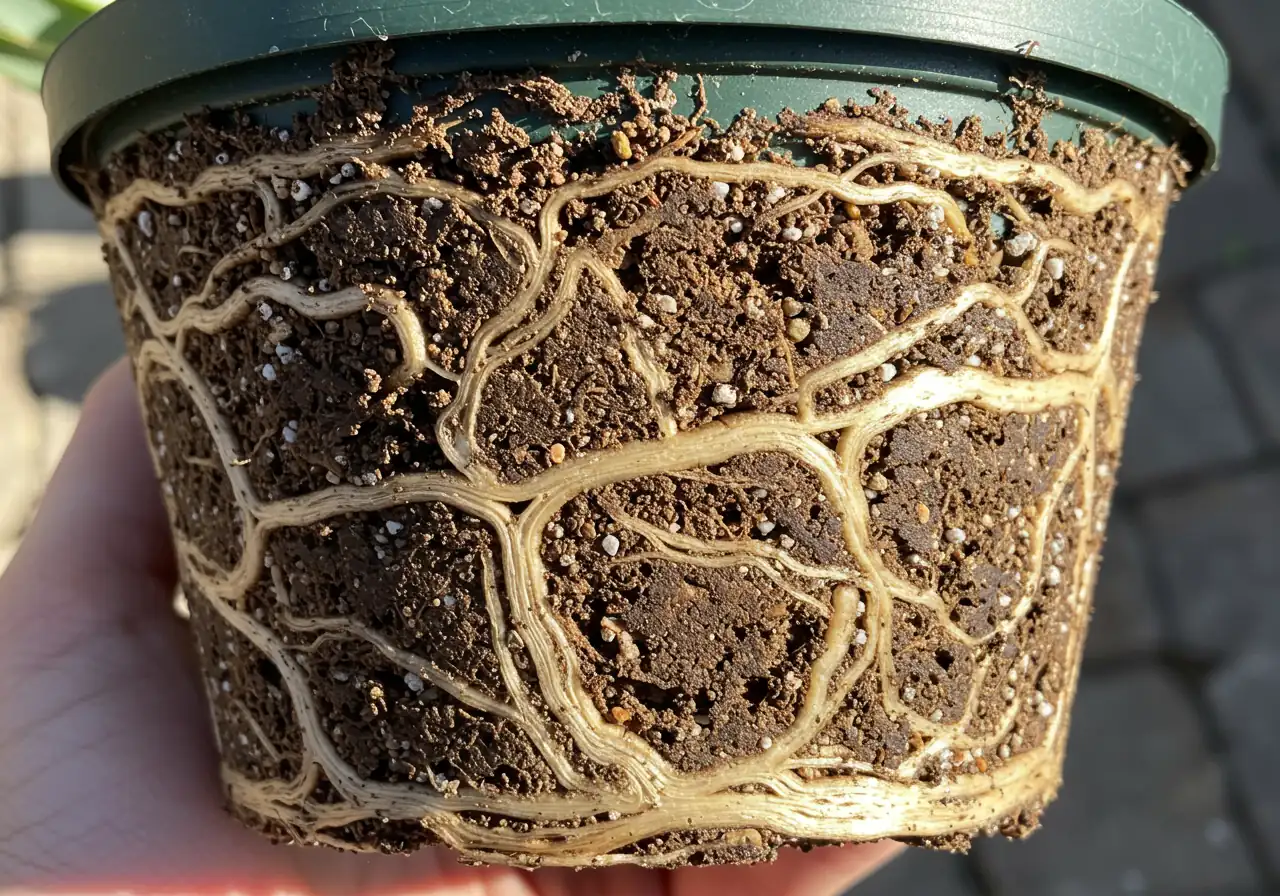
What does that mean? Imagine your plant's roots trying to find more room to grow, but hitting the sides of the pot again and again. Eventually, they start circling around the inside of the container, creating a dense, tangled mass. Think of it like spaghetti tightly packed in a small bowl – there's just no more room to move or breathe!
When roots get this cramped, they struggle to take up precious water and essential nutrients from the soil. This leads to classic signs of plant stress:
Stunted growth (it just stops getting bigger)
Yellowing or browning leaves
Wilting quickly, even after watering
Water running straight through the pot without soaking in
But don't toss that treasured fern or favourite tomato plant just yet! We have a fantastic landscaping solution that acts like a reset button: root pruning. Think of it as a refreshing spa day and a much-needed haircut, all rolled into one for your plant's roots. It's a simple but effective technique that can revitalize your container plants right here in the Ottawa region, encouraging fresh, healthy growth. Ready for a root rescue? Let’s dig in!
Is Your Plant Sending Out an S.O.S.? Spotting the Signs of Being Pot-Bound
Tangled, circling roots are the classic sign of a pot-bound plant.
Okay, plant parents of Ottawa, let's play detective! Sometimes our green buddies start acting a bit… off. They might not be shouting "Help me!" from their pots (though wouldn't that be handy?), but they are sending out subtle distress signals. If you suspect your plant feels more cramped than a commuter on the 95 bus through Nepean during rush hour, here’s how to spot the S.O.S. of being pot-bound:
The Incredible Shrinking Plant: Is your once-vigorous grower suddenly stalled? If it hasn't put out new leaves or grown taller in ages, its roots might have hit the wall – literally. This isn't about slowing down naturally; it's a full stop. This kind of stunted growth is different from the intentional growth control achieved through expert pruning of older shrubs like Kenmore dogwoods in your garden beds.
Yellow Pages (or Brown): Are the lower leaves turning yellow or brown and dropping off? While occasional leaf loss is normal, excessive yellowing, especially from the bottom up, can mean the roots can't access enough nutrients in their tight quarters. Just be sure not to confuse this slow decline with the abrupt browning seen after a surprise frost, which requires a different approach like fixing frost-damaged plants for garden recovery in Kars.
Thirsty Thursdays (and Mondays, and Tuesdays...): Does your plant wilt super fast, even if you feel like you just watered it? Or maybe the water seems to zip straight through the pot and out the bottom without really soaking in? Compacted, circling roots can prevent the soil from holding moisture properly. It's easy sometimes mistaking pot-bound stress for problems like overwatering in Kars' tricky clay soil, as both can cause wilting or yellowing leaves.
Root Peep Show: This is a big one! Can you see roots poking out of the drainage holes at the bottom? Or worse, are roots visibly growing over the soil surface, trying to make a break for it? That’s a flashing neon sign saying, "Get me outta here!"
The Pot Won't Budge: Sometimes, the root ball becomes so dense it pushes up against the top of the pot, making it hard to even water properly. The whole soil mass might feel rock solid and compressed. Unlike the sudden issues caused by pesky vole damage needing spring garden rescue in Richmond attacking roots from the outside, this pressure comes directly from within the pot.
The Ultimate Test: If you're brave (and gentle!), you can try carefully sliding the plant out of its pot. If you see a dense, tangled web of roots circling the outside of the soil ball, often with very little soil visible, then you've found your culprit!
If you're nodding along and recognizing one or more of these signs, especially in a plant that's been chilling in the same container for a year or more (even less time for fast growers!), it’s likely feeling the squeeze. Don't worry, it's usually fixable with some root attention! If diagnosing plant problems or tackling landscaping tasks feels overwhelming, remember that professional help is available through our comprehensive Clean Yards landscaping services.
Why Root Pruning is a Breath of Fresh Air for Your Plants (Especially Here!)
Okay, so we've figured out when your plant might be silently screaming for more space. But why exactly is giving those roots a little trim such a game-changer? Think of root pruning not as punishment, but as hitting the refresh button – giving your plant a literal breath of fresh air right down where it matters most. Especially here in the Ottawa area, with our sometimes-finicky gardening conditions, it offers some fantastic advantages.
Let's break down why this simple landscaping technique is so beneficial:
Encourages Awesome New Roots: This is the big one! When you carefully trim away those old, circling, and frankly lazy outer roots, you send a signal to the plant: "Time to make some new ones!" The plant responds by branching out with fresh, vigorous feeder roots. These new roots are much better at soaking up water and nutrients, giving your plant the fuel it needs to thrive.
Keeps Your Plants Fit, Not Flabby: Constantly repotting into bigger and bigger containers isn't always practical, especially if you're gardening on a balcony in Barrhaven or have limited space. Root pruning allows you to keep a plant happily in the same pot (or one just slightly larger) for much longer. It helps manage the plant's overall size without sacrificing its health.
Boosts Nutrient and Water Absorption: Remember how pot-bound roots struggle to drink and eat? Root pruning fixes that! By removing the congested outer layer and encouraging those efficient new feeder roots, you dramatically improve the plant's ability to access everything it needs from the soil. This means greener leaves, stronger stems, and often more flowers or fruit – maximizing growth during our precious Ottawa growing season. Getting your plants ready with techniques like this is a key part of seasonal prep, much like a thorough Nepean garden clean-up service gets the whole space ready.
Reduces Plant Stress & Increases Resilience: A plant choked by its own roots is a stressed plant, making it more vulnerable to pests and diseases. Root pruning alleviates this major stressor. A healthier, less-stressed plant with a robust (but not congested) root system is better equipped to handle environmental challenges, like transitioning indoors for our chilly Metcalfe winters or bouncing back come spring. Proper care contributes to overall property health, which might involve tasks like those offered by a city property cleanup service for keeping urban green spaces tidy and thriving.
It’s Eco-Friendly!: Instead of constantly buying bigger plastic pots and bags upon bags of new soil, root pruning lets you rejuvenate your plants in their existing homes. It’s a sustainable practice that reduces waste and saves you money. It’s just one aspect of keeping your outdoor space healthy and beautiful, similar to how residents might use a Marionville yard cleanup service for general tidiness.
Root pruning might sound a bit intense, but it's a straightforward process that pays huge dividends for your container plants. It’s a vital tool in a gardener’s toolkit, promoting long-term plant health and vigour. If you're looking after a garden, perhaps in areas like Marionville, incorporating practices like root pruning alongside regular maintenance, such as that provided by a Marionville garden clean-up service, ensures your plants stay happy. For broader landscaping needs, remember that a range of professional Clean Yards landscaping services are available to help keep your entire yard looking its best. Give root pruning a try – your plants will thank you for the breathing room!
The Gardener's Calendar: Ideal Timing for Root Pruning in the Ottawa Valley
Alright Ottawa Valley gardeners, let's talk timing! You wouldn't wear shorts to skate on the Rideau Canal in January (well, most of us wouldn't!), and similarly, your plants prefer certain times for potentially stressful activities like root pruning. Getting the timing right is key to helping them bounce back quickly and thrive. Mess it up, and you might just stress them out more than help them.
So, when is the golden window for giving those roots a trim around here?
The Sweet Spot: Late Winter to Very Early Spring This is generally the best time. Think late February, March, or even early April, depending on the year and the specific plant. Why then? Most container plants (both houseplants enjoying the indoors near Kars and outdoor potted perennials) are dormant or just beginning to wake up. They aren't actively pushing out tons of leaves or flowers. Pruning roots during this sleepy phase minimizes shock. The plant can focus its emerging energy on healing the cuts and growing new, healthy roots just as the growing season begins. Scheduling this before the main spring rush is wise, much like booking your Marionville garden clean-up service ahead of time ensures your beds are ready for planting.
Second Choice: Early Fall If you miss the spring window, early fall (September to early October) can also work. The extreme heat of summer has passed, but the potting mix hasn't frozen solid like it does near Winchester come deep winter. The plant is slowing down its top growth, giving the roots a chance to recover a bit before true dormancy sets in. Some find this timing convenient as it coincides with other end-of-season tasks, perhaps around the same time they schedule their Metcalf yard cleanup service.
Times to Avoid: The No-Go Zones
Peak Growing Season (Late Spring/Summer): Absolutely avoid major root pruning when the plant is working its hardest – flowering, fruiting, or putting on significant leafy growth. Too much stress!
Deep Winter: While the plant is dormant, cold temperatures mean recovery can be very slow or stalled.
Why Timing Matters So Much
Root pruning is a bit of a shock, even when done carefully. Timing it during dormancy allows the plant to handle the stress using its stored energy reserves, focusing on root repair before it needs to support vigorous top growth. Pruning during active growth forces the plant to divert energy from leaves and flowers to fix the roots, often resulting in wilting, leaf drop, and a serious setback.
Think of it like this: proper timing helps your plant integrate this "spa treatment" smoothly into its natural cycle. While root pruning is a specific task for potted plants, remember that good timing is crucial for many landscaping jobs, including larger projects perhaps handled by a Marionville property cleanup service which also benefit from careful seasonal planning.
Simple Tip: Keep a small note in your gardening journal or calendar for plants you suspect might need root pruning next season. Mark the ideal late winter/early spring window.
Getting the timing right makes root pruning a highly effective way to rejuvenate your plants. If you're ever hesitant about the timing for your specific green friends or how it fits with other garden tasks, don't hesitate to reach out; you can always contact Clean Yards for advice. We also appreciate hearing about your gardening successes and challenges; feel free to share your experiences via our Clean Yards estimate and feedback form. Happy pruning!
Let's Get Untangled: Your Step-by-Step Root Pruning Guide
Okay, deep breaths! Your plant is feeling cramped. We've diagnosed the pot-bound blues, and now it's time for the rescue mission: the actual root pruning! Don't worry, it sounds more dramatic than it is. Let’s get those roots untangled and ready for some happy, healthy growth!
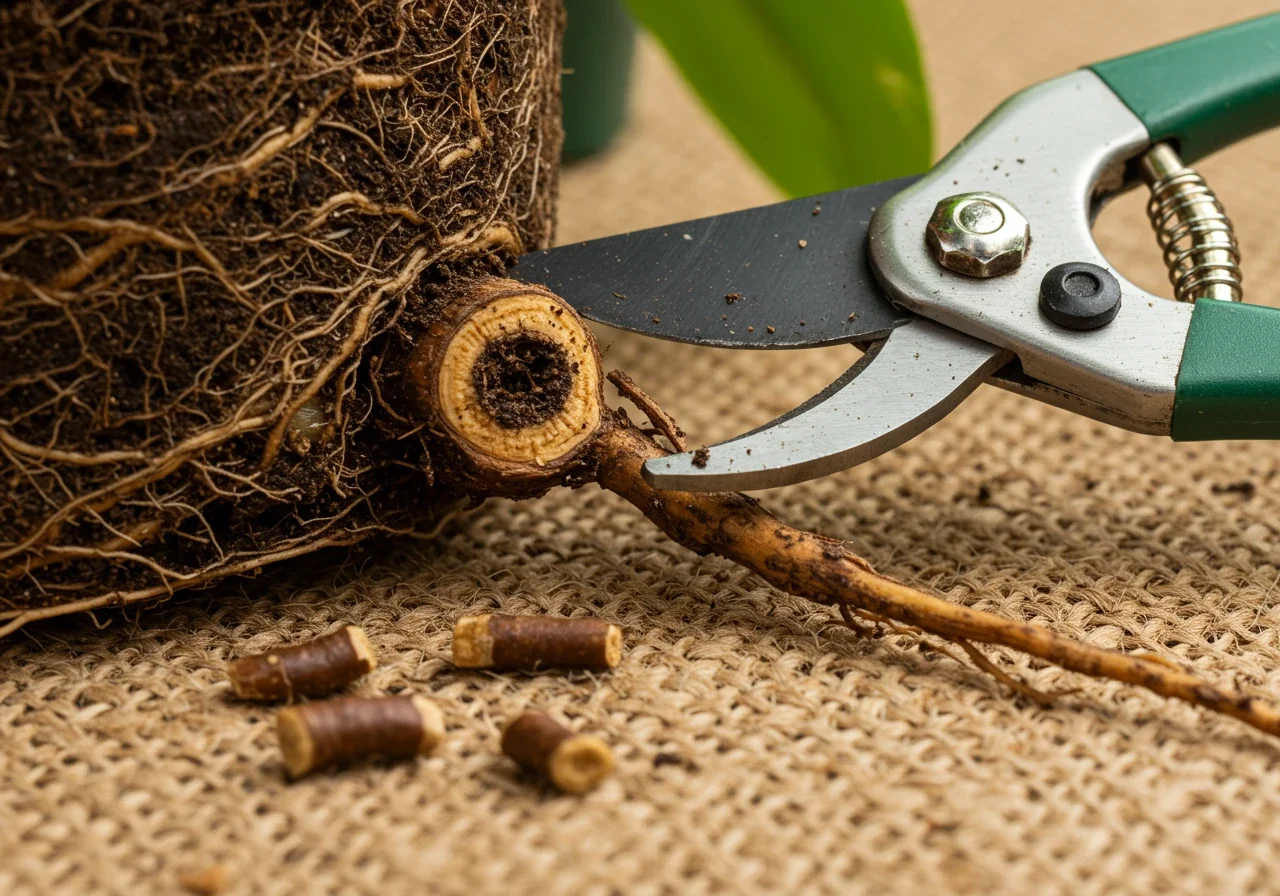
Using clean, sharp pruners is essential for healthy cuts.
Gear Up: Assemble clean, sharp pruners/scissors, a soil knife/dull butter knife, the correct size pot, fresh potting mix, gloves, and a work surface (tarp/newspaper). Clean tool blades with rubbing alcohol.
Free Your Plant: Gently tip the pot and slide the plant out. If stuck, run the knife around the inside edge or tap the pot bottom. Avoid yanking stems.
Assess Roots: Examine the root ball. Look for circling roots, a dense bottom mat, or thick, woody roots winding around.
Pruning Time:
Trim dead, mushy, or damaged roots first.
Snip thick, circling roots on the outside and bottom.
Cut off the dense mat at the bottom (maybe remove the bottom inch).
Make 3-4 shallow (1-inch deep) vertical cuts down the sides if severely compacted.
Aim to remove 10-20% of the root mass (up to 30% for severe cases).
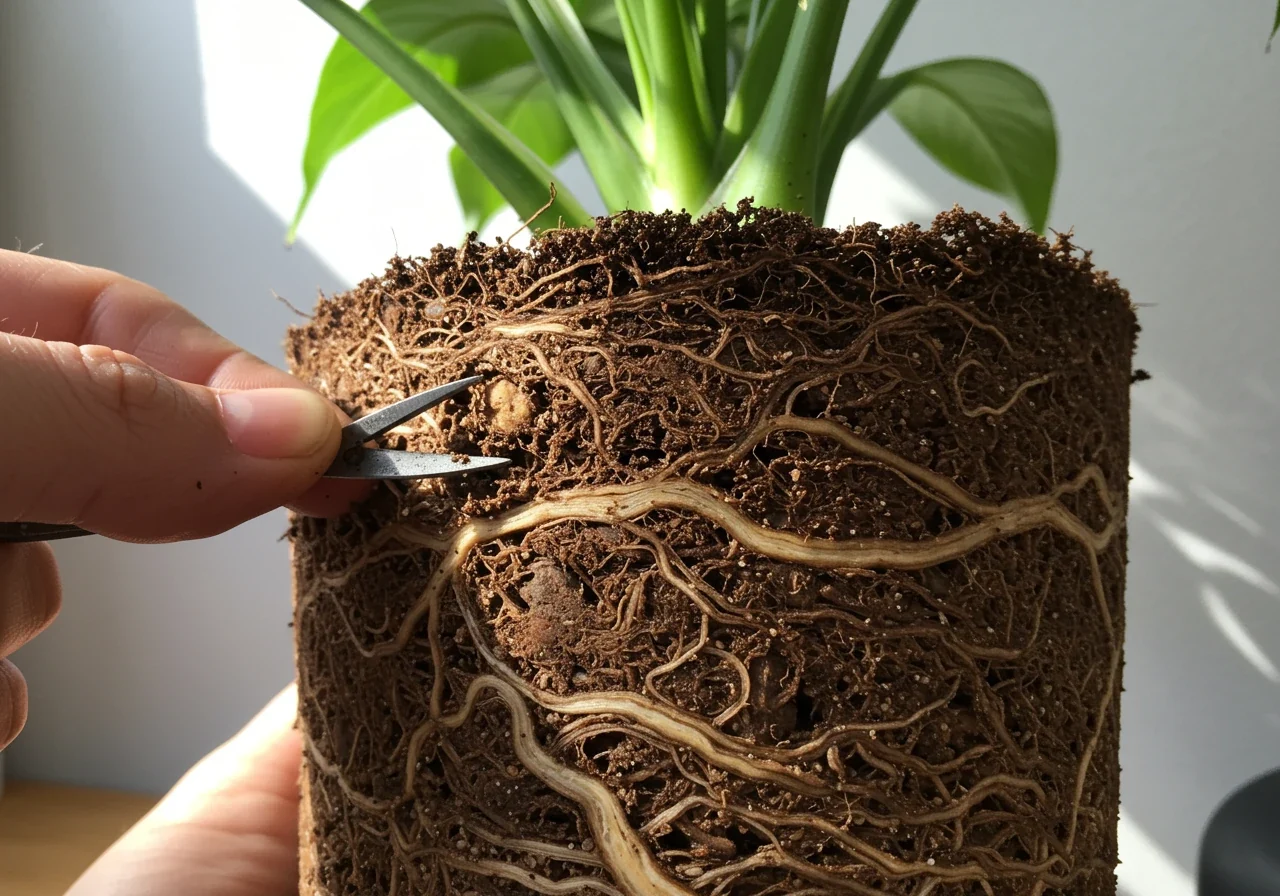
Loosen Roots:Gently tease apart the outer roots after pruning.
Gently tease apart remaining outer roots with fingers or a tool. Encourage them to spread outwards.
Repotting:
Clean the original pot or use one slightly larger.
Add fresh potting mix to the bottom. Good soil preparation principles apply even in pots – use quality mix!
Center the plant, ensuring the root ball top is ~1 inch below the rim.
Fill around sides with fresh mix, firming gently. Avoid tight packing.
Water thoroughly until water drains out.
Post-Pruning Care (TLC): See the "TLC Time" section below for detailed aftercare. This includes indirect light, consistent moisture, and delaying fertilizer. We love feedback on your gardening journey; share results on our estimate and feedback page!
Clean Up: Compost healthy root trimmings (if desired), trash diseased ones. Clean and sterilize tools. This step is tidier than large mulching and edging projects, but still important!
And that’s the root of it! You’ve successfully performed root pruning. A big thank you from Clean Yards for following along!
Visualizing the Benefits: Root Health Improvement
Estimated Root Efficiency (Before vs. After Pruning)
Before Pruning
After Pruning & Recovery
*Conceptual representation of improved water/nutrient uptake potential.
Root Pruning Timeline: A Seasonal Perspective
Late Winter (Feb/Mar)
Plant is dormant. Ideal time to check roots and perform pruning with minimal shock. Similar timing for planning spring Ottawa garden clean-up.
Early Spring (Apr)
Last chance for optimal pruning before active growth. Plant begins waking up. Time for soil preparation in garden beds.
Spring/Summer (May-Aug)
Avoid major root pruning. Focus on regular care: watering, light fertilizing (after recovery), and enjoying growth! Consider lawn care and sod installation if needed elsewhere.
Early Fall (Sep/Oct)
Second window for pruning if missed in spring. Plant growth slows. Good time for general Ottawa yard cleanup and preparing plants for winter.
Late Fall/Winter (Nov-Jan)
Avoid root pruning. Plants are dormant or semi-dormant. Protect outdoor containers from harsh freezes. A good time to review your gardening strategy or check out project transformations for inspiration.
TLC Time: Post-Pruning Care for a Happy Recovery
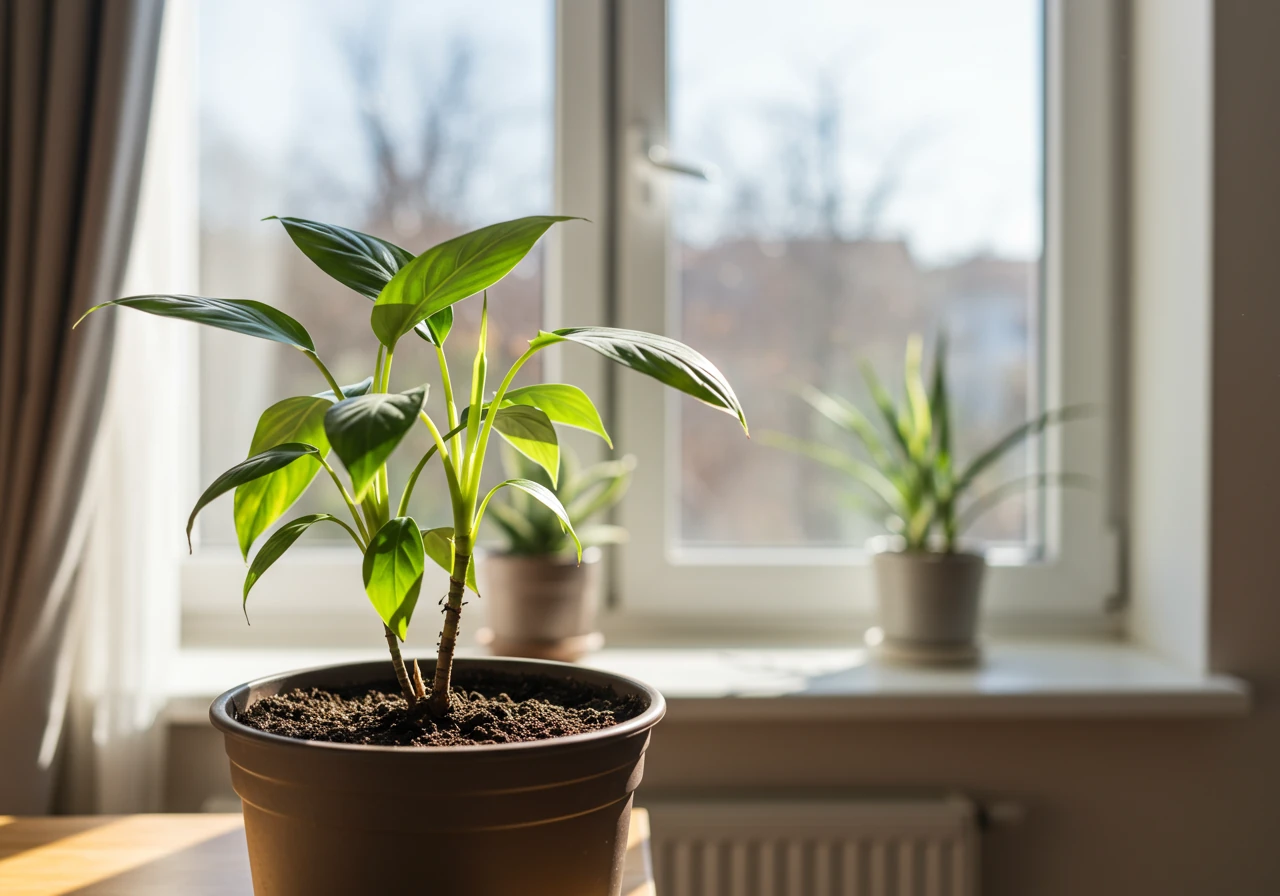
Provide gentle light and consistent moisture for optimal recovery.
Okay, you’ve done the deed – the root pruning is complete! Your plant might look a little shocked, like it just heard the price of gas in downtown Ottawa, but don't fret. With a bit of tender loving care, it’ll bounce back stronger than ever. Think of this phase as its spa recovery time before it's ready to show off in your Russell garden oasis. Here’s how to pamper your patient:
Hydration Station (But Gently!): After the initial thorough watering post-repotting, the key is consistent moisture. Don't let the soil completely dry out, but definitely avoid soggy conditions. Check soil moisture every couple of days.
Shady Relaxation Zone: Place it in bright, indirect light. No intense sun! Think gentle morning sun or filtered light. While your plant rests, maybe focus on less intensive tasks like regular lawn care duties.
Hold the Fertilizer Feast: Wait 3-4 weeks before fertilizing to avoid burning new roots. Let it use nutrients from the fresh mix first.
Watchful Waiting: Look for signs of recovery like perkier leaves or new buds. This signals roots are healing. While monitoring, perhaps tackle bigger projects like a seasonal property clean up. For specific garden bed tidiness near your recovering plant, consider a focused Metcalf garden clean up service.
Transition Back Gradually: Once new growth is consistent, slowly reintroduce it to preferred light/watering/feeding routines. Acclimate outdoor plants gradually. Soon, it will be ready for ongoing routine garden maintenance.
Providing this careful aftercare is crucial for success. It ensures the stress of pruning leads to rejuvenation. We handle information shared with us carefully, as per our Clean Yards Privacy Policy. Be patient, provide the TLC, and your plant will thank you!
Quick Tips: Root Pruning Power-Ups
Feeling ready but want the cheat sheet? Here are the key power-ups:
Timing is Everything (Almost!): Best: Late Winter/Very Early Spring (Feb-Apr). Second Best: Early Fall. Avoid peak summer & deep winter. This fits within plans like a reliable city garden maintenance service.
Snip Smart, Not Sad: Target outer/bottom circling roots. Use clean, sharp pruners. Remove 10-20% usually. Gently tease remaining roots. Prepare for mess; easier than a full city garden clean up service, but still needs tidying!
Post-Pruning Pampering: Repot in fresh mix. Provide bright, *indirect* light. Keep soil consistently moist (not soggy!). No fertilizer for ~1 month. Crucial part of ongoing essential garden maintenance.
Keep it Contained (Happily!): Manage plant size in the same pot (or slightly larger) longer. Different from large projects like a complete city yard cleanup service.
Know Your Plant's Rules: General tips are great, but tailor to specific plant needs. Like understanding our Clean Yards Terms and Conditions, knowing the details helps! Check out reliable resources like the Master Gardeners of Ottawa Carleton for plant-specific advice.
FAQs: Your Root Pruning Questions Answered for the Ottawa Area
It depends on the plant! Fast growers might need it yearly, while slower ones could go 2-3 years. Check annually in late winter by gently sliding the plant from its pot. If you see lots of circling roots, it’s time. Consider it part of your plant health check-up, similar to the assessments included in regular city garden maintenance services.
Think of it less like surgery and more like a much-needed haircut! While there's minor stress initially, proper root pruning actually *helps* your plant by stimulating fresh, efficient root growth. It prevents the slow decline of being pot-bound. Done correctly, it leads to healthier, more vigorous plants, contributing positively to overall plant and garden transformations over time.
Generally, no. Root pruning is specifically for container plants whose roots are physically confined. Plants in your Manotick garden beds have more space to roam. If landscape tree or shrub roots are causing problems (e.g., near foundations), that requires different techniques, often best handled by professionals. Ensuring proper spacing during new garden installation helps avoid many in-ground root issues later.
Forget digging up garden soil, especially our heavy Ottawa clay! Always use a fresh, high-quality *potting mix* for containers. Look for one that’s well-draining but still holds some moisture. Adding a little compost can boost nutrients too. Discard the old, compacted soil you removed – perhaps during a spring spruce-up alongside a broader Ottawa area property cleanup service – to give roots the best restart. Need help choosing? Our material selection advice can guide you.
Don't panic! A little wilting or drooping right after root pruning is common – it’s temporary transplant shock. You likely didn’t do anything wrong, especially if you followed the steps carefully. Just ensure it gets that crucial post-pruning TLC: consistent moisture (not soggy!), indirect light, and no fertilizer for a few weeks. Patience is key! Consult the Ottawa Public Library's gardening resources for general plant care tips.
Nope, different gardening tasks! Root pruning helps one plant stay healthy and manageably sized *within its pot*. Dividing involves splitting a larger perennial clump (often in garden beds, maybe in Kars or Greely) into multiple smaller plants to rejuvenate the original and create new ones. Dividing is great when planning for a new garden bed installation or simply wanting more plants. Check out info from groups like the Friends of the Central Experimental Farm for workshops on dividing.
Conclusion: Give Your Kars Plants Room to Breathe!
So there you have it, Kars gardening friends! Giving your potted plants a root trim isn't some scary operation; it's like opening a window for them to take a deep, refreshing breath. Don't let your favourite green pals slowly suffocate in their containers, dreaming of the spacious fields out near Osgoode or Richmond. Root pruning is your secret weapon for keeping those container plants happy, healthy, and thriving right here in the Ottawa area for years to come. It encourages fresh growth and ensures your plants can actually use the water and nutrients you give them.
Feeling ready to tackle those tangled roots yourself? Awesome! Use the steps we outlined and watch your plants perk up. But hey, if the thought of plant 'surgery' makes you a bit nervous, or if you're juggling garden tasks across Metcalfe or other city properties and just need an expert hand, we're here to help. Clean Yards offers professional root pruning assistance to take the guesswork out of it. Check us out on Google to see what others say about our work. Plus, we handle all sorts of landscaping and gardening services, from getting to know us to full property cleanups, to keep your entire property looking fantastic. Give us a shout – let's give those roots some room to groove and keep your Kars garden gorgeous!
{
"@context": "https://schema.org",
"@type": "Article",
"headline": "Rescue Pot-Bound Plants in Kars: Root Prune Now",
"author": {
"@type": "Organization",
"name": "Clean Yards",
"url": "https://cleanyards.ca/"
},
"datePublished": "2024-04-15",
"image": [
"https://cleanyards.ca/wp-content/uploads/2025/04/close_up_photograph_of_a_sever_5375.webp",
"https://cleanyards.ca/wp-content/uploads/2025/04/macro_photograph_focused_on_a__8382.webp",
"https://cleanyards.ca/wp-content/uploads/2025/04/close_up_photograph_of_a_plant_9332.webp",
"https://cleanyards.ca/wp-content/uploads/2025/04/photograph_of_a_freshly_repott_3321.webp"
],
"description": "Learn how to identify and fix pot-bound (root-bound) plants in the Kars and Ottawa area with step-by-step root pruning instructions. Revitalize your container plants for healthier growth.",
"mainEntityOfPage": {
"@type": "WebPage",
"@id": "https://cleanyards.ca/blog/rescue-pot-bound-plants-kars-root-prune-now/" // Replace with actual URL if known
}
}{
"@context": "https://schema.org",
"@type": "HowTo",
"name": "How to Root Prune a Pot-Bound Plant",
"description": "A step-by-step guide to identifying and correcting pot-bound plants through root pruning.",
"image": "https://cleanyards.ca/wp-content/uploads/2025/04/macro_photograph_focused_on_a__8382.webp",
"estimatedCost": {
"@type": "MonetaryAmount",
"currency": "CAD",
"value": "5-15"
},
"supply": [
{ "@type": "HowToSupply", "name": "Clean, sharp bypass pruners or scissors" },
{ "@type": "HowToSupply", "name": "Soil knife or dull butter knife" },
{ "@type": "HowToSupply", "name": "Appropriate size pot (original cleaned or slightly larger)" },
{ "@type": "HowToSupply", "name": "Fresh potting mix" },
{ "@type": "HowToSupply", "name": "Gardening gloves (optional)" },
{ "@type": "HowToSupply", "name": "Tarp or newspaper" },
{ "@type": "HowToSupply", "name": "Rubbing alcohol (for cleaning tools)" }
],
"tool": [
{ "@type": "HowToTool", "name": "Bypass pruners/scissors" },
{ "@type": "HowToTool", "name": "Soil knife/dull knife" }
],
"step": [
{
"@type": "HowToStep",
"name": "Gear Up",
"text": "Assemble clean tools (pruners, knife), pot, fresh potting mix, gloves, and a work surface. Clean pruner blades with rubbing alcohol.",
"url": "#how",
"position": 1
},
{
"@type": "HowToStep",
"name": "Free Your Plant",
"text": "Gently tip the pot and slide the plant out. Use a knife around the edge or tap the bottom if stuck.",
"url": "#how",
"position": 2
},
{
"@type": "HowToStep",
"name": "Assess Roots",
"text": "Examine the root ball for circling roots, bottom matting, or thick woody roots.",
"url": "#how",
"position": 3
},
{
"@type": "HowToStep",
"name": "Pruning Time",
"text": "Trim dead/damaged roots. Snip thick circling roots on the outside/bottom. Remove bottom mat. Make vertical cuts on sides if needed. Aim to remove 10-30% of root mass.",
"image": "https://cleanyards.ca/wp-content/uploads/2025/04/macro_photograph_focused_on_a__8382.webp",
"url": "#how",
"position": 4
},
{
"@type": "HowToStep",
"name": "Loosen Roots",
"text": "Gently tease apart remaining outer roots with fingers or a tool to encourage outward growth.",
"image": "https://cleanyards.ca/wp-content/uploads/2025/04/close_up_photograph_of_a_plant_9332.webp",
"url": "#how",
"position": 5
},
{
"@type": "HowToStep",
"name": "Repotting",
"text": "Place plant in cleaned/new pot with fresh mix at the bottom. Center plant, fill sides with mix, firm gently. Water thoroughly.",
"url": "#how",
"position": 6
},
{
"@type": "HowToStep",
"name": "Post-Pruning Care (TLC)",
"text": "Provide bright, indirect light, consistent moisture (not soggy), and wait 3-4 weeks before fertilizing.",
"image": "https://cleanyards.ca/wp-content/uploads/2025/04/photograph_of_a_freshly_repott_3321.webp",
"url": "#aftercare",
"position": 7
},
{
"@type": "HowToStep",
"name": "Clean Up",
"text": "Compost or discard pruned roots appropriately. Clean and sterilize tools.",
"url": "#how",
"position": 8
}
]
}{
"@context": "https://schema.org",
"@type": "FAQPage",
"mainEntity": [
{
"@type": "Question",
"name": "How often should I root prune my container plants in Ottawa?",
"acceptedAnswer": {
"@type": "Answer",
"text": "It depends on the plant! Fast growers might need it yearly, while slower ones could go 2-3 years. Check annually in late winter by gently sliding the plant from its pot. If you see lots of circling roots, it’s time. Consider it part of your plant health check-up, similar to the assessments included in regular city garden maintenance services."
}
},
{
"@type": "Question",
"name": "Will root pruning hurt my plant?",
"acceptedAnswer": {
"@type": "Answer",
"text": "Think of it less like surgery and more like a much-needed haircut! While there's minor stress initially, proper root pruning actually *helps* your plant by stimulating fresh, efficient root growth. It prevents the slow decline of being pot-bound. Done correctly, it leads to healthier, more vigorous plants, contributing positively to overall plant and garden transformations over time."
}
},
{
"@type": "Question",
"name": "Can I root prune plants directly in my garden beds (like in Manotick)?",
"acceptedAnswer": {
"@type": "Answer",
"text": "Generally, no. Root pruning is specifically for container plants whose roots are physically confined. Plants in your Manotick garden beds have more space to roam. If landscape tree or shrub roots are causing problems (e.g., near foundations), that requires different techniques, often best handled by professionals. Ensuring proper spacing during new garden installation helps avoid many in-ground root issues later."
}
},
{
"@type": "Question",
"name": "What kind of soil should I use after root pruning, especially with Ottawa's clay?",
"acceptedAnswer": {
"@type": "Answer",
"text": "Forget digging up garden soil, especially our heavy Ottawa clay! Always use a fresh, high-quality *potting mix* for containers. Look for one that’s well-draining but still holds some moisture. Adding a little compost can boost nutrients too. Discard the old, compacted soil you removed – perhaps during a spring spruce-up alongside a broader Ottawa area property cleanup service – to give roots the best restart."
}
},
{
"@type": "Question",
"name": "My plant looks droopy after root pruning – did I do something wrong?",
"acceptedAnswer": {
"@type": "Answer",
"text": "Don't panic! A little wilting or drooping right after root pruning is common – it’s temporary transplant shock. You likely didn’t do anything wrong, especially if you followed the steps carefully. Just ensure it gets that crucial post-pruning TLC: consistent moisture (not soggy!), indirect light, and no fertilizer for a few weeks. Patience is key!"
}
},
{
"@type": "Question",
"name": "Is root pruning the same as dividing perennials?",
"acceptedAnswer": {
"@type": "Answer",
"text": "Nope, different gardening tasks! Root pruning helps one plant stay healthy and manageably sized *within its pot*. Dividing involves splitting a larger perennial clump (often in garden beds, maybe in Kars or Greely) into multiple smaller plants to rejuvenate the original and create new ones. Dividing is great when planning for a new garden bed installation or simply wanting more plants."
}
}
]
}(function() {
// Ensure DOM is fully loaded before running scripts
document.addEventListener('DOMContentLoaded', function() {// --- Progress Bar ---
const progressBar = document.getElementById('progressBar');
const body = document.body;
const html = document.documentElement;function updateProgressBar() {
const scrollHeight = Math.max(body.scrollHeight, body.offsetHeight, html.clientHeight, html.scrollHeight, html.offsetHeight);
const clientHeight = html.clientHeight || window.innerHeight;
const scrollTop = window.pageYOffset || html.scrollTop || body.scrollTop || 0;
const height = scrollHeight - clientHeight;
const scrolled = (scrollTop / height) * 100;if (progressBar && height > 0) {
progressBar.style.width = scrolled + '%';
} else if (progressBar) {
progressBar.style.width = '0%'; // Handle case where content is shorter than viewport
}
}// --- Back to Top Button ---
const backToTopBtn = document.getElementById('backToTopBtn');
const scrollThreshold = 300; // Show button after scrolling 300pxfunction toggleBackToTopButton() {
if (window.pageYOffset > scrollThreshold) {
if (backToTopBtn) backToTopBtn.style.display = 'block';
} else {
if (backToTopBtn) backToTopBtn.style.display = 'none';
}
}if (backToTopBtn) {
backToTopBtn.addEventListener('click', function() {
window.scrollTo({ top: 0, behavior: 'smooth' });
});
}// Add scroll event listener for both progress bar and back-to-top
window.addEventListener('scroll', () => {
updateProgressBar();
toggleBackToTopButton();
});
// Initial calls on load
updateProgressBar();
toggleBackToTopButton();// --- Collapsible Sections (FAQ) ---
const collapsibles = document.querySelectorAll('.standalone-article-wrapper .collapsible-button');
collapsibles.forEach(button => {
button.addEventListener('click', function() {
this.classList.toggle('active');
const content = this.nextElementSibling;
if (content && content.classList.contains('collapsible-content')) {
if (content.style.maxHeight) {
content.style.maxHeight = null;
content.classList.remove('show'); // Remove padding class
content.style.paddingTop = '0'; // Animate padding removal
content.style.paddingBottom = '0';
} else {
content.style.maxHeight = content.scrollHeight + "px";
content.classList.add('show'); // Add padding class
content.style.paddingTop = '15px'; // Restore padding with transition
content.style.paddingBottom = '18px';
}
}
});
});// --- Tabs ---
const tabButtons = document.querySelectorAll('.standalone-article-wrapper .tab-button');
const tabContents = document.querySelectorAll('.standalone-article-wrapper .tab-content');tabButtons.forEach(button => {
button.addEventListener('click', function() {
const targetTab = this.getAttribute('data-tab');// Deactivate all buttons and content
tabButtons.forEach(btn => btn.classList.remove('active'));
tabContents.forEach(content => content.classList.remove('active'));// Activate clicked button and corresponding content
this.classList.add('active');
const activeContent = document.getElementById(targetTab);
if(activeContent) {
activeContent.classList.add('active');
}
});
});
// Ensure the first tab is active on load (if applicable)
if (tabButtons.length > 0 && !document.querySelector('.standalone-article-wrapper .tab-button.active')) {
tabButtons[0].classList.add('active');
const firstTabId = tabButtons[0].getAttribute('data-tab');
const firstTabContent = document.getElementById(firstTabId);
if (firstTabContent) {
firstTabContent.classList.add('active');
}
}// --- Bar Chart Animation ---
const bars = document.querySelectorAll('.standalone-article-wrapper .bar');function animateBars() {
bars.forEach((bar, index) => {
const value = bar.getAttribute('data-value');
// Add a slight delay for each bar for staggered effect
setTimeout(() => {
if (value) {
bar.style.height = value + '%';
bar.classList.add('animate'); // Trigger pseudo-element animation
}
}, index * 150); // 150ms delay between bars
});
}// Option 1: Animate immediately on load
// animateBars();// Option 2: Animate when chart scrolls into view (more robust but more complex)
const chart = document.getElementById('rootChart');
if (chart) {
const observer = new IntersectionObserver((entries) => {
entries.forEach(entry => {
if (entry.isIntersecting) {
animateBars();
observer.unobserve(chart); // Stop observing once animated
}
});
}, { threshold: 0.5 }); // Trigger when 50% visibleobserver.observe(chart);
} else {
// Fallback if chart container ID not found - animate immediately
animateBars();
}}); // End DOMContentLoaded
})();
To request a quote, kindly fill out the form below.
Before You Go
We’re confident in our services, we offer a 30-day money-back guarantee. Not 100% satisfied? We’ll swiftly refund all labor costs. Your satisfaction is our top priority!
Get in touch today for expert service and satisfaction guaranteed. You won't regret it!