Kenmore Lawn Care: Spring Fertilizing Guide
Spring Fertilizing Guide Highlights:
- Best time to fertilize: Late April/Early May when soil temperature reaches 55°F (13°C)
- Choose fertilizers with higher nitrogen content for spring green-up
- Use a soil test to determine your lawn’s specific nutrient needs
- Apply fertilizer evenly using a broadcast spreader
- Water thoroughly after application to prevent fertilizer burn
Looking for professional help with your Kenmore lawn? Contact us today for a personalized quote!
Introduction: Wake Up Your Kenmore Lawn with Spring Fertilizing!
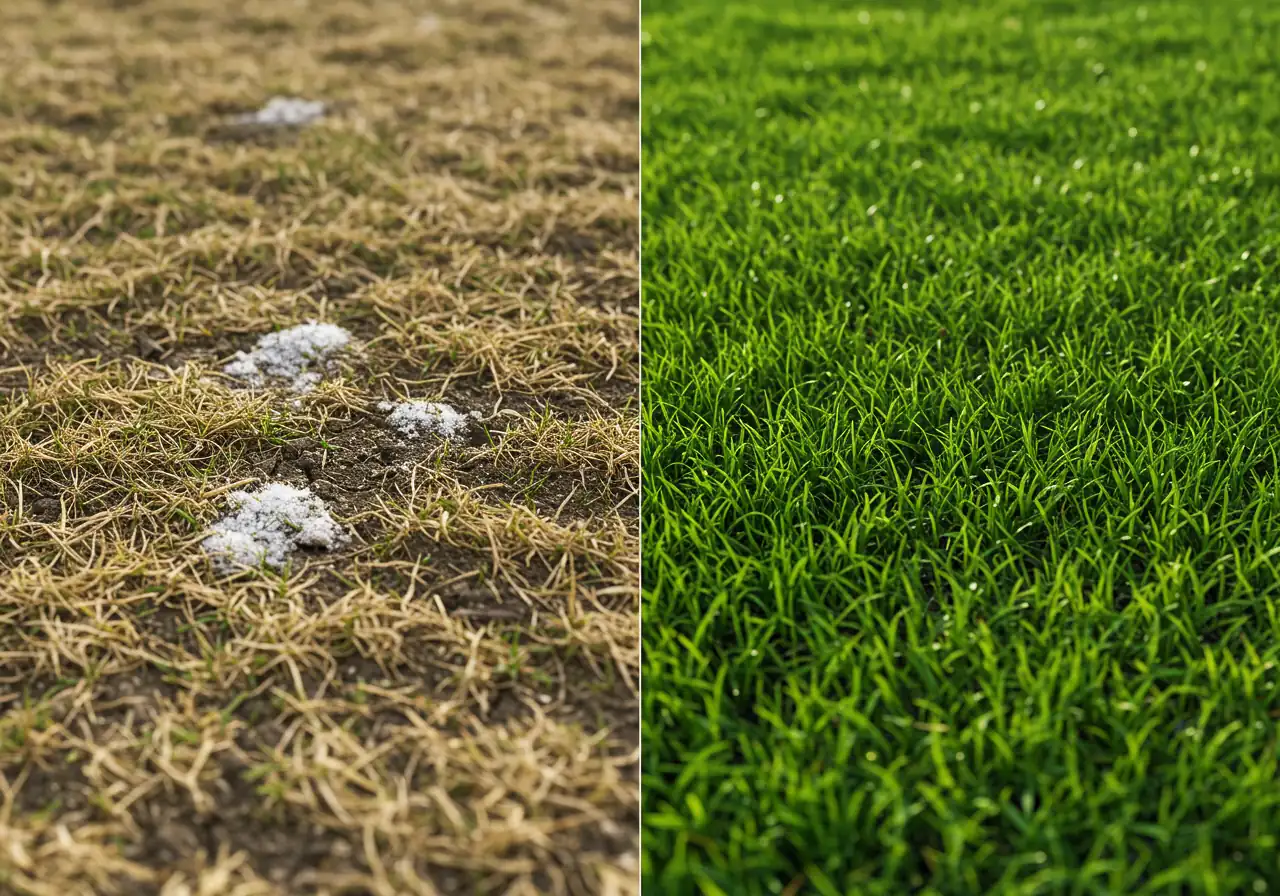
Spring in Kenmore – it’s a beautiful thing, isn’t it? After a long Ottawa winter (and maybe a few too many snowbanks courtesy of Barrhaven or Russell’s plows!), your lawn is probably looking a little, well, tired. Think of it like this: your grass has been hibernating, just like you, huddled under a blanket of snow and ice. Now that the birds are chirping and the tulips are starting to peek through, it’s time to give your Kenmore lawn the wake-up call it deserves!
And what’s the best way to do that? Spring fertilizing! Just like you might reach for a strong coffee and a good breakfast to start your day, your lawn needs a boost of nutrients to truly thrive after the harsh winter. This guide is all about helping you achieve that lush, green carpet of grass you’ve been dreaming of all winter long.
The Ottawa climate, as any resident of Kenmore, Greely, or Embrun will tell you, can be a bit of a rollercoaster. We get extreme cold, heavy snow, and then a rapid thaw, followed by potentially hot and dry summers. All of this puts a lot of stress on your grass. This means your lawn requires extra attention to recover and grow strong enough to withstand those future temperature swings.
This guide is specifically designed for Kenmore lawns (and the surrounding areas!), taking into account those unique challenges. We’ll walk you through:
- Why spring fertilizing is so crucial.
- Choosing the right type of fertilizer for your lawn’s needs.
- The best time to apply fertilizer for maximum impact.
- Simple, step-by-step instructions for application.
- Avoiding common mistakes that can harm your lawn.
Think of fertilizing as giving your lawn a healthy, balanced meal. It provides the essential building blocks – nitrogen, phosphorus, and potassium – that your grass needs to develop strong roots, vibrant green blades, and the resilience to fight off weeds and diseases. With a little bit of care and the right knowledge, you can transform your lawn from drab to fab and be the envy of your Kenmore neighbors! So, let’s get started and give your lawn the spring awakening it deserves.
Why Spring Fertilizing is Essential for Ottawa Lawns
Question: Why is spring fertilizing so important for my lawn in Ottawa, especially after a tough winter?
Answer: Let’s face it, Ottawa winters are brutal. They’re not just cold; they’re a full-on assault on your lawn! Think of places like Kenmore, Osgoode, or Metcalfe – they get buried under snow and ice for months. This creates a unique set of challenges that make spring fertilizing absolutely crucial.
Here’s the science behind it:
- Nutrient Depletion: During the winter, your grass goes dormant. It’s basically in survival mode, using up its stored energy reserves. The snow cover, while acting as insulation, also prevents the natural decomposition of organic matter that would normally replenish nutrients in the soil. Think of your lawn emerging from winter with an empty fridge. It needs a good meal!
- Spring Growth Spurt: As the temperatures rise and the snow melts, your grass starts to wake up. This is when it experiences a rapid growth spurt. To support this growth, it needs a readily available supply of nutrients, particularly nitrogen (for green, leafy growth), phosphorus (for strong root development), and potassium (for overall health and disease resistance). Spring fertilizing provides that essential boost. If you want the deepest green in your end of Vernon, this is a must-do.
- Combating Winter Damage: Ottawa’s freeze-thaw cycles can be incredibly damaging to lawns. The constant expansion and contraction of water in the soil can heave grass roots, leaving them exposed and vulnerable. Additionally, snow mold and other fungal diseases can thrive under the snow cover. A healthy, well-fed lawn is much better equipped to recover from this damage and resist disease.
- Weed Prevention: A thick, healthy lawn is the best defense against weeds. When your grass is struggling, weeds see an opportunity to move in. Spring fertilizing helps your grass grow dense and strong, crowding out those pesky invaders before they can even get established. This is much easier than dealing with weeds later! A guide to improving your soil can be found here: .
- Ottawa’s Specific Challenges: Our climate throws everything at our lawns. We have heavy clay soil in many areas (making drainage a challenge), intense summer heat, and, of course, those long, harsh winters. Proper soil amendments, and also a well-placed irrigation system, will aid with this. For some ideas on this, check out . Spring fertilizing helps your lawn build resilience to cope with these extremes. The right mulch will also help keep soil temperature and moisture more consistent. Check here for tips: Best Mulch for Ottawa Clay Soil Gardens.
- Root Development Focus. Your goal is to help the grass plant recover from winter, not just have top growth. The fertilizer helps rebuild a depleted root system. Strong roots are the foundation of a healthy lawn and that will be useful when the summer heat waves hit, common to Nepean and surrounding regions.
In short, spring fertilizing in Ottawa isn’t just a good idea; it’s essential for a healthy, vibrant lawn. It’s like giving your grass the perfect post-winter recovery plan. And when fall rolls around again, you’ll be doing a final feeding to prepare for next winter. See Greely Garden Revival: Expert Fall Cleanup Tips for guidance on that.
Need Professional Help With Your Lawn Care?
Let our experts handle your spring fertilizing and lawn care needs. We understand the unique challenges of Ottawa lawns and have the expertise to get yours looking its best!
Explore Our Lawn Care ServicesUnderstanding Your Ottawa Soil: The Foundation of a Healthy Lawn
Question: What kind of soil do I have in Ottawa, and why does it matter for my lawn?
Answer: Great question! Understanding your soil is like knowing the secret ingredient to a delicious recipe – it’s essential for success. In Ottawa, we have a fascinating mix of soil types, and knowing yours is the first step to a thriving lawn. It’s a bigger deal than most people think. Ignoring this will leave you wasting time and money, year after year.
Most of Ottawa, and encompassing areas like Nepean, Barrhaven and even stretching out towards Winchester, sits on what’s called the Champlain Sea plain. Thousands of years ago, this whole area was under a massive saltwater sea. When that sea receded, it left behind deposits that now make up our soil.
Here’s a breakdown of the common soil types you’ll find in the Ottawa region:
- Clay Soil: This is the most prevalent type. Clay soil is made up of very fine particles, which means it holds onto water really well (sometimes too well!). It can be dense and compact, making it difficult for roots to penetrate and for air to circulate. Think of it like modeling clay – sticky when wet, hard as a rock when dry. Many areas of Barrhaven have heavy clay soil.
- Sandy Soil: Sandy soil is the opposite of clay. It has large, coarse particles, which means water drains through it very quickly. This can be a problem in the hot Ottawa summers, as your lawn can dry out fast. Sandy soil also doesn’t hold onto nutrients very well.
- Silty Soil: Silty soil falls somewhere between clay and sand. It has medium-sized particles and feels smooth, almost like flour. It holds water reasonably well and is generally fertile.
- Loam: This is the “holy grail” of soil types! Loam is a balanced mixture of clay, sand, and silt, along with a good amount of organic matter. It drains well, retains moisture, and is packed with nutrients. If you have loamy soil, consider yourself lucky!
- Peat Soil: You won’t see this one as frequently on residential lawns. Peat soil is dark brown or black and formed mostly from decomposing organic matter in wetlands. It’s acidic and may require amendment to be suitable for lawns.
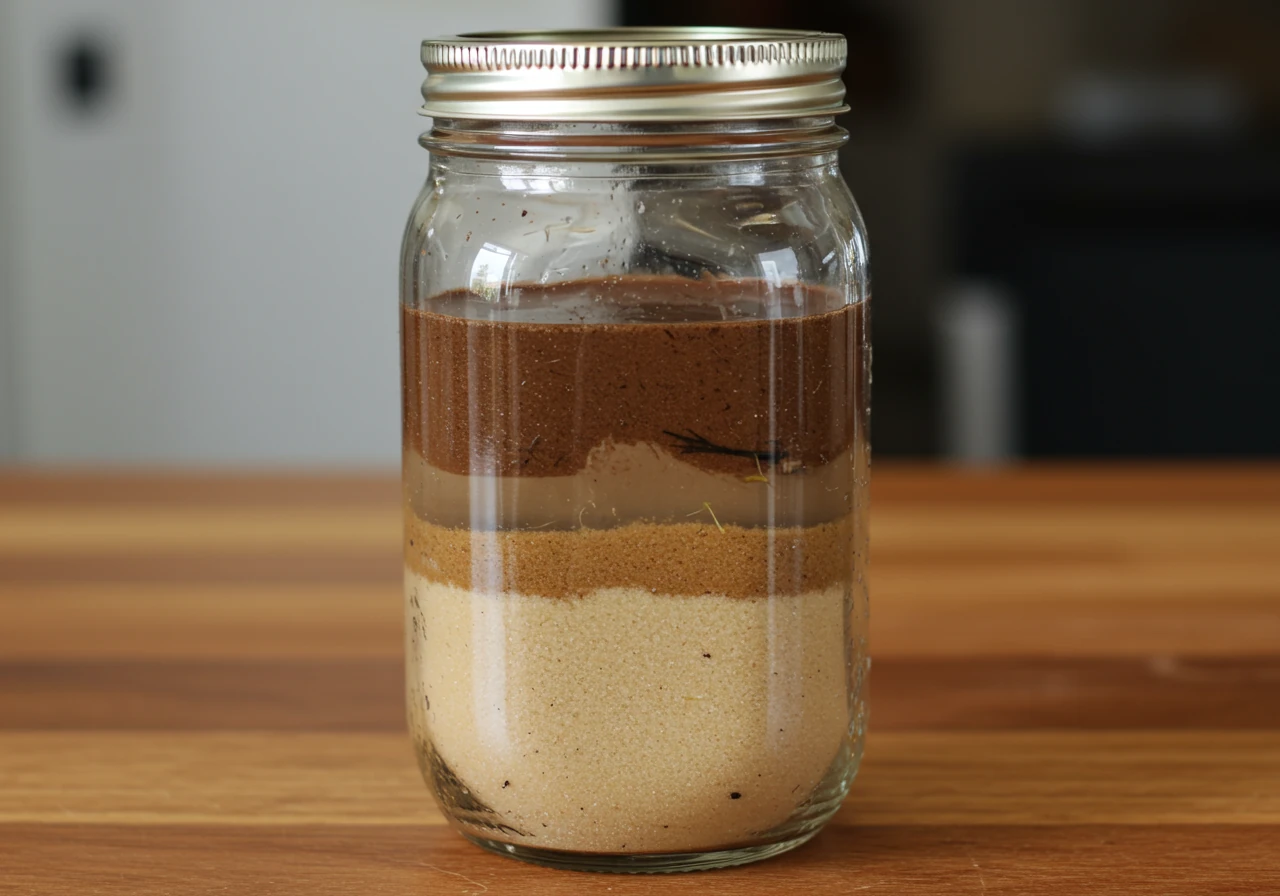
How to Easily Test Your Soil (The “Jar Test”):
You don’t need a fancy lab to get a good idea of your soil type. Here’s a simple DIY test:
- Gather Supplies: You’ll need a clear jar with a lid (like a mason jar), water, and a sample of your soil (taken from about 4-6 inches below the surface, avoiding the very top layer).
- Fill the Jar: Add about 1-2 cups of soil to the jar.
- Add Water: Fill the jar almost to the top with water.
- Shake It Up: Put the lid on tightly and shake the jar vigorously for a few minutes, until all the soil clumps are broken up.
- Let It Settle: Place the jar on a flat surface and let it settle for at least 24 hours (48 is even better). The soil particles will separate into layers.
- Observe the Layers:
- Bottom Layer (Sand): The heaviest particles (sand) will settle at the bottom.
- Middle Layer (Silt): The next layer will be silt.
- Top Layer (Clay): The finest particles (clay) will form the top layer. The water above the clay may be cloudy.
- Floating Stuff (Organic Matter): You might see some organic matter floating on the surface.
- Measure and Calculate: Measure the height of each layer and the total height of the soil. Calculate the percentage of each component (e.g., sand height / total height x 100 = % sand). This will give you a good estimate of your soil composition.
Why pH Matters (and How to Test It):
Soil pH is a measure of how acidic or alkaline your soil is. It’s measured on a scale of 0-14, with 7 being neutral. Most grasses prefer a slightly acidic to neutral pH (around 6.0 to 7.0).
- Too Acidic (Low pH): Nutrients can become “locked up” in the soil, making them unavailable to your grass.
- Too Alkaline (High pH): Can also interfere with nutrient uptake.
You can buy a simple soil pH test kit at most garden centers. These kits are inexpensive and easy to use. Follow the instructions on the kit to test your soil’s pH.
Soil Amendments: Optimizing for Nutrient Absorption:
Once you know your soil type and pH, you can amend it to improve its structure and fertility. Here are some common amendments:
- For Clay Soil: Add organic matter like compost, composted manure, or leaf mold. This will improve drainage, aeration, and nutrient content. Marionville Property Cleanup Service can help remove old plant matter, which can be used to make your own leaf-mold compost, over time.
- For Sandy Soil: Add organic matter (same as above!) to help retain moisture and nutrients.
- For Acidic Soil (Low pH): Add lime (calcium carbonate) to raise the pH.
- For Alkaline Soil (High pH): Add sulfur or acidic organic matter (like peat moss) to lower the pH.
Important Note: It’s always best to add amendments gradually and retest your soil periodically to avoid over-correcting.
Remember, healthy soil is the foundation of a healthy lawn. By understanding your soil type, testing its pH, and making appropriate amendments, you’re setting your lawn up for success. If you prefer professional assistance with your lawn care needs, including soil testing and amendment, explore our services. For specific location service see, for example: Kenmore Garden Clean Up Service. We’re here to help you achieve the lush, green lawn you’ve always wanted!
Choosing the Right Fertilizer for Your Kenmore Lawn
Question: With so many fertilizer options, how do I pick the right one for my Kenmore lawn?
Answer: Choosing a fertilizer can feel like navigating a maze – so many numbers, formulas, and promises! But don’t worry, it’s not as complicated as it seems. Let’s break it down and make it easy to understand, so you can confidently choose the best option for your lawn, whether you’re in Kenmore, Richmond, or even over in Kars.
Understanding N-P-K: The Big Three
Fertilizers are all about providing three key nutrients, represented by the letters N, P, and K on the packaging. This is the N-P-K ratio, and it’s your key to understanding what the fertilizer will do.
- N (Nitrogen): Think green growth. Nitrogen is crucial for leaf development and that lush, vibrant green color we all crave.
- P (Phosphorus): Think root growth. Phosphorus is essential for strong root development, especially important for new lawns or recovering from winter stress.
- K (Potassium): Think overall health. Potassium helps your grass withstand stress from drought, disease, and heavy foot traffic. It’s like a multivitamin for your lawn.
The N-P-K ratio tells you the percentage of each nutrient in the fertilizer. For example, a 20-5-10 fertilizer contains 20% nitrogen, 5% phosphorus, and 10% potassium. The rest is usually filler material that helps with even distribution.
Choosing the Right N-P-K Ratio for Your Needs:
- Spring (Post-Winter Recovery): A fertilizer with a higher nitrogen content is generally recommended for spring. This helps kick-start growth and green-up after the winter dormancy. Something like a 20-5-10 or similar would be a good starting point.
- Established Lawns (Maintenance): A balanced fertilizer with a more even ratio, like 10-10-10 or 15-15-15, can be used for regular maintenance throughout the growing season.
- New Lawns or Seeded Areas: A fertilizer with a higher phosphorus content is beneficial for promoting root development. Look for “starter” fertilizers, which often have ratios like 10-20-10.
- Fall (Preparing for Winter): A fertilizer with a higher potassium content can help your lawn prepare for the harsh winter months. This will strengthen the roots and build up reserves.
Types of Fertilizer: A Comparison
Beyond the N-P-K ratio, you’ll also need to choose the type of fertilizer. Here’s a breakdown of the common options:
| Fertilizer Type | Description | Pros | Cons | Best For |
|---|---|---|---|---|
| Granular | Dry pellets that are spread on the lawn. | Easy to apply, readily available, often less expensive. | Can be unevenly distributed if not applied carefully, potential for fertilizer burn if over-applied. | General lawn feeding, larger areas. |
| Liquid | Concentrated liquid that is mixed with water and sprayed on the lawn. | Absorbed quickly by the grass, provides fast results, good for correcting nutrient deficiencies. | Requires more frequent application, can be more expensive, potential for runoff if over-applied. | Quick green-up, addressing specific nutrient deficiencies. |
| Slow-Release | Releases nutrients gradually over time (weeks or months). Often coated granules. | Provides a steady supply of nutrients, reduces the risk of fertilizer burn, less frequent application needed. | Slower initial results, can be more expensive. | Long-term feeding, low-maintenance lawns. |
| Quick-Release | Releases nutrients immediately, providing a rapid boost to the lawn. | Fast green-up, good for jump-starting growth. | Higher risk of fertilizer burn, requires more frequent application, nutrients can leach out of the soil quickly. | Quick results, correcting nutrient deficiencies. |
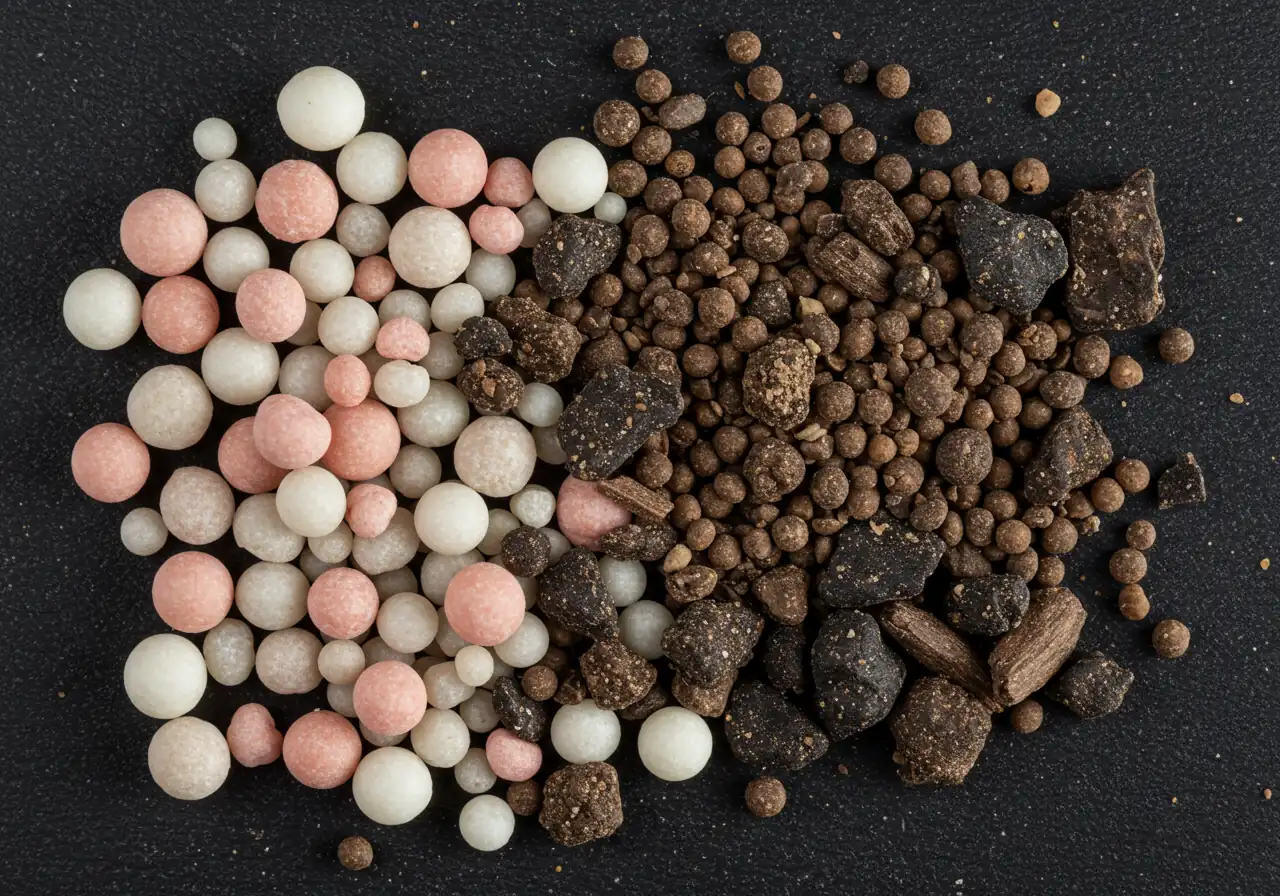
| Organic | Derived from natural sources like compost, manure, or seaweed. | Improves soil health, environmentally friendly, less likely to burn the lawn. | Slower release of nutrients, can be more expensive, may have a noticeable odor. | Environmentally conscious homeowners, improving soil health. |
| Synthetic | Manufactured from chemical compounds. | Readily available, often less expensive, provides precise nutrient ratios. | Can contribute to soil and water pollution if over-applied, doesn’t improve soil health. | Fast results, specific nutrient needs. |
Eco-Friendly Fertilizer Suggestions:
If you’re looking for more environmentally friendly options, consider these:
- Compost: Making your own compost from kitchen scraps and yard waste is a fantastic way to add nutrients and organic matter to your soil. See our transformations page for inspiration on improving your overall yard.
- Composted Manure: Well-aged composted manure is a great source of nutrients and improves soil structure.
- Seaweed-Based Fertilizers: These are rich in micronutrients and growth hormones that can benefit your lawn.
- Corn Gluten Meal: This is a natural pre-emergent herbicide that also provides a slow release of nitrogen.
- Grass Clippings: After you mow, use your mulching setting to leave grass clippings on the lawn. This is free and helps return nutrients to the soil.
Practical Tips for Choosing Fertilizer:
- Soil Test: As mentioned, before applying any fertilizer, it’s a great idea to get a soil test. This will tell you exactly what nutrients your lawn is lacking, so you can choose a fertilizer with the appropriate N-P-K ratio.
- Read the Label: Pay close attention to the instructions on the fertilizer bag. It will tell you the recommended application rate and any precautions you should take.
- Don’t Over-Fertilize: More is not better when it comes to fertilizer. Over-fertilizing can burn your lawn, damage the roots, and contribute to water pollution. It’s better to under-fertilize slightly than to overdo it.
- Consider Your Lawn’s Needs: Think about the age of your lawn, its current condition, and your goals. Are you trying to establish a new lawn, revive a struggling lawn, or simply maintain a healthy lawn?
- Water After Application: After applying granular fertilizer, water your lawn thoroughly. This helps the fertilizer dissolve and reach the roots.
- Ask for help. Our customer portal contains resources for customers.
Choosing the right fertilizer is a key step in achieving a lush, healthy lawn. By understanding the N-P-K ratio, comparing different fertilizer types, and considering your lawn’s specific needs, you can make an informed decision and give your grass the nutrients it needs to thrive. And if you ever need a hand after all that hard work, just reach out and say thank you for making it easy!
Want Expert Advice on Fertilizer Selection?
Our lawn care professionals can help you choose the perfect fertilizer for your specific soil type and lawn conditions. Schedule a consultation today!
Get Professional Fertilizer AdviceStep-by-Step Guide to Spring Fertilizing in Kenmore
Question: How do I actually apply fertilizer to my lawn in Kenmore, and what’s the best timing?
Answer: Okay, you’ve chosen your fertilizer, you understand your soil (hopefully!), and now it’s time for the main event: applying that fertilizer! Don’t worry, it’s not rocket science. This step-by-step guide will walk you through the process, making it easy and effective, whether you’re in Kenmore, Manotick, Richmond, or anywhere else in the Ottawa area.
Step 1: Timing is Everything – The Ottawa Spring Calendar
Timing is crucial for spring fertilizing. You want to hit that sweet spot when the grass is actively growing but before it gets too hot. Here’s a general timeline, keeping in mind that Ottawa weather can be a bit unpredictable (we’ve all seen snow in May!):
- Late April/Early May (Soil Temperature Matters Most): This is usually the ideal time for your first spring fertilizer application. A good rule of thumb is to wait until the soil temperature consistently reaches about 55°F (13°C). You can use a soil thermometer to check. Another indicator is when the lilacs start to bloom – that’s a sign that the soil is warming up. Don’t fertilize too early, while the ground is still frozen or soggy.
- Mid-May (Optional Second Application): If you’re using a quick-release fertilizer, or if your lawn is particularly nutrient-deficient, you might consider a second, lighter application about 4-6 weeks after the first. But remember, don’t overdo it!
- Avoid Summer Fertilizing (Generally). Fertilizing in the heat will damage your grass. The next application will be in the fall.
Step 2: Prepare Your Lawn
Before you even open that bag of fertilizer, take these steps to prepare your lawn:
- Rake: Remove any leaves, debris, or dead grass that have accumulated over the winter. This will allow the fertilizer to reach the soil more easily. A thorough Ottawa yard cleanup service can take care of this for you if you’re short on time.
- Mow (But Not Too Short): Mow your lawn to its normal height before fertilizing. Don’t scalp it! Leaving the grass a little longer (around 2.5-3 inches) is generally healthier.
- Aerate (If Needed): If your soil is compacted (common with clay soil, as we discussed), consider aerating your lawn. This involves creating small holes in the soil to improve air circulation and allow the fertilizer to penetrate more effectively. You can rent a core aerator or hire a professional. Aeration is best done in the fall, but spring is okay if absolutely necessary.
- Dethatch (If Needed). If you have a thick layer of dead grass and organic matter (thatch), you may want to dethatch. A thin layer is beneficial, but over about 1/2 inch prevents air and nutrients from reaching the grass roots.
- Edge. This is more for the visual appeal, but a sharp edge will make the whole lawn appear even more crisp. If you are also applying mulch to flower beds, this is a good time. Here is more info on mulching and edging.
Step 3: Calculate the Right Amount of Fertilizer
This is where many people go wrong. Too much fertilizer can burn your lawn, and too little won’t have much effect. Here’s how to get it right:
- Read the Bag: The fertilizer bag will tell you the recommended application rate, usually expressed as pounds of fertilizer per 1,000 square feet.
- Measure Your Lawn: Determine the square footage of your lawn. You can do this by multiplying the length by the width of each section of your lawn and adding them together. Don’t worry about being perfectly precise; a reasonable estimate is fine.
- Do the Math: Use the application rate and your lawn’s square footage to calculate the total amount of fertilizer you need.
Example:
- Your lawn is 2,500 square feet.
- The fertilizer bag recommends 4 pounds per 1,000 square feet.
- Calculation: (2,500 sq ft / 1,000 sq ft) * 4 lbs = 10 lbs of fertilizer.
Step 4: Apply the Fertilizer – Evenly is Key!
Uneven fertilizer application can lead to streaks of dark green and light green, or even burnt patches. Here are your options for applying fertilizer:
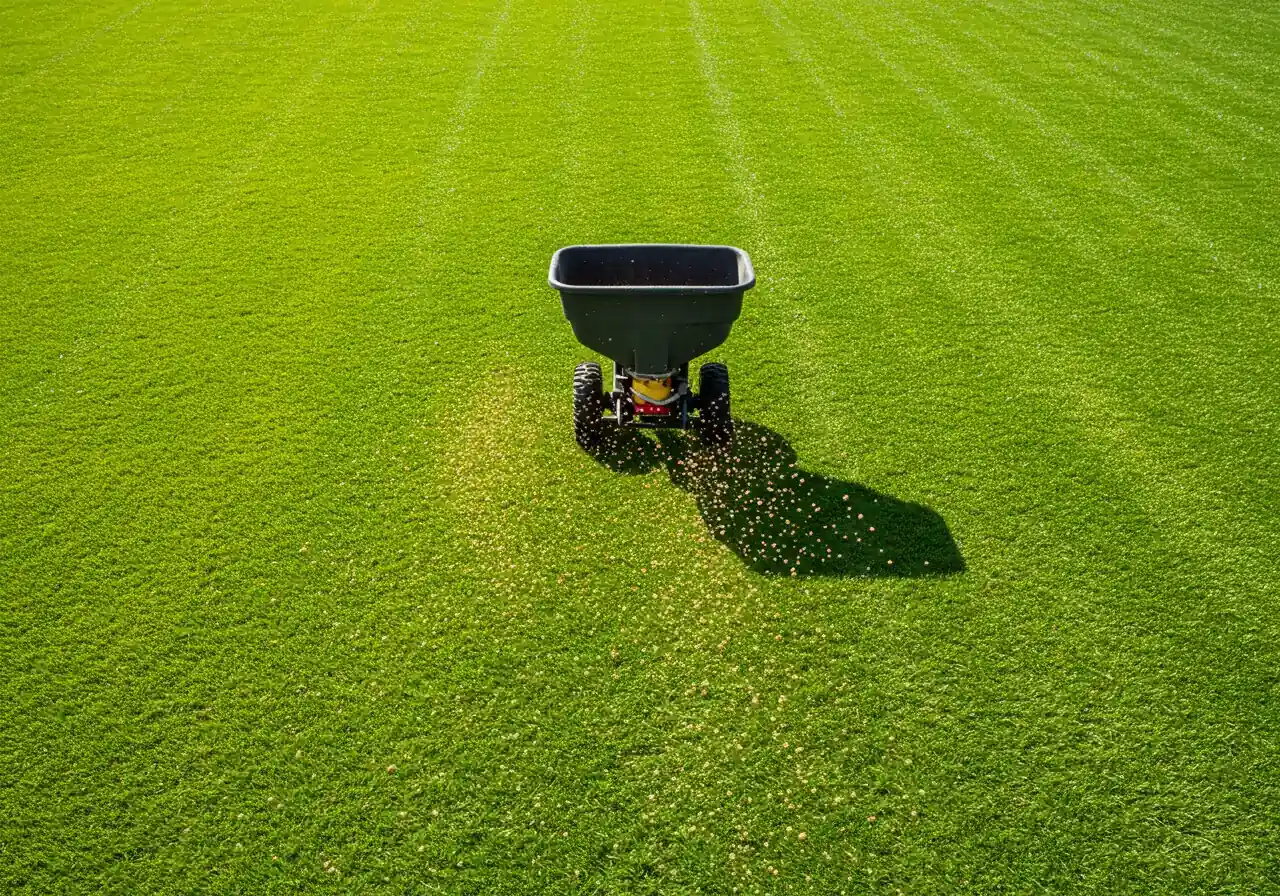
- Broadcast Spreader (Recommended): This is the best option for most lawns. It distributes the fertilizer evenly in a wide swath.
- Fill the Spreader: Fill the hopper with the calculated amount of fertilizer.
- Set the Spreader: Adjust the spreader setting according to the fertilizer bag’s instructions. It’s usually better to start with a lower setting and make two passes over the lawn in a crisscross pattern (one pass horizontally, one pass vertically) than to apply too much at once.
- Walk at a Steady Pace: Walk at a consistent pace, overlapping each pass slightly (about 2-4 inches) to ensure even coverage.
- Avoid Overlap on Sidewalks/Driveways: Be careful not to get fertilizer on sidewalks, driveways, or patios, as it can stain and contribute to runoff pollution. Sweep up any spills immediately.
- Drop Spreader: This type of spreader drops the fertilizer directly below it. It’s more precise than a broadcast spreader, but it can be more difficult to achieve even coverage. It’s best for smaller lawns or tight spaces.
- Hand Application (Not Recommended): This is the least accurate method and is only suitable for very small areas. If you must apply fertilizer by hand, wear gloves and try to scatter it as evenly as possible.
Step 5: Water, Water, Water!
After applying granular fertilizer, it’s essential to water your lawn thoroughly. This does several things:
- Dissolves the Fertilizer: Water helps the fertilizer granules dissolve and move down into the soil, where the roots can absorb them.
- Prevents Fertilizer Burn: Watering helps prevent the fertilizer from burning the grass blades.
- Activates the Nutrients: Water activates the nutrients in the fertilizer, making them available to the grass.
How much water? Aim for about 1 inch of water, including any rainfall. You can use a rain gauge or place a few empty tuna cans around your lawn to measure the amount of water. Water deeply and less frequently, rather than shallowly and more often. This encourages deeper root growth.
Important Considerations:
- Avoid fertilizing before heavy rain: This can cause the fertilizer to run off, wasting your money and polluting waterways.
- Don’t fertilize during a drought: Wait until your lawn has received adequate moisture.
- Keep children and pets off the lawn: For at least 24-48 hours after fertilizing, or until the fertilizer has been thoroughly watered in.
- Store leftover fertilizer properly: In a cool, dry place, out of reach of children and pets.
Simple Spring Lawn Care Calendar (Kenmore/Ottawa Area):
- Early Spring (March/Early April): Rake, remove debris, assess lawn condition.
- Mid-Spring (Late April/Early May): First fertilizer application (soil temp around 55°F/13°C), mow (to normal height), aerate/dethatch (if needed).
- Late Spring (Mid-May): Optional second fertilizer application (if needed), continue mowing, monitor for weeds.
- Ongoing: Monitor soil conditions and your grass. If you need more, see the resources in our about us page.
Following these steps will give your Kenmore lawn the best possible start to the growing season. Remember, consistency is key! Regular, proper fertilization, combined with good mowing and watering practices, will result in a healthy, beautiful lawn that you can enjoy all summer long.
Eco-Friendly Fertilizing Practices for a Greener Ottawa
Question: How can I fertilize my lawn in Ottawa in a way that’s good for the environment? I’ve heard about fertilizer runoff causing problems.
Answer: That’s a fantastic question! It shows you’re thinking about the bigger picture, and that’s important. Traditional fertilizing practices, if done improperly, can have negative impacts on our environment, especially our local waterways like the Ottawa River and Rideau Canal. But the good news is, you can absolutely have a beautiful, healthy lawn and be eco-conscious. It’s all about making smart choices. Think of it as being a good neighbor to the environment, whether you live in a busy area like downtown, or a quieter place like Manotick.
Here’s the scoop on eco-friendly fertilizing in Ottawa:
1. The Problem with Runoff (and Why it Matters):
When it rains heavily (and we get plenty of that in Ottawa!), excess fertilizer that hasn’t been absorbed by your lawn can wash away. This runoff carries those nutrients, mainly nitrogen and phosphorus, into storm drains. These drains often lead directly to our rivers and lakes, without any treatment.
What happens then? Those excess nutrients act like fertilizer for algae in the water. This leads to algal blooms – massive growths of algae that can:
- Deplete Oxygen: As the algae die and decompose, they use up oxygen in the water. This can suffocate fish and other aquatic life.
- Block Sunlight: Thick algae blooms can block sunlight from reaching underwater plants, disrupting the entire ecosystem.
- Produce Toxins: Some types of algae produce toxins that can be harmful to humans and animals.
So, by being mindful of how we fertilize, we’re protecting our water quality, our wildlife, and our own health.
2. Go Organic (or at Least “Organic-Based”):
The single best thing you can do for the environment is to choose organic fertilizers. Here’s why:
- Slow Release: Organic fertilizers release nutrients slowly, over time. This reduces the risk of runoff and provides a more consistent supply of nutrients to your lawn. Synthetic fertilizers, especially quick-release ones, can deliver a big jolt of nutrients all at once, increasing the chance of them washing away.
- Improve Soil Health: Organic fertilizers, like compost and composted manure, actually improve the structure and health of your soil. They add organic matter, which helps the soil retain water, improves drainage, and supports beneficial microbes. Synthetic fertilizers, on the other hand, don’t do anything to improve soil health in the long run.
- Reduced Chemical Exposure: Organic fertilizers are derived from natural sources, reducing your exposure (and your family’s and pets’ exposure) to synthetic chemicals.
Examples of Great Organic Options:
- Compost: As discussed before, homemade or purchased compost is fantastic. It’s like a superfood for your lawn and your garden.
- Composted Manure: Well-aged composted manure is another excellent choice. Make sure it’s properly composted to avoid any unpleasant odors or potential pathogens.
- Seaweed-Based Products: These are rich in micronutrients and beneficial growth hormones.
- Corn Gluten Meal: This acts as a natural pre-emergent weed control and a slow-release nitrogen fertilizer.
- Grass Clippings: Return these to the soil every time you mow.
3. Responsible Fertilizer Use (Even with Synthetics):
If you do choose to use synthetic fertilizer, it’s absolutely crucial to do so responsibly:
- Soil Test First: Don’t guess! A soil test will tell you exactly what nutrients your lawn needs (or doesn’t need). You might be surprised to find that you don’t need as much fertilizer as you think.
- Follow the Instructions (Exactly!): Read the label carefully and follow the recommended application rate. More is not better. Over-fertilizing is a major cause of runoff.
- Use a Spreader (and Calibrate It): A broadcast spreader will distribute the fertilizer evenly, reducing the risk of over-application in certain areas. Make sure you know how to calibrate your spreader correctly.
- Avoid Applying Before Heavy Rain: Check the forecast! If heavy rain is expected, wait to fertilize.
- Sweep Up Spills: If you spill fertilizer on sidewalks, driveways, or patios, sweep it up immediately. Don’t hose it down the drain.
- Consider Slow-Release Options: Even within synthetic fertilizers, choose slow-release formulations whenever possible.
- Never apply to hard surfaces. Keep fertilizer on the grass.
4. Proper Watering Techniques:
Watering correctly is just as important as choosing the right fertilizer:
- Water Deeply, Less Frequently: Encourage deep root growth by watering deeply and less often. This helps your lawn become more drought-tolerant and reduces the need for frequent watering. Aim for about 1 inch of water per week, including rainfall.
- Water in the Morning: The best time to water is early in the morning (before 10 am). This allows the grass blades to dry off during the day, reducing the risk of fungal diseases. Watering in the evening can create a humid environment that’s perfect for diseases to thrive.
- Avoid Overwatering: Overwatering can lead to runoff, just like over-fertilizing. It can also weaken your lawn’s roots and make it more susceptible to disease.
- Use a Rain Gauge: A simple rain gauge will help you keep track of how much water your lawn is receiving.
- Optimize sprinkler coverage. Make sure you are not watering the street or driveway.
5. The City of Ottawa’s Role and Resources:
The City of Ottawa is committed to protecting our waterways and encourages responsible lawn care practices. They offer a variety of resources and information:
- City Website: The City of Ottawa website (which we can’t link to directly) has information on water conservation, fertilizer use, and protecting our rivers. Search for “fertilizer” or “water quality” on their site.
- Educational Programs: The City sometimes offers workshops and educational programs on sustainable lawn care.
Remember:
- A healthy lawn is a resilient lawn. By focusing on soil health, proper mowing, and responsible watering, you can reduce your reliance on fertilizers.
- Consider alternatives to traditional lawns, such as clover lawns or native plant gardens, which require less fertilizer and water.
- Read our page to help you book estimate.
- If you choose to apply a top dressing of triple mix, you might also want to add a layer of mulch, to help keep the soil cool and moist. This page gives more details: mulching and edging.
- Our page lawn care has lots of useful hints and tips.
- If you need a professional hand with a big spring clean, check out our services for Metcalf property cleanup service.
By adopting these eco-friendly fertilizing practices, you can contribute to a healthier, greener Ottawa for everyone. It’s about making small changes that have a big impact.
Highlight Box: Key Spring Fertilizing Tips for Ottawa
Spring Fertilizing Quick Reference Guide
Here’s a quick cheat sheet to get your Ottawa lawn looking its best this spring – whether you’re in Nepean, Osgoode, or anywhere in between!
- Test Your Soil: Don’t guess, test! Knowing your soil’s pH and nutrient levels is the key to choosing the right fertilizer. A simple DIY jar test can tell you a lot about composition, or grab a pH testing kit.
- Time it Right: Aim for late April or early May, when the soil temperature consistently hits around 55°F (13°C). Think lilacs blooming – that’s your cue!
- N-P-K Know-How: Understand the fertilizer numbers! For spring, a higher nitrogen (N) number is usually best to boost that green growth after winter.
- Choose Wisely: Consider slow-release or organic fertilizers for a healthier lawn and environment. They’re gentler and release nutrients over time.
- Apply Evenly: Use a broadcast spreader for the most even application. Overlap slightly and walk at a steady pace.
- Water Thoroughly: Always water after applying granular fertilizer. This dissolves the nutrients and helps prevent fertilizer burn. Aim for about an inch of water.
- Don’t Overdo It: More fertilizer is not better. Follow the instructions on the bag and avoid fertilizing before heavy rain.
- Mow Smart: Mow before fertilizing, and leave the grass clippings on the lawn (it’s free fertilizer!).
- Go Green When Possible: Opt for organic fertilizers like compost or composted manure to improve soil health and reduce runoff pollution. Information about our approach can be found in our privacy policy.
- Prepare in Advance. In the fall, remove all old and dead plant matter. See, for instance, our Ottawa property cleanup service.
- Ask for help if you need it! We offer services to help with your gardens throughout the growing season. For example: Marionville garden clean up service.
Frequently Asked Questions (FAQs) about Spring Fertilizing in Ottawa
That’s a very valid concern! The safety of your family (furry members included!) is paramount. The good news is that you can absolutely fertilize your lawn safely by taking a few precautions. Many fertilizers, especially synthetic ones, can contain chemicals that could be harmful if ingested or if there’s prolonged skin contact. However, the risk is generally low if you follow these guidelines:
- Read the Label (Always!): The fertilizer label is your best friend. It will provide specific instructions on how to apply the product safely, including any waiting periods before allowing pets and children back on the lawn.
- Water Thoroughly After Application: This is crucial! Watering helps the fertilizer dissolve and move down into the soil, reducing the amount of residue on the grass blades. Aim for that 1-inch of water we talked about earlier.
- Wait the Recommended Time: Most fertilizer labels will recommend waiting at least 24-48 hours after application (and watering) before allowing pets and children back on the lawn. Some may recommend longer, especially if the product contains pesticides. When in doubt, err on the side of caution.
- Choose Safer Options: Opting for organic fertilizers significantly reduces the risk. These products are derived from natural sources and are generally less toxic than synthetic ones.
- Store Fertilizer Safely: Keep fertilizer bags or containers tightly sealed and stored in a cool, dry place, out of reach of children and pets.
- Consider Spot Treatment: If you have a small area to handle, consider hand-spreading. This reduces the need to treat a large area and is more effective.
Weeds are the bane of many Ottawa homeowners’ existence! They’re opportunistic little buggers, and they love to take advantage of any weakness in your lawn. Fertilizing alone isn’t always enough to prevent weeds. Here’s a more holistic approach:
- Thick, Healthy Grass is the Best Defense: A dense, vigorous lawn will naturally crowd out weeds. Proper fertilizing (at the right time, with the right product) is part of this, but it’s not the whole story.
- Mowing Height Matters: Mowing your lawn too short can weaken the grass and give weeds an opening. Keep your grass at the recommended height (usually 2.5-3 inches for most Ottawa lawns).
- Watering Properly: Deep, infrequent watering encourages strong root growth, making your grass more competitive against weeds.
- Aeration and Dethatching: If your soil is compacted or you have a thick layer of thatch, it can hinder grass growth and favor weeds. Aerating and dethatching can help.
- Pre-Emergent Herbicides (Use with Caution): These herbicides prevent weed seeds from germinating. Corn gluten meal is a natural pre-emergent option. If you choose a synthetic pre-emergent, apply it before the weeds start to grow (usually in early spring).
- Post-Emergent Herbicides (Spot Treat): These herbicides kill weeds that have already emerged. Use them sparingly and only on the affected areas.
- Hand-Pulling: For small infestations, good old-fashioned hand-pulling can be surprisingly effective (and good exercise!).
- Consider our Ottawa garden clean up service to handle weed removal, along with other spring tasks.
Patchy, brown spots can have several causes, and fertilizing might help, but it depends on the underlying problem. Here are some common culprits:
- Winter Damage: Snow mold, salt damage (from sidewalks and roads), and voles (tiny rodents that tunnel under the snow) can all cause brown patches.
- Grubs: White grubs are the larvae of beetles, and they feed on grass roots. A heavy grub infestation can cause significant damage, leading to brown, wilting patches that lift up easily.
- Dog Urine: Dog urine is high in nitrogen, which can “burn” the grass, creating brown spots.
- Fungal Diseases: Several fungal diseases can affect lawns, causing discoloration and thinning.
- Poor Soil: Compacted soil, poor drainage, or nutrient deficiencies can all contribute to patchy growth.
What to Do:
- Identify the Cause: Examine the brown patches closely. Look for signs of disease, insect activity, or other clues.
- Address the Underlying Problem: If it’s grubs, you’ll need to treat for grubs. If it’s dog urine, try to train your dog to go in a designated area. If it’s a fungal disease, you might need a fungicide (but try to improve air circulation and avoid overwatering first).
- Improve Soil Health: Aerate compacted soil, amend with compost, and ensure proper drainage.
- Reseed Bare Patches: Once you’ve addressed the underlying problem, reseed the bare patches with a grass seed mix suitable for your lawn. Consider our sod installation service for larger areas or if you want instant results.
- Fertilize Appropriately: Once the new grass has established, fertilize according to the guidelines we’ve discussed.
Your neighbor is partly right! While Ottawa shares a general climate, there can be significant variations in soil type and microclimates across different neighborhoods. Barrhaven, for example, is known for having heavier clay soil in many areas. Greely, being a bit more rural, might have areas with sandier soil or more organic matter. Even within a single neighborhood, conditions can vary from one yard to the next!
Here’s why this matters for fertilizing:
- Clay Soil: Clay soil holds onto nutrients well, but it can also become compacted and have poor drainage. If you have heavy clay, you might need to focus on improving soil structure with organic matter (compost, leaf mold) before you worry too much about adding a lot of fertilizer. A fertilizer with a slightly lower nitrogen content might be appropriate, as nitrogen can leach out less readily in clay.
- Sandy Soil: Sandy soil drains quickly and doesn’t hold onto nutrients as well. If you have sandy soil, you might need to fertilize more frequently, using a slow-release fertilizer to provide a steady supply of nutrients.
- Microclimates: Factors like sun exposure, shade, and proximity to trees or buildings can also affect your lawn’s needs. A shady lawn, for example, will need less nitrogen than a lawn in full sun.
The Best Approach:
- Soil Test (Again!): A soil test is the most reliable way to determine your lawn’s specific needs, regardless of your neighborhood.
- Observe Your Lawn: Pay attention to how your lawn grows. Is it lush and green, or pale and thin? Are there any problem areas?
- Talk to Your Neighbors (and Local Experts): Chat with your neighbors about their lawn care practices. Local garden centers and nurseries can also provide valuable advice tailored to your specific area.
- Start Conservatively: When in doubt, start with a lower application rate of fertilizer and see how your lawn responds. You can always add more later if needed.
By understanding these nuances, you can tailor your fertilizing approach to your lawn’s specific needs, no matter where you are in the Ottawa area.
Conclusion: Get Ready for a Lush, Green Lawn in Kenmore This Summer!
Well, there you have it! You’re now armed with the knowledge to transform your Kenmore lawn from winter-weary to wonderfully green. We’ve covered everything from understanding Ottawa’s unique soil challenges (that clay can be a real beast, can’t it?) to choosing the right fertilizer and applying it like a pro. Remember, spring fertilizing isn’t just about aesthetics; it’s about giving your grass the strength it needs to thrive through the hot Ottawa summer and bounce back even stronger next year. Think of it as an investment in long-term lawn health.
Let’s recap those key takeaways, just to make sure they’re firmly planted in your mind (pun intended!):
- Soil is King: Understanding your soil type – whether it’s the heavy clay common in many parts of Ottawa, or something sandier – is the foundation of everything. A simple jar test can tell you a lot, and a pH test is worth its weight in gold.
- Timing is Crucial: Aim for that late April/early May window, when the soil temperature consistently reaches about 55°F (13°C). Watch for those blooming lilacs – nature’s handy fertilizer alarm clock!
- N-P-K Decoded: Nitrogen (N) for green growth, Phosphorus (P) for strong roots, and Potassium (K) for overall health. Choose a fertilizer with a higher nitrogen ratio for that spring boost.
- Apply Like a Pro: Use a broadcast spreader for even coverage, and always water thoroughly after applying granular fertilizer.
- Eco-Friendly is the Way to Be: Consider organic fertilizer options to minimize runoff and protect our precious Ottawa waterways. Every little bit helps!
- Consistency is Key: Spring fertilizing is just one piece of the puzzle. Proper mowing, watering, and addressing any underlying issues (like grubs or compaction) are equally important.
Now, it’s time to put that knowledge into action! Don’t let your lawn be the “before” picture in a dramatic lawn transformation. Get out there, assess your lawn’s needs, choose the right fertilizer, and apply it with confidence.
And if you’re feeling overwhelmed, or just don’t have the time to tackle it yourself, remember that help is always available. We are only a click away: Contact Us. Clean Yards offers professional lawn care services, tailored to the specific needs of Ottawa lawns. We can help with everything from soil testing and fertilizing to aeration, overseeding, and weed control. We can also help you understand the nuances of Material Selection for all your landscape improvement projects.
So, get ready to enjoy a lush, green lawn all summer long. Picture yourself relaxing on that vibrant green carpet, hosting barbecues, playing with your kids or pets, and simply enjoying the beauty of your outdoor space. With a little bit of effort and the right knowledge, that dream can become a reality. Happy fertilizing!
Call to Action
Ready to Give Your Lawn the Professional Care It Deserves?
Ready to give your Ottawa lawn the VIP treatment it deserves? We’ve shared a ton of information, and now it’s your turn to take action! Here’s how you can keep that lawn-loving momentum going:
- Book Your FREE, No-Obligation Consultation: Don’t spend another weekend guessing about your lawn’s needs. Let our experts take a look! We’ll assess your soil, identify any issues, and create a customized plan to get your grass looking its absolute best. Whether you are close to the city, or in a neigbourhood like Richmond or Kars, we can help. It’s completely free, and there’s no pressure – just honest, expert advice. Click here to schedule your consultation: Book Estimate.
- Explore Our Website for More Tips and Services: We’ve packed our website with even more helpful information, including details on all our services, from fertilizing and weed control to complete landscape makeovers. You’ll find project examples, and answers to just about any other questions you might have. Dive in and discover how we can help you create the outdoor space of your dreams: Clean Yards.
- Dig Into Specific Services: Do you want to make a specific upgrade? Maybe something like some fresh mulch? You can find more details here Mulching and Edging.
- Leave a Comment or Question Below: Did we miss something? Do you have a specific question about your lawn in Manotick, Osgoode, or anywhere else in the Ottawa area? Don’t be shy! Leave a comment below, and we’ll do our best to answer it. We love hearing from fellow lawn enthusiasts! (Note that comments are moderated, and may be adapted for the FAQ).
- Get Social With Us: Follow us on social media! We regularly share tips, tricks, special offers, and behind-the-scenes glimpses of our work. It’s a great way to stay connected and get inspired. Check out our Customer Portal.
- Tell Us How We Did. Customer feedback is important. See how to give us a great review, or reach out directly to address any concerns, on our Thank You page.
- Share This Guide: Know someone else who’s struggling with their lawn? Share this guide with them! Help spread the lawn love and make Ottawa a greener, more beautiful place, one yard at a time.
Don’t wait for your lawn to beg for help. Take action today and get ready to enjoy a lush, healthy lawn all season long! We’re here to help you every step of the way.
Get Professional Help With Your Lawn CareCheck Our Google Reviews