
Crisp Metcalfe Garden Edges: Pro Tips for Sharp Flower Beds
Quick Takeaways:
- Sharp garden edges significantly boost curb appeal and create a tidy, professional look.
- Defined edges contain mulch/soil, prevent grass invasion, and simplify mowing.
- Choose the right tool (manual vs. power) and technique (e.g., spade-cut) for creating edges.
- Select appropriate edging materials (plastic, metal, wood, stone) based on budget, durability, aesthetics, and Ottawa's climate.
- Proper installation (especially depth) is crucial to prevent frost heave.
- Seasonal maintenance ensures edges stay sharp and functional year-round.
Ready to transform your garden beds from basic to beautiful? Get a professional quote for expert edging and landscaping services. Request Your Free Estimate Today!
Introduction: Beyond Basic Beds - Why Sharp Edges Elevate Your Metcalfe Garden
Okay, let's talk about your garden beds here in Metcalfe. You've planted the perfect perennials, maybe added some lovely shrubs, but does something still feel… unfinished? Often, the secret ingredient isn't another plant, but something much simpler: sharp edges. We're moving beyond just digging a basic border and calling it a day. Think of crisp, defined lines separating your lush lawn from your beautiful flowerbeds or garden areas.
Why bother, you ask? Well, imagine putting a gorgeous painting in a cheap, flimsy frame – it just doesn't do it justice! Sharp edges are like the perfect frame for your landscaping masterpiece. They instantly boost curb appeal, making your entire property look neater, more intentional, and professionally maintained. This isn't just about looking good for the neighbours in nearby Greely or Manotick; it's about creating a sense of order and definition that truly elevates your own enjoyment of your Ottawa garden.
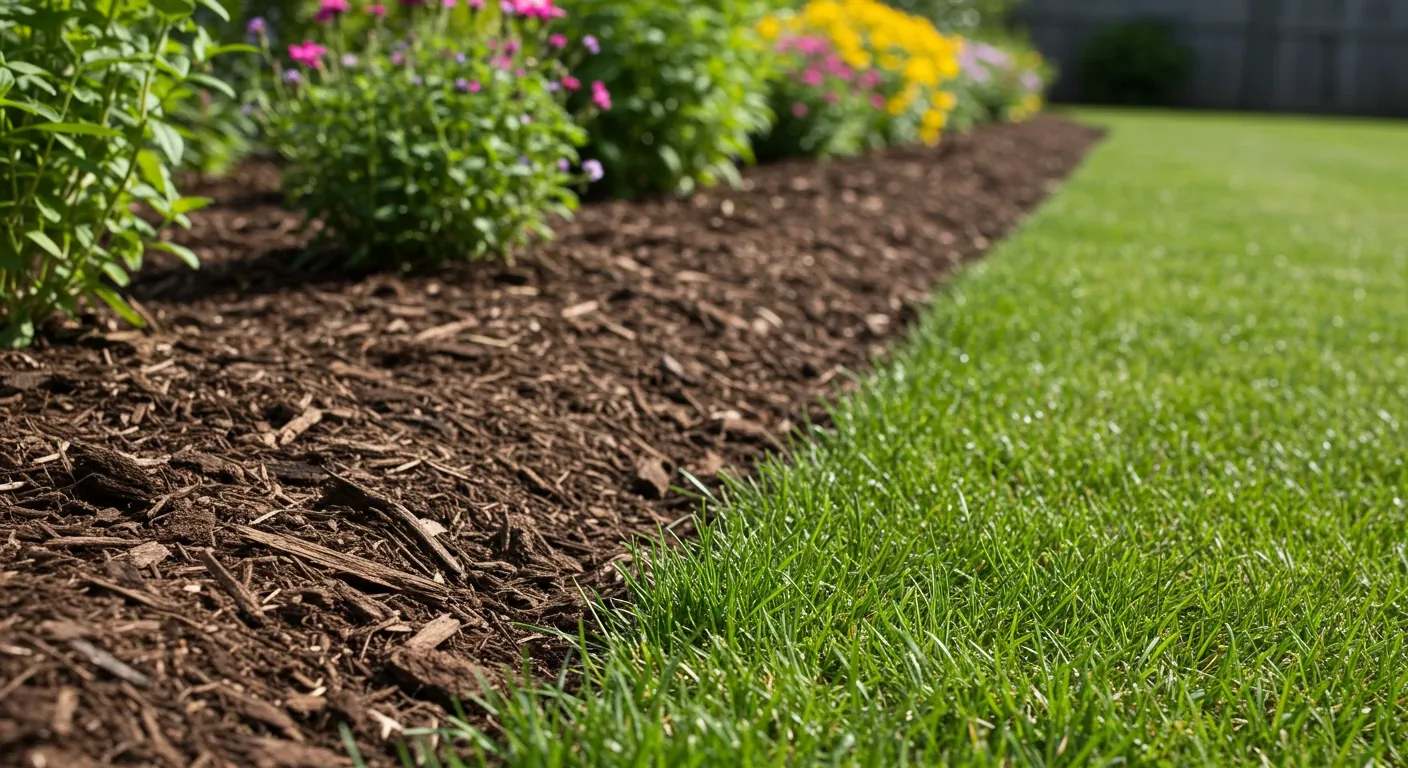
Beyond the visual "wow" factor, defined edges are practical workhorses. They help keep ambitious lawn grass from invading your beds (we've all fought that battle!), contain mulch or decorative stone (explore options with our Material Selection guide), and make mowing alongside the beds significantly easier and cleaner. Find out more about how we combine these elements with our Mulching and Edging services.
In this section, we'll dive into why these sharp edges are such a game-changer for Metcalfe gardens, exploring both the aesthetic boost and the practical perks. Get ready to see your garden in a whole new, tidier light!
The 'Edge' Advantage: More Than Just a Pretty Line
Okay, so we established in the intro that sharp edges look fantastic, like putting a snazzy frame around your garden masterpiece. But let's be honest, the real magic – the "edge" advantage – goes way deeper than just looking pretty. Think of it like neat handwriting versus rushed scribbles; one is just so much easier and more pleasant to work with! It’s about function meeting form right here in your Ottawa landscape.
First up: Mowing. Ah, the weekly tango with the lawnmower! Having a crisp, defined edge along your garden beds, whether in Barrhaven or Osgoode, is a huge time-saver and plant-saver when it comes to lawn care. No more accidentally scalping your precious hostas or spending ages meticulously using the trimmer to zap every single blade of grass attempting a hostile takeover of your flowerbeds. A clean line – whether it’s a deep spade cut, natural stone, or installed edging material – gives your mower wheels a clear, safe path. This means quicker, cleaner mowing and less risk of damaging the plants you've worked so hard to nurture.
Then there's the "bouncer" effect. Good edges are fantastic at containment. They keep the good stuff (your valuable mulch, nutrient-rich soil, decorative gravel) in the garden bed where it belongs, and help keep the unwanted guest (pesky lawn grass) out. This isn't just about tidiness; it actively saves you effort and potentially money. Less mulch spilling onto the lawn means you replace it less often. Less grass creeping in means less time spent on your knees weeding. It creates a more stable, manageable environment for your plants to thrive. Protecting your plant investment is key, and simple barriers can even help in small ways, like making it easier to spot problems early, complementing efforts like Richmond Vole Damage Prevention for Spring Garden Health.
Clean edges contribute subtly to overall garden health, too. While not a magic bullet, they reduce those convenient, damp hiding spots for slugs and snails right at the border between lawn and bed. A tidy edge also makes it simpler to monitor the base of your plants for any signs of trouble, supporting proactive care like undertaking a Kars Garden Health Assessment to Prevent Winter Loss.
And yes, let's circle back to aesthetics because it *does* matter! That sharp separation makes your planting areas look intentional and well-cared-for. It provides contrast, making colourful perennials pop and highlighting the beautiful structure of well-pruned shrubs – the kind of result you get from smart seasonal work detailed in guides like the Winchester Fall Shrub Rescue Pruning to Save Costs. This polished look complements other essential gardening practices, such as those outlined for Kenmore Fall Garden Care for Long-Lasting Plants. It simply elevates the entire look of your property, making it feel complete and professionally managed, like the results seen in our Project Transformations gallery. If achieving that perfect edge feels daunting, remember there are many Clean Yards Landscaping Services available to help get your garden lines looking sharp.
Enhanced Curb Appeal
Sharp edges create a polished, professional look that significantly enhances the visual appeal of your property. It frames your garden beds like a picture frame, making plantings stand out.
- Creates visual separation between lawn and beds.
- Makes the landscape look intentional and well-maintained.
- Increases perceived property value.
Easier Maintenance
Defined edges simplify lawn care and garden upkeep.
- Provides a clear mowing strip, reducing trimmer use.
- Contains mulch, soil, and decorative stones within beds.
- Acts as a barrier against encroaching lawn grass, reducing weeding.
This is a key component of efficient City Garden Maintenance.
Subtle Garden Health Benefits
While not a primary function, clean edges can contribute positively to garden health.
- Reduces hiding spots for pests like slugs and snails at the lawn border.
- Makes it easier to inspect the base of plants for issues.
- Helps maintain soil structure within the bed by reducing runoff.
Related services include overall Ottawa Property Cleanup.
Gearing Up: Tools & Techniques for a Killer Cut
Alright, let's dig into the nitty-gritty of actually creating those sharp garden edges we've been raving about! Having the right tools and knowing how to use them makes all the difference between a crisp, professional line and, well, something that looks like you wrestled a grumpy badger along your flowerbed.
Choosing Your Weapon: Manual vs. Power Edgers
You've got two main camps when it comes to edging tools: good old-fashioned muscle power, or tools that use fuel or electricity.
- Manual Tools:
- Half-Moon Edger: Shaped like its name, this is designed specifically for cutting clean curves and straight lines. Requires a good stomp!
- Flat Spade: Your trusty garden spade can absolutely do the job. Make sure it's sharp!
- Edging Shears: Like long-handled scissors for grass, good for trimming vertical edges once cut.
- Pros: Great control, quiet (your neighbours in Barrhaven will thank you!), no fumes, good workout.
- Cons: Requires more physical effort, can be slower for large properties.
- Power Tools:
- String Trimmer (Used Carefully!): Can be turned vertically to cut an edge, but tricky to get a clean line and can send debris flying. Use with caution!
- Stick Edger: A dedicated machine (gas, electric, or battery) with a vertical blade. Designed specifically for this job.
- Pros: Much faster, less elbow grease needed, great for long, straight runs.
- Cons: Noisy, needs fuel/charging, can be too aggressive if you're not careful, less precise on tight curves.
Quick Comparison:
| Feature | Manual Tools | Power Tools |
|---|---|---|
| Speed | Slower | Faster |
| Effort | More Physical | Less Physical |
| Precision | High | Moderate to High |
| Noise | Low | High |
| Cost (Initial) | Lower | Higher |
| Best For | Smaller yards, curves | Large yards, straight lines |
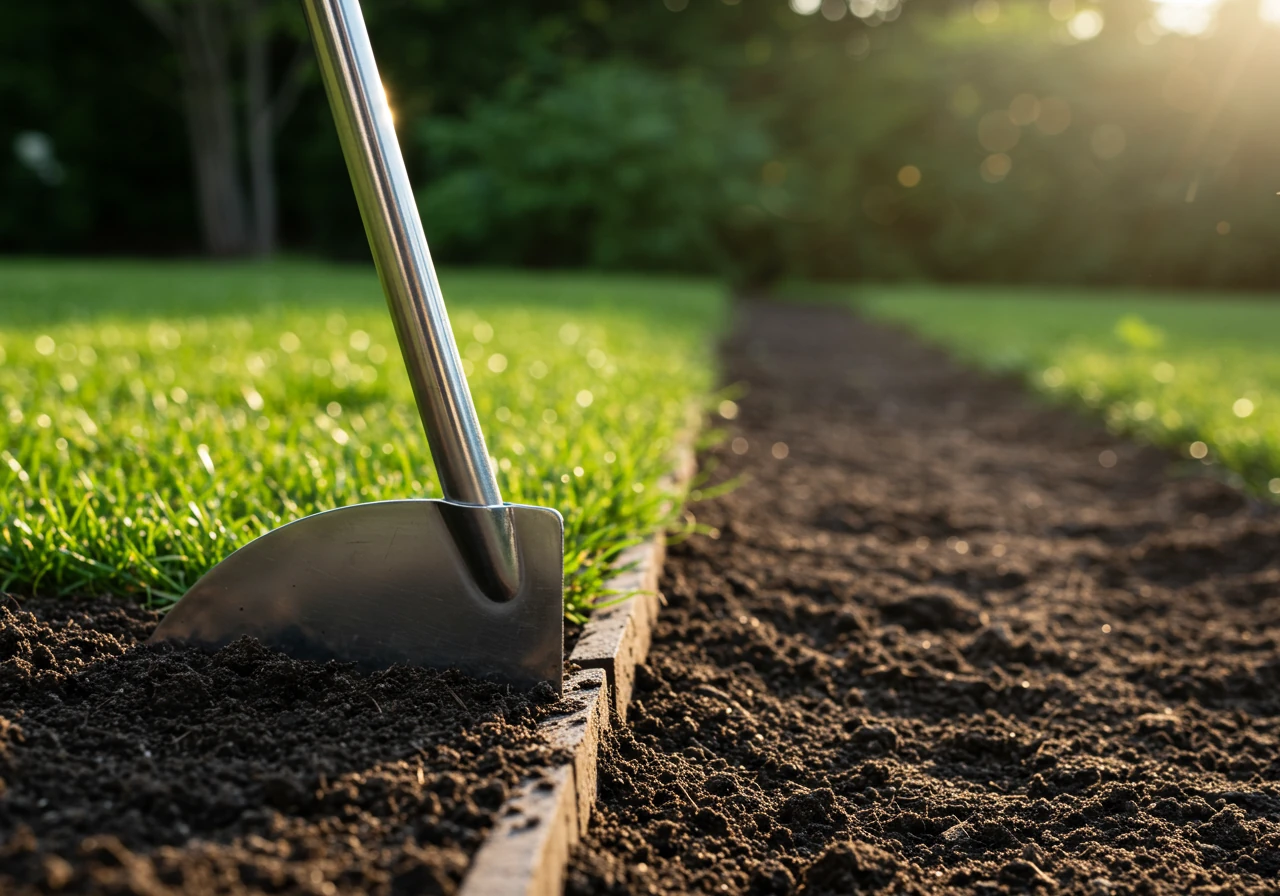
How-To: The Classic Spade-Cut Edge
This technique creates a beautiful, natural-looking edge without needing extra materials (though you might add some later!). Here’s how to tackle it:
- Plan Your Attack: Lay out a garden hose or rope to mark the desired edge line. Curves look great, but gentle sweeps are easier to mow than tight corners.
- Gear Up (Safety First!): Put on sturdy shoes (no sandals!), gloves, and eye protection. Flying soil or small stones are no joke.
- Choose Your Tool: Grab a sharp flat spade or a half-moon edger. Sharp is key!
- Make the Cut: Position your tool along the line and push straight down with your foot, aiming for a depth of about 4-6 inches. Overlap your cuts slightly. This can be tougher in Ottawa's common heavy clay soil – you might need to put some weight into it! If the ground is very dry and hard, watering the line slightly an hour beforehand can sometimes help. Sandy soil, often found further out towards areas like Greely, cuts easier but might crumble, so take care.
- Remove the Strip: Once you've cut a section, make angled cuts back from the inside edge of the bed towards your vertical cut line, allowing you to lift out a wedge or strip of turf and soil. Toss this onto the compost pile or use it to fill bare spots elsewhere (perhaps after sod installation?).
- Tidy Up: Tamp down the newly exposed soil inside the bed slightly and clean up any loose debris. Voilà! A crisp, natural edge.
Creating these edges is often part of a broader spring or fall cleanup. If the task feels overwhelming, or you're looking for a really polished finish across your whole property, exploring professional Clean Yards Landscaping Services is a great option. Services like a Metcalf Yard Cleanup Service often include edging as part of the package deal.
Once you have that beautiful cut edge, you might decide to install permanent edging. There's a lot to consider, from plastic to stone, which is covered well in guides on Material Selection for Landscaping Projects. And if you do hire professionals for an Ottawa Property Cleanup Service, remember that good communication ensures you get the results you want. Don't hesitate to ask questions about the process or provide input; reliable companies value your Estimate Feedback and Project Input. Now, go forth and conquer those edges!
Material Matters: Choosing the Right Edging for Your Ottawa Landscape
Okay, you've decided your garden needs that sharp, polished look. You've maybe even practiced your spade technique (or wisely decided to call in the pros!). Now comes the fun part: choosing the actual material that will form that crucial border. It's like picking the right shoes for an outfit – the wrong choice can throw everything off, especially with our wild Ottawa weather rollercoaster!
Choosing edging isn't just about looks; it's about durability, maintenance, budget, and how well it plays with our infamous freeze-thaw cycles. Let's break down some popular options:
- Plastic & Composite Edging: The go-to for many homeowners because it's generally affordable and easy to find.
- Pros: Inexpensive, flexible (great for curves!), easy DIY installation, won't rust or rot. Some composites use recycled materials, which is a nice eco-bonus for folks in places like Vernon concerned about sustainability.
- Cons: Can look less high-end. Cheaper plastic can become brittle in cold Ottawa winters and crack. UV rays cause fading. Biggest potential headache? Frost heave. If not installed deeply enough, it can pop out of the ground.
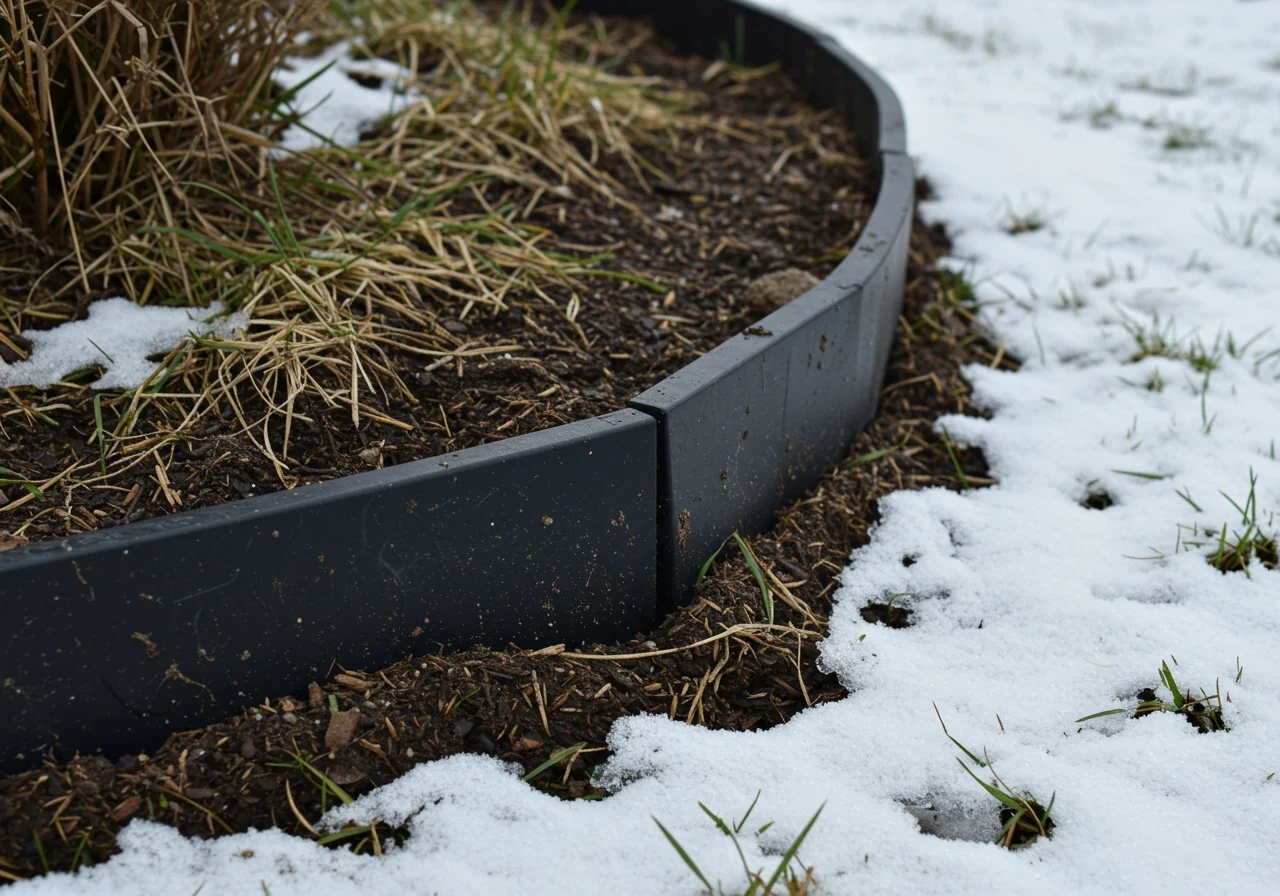
- Metal Edging (Steel & Aluminum): Offers a sleek, modern, and often barely-there look.
- Pros: Very durable, creates clean lines, long-lasting. Aluminum won't rust; steel is often coated. Less prone to heaving *if* installed correctly (deeper).
- Cons: More expensive. Installation can be trickier. Edges can be sharp (quality products mitigate this).
- Wood Edging (Natural & Treated): A classic choice for a more traditional or rustic garden aesthetic.
- Pros: Natural look. Can be relatively inexpensive (pine) or pricier (cedar). Treated wood resists rot longer.
- Cons: Will eventually decay, especially with Ottawa's weather. Susceptible to insects. Can warp or heave. Requires maintenance (sealing/staining).
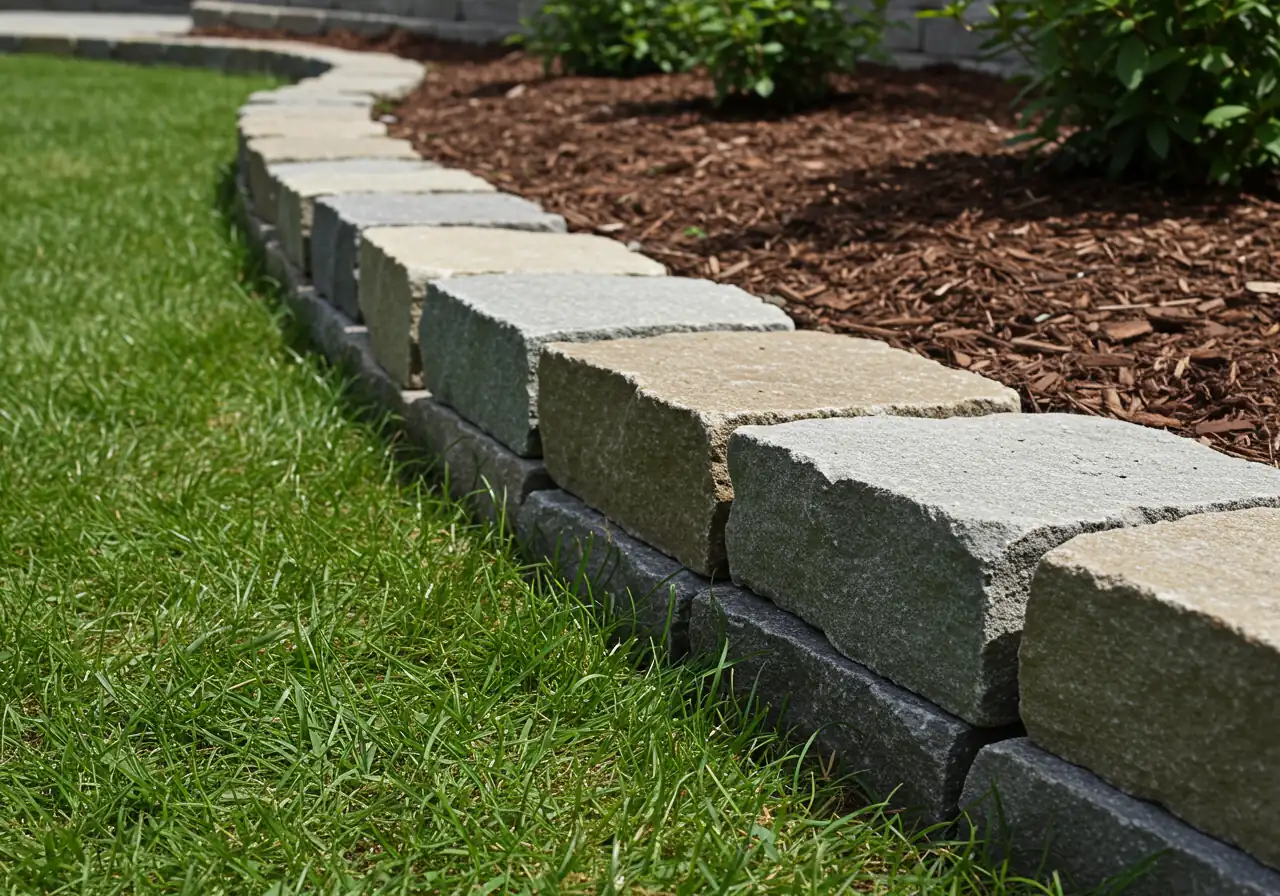
- Stone, Brick & Pavers: The heavyweights – offering a permanent, high-end look.
- Pros: Extremely durable, timeless appeal, variety in style. Won't rot/rust. Creates a stable edge *if* installed properly. Perfect alongside walkways. Services like a Marionville Property Cleanup Service might integrate these.
- Cons: Most expensive (materials & labour). Installation is labour-intensive and requires a proper gravel base below the frost line to prevent shifting. Not a quick DIY.
- Concrete Edging (Poured & Blocks): Offers durability and design flexibility.
- Pros: Very strong and long-lasting. Poured allows custom shapes. Blocks are uniform (still need a good base!). Can be coloured/stamped.
- Cons: Poured is expensive and needs pros. Blocks need a solid base. Can look 'commercial'.
Eco-Friendly Considerations:
For the environmentally conscious gardener in Kenmore or elsewhere, consider reclaimed bricks or stones. Untreated, locally sourced wood like cedar has natural resistance to rot (though still requires upkeep). Recycled plastic/composite edging is improving. And don't forget the ultimate eco-choice: a well-maintained natural spade-cut edge requires no extra materials at all! If you're unsure about sustainable options, you can always ask the professionals – find out more about our approach on the Clean Yards About Us Page.
Considering options? Check out the City of Ottawa's resources on green initiatives for local context or the Ottawa Horticultural Society for gardening advice.
Quick Comparison:
| Material | Cost | Durability | Installation | Ottawa Climate Suitability |
|---|---|---|---|---|
| Plastic/Composite | Low | Low-Med | Easy | Fair (Prone to heave/cracking) |
| Metal | Med-High | High | Moderate | Good (If installed deep) |
| Wood | Low-Med | Low-Med | Moderate | Fair (Prone to rot/heave) |
| Stone/Brick/Paver | High | Very High | Hard | Excellent (With proper base) |
| Concrete | Med-High | Very High | Hard (Poured)/Moderate (Blocks) | Excellent (With proper base) |
Choosing the right material is crucial for long-term satisfaction. Think about your budget, the style of your home and garden, how much maintenance you're willing to do, and the specific challenges of your site. Combining new edging with fresh mulch is a fantastic way to rejuvenate beds – check out our info on Clean Yards Mulching and Edging Services for ideas. Installing edging can often be part of a larger project, like a spring spruce-up handled by an Ottawa Garden Clean Up Service or a complete Garden Install. Don't hesitate to get professional advice, and remember that providing details about your preferences helps ensure the best result; your input is valued, which is why we encourage Estimate Feedback and Project Input. Choose wisely, and your edges will keep things looking sharp for years to come!
Installation Station: Laying Down the Law(n Edge)
Alright, you've picked your weapon of choice from the edging arsenal – nice work! But even the best material won't look sharp or last long if it's installed poorly. Think of this stage as the mission control for your garden borders; careful planning and execution are key to launching a successful edge that stays put. Let's get down to the business of laying it down right, avoiding those wonky lines that scream "DIY disaster."
Step 1: Plan & Prepare Like a Pro
Before you dig a single inch, walk the line. Seriously. Lay out your garden hose or use landscape marking paint to visualize the exact path your edging will take. Gentle curves are your friends; super tight corners are tricky to install *and* mow around later.
Clear the area! Remove any existing turf, weeds, or large rocks along your marked line. You’ll need a clean workspace. Consider the soil you're working with – much of Ottawa, especially areas like Nepean, deals with heavy clay, which requires more muscle to dig but holds shape well once cut. Sandy soil, sometimes found further out, is easier to dig but might need more careful backfilling to prevent shifting. Getting the ground ready is crucial, and if you're tackling larger bed creations, expert Soil Preparation Services can make a world of difference.
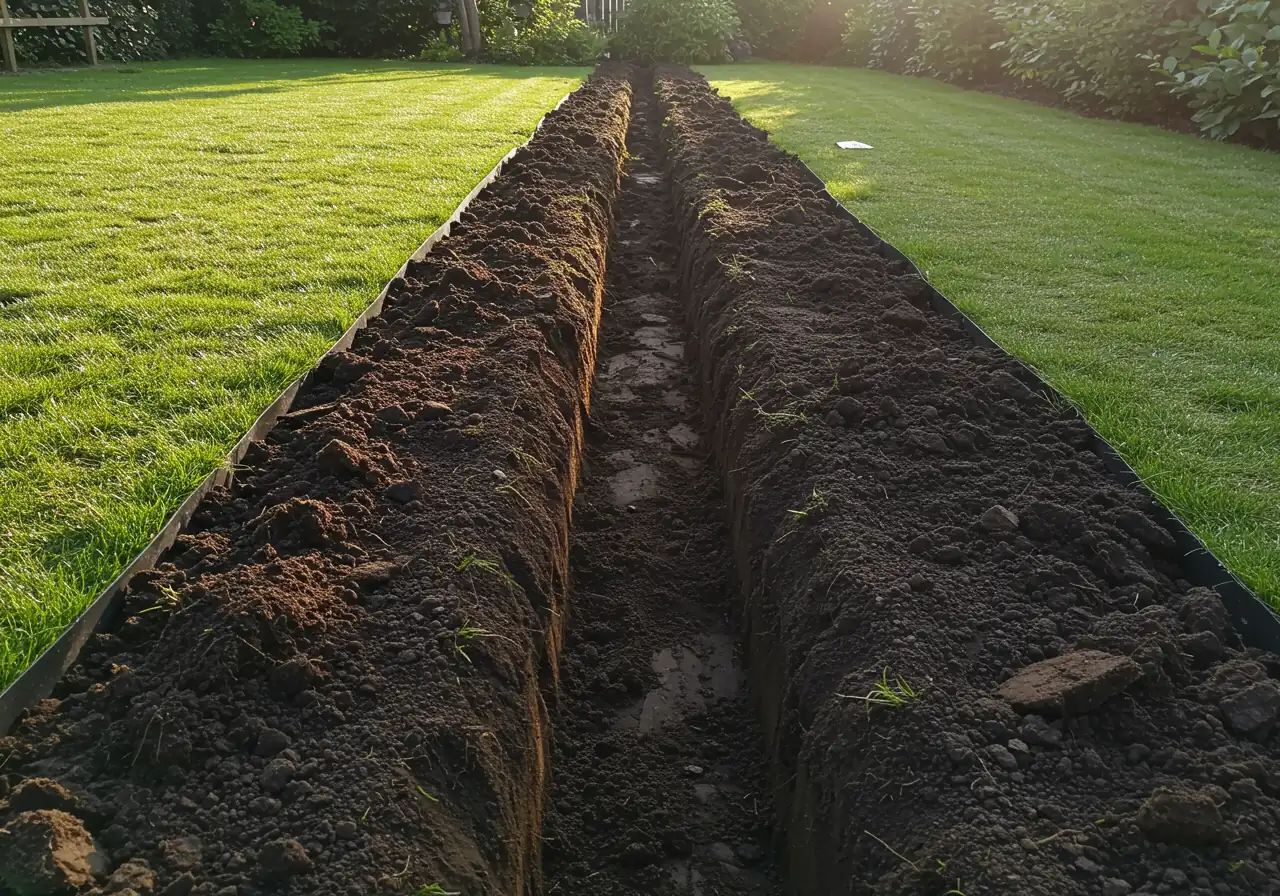
Step 2: Dig That Trench (The Right Way!)
This is where many edging projects go sideways – or rather, upwards after winter. For most edging types (especially plastic and metal), you need to dig a small trench along your marked line.
- Depth is Crucial: To combat Ottawa's notorious frost heave (where freezing and thawing soil pushes things up), aim for a trench depth of about 4-6 inches for basic edging. This helps anchor it below the major frost movement zone. For heavier stone or pavers, you need to dig much deeper to install a proper gravel base – often 8-12 inches or more, depending on the material and site.
- Width: Just wide enough to comfortably fit the edging material.
Step 3: Installing Metal Edging (Step-by-Step)
Metal edging offers a sharp, lasting line. Here’s a common installation method:
- Place & Connect: Lay the first piece of metal edging into the trench. Most types connect end-to-end using overlapping sections or special joiners.
- Stake it Down: Metal edging usually comes with stakes. Hammer these through the designated slots into the ground inside the trench. Don't hammer them all the way down just yet.
- Check Your Level: Use a level! Place it across the top edge of the metal strip. Adjust the height by tapping the stakes further in or slightly pulling them up until it's perfectly level (or follows the desired slope consistently).
- Backfill Power: Once level, carefully backfill the trench on both sides of the edging, packing the soil down firmly as you go. Use the handle of your hammer or a block of wood to tamp it tightly. Loose soil is an invitation for shifting later.
- Continue & Curve: Repeat for the next section, ensuring connections are snug and the line flows smoothly. For curves, gently bend the metal (most steel/aluminum edging allows for gradual curves) to follow your marked path.
Common Pitfalls & How to Avoid Them
- The Frost Heave Pop-Up: Cause: Trench wasn't deep enough. Fix: Dig deeper! It’s extra work upfront but saves headaches later.
- The Wobbly Worm: Cause: Edging wasn't leveled or backfilled firmly. Fix: Use a level religiously and pack that soil tightly on both sides.
- The Sunken Edge: Cause: Ground wasn't properly prepared, especially under heavy pavers/stone. Fix: Always use a compacted gravel base for heavy materials.
Proper installation takes time and attention to detail. It reflects a commitment to quality, something you can learn more about on the Clean Yards About Us Page. If wrestling trenches and levels isn't your idea of weekend fun, or you want it integrated perfectly with a larger garden refresh, professional help is always an option. Services ranging from a comprehensive Ottawa City Garden Clean Up Service to a focused Metcalf Property Cleanup Service or a reliable Nepean City Yard Cleanup Service often include expert edging installation.
Take your time, follow the steps, and soon you'll be admiring those crisp, professional lines that truly elevate your landscape!
Year-Round Edge Excellence: Seasonal Maintenance for Ottawa Gardens
So, you’ve got those crisp, gorgeous garden edges installed, maybe bordering your beautiful beds in Barrhaven or defining a walkway in Greely. High five! But hold on – like any part of your landscape, those sharp lines need a little TLC throughout the year to stay looking their best, especially with Ottawa's dramatic seasons doing their best impression of a mood swing. Let’s face it, frost heave isn't exactly gentle, and heavy snow can pack a punch. Keeping your edges in top form isn't hard, but a little seasonal attention goes a long way.
Think of it as a quick check-up to prevent bigger problems down the road. Here’s a simple plan:
Spring Forward (March-May): Post-Winter Recovery
Inspect for frost heave and damage. Tamp down raised sections (if possible) or plan for resetting. Clear debris. Redefine natural spade cuts as part of your Spring Property Clean Up. Check soil levels inside beds.
Summer Shape-Up (June-August): Keeping it Tidy
Regularly trim grass/weeds along the edge. Rake back any spilled mulch or soil. Quick stability check after storms. Consider routine City Garden Maintenance Service.
Fall Back (September-November): Winter Prep
Clear fallen leaves and debris *before* snow. Do a final check for looseness or damage. Ensure natural edges have a clear trench. Essential part of Marionville Garden Clean Up or City Property Cleanup Service.
Winter Watch (December-February): Mostly Hands-Off
Avoid piling heavy snow directly on edging. Be careful with shovels near edges. Monitor for potential ice damage. Wait for spring inspection.
Quick Seasonal Calendar:
| Season | Key Edging Tasks |
|---|---|
| Spring | Inspect for heave/damage, reset/repair, clean debris, redefine cuts |
| Summer | Trim grass/weeds, contain mulch/soil, check stability |
| Fall | Clear leaves/debris, final stability check, secure for winter |
| Winter | Avoid direct snow piling, be careful with shovels nearby |
A little seasonal effort keeps your garden edges performing their best – containing your beds, simplifying lawn care, and giving your entire Ottawa property that polished, professional look year after year!
Illustrative chart showing relative frequency of common edging maintenance issues requiring attention.
Pro Tip Highlight Box: Secrets to Razor-Sharp Edges
Want garden edges so sharp they could give a paper cut? (Okay, maybe not *that* sharp, but you get the idea!). Here are a few secrets from the pros to get those crisp lines looking amazing:
- Sharpen Up! Honestly, keeping your spade or half-moon edger sharp is half the battle. A dull blade crushes and tears turf instead of slicing cleanly.
- The Magic V-Cut: For natural, dug edges: After the vertical cut, make a *second*, angled cut from inside the bed back towards the first cut. This removes a clean wedge of soil/turf.
- Defend the Line: Regularly trim grass right along the border with a string trimmer (held vertically) or manual shears. Constant vigilance prevents root invasion in your Manotick garden and is often part of services like a Marionville Garden Clean Up Service.
- Deep Freeze Defence: To fight Ottawa frost heave (especially with plastic/metal), install edging *deep* – aim for at least 4-6 inches below ground. Depth is key in professional Garden Install work. Not sure? Just Contact Us!
- Integrate and Elevate: Ensure your edge flows naturally with paths and driveways. Achieving a seamless look across the property might involve a comprehensive Ottawa Yard Cleanup Service, or even a dedicated Marionville Yard Cleanup Service if you're nearby.
FAQs: Your Ottawa & Metcalfe Edging Conundrums Solved
Got questions about keeping those garden lines looking sharp in Ottawa and Metcalfe? You're not alone! Here are some common head-scratchers, solved just for you.
Ah, the dreaded frost heave! This is super common in our climate. Usually, it means the edging wasn't installed deep enough to get a good grip below the frost line. Aim for at least 4-6 inches down. Once the ground thaws, try digging a deeper trench and resetting it firmly, packing soil tightly on both sides. For persistent problems, heavier metal or stone edging installed properly often fares better. Learn more about potential issues in our Privacy Policy regarding site conditions (just kidding, but proper install is key!).
Good news – clay soil holds a cut edge quite well, so a natural spade-cut trench is a great, simple option! For installed materials, metal edging (steel or aluminum) slices through clay reasonably well during installation and holds a firm line. Stone or concrete pavers are also excellent choices, *but only if* they have a deep, compacted gravel base dug below the frost line to prevent shifting in that dense soil.
Great question! For that super-crisp, professional look, redefining your spade edge once thoroughly in the spring (during your main cleanup) and maybe a quick tidy-up in the fall usually does the trick. Regular grass trimming right along the edge helps maintain the line mid-season. Consistent upkeep is often part of routine Year-Round Garden Maintenance Packages, keeping things sharp without a major overhaul each year.
It definitely helps *a lot*! Think of it as a border patrol for your beds. While some persistent grass roots might eventually sneak under very shallow edging, a properly installed edge (especially sturdy metal, deep plastic, or stone/concrete) significantly blocks surface runners and makes invasion much harder. It drastically reduces weeding time along the border compared to having no edge at all. For help reclaiming invaded beds, consider a Metcalf Garden Clean Up Service.
It often depends on the extent of the damage and the specific service agreement. Minor fixes, like tamping down slightly heaved sections, might be part of a standard cleanup. More significant repairs (like replacing broken pieces) might require specific attention and quoting. When booking an Expert Ottawa Yard Cleanup Service, always mention the edging damage so it can be properly assessed. You can usually find details on service scope in the Company Terms and Conditions.
Doing your homework is smart! Professional installation ensures longevity and that crisp look. Hearing from neighbours about their experiences can be really helpful. Many landscaping companies share testimonials; we're certainly grateful for the kind words shared by satisfied clients, some of which you might find reflected on pages like our Customer Appreciation Thank You Page. Asking for local references or checking platforms like our Google Business Profile is also a good idea!
Conclusion: Get the Edge You Deserve in Metcalfe (and Beyond!)
Okay, we've reached the end of our edging expedition! Hopefully, you're now seeing just how much those crisp lines can do for your Metcalfe garden. It's not just about looking tidy (though that's a huge perk!); it's about giving your landscaping that professional frame it deserves, boosting curb appeal, and making lawn care less of a wrestling match. Think easier mowing near your garden beds, better mulch containment so it stays put, and showcasing those beautiful plants you've worked so hard on. Whether you're gardening in Greely, Osgoode, or right here in Metcalfe, defined edges truly elevate your whole Ottawa outdoor space.
Feeling inspired to tackle those edges yourself? Awesome! Grab your sharpest spade or chosen edging tool, revisit the tips we shared, and get ready for some seriously satisfying results. There's nothing quite like stepping back to admire that crisp, clean line you created – go you!
But hey, if digging trenches sounds less fun than watching grass grow, or you simply want that flawless finish without the fuss? No worries! Clean Yards Landscaping is here to help transform your garden beds in Metcalfe, Barrhaven, Manotick, and across the wider Ottawa region. We'll expertly handle the digging, defining, and installation, getting those lines razor-sharp so you can just relax and enjoy the beautiful view. Check out our full range of Landscaping Services.
Ready for the edge you deserve?
Get in touch today for expert edging and landscaping services! Visit us at cleanyards.ca or Contact Us to get started.
