Metcalfe Patio Tips: Avoid Clay Soil Sinkage & Cracks
Ready to build your dream patio but worried about Ottawa’s tricky clay soil? Let us help you get it right the first time. Request a quote today!
Quick Tips for a Stable Patio:
- Dig Deep: Excavate 12-18 inches, removing all topsoil.
- Solid Base: Use geotextile fabric, layered & compacted Granular A gravel, and stone dust.
- Proper Slope: Ensure water drains away from foundations (1/4 inch per foot).
- Seal Joints: Use polymeric sand to lock pavers and deter weeds/ants.
- Regular Care: Sweep, check for settling, and top up joint sand as needed.
Introduction: That Sinking Feeling? Keeping Your Metcalfe Patio Picture-Perfect
Ah, the backyard patio. It’s your personal slice of paradise right here in Metcalfe, isn’t it? That perfect spot for enjoying a morning coffee, hosting summer barbecues, or simply relaxing under the big Ottawa sky. But hang on… does that patio chair suddenly feel a bit wobbly? Are those beautiful pavers looking a little… *uneven*? If you’re getting that literal sinking feeling, you’re not alone.
Unfortunately, keeping patios pristine in our corner of the world presents unique landscaping challenges. The infamous Ottawa freeze-thaw cycle can wreak havoc on even the most carefully laid interlock. Add to that the notorious Leda Clay soil – common throughout areas like Metcalfe, Greely, and Osgoode – which can shift and settle unexpectedly, and you’ve got a recipe for dips, cracks, and tilting stones. It’s enough to make any homeowner sigh! Explore local resources like the City of Ottawa website for general information on regional conditions.
But don’t throw in the trowel just yet! Understanding *why* your patio might be misbehaving is the first step. Stick with us, and we’ll walk you through the common culprits and share practical, actionable tips to prevent issues and keep your patio looking picture-perfect for years to come. Let’s get your outdoor oasis back on solid ground.
Why Clay Soil is the ‘Problem Child’ for Patios in Ottawa and Beyond
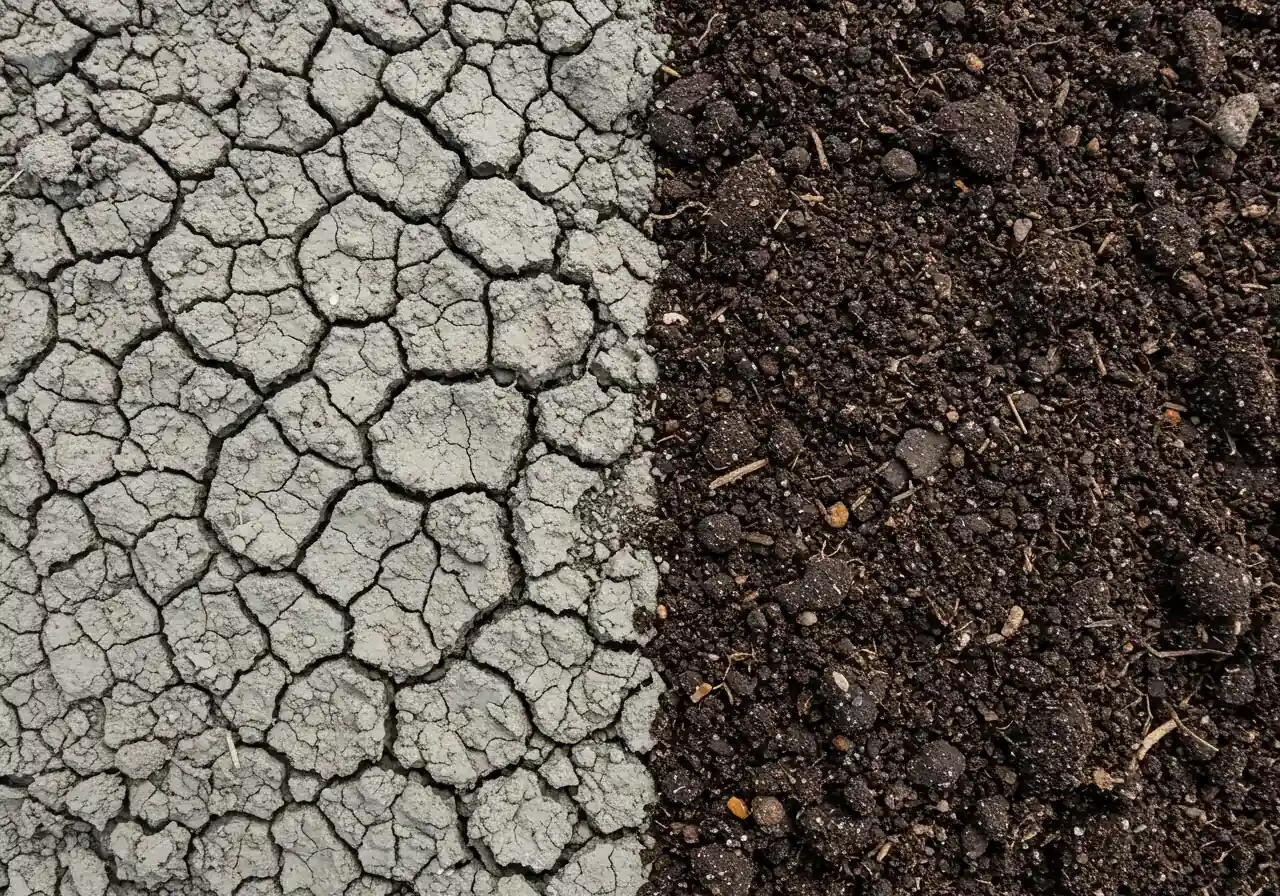
Okay, let’s talk dirt. Specifically, let’s talk about clay soil, the often-frustrating foundation beneath many yards in Ottawa and surrounding areas like Metcalfe, Barrhaven, and Nepean. If your patio seems to have a mind of its own, shifting and sinking over time, chances are this geological *problem child* is playing a starring role.
So, what makes clay soil such a handful for landscaping projects, especially patios? It boils down to tiny particles and water. Unlike sandy soil where water drains quickly, clay soil is made up of super-fine particles packed tightly together. Think of it like a dense sponge. When it gets wet, it holds onto that water for dear life and *swells* up. When it dries out during those hot Ottawa summers, it *shrinks* and can crack. You can learn more about dealing with summer conditions in the Metcalfe Summer Plant Care Guide. This constant expansion and contraction is bad news for anything sitting on top of it, like your beautiful interlock patio, causing pavers to become uneven or gaps to appear.
Now, add Ottawa’s famous freeze-thaw cycles into the mix. Remember how clay holds water? When winter arrives, that trapped water freezes. And when water freezes, it expands – creating immense pressure that pushes the ground (and your patio) upwards. This is called *frost heave*. The trouble is, it rarely heaves evenly. Then, come the thaw, everything settles back down… but often not quite where it started. This repeated push-up and slump-down cycle is a major cause of sinking sections, tilted pavers, and even cracked stones. It’s similar to the winter stress our plants endure, which you can read about in our guide to Metcalfe Fall Plant Healthcare for Winter Stress. Understanding local soil and water conditions is key; resources like the Rideau Valley Conservation Authority provide valuable watershed information.
In our region, we often deal with a specific type called Leda Clay (sometimes called Champlain Sea Clay), which is particularly sensitive to moisture changes. While improving drainage around your property is always a good idea – something to consider during your seasonal yard work like the tasks mentioned in Fall Cleanup Services: Get Your Metcalfe Yard Ready – the real key to a stable patio on clay is *proper base preparation*. You need a deep, well-compacted base of the *right* materials (like granular aggregates) underneath your pavers to buffer them from the clay’s dramatic behaviour. Managing moisture in adjacent garden beds using techniques like those in Metcalfe Mulch Magic: Expert Installation Tips can also contribute to a more stable landscape overall.
Dealing with clay soil requires understanding its quirks and planning accordingly. It might be a bit high-maintenance, but with the right approach during installation, you can significantly reduce future patio problems. If you suspect clay soil shenanigans are ruining your outdoor oasis, getting expert advice on base preparation or repairs might be your next best step. Check out the professional landscaping services available to help tackle this challenge head-on.
Relative Importance of Patio Stability Factors
Step 1: Digging Deep
Proper excavation (12-18 inches) removes unstable topsoil and allows for a sufficient base depth to combat frost heave and clay movement.
Step 2: Building the Base
Using geotextile, layered/compacted Granular A, and a stone dust bed creates the stable foundation essential for longevity.
Step 3: Smart Choices
Selecting suitable pavers, ensuring proper slope, using polymeric sand, and managing drainage are crucial installation details.
Step 4: Long-Term Care
Regular maintenance like cleaning, checking joints, and managing water runoff preserves the patio’s integrity over time.
Step 1: Digging Deep – Proper Excavation is Non-Negotiable
Okay, let’s get digging – literally! Think of your patio like a house: you wouldn’t build it on shaky ground, right? The same goes for your beautiful interlock pavers. Proper excavation isn’t just a suggestion; it’s the absolute *foundation* (pun intended!) for a patio that lasts, especially here in Ottawa with our tricky clay soil and frosty winters. Skipping this step is like trying to bake a cake without flour – it’s just not going to work out well. This step is truly non-negotiable for a long-lasting result.
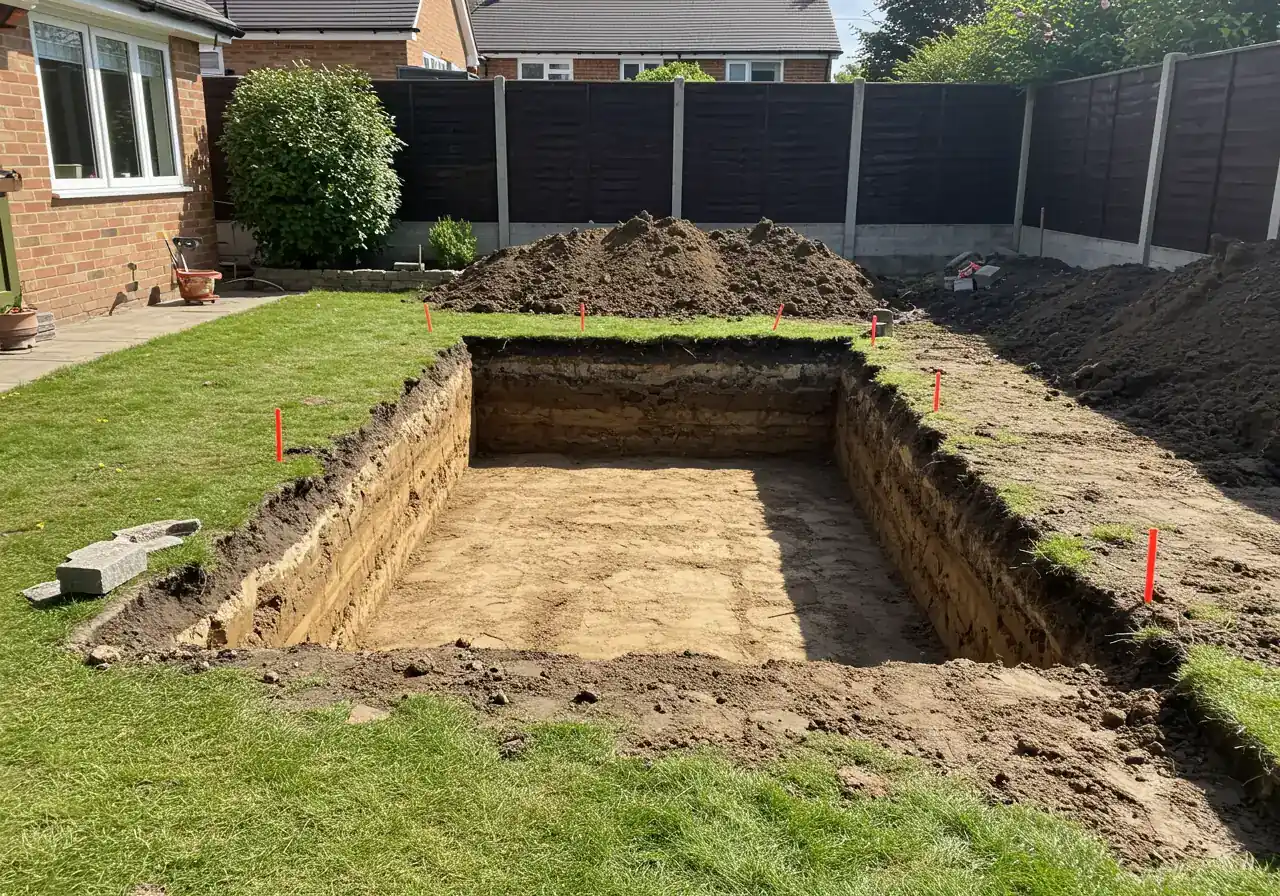
So, why all the fuss about digging deep? First off, we need to get rid of *all* the topsoil. That dark, rich earth is fantastic for your flower beds or vegetable garden, but under a patio? It’s trouble. Topsoil is full of organic matter that compresses and decomposes over time, leading to sinking and shifting. Just scraped off the grass? Not good enough! We need to dig *past* the black stuff down to the stable subsoil, often the lovely clay we discussed earlier. This ensures your base material sits on solid ground, not squishy organic material.
How deep is deep enough? In areas like Metcalfe, Barrhaven, or Greely, dealing with potential frost heave means we need a substantial base. For patios and walkways, plan on excavating at least *12 to 18 inches* below the final paver height. Yes, that sounds like a lot of digging, but this depth allows for enough compacted granular base material (we’ll talk about that next!) to create a stable buffer against soil movement and those infamous freeze-thaw cycles. Going shallower is asking for trouble down the road. This crucial depth is something detailed estimates should cover; feel free to provide feedback on your estimate details if anything seems unclear about the proposed excavation.
Once you’ve dug your pit (and resisted the urge to turn it into a swimming pool!), make sure the bottom has a slight slope – usually about 1/4 inch per foot – directing water *away* from your home’s foundation. Proper grading *within* the excavated area itself is key for drainage *before* you even start adding base material. Water needs a path to escape, even underground.
Handling all that excavated soil and potential debris like old roots or rocks can be part of the project scope. If you’re undertaking a major yard overhaul, remember that services like an Ottawa property cleanup service can manage the removal efficiently. You might even repurpose some good topsoil elsewhere in your yard, perhaps prepping an area for future sod installation services to create a lush lawn around your new patio.
Excavation is hard work, and getting it right requires precision and the right equipment. It’s often a key component of professional landscaping and interlocking services. If you’re working with a contractor for your project, you can often track project milestones, like the completion of the excavation phase, through tools such as a customer portal login. Trust us, investing the time and effort (or budget) in proper excavation now saves you major headaches and costly repairs later. Don’t skimp on the dig!
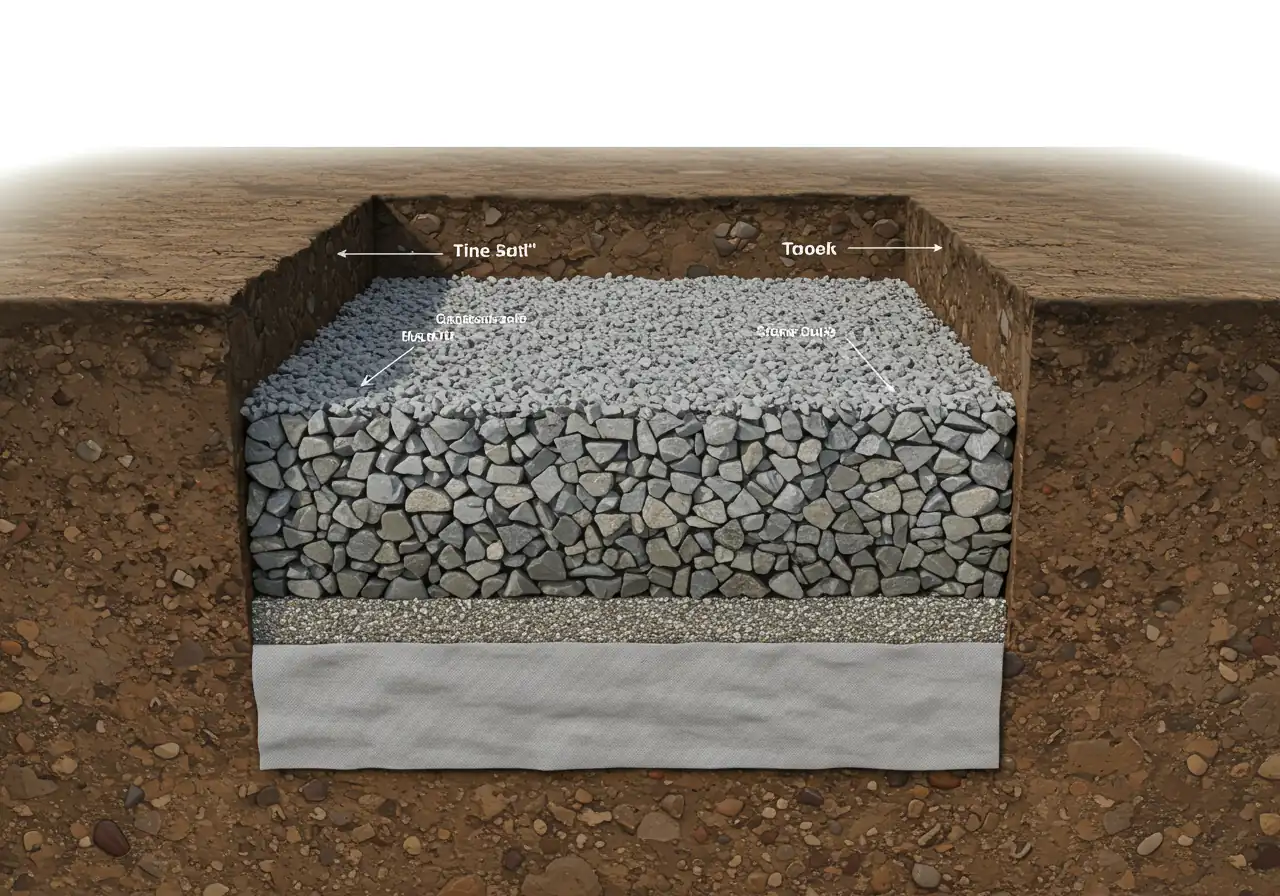
Step 2: Building a Base That Won’t Budge – Your Patio’s Best Friend
Alright, you’ve dug the big hole (congratulations, the hardest part might be over!). Now, what do we fill it with? Not just any old dirt, that’s for sure. Remember our chat about Ottawa’s tricky clay soil and those pesky freeze-thaw cycles? Well, this next step is where we build the superhero shield for your patio – a super-strong, ultra-stable base that laughs in the face of shifting ground. Think of it as the unsung hero holding everything up, the *best friend* your beautiful pavers will ever have. Get this right, and your patio in Greely or Manotick will stay put for years to come.
Geotextile Fabric: The Separator
Imagine a tough, permeable sheet laid down first at the very bottom of your excavated area. This landscape fabric acts like a bouncer – it lets water pass through but stops the underlying clay soil from mixing with your clean gravel base above. This separation is crucial for long-term stability and prevents your expensive base material from sinking into the muck.
Granular A Gravel: The Muscle
This is typically crushed stone (e.g., 3/4 inch clear stone mixed with smaller particles) that packs down incredibly well. It provides the main structural support and allows water to drain freely, preventing water buildup that leads to frost heave. Most of your 12-18 inch excavation depth will be filled with carefully compacted Granular A. This differs greatly from garden soil preparation, where organic matter is key; here, stability reigns.
Stone Dust (or Concrete Sand): The Bedding Layer
This finer material (like limestone screening) forms the final layer before the pavers, usually about 1 inch thick. It creates a smooth, level bed, filling tiny voids in the Granular A and making it much easier to get your pavers perfectly level. Do *not* compact this layer.
Layering and Compacting: The Secret Sauce
You can’t just dump all the gravel in at once. The real secret is *compaction*, done in layers (lifts) of 4-6 inches. Use a mechanical plate tamper on each lift until it’s tightly packed. Hand tamping isn’t sufficient. Thorough compaction is the *most critical* part for preventing future sinking. If your estimate details seem vague on this, use the feedback on your estimate details link to ask for clarification.
Why Proper Base Depth Matters
Remember we aimed for 12-18 inches of excavation? That means you need roughly 10-16 inches of *compacted* Granular A, topped with that 1 inch of stone dust. Anything less, especially in areas prone to frost heave like Ottawa, is simply asking for trouble. A shallow base is the #1 reason patios fail, sink, and heave.
Building this base involves moving a lot of material. Bringing in tons of gravel and potentially removing leftover excavated soil requires planning. Services like a dedicated Ottawa yard cleanup service can be invaluable for managing logistics. It’s also wise to keep surrounding areas clear; if needed, a specific Metcalfe property cleanup service or broader Marionville property cleanup service can help restore order post-construction. Even keeping nearby garden beds tidy might need attention, where an Ottawa garden clean up service or Metcalfe garden clean up service can lend a hand.
Investing the effort (and materials!) into a deep, properly layered, and meticulously compacted base is the single best thing you can do to ensure your patio remains a beautiful, stable haven. Your future self will thank you!
Step 3: Smart Choices – Materials, Drainage, and Installation
Okay, deep breath! You’ve conquered the excavation beast (Step 1) and built a base more solid than your grandpa’s opinions (Step 2). Now for the fun part – choosing the materials that make your patio *look* amazing, and installing them smartly so they *stay* amazing. This step is all about making choices that work *with* our challenging Ottawa conditions, not against them. Explore options with our material selection guide.
Choosing Your Champion: Pavers vs. Slabs
| Feature | Interlocking Pavers | Large Slabs |
|---|---|---|
| Flexibility | More forgiving to minor ground movement due to joints. | Less flexible; movement can cause noticeable tilting or cracking. |
| Repairs | Easier to repair small sections by resetting individual pavers. | Repairing or resetting large slabs can be more difficult and costly. |
| Look | Classic look, various patterns available. More joint lines. | Modern, sleek look with fewer joint lines. |
| Recommendation for Clay Soil | Often recommended due to flexibility. | Can work, but requires an exceptionally stable base. |
For most patios built on clay soil here in Ottawa, *interlocking pavers are often the recommended choice* due to their inherent flexibility.
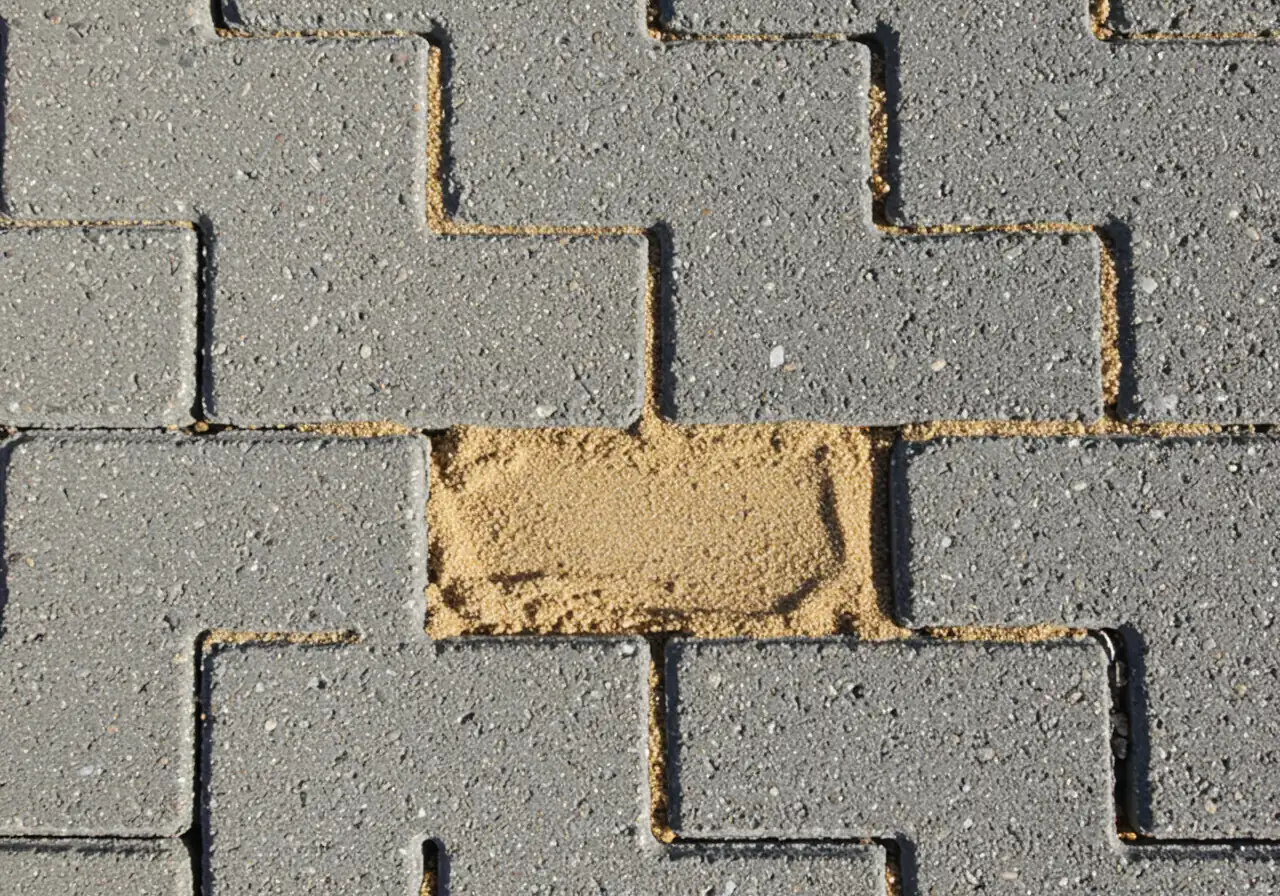
Key Ingredient: Polymeric Sand
Once pavers are laid, fill the joints with polymeric sand. It hardens when activated with water, locking pavers together, significantly reducing weed growth and ant hills, and resisting washout. It’s a must-use for low-maintenance patios!
Go with the Flow: Drainage and Slope
We talked about grading the base, but the final paver surface needs that slope too! A gentle slope (usually 1/4 inch drop per foot) directed *away* from your house foundation is crucial. This ensures rainwater runs off. Also, ensure downspouts are extended away from the patio. Consider permeable pavers for eco-friendly drainage, especially near water sources or if runoff is a concern.
Installation Smarts & When to Call for Backup
Properly laying pavers, ensuring tight fits, cutting edges, and correctly installing polymeric sand takes care. While a small patio might be DIY, larger projects on clay soil can be challenging. Getting the base level, compacted, and sloped correctly is hard work. If unsure, professional help ensures it’s done right. Learn more About Us and our experience with local conditions. Professional garden installation services often integrate patio work seamlessly. See our work in the gallery.
After installation, tidying up is essential. Construction can impact surrounding areas; an Ottawa garden clean up service or a Marionville garden clean up service can restore neatness. A big Thank You for following these steps to ensure a great result!
Keeping Your Patio Perfect: Long-Term Care in the Capital Region
Alright, your patio masterpiece is complete! High five! But just like any great relationship, your patio needs a little ongoing love to stay looking its best, especially with Ottawa’s dramatic seasonal shifts. Keeping things perfect isn’t rocket science, but routine care goes a long way, particularly in areas like Kars or Vernon.
- Spring & Fall Patrol: Twice a year, check for rocking/sinking pavers and inspect joint sand for gaps or washout. Catch issues early!
- Clean Sweep (and Rinse): Regularly sweep away dirt and debris. Rinse occasionally with a hose. Use paver-specific cleaners for tough stains, avoiding high-pressure washing on joints. Keep adjacent beds tidy with help from services like Metcalfe Garden Clean Up Service.
- Joint Sand TLC: Top up polymeric sand in joints where it has settled or washed out. Sweep in dry sand, remove excess, and mist lightly with water. This keeps pavers locked and weeds out. Consider adding mulching and edging to garden beds to further define spaces and reduce spillover.
- Watch the Water: Ensure the slope is still working after rain – no pooling! Keep downspouts directed away. Standing water is detrimental to the base.
When DIY Isn’t Enough
Topping up sand is easy, but significant sinking or widespread loose pavers likely need professional attention. Attempting major repairs without experience can worsen problems. Understand service details by checking Terms and Conditions before proceeding. Don’t hesitate to Contact Us for expert advice or repair services.
A little preventative maintenance means more enjoyment and less worry. For taking care of your investment, we say Thank You! Your future self will appreciate it. We take pride in our work, check out our Google Reviews!
Key Takeaways: Your Cheat Sheet for a Sink-Proof Metcalfe Patio
Want that gorgeous patio in Metcalfe or Greely to stay level and lovely? Keep this quick cheat sheet handy:
- Dig Deep: Excavate 12-18 inches, removing *all* topsoil.
- Build a Base Like a Boss: Geotextile fabric, layered & *thoroughly compacted* Granular A gravel (use a plate tamper!), topped with stone dust.
- Go With the Flow: Ensure base and surface slope away from the house (1/4 inch per foot).
- Magic Sand: Use *polymeric sand* for joints – locks pavers, stops weeds & ants.
- Keep an Eye On It: Sweep regularly, check for settling, top up joint sand as needed. Integrate care with overall lawn care. Professional property clean up services or specific cleanup like Marionville garden clean up service can handle larger seasonal tidying.
Follow these, and enjoy your stable patio! If you need help, rest assured we respect your data as outlined in our Privacy Policy.
Metcalfe & Ottawa Patio FAQs: Clay Soil Conundrums Solved
Tempting, we know, but it’s usually not a good long-term fix! Adding material on top won’t solve the underlying issue – likely a weak or shallow base reacting to that pesky Metcalfe clay. It’s like putting a band-aid on a bigger problem. For a lasting solution, properly excavating and rebuilding the base is almost always necessary. Tackling a big repair can create mess, which is where a Metcalfe Yard Cleanup Service can help manage the site afterwards.
Ah, the mysteries of microclimates and soil! Even within neighbourhoods like Osgoode or Greely, soil composition can vary significantly from one yard to the next. Your neighbour might have hit a patch with better drainage or less reactive clay. Or, maybe their patio is newer and the sinking hasn’t started *yet*. Proper base preparation following guidelines (12-18 inch depth minimum) is always the safest bet for longevity in our unique Ottawa region.
Great question! Avoid planting trees or large shrubs with aggressive root systems right next to the patio edge, as strong roots can disturb the base over time. Opt for perennials or smaller shrubs that tolerate clay and don’t need *constant* watering right beside the patio (too much moisture near the base isn’t ideal). Think Daylilies, Hostas, Sedum, or certain Ornamental Grasses. Regular Garden Maintenance can help keep plants healthy and ensure they don’t encroach on your patio structure. For local plant advice, consider resources like the Master Gardeners of Ottawa-Carleton.
While clay soil and frost heave are very common culprits here in Ottawa, other things *can* cause sinking – maybe poor initial compaction, water pooling from poorly directed downspouts, or even burrowing critters having a field day underneath! Look for uneven settlement, especially after very wet periods or spring thaws. If it heaves unevenly, clay/frost is a likely suspect. Seeing examples of professionally built, stable patios in our online Photo Gallery might help you compare.
Raised patios can sometimes offer advantages. They often involve building sturdy retaining walls and bringing in engineered fill material, potentially isolating the main patio structure more effectively from the native clay below. However, the *foundation* for those retaining walls still needs proper excavation and base preparation to prevent shifting on the clay. It’s not necessarily simpler, just a different construction approach suitable for certain sites around Metcalfe.
Absolutely! Seeing is believing, isn’t it? Fixing patios on difficult soil often involves significant base correction, and the difference it makes is huge. We showcase several projects where sinking or poorly installed patios were completely redone using proper base preparation techniques, resulting in beautiful, stable outdoor living spaces. Check out some dramatic Before & After Patio Transformations on our website to see how proper installation leads to long-lasting results.
Conclusion: Build Your Dream Patio, Without the Drama!
So there you have it! Building a beautiful, long-lasting patio here in Ottawa, even on that notoriously tricky clay soil, isn’t just a pipe dream. It’s totally achievable, *without* the headaches and sinking feelings down the road. The secret? It all boils down to doing things right from the ground up – literally! From proper deep excavation to building that super-strong, multi-layered, compacted base, these steps are your ticket off the patio rollercoaster. Skipping the foundation work might seem faster, but trust us, you’ll pay for it later with wobbly tables and tripping hazards.
Ready to finally create that perfect backyard oasis in Metcalfe or Russell, *without* worrying about future drama? Want a stable, stunning space for relaxing and entertaining? Don’t let soil stress you out! Let’s talk about your vision. Reach out to us today for a friendly consultation or a detailed quote. We’re here to answer your landscaping questions and help you build the patio you’ve always wanted, the *right* way. Let’s get your dream patio project started!