
Quick Winter Tool Prep Guide:
- Clean Thoroughly: Remove all dirt, mud, and plant debris.
- Dry Completely: Towel dry all parts, especially joints.
- Sharpen Edges: Use a file or stone on cutting tools for clean cuts next season.
- Oil Metal: Apply a light coat of oil (WD-40, mineral oil) to prevent rust.
- Treat Wood: Use linseed/tung oil on wooden handles.
- Store Smartly: Keep tools dry, off the floor, ideally hanging in a shed/garage.
Introduction: Winter is Coming, Metcalfe! Is Your Garden Gear Ready?
Okay, Metcalfe neighbours, let's have a chat! The glorious fall colours are fading across our slice of Ottawa, maybe even rivaling the display over in nearby Greely. But we all know what's lurking around the corner after those beautiful leaves fall... winter. Brrr! While you're digging out the cozy blankets and thinking about snow shovels (the other kind), spare a thought for the garden tools that served you so well all summer. Check the latest Ottawa forecast from Environment Canada - cold snaps are on the way!
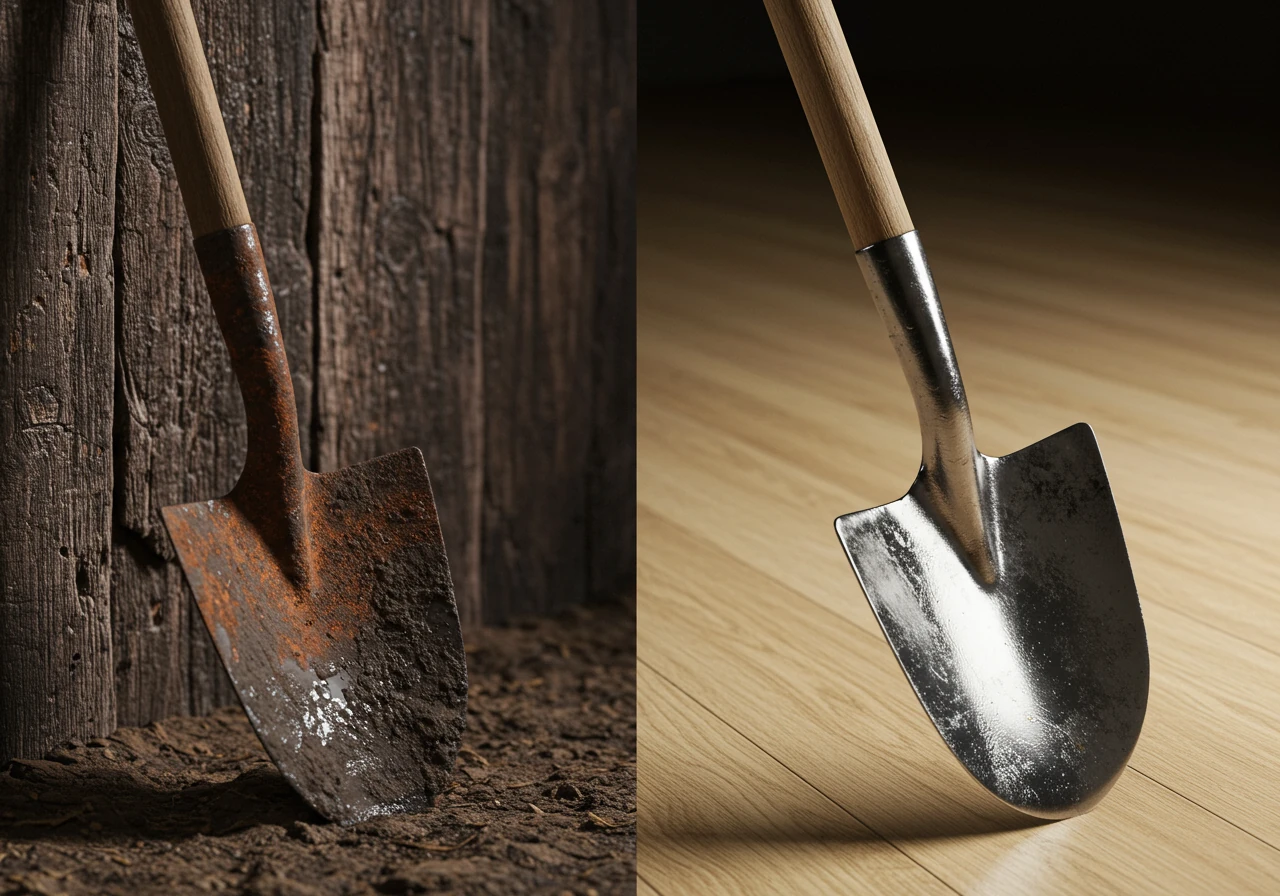
Did you toss that trusty trowel into the shed still caked with soil? Are your pruning shears looking a bit worse for wear? Ignoring your essential landscaping equipment now is like inviting rust and decay to a winter-long party in your shed. Come spring, you could be facing seized parts, dull blades that damage your precious plants, and the frustrating (and costly!) task of repairing or replacing tools.
Taking just a little time now for proper winter preparation is your secret weapon. It ensures your garden gear survives the freeze-thaw cycles, prevents annoying rust, and means everything is sharp, clean, and ready for action the moment spring finally arrives. Let's make sure your tools are eager for that first thaw, not a rusty disappointment!
Why Bother? The Crucial Case for Winter Tool Prep in the Ottawa Valley
Okay, let's get real for a minute. After a long season of digging, planting, weeding, and maybe even tackling some ambitious Metcalfe Renovation Pruning to Revive Old Shrubs, the last thing many of us feel like doing is giving our tools a spa day. Shoving that muddy shovel into the corner of the shed feels so much easier, right? Tempting, yes. Smart? Not so much, especially here in the Ottawa Valley.
So, why bother? What makes winter tool prep such a big deal for folks gardening in Metcalfe, Greely, or anywhere else around Ottawa?
- Our Wild Winter Weather: The biggest culprit? Our infamous freeze-thaw cycles. Moisture left on metal tools - even tiny droplets hidden in joints or caked-on soil - expands when it freezes and contracts when it thaws. Repeat this dozens of times over winter, and you get weakened metal, loosened handles, and the perfect breeding ground for rust. Think of it as tiny ice gremlins constantly working to ruin your favourite trowel.
- That Lovely Clay Soil: Many areas around Ottawa, including parts of Metcalfe, are blessed (or cursed, depending on your perspective!) with heavy clay soil. It sticks like nobody's business! Leaving clumps of damp soil on your shovels, forks, or hoes is like tucking them in with a wet, rust-inducing blanket for the winter. Cleaning them thoroughly is essential. Remember how nice it was working with clean tools when applying that beautiful layer using our Metcalfe Mulch Magic: Expert Installation Tips? Let's keep them ready for next year's mulch!
- Protecting Your Plant Pals: Dull, rusty blades on pruners or loppers don't just make your job harder; they actually damage your plants. Instead of a clean cut that heals quickly, they crush and tear stems, leaving plants vulnerable to disease and pests. You wouldn't perform delicate Metcalfe Summer Deadheading to Extend Flower Blooms with rusty scissors, right? Same principle applies here. Sharp, clean tools mean healthier shrubs and perennials come spring. Get more gardening tips from the Master Gardeners of Ottawa-Carleton.
- Saving Your Loonies and Toonies: Replacing tools gets expensive! A little preventative maintenance now - cleaning, drying, sharpening, oiling - costs far less than buying a new set of shears or a shovel next April. Think of it as an investment in future gardening seasons. Proper tool care is just as crucial as remembering your Fall Cleanup Services to Get Your Metcalfe Yard Ready for the winter ahead.
- Spring Ahead (Without the Headache): Picture this: the first beautiful spring day arrives, the soil is finally workable, and you're itching to get planting. You grab your tools... only to find seized pruners, a rusty spade, and a mower that refuses to start. Ugh! A little effort now means you hit the ground running (or digging!) the moment gardening season officially kicks off.
Your Winter Tool Prep Timeline
Step 1: The Great Tool Roundup & Initial Scrub-Down
Gather all tools. Knock off loose dirt, scrub away caked-on grime (wire brush on metal), rinse well, and DRY thoroughly. Don't forget tools used for Effective Soil Preparation for Ottawa Gardens or Professional Mulching and Edging Services.
Step 2: Banishing Rust Bunnies & Honing the Edge
Tackle rust with vinegar, scrubbing, or specific removers. Sharpen blades (shovels, pruners, hoes) using a file or stone, maintaining the original angle. Safety first!
Step 3: The Protective Shield - Oiling & Lubrication
Apply a light coat of oil (WD-40, 3-in-One, mineral oil) to all metal surfaces. Lubricate moving parts. Treat wooden handles with boiled linseed or tung oil (wipe off excess!). Remember proper disposal for oily rags - check City of Ottawa guidelines.
Step 4: Tucking Them In - Smart Storage for an Ottawa Winter
Store clean, dry, oiled tools in a dry location (shed/garage), preferably hanging or on shelves, off the concrete floor. Drain hoses completely. Follow manufacturer guidelines for winterizing power equipment like mowers used for Expert Lawn Care Solutions.
Detailed Look: Step 1 - Roundup & Scrub-Down
Okay, let's roll up those sleeves! Step one is playing hide-and-seek with your garden gear. You know how it is - that favourite trowel might be hiding under a rogue pot in the shed, or perhaps the rake decided to take an extended vacation behind the garage. It happens to the best of us, from Manotick to Barrhaven!
The Great Tool Roundup:
First things first, we need to gather all the troops. Take a good look around your shed, garage, under the deck - wherever your landscaping tools might be lurking. We're talking:
- Shovels, spades, and trowels (still wearing their muddy boots from summer?)
- Rakes (leaf and garden varieties)
- Hoes and cultivators
- Pruners, loppers, and shears
- Garden forks
- Anything else you used for digging, chopping, snipping, or moving stuff around the yard.
Operation Initial Scrub-Down:
Got 'em all? Great! Now for the first cleaning mission. This isn't the deep spa treatment yet; think of it as getting the worst of the grime off before the real work begins.
- Knock it Off: Bang tools gently against a hard surface (that you don't mind getting dirty!) to dislodge loose soil and debris. Sometimes a good whack is surprisingly effective.
- Brush Away: Grab a stiff brush - a wire brush works wonders on metal parts, while a stiff nylon brush is good for handles and more delicate areas. Scrub away any remaining caked-on dirt. Remember that stubborn Ottawa clay we battled during Effective Soil Preparation for Ottawa Gardens? Now's the time to banish it from your tools!
- Wash Up: Use a hose or a bucket of water to rinse everything down. For stubborn grime, a little dish soap or a vinegar-water mix can help cut through it. Pay attention to tools you used for tasks like Professional Mulching and Edging Services as they often collect damp debris.
- Eco-Friendly Tip: Want to save water? Use collected rainwater for rinsing! Or, skip the harsh chemicals and use that simple 50/50 white vinegar and water solution in a spray bottle - it's great for dissolving grime and even light rust.
- Dry, Dry, Dry! This is super important. Grab some old rags or towels and dry every single tool thoroughly. Pay extra attention to joints, springs, and crevices where water loves to hide and start rust. Leaving them wet is like sending rust an engraved invitation.
This initial clean makes the next steps (like sharpening and oiling) much easier. Getting this basic tool upkeep done now ensures everything is ready for next season's Essential Garden Maintenance Tasks. It's a key part of overall Expert Lawn Care Solutions too, keeping your whole operation running smoothly. Feeling a bit overwhelmed by the sheer amount of fall cleanup? Don't forget, professional help is available for various yard tasks; explore our Complete Landscaping and Gardening Services to see how we can lighten your load.
Detailed Look: Step 2 - Rust Removal & Sharpening
With the mud and grime mostly banished (thanks, Step 1!), it's time to tackle the sneaky orange invaders: rust! Those pesky "rust bunnies" don't just look bad; they weaken metal and dull edges faster than you can say "Ottawa Senators." Let's also put a razor-sharp edge back on those cutting tools. Ready?
Banishing the Rust Bunnies
Choosing the right method depends on how rusty your tools are and how much elbow grease you're willing to apply.
White Vinegar Soak
- Pros: Cheap, readily available, eco-friendly.
- Cons: Takes time (hours to overnight), needs rinsing/drying afterward.
- Best For: Light to moderate rust on smaller tools or parts you can easily submerge.
Simply submerge the rusty parts in white vinegar and let sit. Check periodically. Rinse well and dry immediately after.
Wire Brush / Steel Wool
- Pros: Good for quick surface rust removal, controllable.
- Cons: Requires physical effort, can scratch softer metals if too aggressive.
- Best For: Surface rust, getting into nooks and crannies, often used after a soak or with oil.
Apply some elbow grease! Combine scrubbing with a little oil (like WD-40) to help lift the rust.
Chemical Rust Remover
- Pros: Fast-acting, effective on heavy rust.
- Cons: Can be caustic (wear protection!), needs good ventilation, requires careful handling and disposal. Always read product instructions, similar to how you'd review our Service Terms and Conditions for important details.
- Best For: Stubborn, heavy rust when speed is needed.
Follow product directions precisely. Ensure good ventilation and wear appropriate safety gear (gloves, eye protection).
Action Tip: Start with the gentlest method (vinegar or scrubbing). If that doesn't cut it, then consider a chemical remover. After any method, rinse metal parts thoroughly (unless the product says otherwise) and dry immediately and completely!
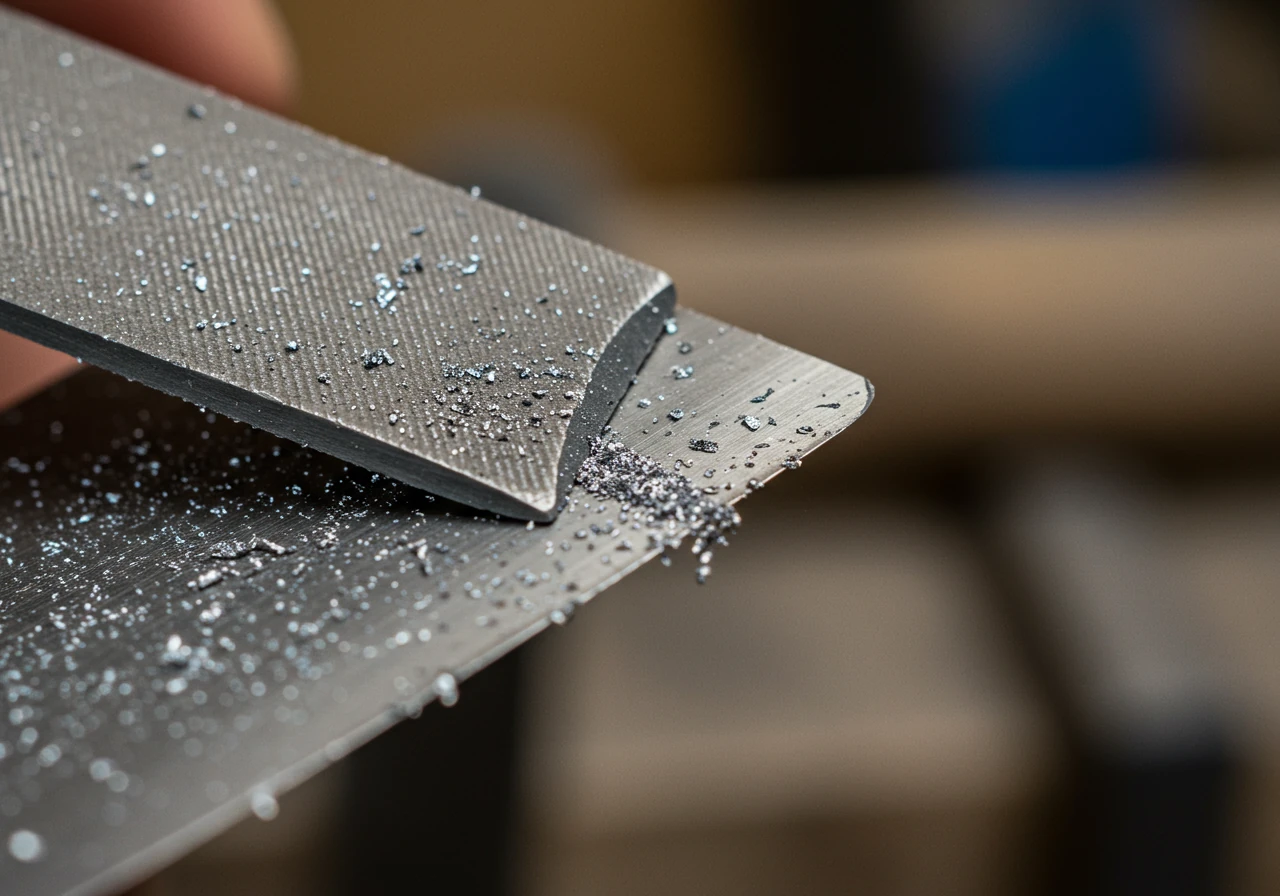
Honing the Edge: Sharp Tools = Happy Gardener (and Plants!)
Dull tools make gardening feel like wrestling a bear. Sharp tools slice cleanly, making your job easier and promoting faster healing for your plants - essential for effective Essential Garden Maintenance Routines. We've seen some seriously dull tools during our Marionville Area Yard Cleanup Services and Metcalfe Fall Yard Cleanup Service, and trust us, sharp is better!
What You'll Need:
- Safety glasses (non-negotiable!)
- Sturdy gloves
- A vise or clamp (highly recommended to hold the tool securely)
- A mill bastard file (good for shovels, hoes)
- A sharpening stone (whetstone) or diamond file (great for pruners, shears)
- Cleaning rags
- Lubricating oil (like WD-40, 3-in-One, or mineral oil)
Sharpening Basics (Example: Shovel/Spade):
- Safety First! Put on your glasses and gloves.
- Secure It: Clamp the shovel blade firmly in a vise, edge facing up. If no vise, brace it securely against a solid surface.
- Find the Angle: Look closely at the edge. Most shovels have a bevel (angle) on one side only, usually around 45 degrees. You want to match this existing angle.
- File Time: Place the file flat against the bevel. Push the file away from your body, along the edge, maintaining that angle. Lift the file, bring it back, and repeat. Don't saw back and forth! Use smooth, even strokes along the entire edge.
- Check Your Work: You'll see shiny metal where you've filed. Feel carefully for a slight burr (a thin ridge of metal) forming on the flat underside.
- Remove the Burr: Flip the shovel over (or reposition). Lay the file flat against the back edge and make one or two light passes to remove the burr.
- Wipe & Oil: Wipe away any metal filings with a rag. Apply a light coat of oil to prevent immediate rusting.
Sharpening Pruners/Shears: Use a whetstone or diamond file. Follow the existing bevel on the cutting blade only, moving the stone/file from the base towards the tip. Again, file away from the sharp edge. Gently remove any burr from the flat side. Clean and oil the blades and pivot point.
Where to Get Supplies: You can find files, stones, safety gear, and oils at most local hardware stores around Ottawa, whether you're near Nepean or Barrhaven. Deciding if a really rusty tool is worth saving can be tricky. Getting feedback sometimes helps, just like we appreciate your helpful Feedback on Yard Cleanup Estimates! Taking the time now to banish rust and sharpen edges means you're all set for spring success.
Detailed Look: Step 3 - Oiling & Lubrication
Okay, folks, you've scrubbed, you've rinsed, you've banished the rust bunnies, and you've sharpened those edges until they gleam. Nice work! Now for the final, crucial step before tucking your garden warriors away for their long winter nap: applying the protective shield of oil and lubrication.
Think of this step as giving your tools a cozy, waterproof winter jacket. After all the cleaning and sharpening, the bare metal is exposed and practically screaming, "Hey rust, come on over!" Oiling creates a barrier that repels moisture - a critical defense against the damp conditions often found in sheds and garages, especially during those unpredictable Ottawa freeze-thaw cycles we know and love (or tolerate!) from Osgoode to Manotick. Without this shield, all your hard work cleaning and sharpening could be undone by spring.
Why Oil is Your Tool's Best Friend
Lubrication isn't just about preventing rust on blades and metal surfaces. It's also vital for keeping moving parts moving! Think about your pruners, loppers, or hedge shears. That pivot point needs lubrication to work smoothly and prevent seizing up over the winter. A little oil now prevents a lot of frustration (and potentially busted knuckles) later.
Choosing Your Lubricant: Not All Oils Are Created Equal (But Most Work!)
You don't need anything super fancy. The goal is to displace water and provide a protective film. Common options include WD-40, 3-in-One oil, mineral oil, camellia oil, or even clean leftover motor oil (use responsibly). Choosing the right protection for your tools is key, much like our careful process for Quality Landscape Material Selection ensures durability and beauty in your garden projects.
| Lubricant Option | Good For | Keep in Mind |
|---|---|---|
| WD-40 / Spray Lubricants | Quick application, water displacement, light lubrication | Can evaporate faster, might need reapplication for long storage |
| 3-in-One / Machine Oil | General purpose, pivot points, longer-lasting film | Apply with rag or spout |
| Mineral Oil | Non-toxic, good rust prevention | Can be thicker, apply with rag |
| Camellia Oil | Fine tools, excellent rust prevention, non-toxic | Harder to find, pricier |
| Clean Motor Oil | Excellent rust prevention, persistent film | Messy, handle/dispose of rags carefully, wear gloves |
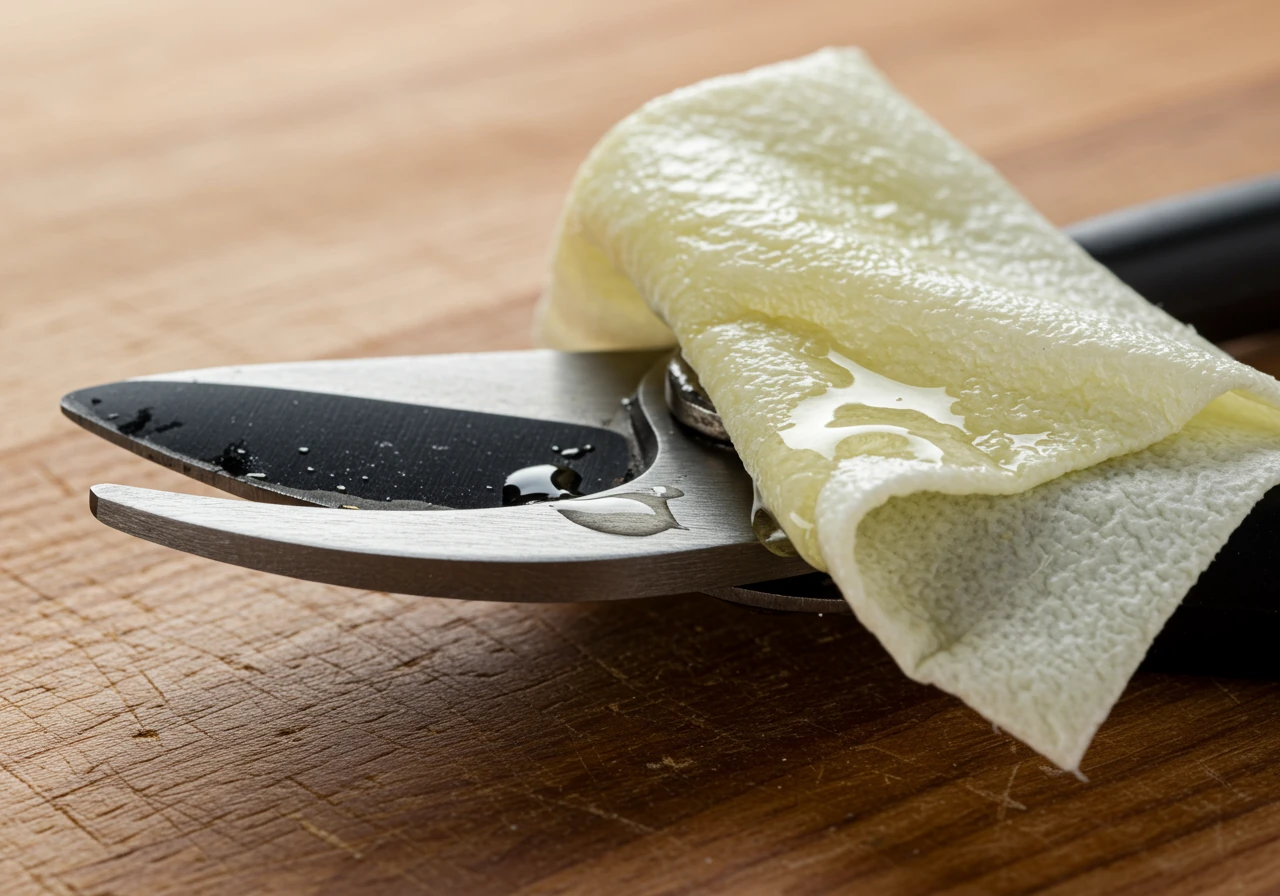
The Oiling Ritual: Protecting Metal and Wood
- Metal Surfaces First: Grab a clean rag. Apply your chosen oil to the rag (or spray directly onto the tool, depending on the product). Wipe down all metal surfaces thoroughly - shovel blades, rake tines, hoe heads, shear blades. Don't forget the nooks and crannies! You want a thin, even coat. Wipe off any heavy excess.
- Don't Forget Moving Parts: Apply a drop or two of oil directly onto pivot points, springs, and any sliding mechanisms on tools like pruners and loppers. Work the tool open and closed a few times to distribute the lubricant evenly. This prevents them from seizing up - ensuring they're ready to help you create results as beautiful as those in our Inspiring Project Gallery.
- Handle With Care (Wooden Handles): Metal isn't the only part that needs love! Wooden handles can dry out, crack, and splinter over the winter. To prevent this, apply a coat of boiled linseed oil or tung oil.
- Wipe the oil generously onto the clean, dry handle with a rag.
- Let it soak in for 10-15 minutes.
- Wipe off all the excess oil thoroughly with a clean rag. If you leave excess on the surface, it can become sticky.
- Safety Note: Rags soaked in linseed oil can spontaneously combust! Either lay them flat to dry completely outdoors away from structures, or soak them in water in a sealed metal container before disposal according to local hazardous waste guidelines. Taking pride in well-maintained tools reflects a commitment to quality and safety, core values you can read more about on our Learn More About Our Team page.
Practical Tip: Keeping track of which tools you've oiled and when can be helpful. While we don't offer tool maintenance tracking (yet!), managing your yard care services is easy via our Convenient Customer Portal Access. A little organization goes a long way!
This final oiling step creates that essential protective shield, ensuring that when spring finally peeks through in Ottawa, your tools are rust-free, moving smoothly, and ready for another great gardening season!
Detailed Look: Step 4 - Smart Storage
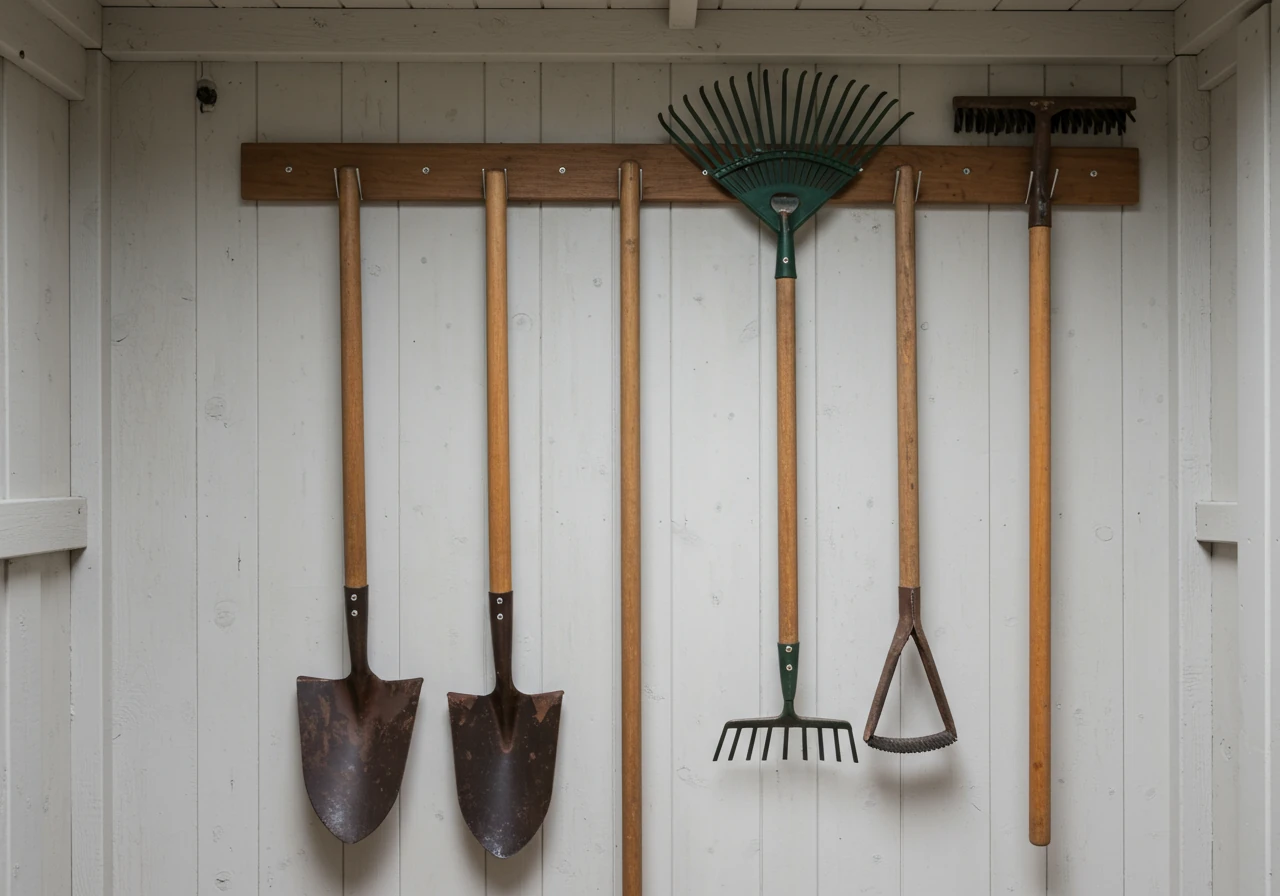
Alright, you've done the hard yards! Your garden tools are clean, rust-free, sharp, and nicely oiled. High five! Now for the final act: tucking them away safely so they emerge ready to rock next spring, avoiding the wrath of an Ottawa winter. Think of this as finding the perfect, cozy (and dry!) winter hibernation spot for your landscaping crew.
Where's the best place? Ideally, a dry shed or garage is your best bet. The main goal is to keep them protected from moisture - our notorious freeze-thaw cycles can wreak havoc even indoors if things get damp. Storing tools directly on a cold concrete floor is a recipe for condensation and rust, whether you're in Barrhaven or Nepean. Get them off the ground!
Here are a few smart storage tricks:
- Hang 'Em High: Hooks, pegboards, or specialized tool racks are fantastic. Hanging tools keeps them off the floor, allows air to circulate (discouraging moisture), saves space, and makes finding that specific spade much easier come April. No more shed Jenga! Keeping things organized here makes spring tasks smoother, much like how our easy-to-use Convenient Customer Portal Access helps you manage your services.
- The Sandy Bucket Trick: For smaller hand tools like trowels, cultivators, and weeders, try filling a bucket with clean sand and mixing in a bit of motor oil (new or leftover clean oil works). Plunge the clean, dry metal ends of your tools into the sand. The sand helps keep them dry and lightly oiled, plus the abrasive action helps maintain the edge!
- Shelf Awareness: Use sturdy shelves for items that don't hang well. Just make sure they are clean and dry before storing. A tidy storage space feels almost as good as seeing the results of a thorough Metcalfe Property Cleanup Service or even further afield like our Marionville Property Cleanup Service.
Quick Notes on Other Gear:
- Garden Hoses: Drain them completely. Seriously, get every drop out! Coil them loosely (avoid sharp kinks) and store them indoors if possible, or at least out of direct sunlight and extreme cold. Frozen water expands and ruins hoses fast.
- Power Equipment (Mowers, Trimmers, etc.): This is a bit more involved. Always follow your manufacturer's winter storage instructions. This usually involves dealing with fuel (using stabilizer or running it dry), cleaning the deck/housing, possibly removing the battery, and maybe changing the oil. If tackling engine prep feels daunting, consider professional servicing. Getting everything ready now prevents headaches when you need your equipment for your next big Ottawa Yard Cleanup Service Needs or Ottawa property cleanup service.
Taking these final storage steps ensures all your hard prep work pays off. Come spring, your tools will be ready for action! And if thinking about next season's gardening tasks, like garden installs or sod installation, already has you sighing, why not get ahead of the game and ? For now, give those tools a good winter's rest. They've earned it!
Impact of Winter Prep Steps
Relative importance estimate. All steps contribute significantly.
Metcalfe Winter Tool Prep: Key Takeaways
Okay, Metcalfe neighbours, we've dug deep into winter tool prep! Feeling a bit like you just ran a marathon through the garden shed? No worries! If you just need the quick-and-dirty highlights (pun intended!), here are the absolute must-do steps to keep your trusty tools happy through an Ottawa winter, whether you're in Metcalfe, over in Osgoode, or anywhere in between.
Think of this as your cheat sheet for avoiding rusty surprises next spring:
- Scrub-a-Dub Clean: Get all the dirt, mud, and plant gunk off. Seriously, every last bit. Caked-on soil, especially our lovely Ottawa clay, holds moisture like a sponge and invites rust to the party. Clean tools are happy tools!
- Dry 'Em Like You Mean It: This is super important here in Ottawa! Our wild freeze-thaw cycles turn any leftover moisture into a tool-destroying menace. Towel dry every nook and cranny, especially joints and moving parts. Don't let winter win!
- Sharpen Up: Give cutting edges (shovels, pruners, hoes) some love with a file or stone. Sharp tools work better, are safer to use, and make cleaner cuts on your plants. This is crucial for plant health and makes tasks easier, whether you're deadheading flowers or preparing ground for beautiful new garden installations. Check out the Ottawa Horticultural Society for more plant care tips.
- Oil for Protection: Slap a light coat of oil (like WD-40, 3-in-One, or mineral oil) on all metal parts to create a moisture barrier. Don't forget wooden handles - a bit of linseed or tung oil prevents drying and cracking. This protective step ensures your tools are ready for anything, even tough jobs like preparing the ground before a fresh sod installation.
- Tuck In Safely: Store your tools off the ground in a dry spot like a shed or garage. Hanging them up is ideal. Avoid damp concrete floors like the plague!
Basically: Clean it, dry it, sharpen it, oil it, and hang it up! It sounds simple, and it really is. Putting in this little bit of effort now saves you so much time, money, and frustration when the gardening bug bites again next spring. It means you're ready for action, complementing any professional help you might enlist, like our dedicated Metcalfe Garden Clean Up Service or our crews assisting homeowners further out with the Marionville Garden Clean Up Service or even Ottawa Garden Clean Up Service. Happy winterizing!
FAQs: Your Ottawa & Metcalfe Tool Care Questions Answered
Got questions about keeping your garden gear in tip-top shape through our chilly Ottawa winters? You're not alone! Here are answers to some common queries we hear from folks around Metcalfe and beyond.
What's the absolute best oil to use on my tools for winter storage in Ottawa?
Honestly, don't overthink it! The main goal is creating a moisture barrier. A quick spray of WD-40 or a wipe-down with 3-in-One oil or even simple mineral oil on metal parts works great. For wooden handles, a bit of boiled linseed oil (wiped off well!) prevents cracking. Just choose one and use it!
Okay, honestly, what really happens if I just toss my muddy shovel in the shed near Greely?
Ah, the path of least resistance! That damp Ottawa clay clings tight, holding moisture against the metal. Add our freeze-thaw cycles, and you've got a perfect recipe for rust pitting the blade and weakening the metal. Plus, the handle might loosen or rot. Come spring, you'll likely face a rusty, dull, and possibly wobbly shovel. Bummer!
I'm terrible at sharpening. How often do garden tools really need it?
Good question! Ideally, touch up edges as they dull during the season. But at a minimum, aim for once a year during your winter prep. Sharp tools make gardening easier, safer, and healthier for your plants (clean cuts!). Keeping tools sharp helps achieve beautiful results, like the ones you can see in our gallery of Completed Yard Transformations.
Some of my tools look beyond hope - super rusty! Should I just toss them?
Maybe not! Try a vinegar soak or some vigorous work with a wire brush first - you might be surprised. If it's truly ancient or badly pitted, weigh the cost of replacement versus repair effort. If tool trouble is just one part of a larger yard refresh, remember our Ottawa Property Cleanup Service or general property clean up can tackle the big jobs, giving you time to assess your gear.
I have more questions about specific tools or maybe need help with the whole yard cleanup. Who can I ask?
We're happy to help where we can! While this guide focuses on DIY tool care, we know sometimes the whole yard needs attention. If you have broader landscaping questions or want to discuss professional services for your Ottawa-area property, please don't hesitate to . You can also check out our Google Business Profile for reviews and updates.
If I contact you for advice or a quote using your forms, how is my personal information handled?
Great question - your privacy is important! We only collect information needed to respond to your request or provide service, like when you or view your confirmation page. We handle your data carefully and don't share it unnecessarily. For the full details on how we protect your information, please review the Clean Yards Privacy Policy.
Conclusion: Set Yourself Up for Spring Success in Metcalfe!
Phew, you made it through the ultimate guide to winter tool TLC for Metcalfe! Give yourself a high five (just maybe wash the potential rust off first, eh?). Seriously though, investing a bit of time now in cleaning, sharpening, and storing your essential gardening and landscaping gear is your secret weapon against springtime frustration. Think of it: no battling rusty shovels or seized pruners when you're itching to get planting next year! You'll save money, keep your plants healthier with clean cuts, and be ready to tackle your garden beds the moment spring finally decides to show up properly here in Ottawa, whether you're right here in Metcalfe, over in Greely, or tending a garden in nearby Manotick.
Actionable Advice Recap: Remember the key steps - clean thoroughly, dry completely, sharpen those edges, and apply that protective oil shield. Getting tools off the damp floor and stored properly is the final winning move.
Looking Ahead: By taking these simple actions now, you're not just storing tools; you're investing in a smoother, more enjoyable start to the next gardening season. Tuck those tools away, pat yourself on the back, and dream of warmer days. Here's to a stress-free thaw and a fantastic, flourishing spring in your beautiful Metcalfe garden!
Ready for a hassle-free spring? Let us handle the heavy lifting!