
Richmond: Clean Tools This Spring Prevent Disease Loss
Quick Guide to Healthy Tools & Gardens
- Prevent Disease: Cleaning garden tools stops the spread of bacteria and fungi from last season.
- How to Clean: Scrub off dirt, disinfect with rubbing alcohol or diluted bleach (rinse well), dry thoroughly.
- Key Times: Clean before spring use and before winter storage. Disinfect between diseased plants.
- Maintain: Sharpen blades for clean cuts, oil metal parts to prevent rust, store dry.
Need help getting your Richmond garden ready? Request a free quote today!
Introduction: Hey Richmond, Let's Talk Dirty (Tools, That Is!)
Hey Richmond! And hello to all our gardening neighbours across the Ottawa area, whether you're in Manotick or over near Barrhaven. Winter's *finally* loosening its grip, right? That snow is melting (mostly!), and you're probably itching to get back outside and play in the dirt. So, let's talk dirty... garden tools, of course!
Before you dive headfirst into your spring planting and landscaping plans, we need a little chat about last year's grime. Remember maybe seeing some fuzzy mould or odd spots on leaves last season? Well, your trusty trowels, *especially* pruners, shears, and shovels, might be harbouring leftover gunk like bacteria or fungal spores from last year's garden.
These unseen hitchhikers can easily spread diseases to your fresh, vulnerable new plants and seedlings. Think of cleaning your tools *before* you start digging as giving your garden a clean bill of health for the season ahead. It’s a simple but super important first step for disease prevention and ensuring your hard work results in a thriving, beautiful garden this year! Let's get those tools sparkling clean.
Why Bother? The Invisible Threat Lurking on Your Tools
Okay, let's dig into why giving your garden tools a good scrub is more than just spring cleaning – it's serious protection for your plants!
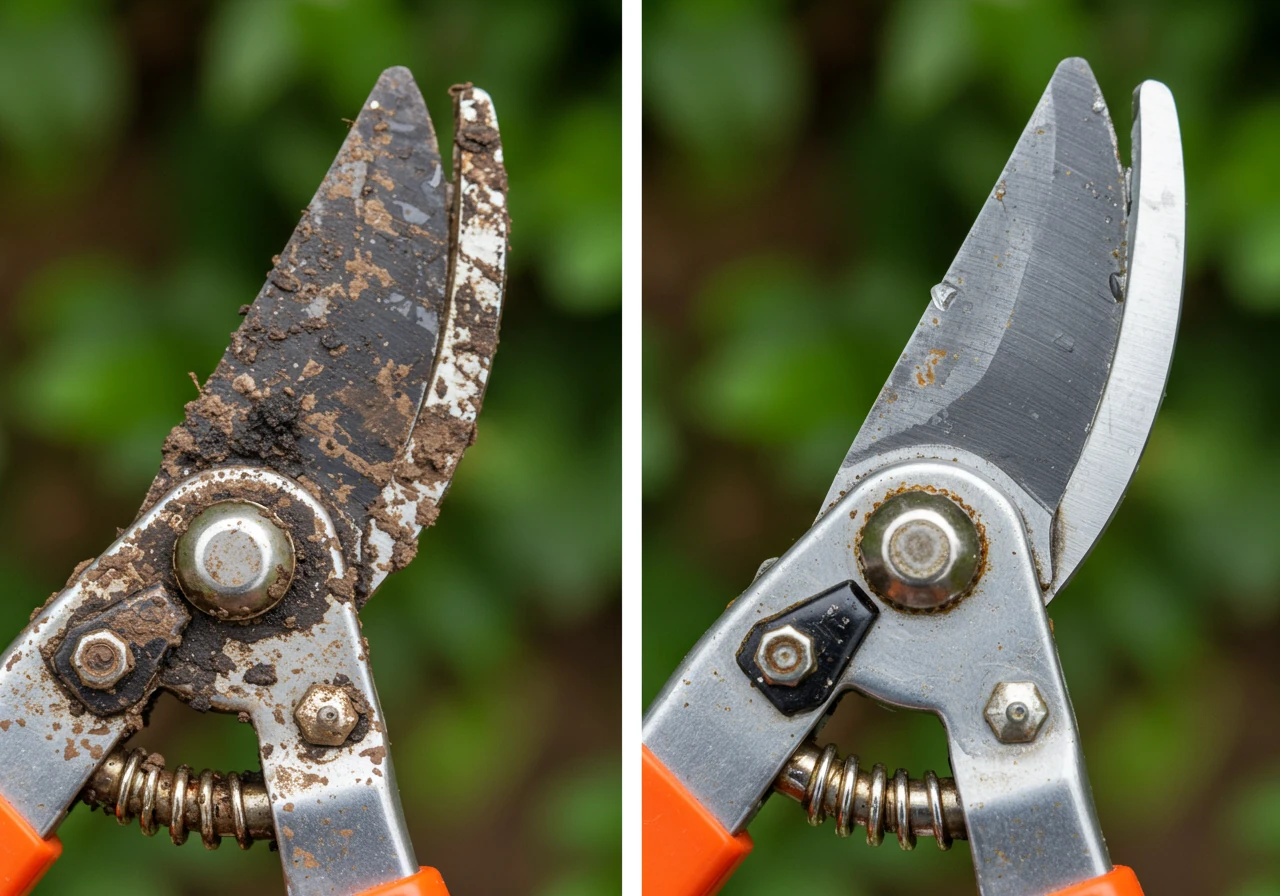
So, you've put away your tools after a long day of gardening. Maybe you knocked *most* of the dirt off your shovel, or perhaps your pruners have a bit of sticky sap clinging to them. What's the big deal, right? Well, think of it like this: using dirty garden tools is kind of like using the same cutting board for raw chicken and then your fresh salad without washing it in between. Yikes! You wouldn't want to spread those germs, and it's the same idea in your garden.
Your tools can be carrying tiny, invisible hitchhikers – namely bacteria, fungi, and viruses. These little nasties are the culprits behind many common plant diseases. They can survive quite happily in leftover soil, plant sap, or dead plant bits stuck to your trowels, shears, rakes, and especially pruning tools.
- Bacteria: Think things like fire blight, which can devastate apple trees and other ornamentals – a good reason to keep pruners clean, especially if you're following Richmond Tree Planting Tips for Healthy Growth.
- Fungi: These guys cause problems like powdery mildew on your squash, black spot on roses, or damping-off disease that kills young seedlings. Fungal spores are super easy to spread on dirty tools and can linger in soil debris. Ensuring your soil is healthy, perhaps by learning about Richmond Fall Mulch and Clay Soil Benefits, can help plants resist fungal attacks.
- Viruses: Plant viruses, like mosaic virus (causing weird yellow patterns on leaves), can also be transferred through microscopic wounds made by contaminated tools.
How does the transfer happen? Easily! You prune a diseased branch, and tiny bits of infected sap stick to the blades. Then, you move on to prune a healthy plant. *Bam!* You've just delivered the disease directly into the fresh cut. Or, you dig up a plant suffering from root rot (a fungal issue often worsened by poor drainage – something good site prep addresses, like discussed in Richmond Site Grading and Water Damage Prevention), and the infected soil clinging to your shovel gets carried over to the next planting hole. Pretty sneaky, right?
This is especially important in diverse gardens, like many lovely ones found around Ottawa, perhaps in Greely or Manotick. If you have lots of different types of plants, or if you happen to share tools with a neighbour, the risk of spreading something from one susceptible plant (or yard!) to another increases. Thoughtful planning, as highlighted in guides to Richmond Garden Design: Crafting Beautiful Backyards, often includes grouping plants with similar needs, but tool hygiene is still key when moving between *any* plants.
Taking a few moments to clean your tools prevents you from accidentally playing doctor-turned-disease-spreader in your own backyard. It's a simple step that protects your investment in plants and all the hard work you put in. And hey, if tackling big garden cleanups or specific plant health issues feels overwhelming, remember there are professional Landscaping and Yard Maintenance Services available right here in the Ottawa area that can help! Also check out our Google My Business page for reviews and updates.
Rogues' Gallery: Common Plant Diseases Plaguing Ottawa Gardens
Alright gardeners, let's talk about the uninvited guests that sometimes crash our backyard parties – plant diseases! Even the most beautifully planned gardens in places like Nepean or Barrhaven can sometimes fall victim. Don't worry, it happens to the best of us! Knowing what to look for is half the battle in keeping your plants healthy and happy. Here are a few common culprits you might encounter in the Ottawa area, especially those sneaky ones that can spread on dirty tools:
-
Powdery Mildew: The Fuzzy Fiend
- What it looks like: You'll notice white, powdery patches on leaves, stems, and sometimes flowers. It seriously looks like someone lightly dusted your plants with flour.
- Who gets it: Lilacs, peonies, garden phlox, squash, cucumbers, and bee balm are frequent targets. It loves the humid conditions we often get during Ottawa summers, especially when air doesn't circulate well between plants.
- Spread: While mostly spread by wind, spores *can* hitch a ride on contaminated tools or gloves if you're handling infected leaves and then touch healthy ones.
- Tips: Give plants enough space for good air circulation – sometimes that means a bit of strategic pruning. Try to water the soil, not the leaves. And yes, keep those tools clean! Check out resources from the Ottawa Horticultural Society for spacing tips.
-
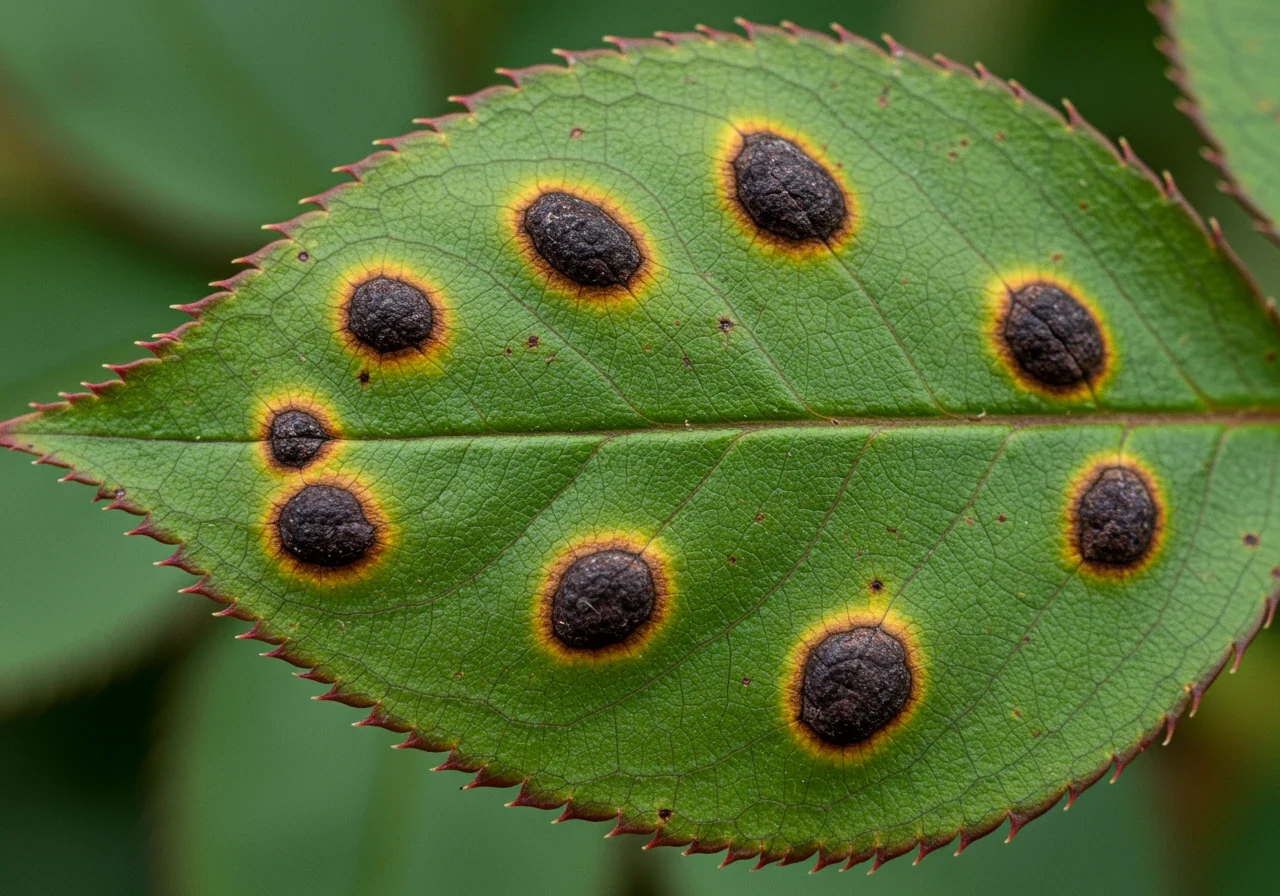
Black Spot: The Rose's Nightmare
- What it looks like: As the name suggests, look for distinct black spots on rose leaves, often with feathery or fuzzy edges. The leaf area around the spots usually turns yellow, and sadly, infected leaves might drop off prematurely, leaving your rose looking a bit naked.
- Who gets it: Roses, roses, roses! It particularly thrives in wet conditions, often flaring up after periods of rain followed by warm weather – sound familiar, Ottawa?
- Spread: Water splashing is a key way spores move around, but they *definitely* stick to pruners. Pruning an infected rose cane and then moving directly to prune a healthy one is a surefire way to spread this disease.
- Tips: Water roses at their base in the morning so leaves can dry quickly. Meticulously clean up *all* fallen leaves, as spores overwinter there. This can be a tedious job, especially in larger gardens; specialized help like a Richmond Garden Clean Up Service can make a big difference in managing diseased debris. And always, always clean your pruners between plants, especially if you know black spot is around.
-
Fire Blight: The Scorcher
- What it looks like: This bacterial beast makes infected branches look like they've been scorched by fire – leaves suddenly wilt, turn black or brown, and often cling stubbornly to the dead stem. Rapidly wilting new shoots might bend over, forming a characteristic "shepherd's crook." In damp spring weather, you might even see sticky, amber-coloured ooze.
- Who gets it: Mainly affects plants in the rose family, including apple, pear, and crabapple trees, plus ornamentals like serviceberry, cotoneaster, and mountain ash. We sometimes see this pop up in established areas like Osgoode or Manotick with older susceptible trees.
- Spread: Pollinators and splashing rain can spread it, but pruning tools are major culprits for moving the bacteria into fresh cuts.
- Tips: Prune infected branches *only* during dry weather. You must cut *well* below the visibly diseased area – aim for at least 12 inches (30 cm) into healthy wood. *Crucially*, disinfect your pruning tools (pruners, loppers, saws) between *every single cut* using rubbing alcohol or a 10% bleach solution (1 part bleach to 9 parts water). Proper disposal of the infected branches is also vital to prevent further spread; consider professional assistance like the Metcalf Yard Cleanup Service for handling and removing diseased wood safely. The Ontario Ministry of Agriculture, Food and Rural Affairs (OMAFRA) has detailed info on identification.
-
Damping Off: Seedling Saboteur
- What it looks like: Your tiny seedlings seem fine one day, then suddenly keel over right at the soil line. The base of the stem looks thin, pinched, and often water-soaked or brownish. Down they go!
- Who gets it: Any young seedlings just starting out indoors or outdoors.
- Spread: Caused by various soil-borne fungi that thrive in cool, overly damp conditions with poor air circulation. Using contaminated tools, reusing old pots without sterilizing, or non-sterile potting mix can introduce the problem fungi.
- Tips: Always start seeds in sterile pots and use a fresh, sterile seed-starting mix. Don't overwater – let the surface dry slightly between waterings. Ensure good air movement around your seedlings (a small fan can help indoors). Avoid crowding seedlings too closely. Healthy plants start with healthy roots, and focusing on proper Soil Preparation techniques for your garden beds ensures better drainage and can help prevent fungal issues later on.
Keeping an eye out for these common garden foes and practicing good garden hygiene (especially cleaning those tools!) goes a long way in preventing headaches. If you spot something weird on your plants and aren't sure what disease you're dealing with, or if managing plant health issues feels like too much, remember that expert help is available right here in the Ottawa area. Check out our range of Landscaping and Yard Maintenance Services designed to keep your garden thriving, or simply Contact Us for specific advice tailored to your yard's needs.
Your Spring Cleaning Arsenal: Tools & Techniques for Sparkling Spades
Okay, team, let's assemble our cleaning kit! Getting your garden tools ready for action isn't rocket science, but having the right supplies makes the job *way* easier (and maybe even a little bit fun?). Think of this as prepping your gardening soldiers for battle against weeds and dirt!
Your Spring Cleaning Shopping List:
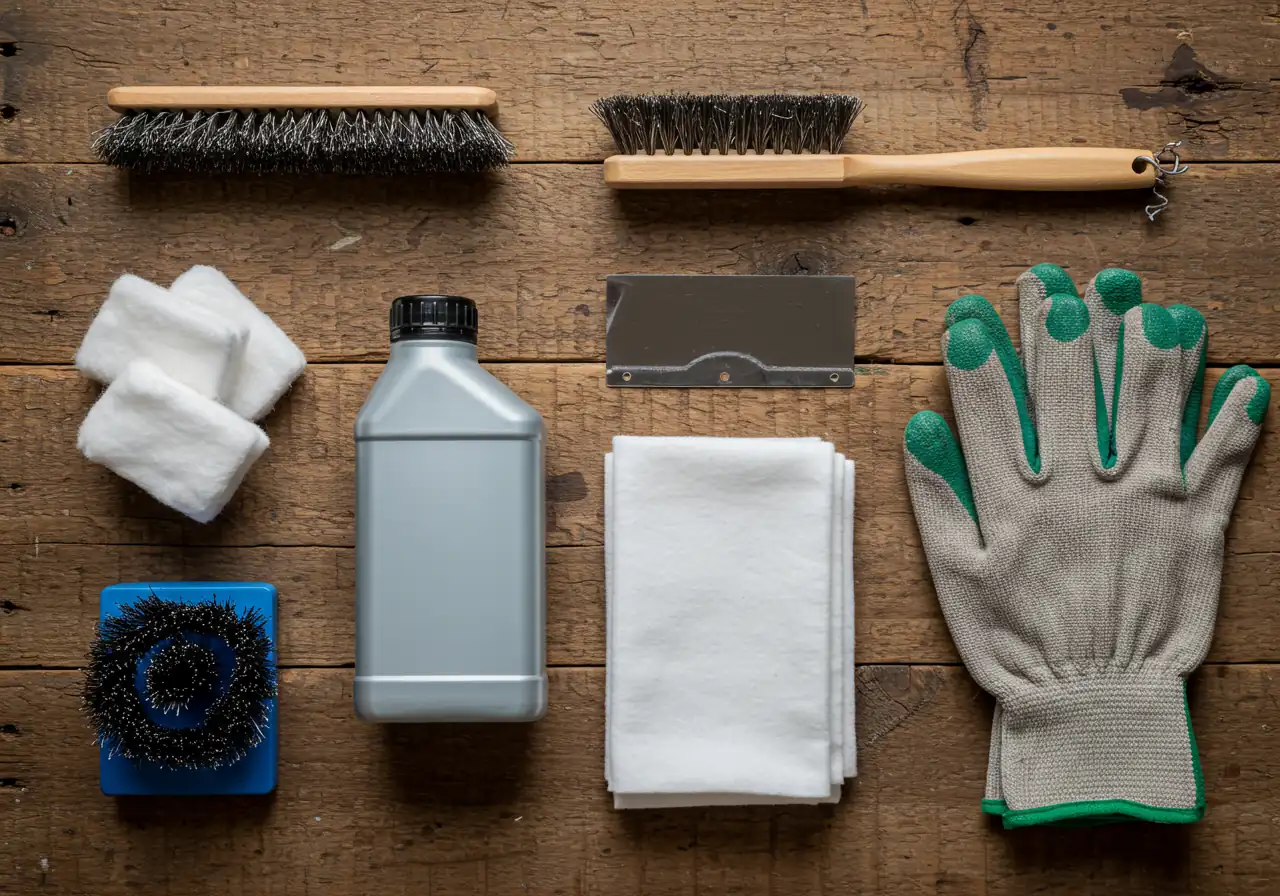
Before you start scrubbing, gather these essentials:
- Stiff Brushes: A wire brush is fantastic for stubborn, dried-on gunk, especially that notorious Ottawa clay soil we often find clinging stubbornly in areas like Kars or Metcalfe. A softer scrub brush works well for general cleaning. An old toothbrush is perfect for getting into nooks and crannies on pruners.
- Bucket or Tub: You'll need something to hold water and your cleaning solution.
- Water Source: A hose with decent pressure helps blast off loose dirt.
- Putty Knife or Scraper: Great for chipping away caked-on mud or sap.
- Rags or Old Towels: For wiping and drying. Microfiber cloths work well too.
- Disinfectant: Crucial for killing off those nasty disease spores. We'll dive into options below.
- Lubricating Oil: Like WD-40 or specific tool oil, to protect metal parts from rust after cleaning and keep moving parts moving smoothly.
- Safety Gear: Don't forget gloves (heavy-duty ones are best) and maybe safety glasses, especially if you're using a wire brush or dealing with power equipment blades.
Choosing Your Disinfectant Weapon:
Not all disinfectants are created equal. Here’s a quick comparison:
| Disinfectant Option | Pros | Cons | Notes |
|---|---|---|---|
| Bleach Solution (10%) | Very effective killer of most pathogens; readily available. | Corrosive to metal (rinse well!); fumes can be strong; harsh on skin. | Mix 1 part bleach to 9 parts water. Don't soak tools for too long. Rinse thoroughly! |
| Rubbing Alcohol (70%) | Effective disinfectant; less corrosive than bleach; evaporates quickly. | Can be more expensive for large batches; flammable. | Great for quick wipes on pruner blades between plants or cuts. No rinsing needed. |
| Household Disinfectants | Some (like Lysol, Pine-Sol) can work; often readily available. | May not be tested specifically for plant pathogens; can leave residue. | Check labels for disinfecting properties. Might need rinsing. Effectiveness varies. |
| Vinegar (Household) | Eco-friendly; readily available; good for dissolving rust. | Less potent disinfectant than bleach or alcohol; acidic (can etch metal). | Primarily a cleaner/rust remover, not a reliable sterilizer for serious plant diseases like fire blight. |
| Boiling Water | Eco-friendly; kills many pathogens; free! | Safety risk (burns!); impractical for large tools; metal needs drying fast. | Dip small tool heads for several minutes. Ensure tools are dried immediately to prevent rust. |
Step-by-Step Sparkle Strategy:
Okay, let's get cleaning!
-
Scrape & Scrub Away the Grime:
- First, use your putty knife or scraper to knock off any large clumps of mud or debris. That heavy clay soil needs a firm hand!
- Next, grab your stiff brush (wire brush for metal, softer brush for handles) and scrub everything down with plain water. Get into all the joints and crevices. This step is crucial because disinfectants work best on clean surfaces, not dirty ones. Think of it like prepping the canvas before you paint – or in our case, like good Soil Preparation before planting!
-
Disinfect to Protect:
- Choose your disinfectant from the table above based on your needs and tools.
- For Hand Tools (Trowels, Pruners, Hand Forks): Dip the metal parts into your chosen solution (e.g., 10% bleach) for a few minutes (follow disinfectant guidelines) OR wipe thoroughly with rubbing alcohol. Pay extra attention to pruner blades.
- For Long-Handled Tools (Shovels, Spades, Rakes, Hoes): You can wipe down the metal parts thoroughly with a rag soaked in disinfectant, or if using bleach solution, maybe stand them head-down in a shallow bucket for the recommended time. Remember to rinse well if using bleach!
- For Power Equipment Blades (Lawn Mowers, Trimmers - SAFETY FIRST!): ALWAYS disconnect the spark plug or power source before touching blades. Carefully clean off grass clippings and dirt (a brush and scraper work well). Then, wipe the clean blades thoroughly with rubbing alcohol or your chosen disinfectant. Clean mower blades contribute significantly to effective Lawn Care by ensuring cleaner cuts that heal faster.
-
Rinse (If Necessary) & Dry Thoroughly:
- If you used bleach or another disinfectant that requires rinsing, do it now with clean water.
- This is key: Dry your tools completely with rags or towels. Leaving them wet is an open invitation for rust! Let them air dry completely in the sun for a bit if possible.
-
Lubricate & Sharpen:
- Once dry, apply a light coat of lubricating oil to all metal surfaces to prevent rust and keep moving parts (like on pruners) working smoothly. Wipe off any excess.
- Now is also a great time to sharpen blades on shovels, hoes, and pruners if needed (that’s a whole other topic!).
There you have it! Your tools are clean, disinfected, and ready to help you create garden magic. It might seem like a chore, but this small effort pays off big time in plant health. If tackling a big yard cleanup or tool maintenance feels overwhelming, you can always Book Estimate for professional help. Before booking, you can review our service details and Terms and Conditions. And for our existing clients, remember you can manage your services or add notes easily via the Customer Portal.
More Garden Care Insights
Timing is Everything: An Ottawa Gardener's Tool Cleaning Calendar
Alright, green thumbs of Ottawa, let's talk timing! Just like planting tulips before the ground freezes solid (we've all pushed that envelope, haven't we?), cleaning your garden tools has its own perfect moments throughout our distinct seasons. Doing it right, at the right time, helps keep those pesky plant diseases from crashing your garden party. Here’s a simple schedule to keep your tools – and plants – happy:
1. Early Spring Spruce-Up
(March/April) Your big pre-season clean! Scrub, disinfect, sharpen, and lubricate everything before touching soil or new plants. Start the year fresh!
2. In-Season Quick Cleans
(May-September) Rinse tools after use. CRUCIAL: Disinfect pruners (e.g., alcohol wipe) between plants if disease (like black spot) is suspected, or even between cuts for serious issues like fire blight. Clean tools if moving between garden areas or neighbours' yards. Consider services like Metcalf Garden Clean Up Service for managing diseased material removal.
3. Fall Tuck-In Tidy
(October/November) Thorough clean and disinfect before winter storage. Ensure tools are BONE DRY. Apply oil. Store dry and preferably hanging. Prevents rust and overwintering diseases. Fall cleanup can be extensive; services like Ottawa Garden Clean Up Service, Metcalf Property Cleanup Service, or Marionville Garden Clean Up Service can help. Check our Terms and Conditions for service details.
Eco-Friendly Tip: Instead of solely relying on petroleum-based lubricants, try using plant-based oils like linseed oil or camellia oil to protect metal parts after cleaning. They work great and are kinder to the environment!
Sticking to a simple schedule makes tool cleaning less of a chore and more of a healthy garden habit!
Beyond the Cleanse: Sharpening, Oiling, and Storing for Success
Okay, so your garden tools are squeaky clean – fantastic! You’ve banished the bacteria and sent the fungi packing. But hold on, don't just toss them back in the shed yet! Proper maintenance goes *beyond* the cleanse. Think of sharpening, oiling, and storing as the dynamic trio that keeps your tools performing like superstars season after season. Ignoring them? Well, that’s like trying to chop veggies with a butter knife – frustrating and not very effective!
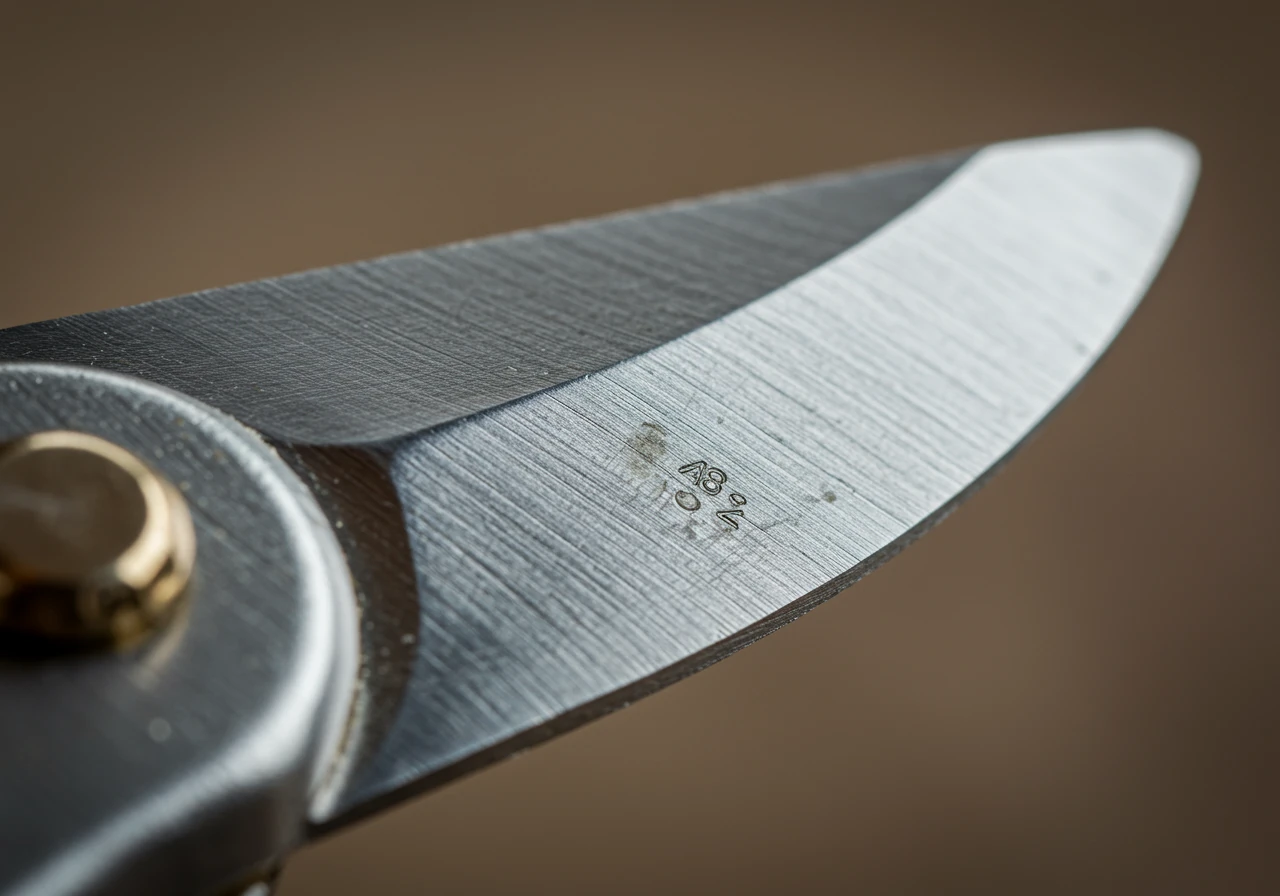
Why Sharpen? Give Your Plants a Clean Cut!
Ever tried cutting wrapping paper with dull scissors? Ragged edges, right? It’s the same with plants! Dull pruners, loppers, or even shovel edges crush and tear plant tissues instead of making a clean slice. These messy wounds are basically open invitations for diseases to waltz right in. Think of those nasty fungi and bacteria we talked about earlier – they *love* a rough entry point.
Sharp tools, on the other hand:
- Make clean cuts that heal quickly, reducing plant stress.
- Minimize entry points for diseases.
- Make your work much easier and more efficient. Trust us, digging into that tough Ottawa soil or pruning branches is way less strenuous with a sharp edge. This is especially true for tasks requiring precision, like preparing the ground for a smooth sod installation.
Getting that edge back can be a DIY job with a good file or sharpening stone (lots of great online guides!). If that's not your cup of tea, many hardware stores or specialized shops offer sharpening services – worth checking out, especially for folks around Winchester or Embrun who might have fewer local options. Investing in sharp tools makes every property clean up smoother.
Oil Up: Fighting Rust Like a Valiant Knight
Rust – the arch-nemesis of metal garden tools, especially here in Ottawa with our humid summers and damp springs and falls. After cleaning and ensuring your tools are bone dry, applying a light coat of lubricating oil is your secret weapon. Wipe down blades, shovelheads, and rake tines. A spray lubricant like WD-40 works, or you can use machine oil or specific tool oil. This creates a barrier, stopping moisture from settling in and starting the dreaded orange bloom. Don't forget to work a drop or two into the moving parts of pruners and loppers to keep them from seizing up!
Eco-Friendly Tip: Want a greener alternative? Plant-based oils like boiled linseed oil or camellia oil are excellent rust inhibitors and keep metal looking great.
Store Smart: Keep 'Em High and Dry
Where you park your tools matters immensely. Piling them damply in a dark corner is practically rolling out the welcome mat for rust and decay. The best practice?
- Store tools in a dry, sheltered location (shed, garage).
- Hang them up if possible! This keeps them off damp concrete floors, allows air to circulate, prevents edges from dulling, and makes them easy to find.
Taking these extra steps – sharpening, oiling, and storing correctly – turns tool maintenance from a chore into an investment. Well-maintained tools make gardening tasks easier, protect your plants, and save you money in the long run by lasting longer. They ensure you're always ready, whether it's for routine gardening, a full Ottawa garden clean up service, or even tackling a larger Ottawa property cleanup service. At Clean Yards, we know the value of top-notch equipment; learn more about us and our approach to professional yard care, including services like mulching and edging or garden installation. Check out our gallery and transformations page to see our work!
Potential Disease Spread Reduction
While exact numbers vary greatly, practicing good tool hygiene significantly reduces the chance of spreading common fungal and bacterial diseases. This chart visualizes the *potential* impact:
Estimated Disease Transfer Risk
Note: Values are illustrative estimates of relative risk reduction.
Cleaning and disinfecting tools, especially between potentially diseased plants, drastically lowers the probability of carrying pathogens like Black Spot spores or Fire Blight bacteria to healthy plants compared to using dirty tools or just rinsing with water. This simple habit is key for effective garden maintenance.
Key Takeaways: Your Cheat Sheet for Healthy Tools & Gardens
Okay, let's cut to the chase! Gardening should be fun, not a disease-spreading disaster. Here's your quick cheat sheet to keep your tools happy and your plants healthy:
- Clean Tools = Healthy Plants: Seriously, folks! Your trusty trowels, shovels, and especially pruners can carry invisible plant villains (like fungi and bacteria) from one plant to another. Giving them a quick clean is the easiest way to stop diseases before they start wrecking your beautiful Ottawa garden. It reflects a commitment to care – learn more about us and our approach to maintaining vibrant landscapes.
- Scrub, Dunk, Dry: Knock off the dirt *first* (a wire brush helps with stubborn clay!). Then, disinfect the important bits. A soak for a few minutes in a 10% bleach solution (1 part bleach, 9 parts water - rinse well after!) or a wipe with 70% rubbing alcohol does the trick. Dry everything thoroughly to prevent rust. Easy peasy!
- Timing Matters (Mostly Spring & Fall): Your most crucial cleaning times are before you start gardening in the spring and before you store tools for winter. *During* the season, especially around Manotick or Greely where gardens thrive, give pruners a quick disinfecting wipe (alcohol pads are handy!) between plants if you suspect disease. If tackling diseased material feels overwhelming, specialized help like the Marionville property cleanup service or Marionville yard cleanup service can manage the safe removal.
- Sharpen, Oil & Store Smart: Clean is great, but sharp is better! Sharp blades make clean cuts that heal faster and resist disease. After cleaning and drying, wipe metal parts with a light oil (like WD-40 or even vegetable oil) to fight rust. Then, hang 'em up or store them somewhere dry – not piled in a damp corner!
- You Got This (And Thanks!): Following these simple steps makes a huge difference in your garden's health and saves you headaches later. We genuinely appreciate you taking the time to learn about better garden care – a big thank you for being awesome! And if you've recently received an estimate from us, we'd love your thoughts; providing estimate feedback helps us improve. Happy gardening!
Ottawa Gardeners Ask: Your Tool Cleaning FAQs
Okay, let's tackle those common questions Ottawa gardeners have about keeping their tools in tip-top shape! We hear these a lot, from Barrhaven to right here in Richmond.
Absolutely! Think of it this way: plant diseases like black spot or powdery mildew can easily overwinter in soil or on plant debris stuck to your tools. Even if you don't *see* disease, the spores might be there. Cleaning prevents you from accidentally spreading last year’s problems to this year's plants within your own beautiful Richmond garden.
For quick, on-the-go disinfection between plants (especially important with roses!), rubbing alcohol (70% isopropyl) is your best friend. Keep a small spray bottle or alcohol wipes handy. A quick spritz or wipe on the blades kills most pathogens instantly, no rinsing needed. It’s much faster than mixing bleach when you're busy pruning.
Rinsing with water is great for removing physical dirt, but sadly, it won't kill microscopic disease spores like fungi or bacteria. You still need a disinfectant step (like alcohol or diluted bleach). Proper disinfecting actually *helps* protect the local environment by reducing disease spread, potentially lessening the need for stronger chemical treatments later. The Rideau Valley Conservation Authority offers tips on watershed-friendly gardening.
Soap and water are excellent for the initial cleaning step – removing dirt and grime. However, regular soaps aren't effective disinfectants against tough plant pathogens. You really need something like 70% rubbing alcohol or a 10% bleach solution (rinsed well!) after cleaning to ensure you’re killing those lingering spores and bacteria that cause trouble.
Don't give up! You can often remove rust with a wire brush, steel wool, or even soaking in vinegar. Once clean, dry them *thoroughly* and oil the metal. For wooden handles, sand them smooth if needed and apply boiled linseed oil to protect them. Good tools are an investment, much like choosing quality pavers based on advice on material selection, so they're worth restoring! Check resources like the Friends of the Central Experimental Farm for tool maintenance tips.
We hear you! Tackling a mountain of dirty tools after a big job can feel daunting. While there's no magic wand, breaking it down helps. If it truly feels like too much, or if the cleanup involves removing diseased plants, consider booking a professional Ottawa yard cleanup service. They handle the debris and leave your space tidy – you can even view our gallery of completed projects to see the difference! Plus, rest assured, we value our commitment to privacy with all client information.
Conclusion: Give Your Richmond Garden the Clean Start it Deserves!
So, there you have it! Giving your garden tools a proper clean isn't just about looking organized (though that's nice too!) – it's the single best way to give your Richmond garden the fresh, healthy start it truly deserves. Think of it as basic hygiene for your backyard buddies, preventing the spread of nasty plant diseases before they even get a chance to crash your garden party. Skipping the scrub lets those sneaky fungal spores and bacteria linger from last year, potentially causing trouble for your new blooms and veggies.
Taking just a few minutes for this simple act of disease prevention means less stress, healthier plants, and more beautiful results all season long. Whether you're deep into a big landscaping project near Manotick or just tending your patio pots closer to Barrhaven, clean tools are a cornerstone of successful gardening in the Ottawa area. It sets the stage for fantastic plant health and lets you focus on the fun parts!
Ready to embrace the sparkle and get growing?
- Share Your Wisdom! We'd love to hear from you. Got a genius tool cleaning tip you swear by, or a burning gardening question? Drop it in the comments section below (if this were on a blog!).
- Need a Hand? Feeling like your garden could use a bit more TLC than just clean tools this spring? Explore our professional Richmond Garden Clean Up Service or browse our other Landscaping and Yard Maintenance Services designed for Ottawa-area yards.
- Get Personalized Help! Need specific advice tailored to your unique garden, or ready for a helping hand with bigger tasks in Richmond or neighbouring communities like Metcalfe Property Cleanup or Marionville Property Cleanup? Don't hesitate to Contact Us directly for a friendly chat or a free estimate.
Here’s to a wonderfully clean, green, and thriving gardening season ahead! Go forth and garden confidently!
