
Russell New Plant Survival: Fall Prep for Ottawa Winter
Give your new plants the best chance against Ottawa's winter! Need professional help ensuring your landscape thrives? Request your free quote today!
Quick Winter Prep Wins for New Plants:
- Water Deeply Before Freeze: Ensure roots are hydrated before the ground locks up.
- Mulch Correctly: Insulate roots with 2-4 inches, keeping it away from stems (donut method).
- Protect Vulnerable Plants: Use burlap wraps for evergreens, tree guards for young trees.
- Leave Healthy Perennials Standing: Provides insulation and wildlife habitat. Cut back only diseased material.
- Use Shredded Leaves: Turn fall leaves into free, beneficial mulch for garden beds.
Introduction: Protecting Your Green Investment in Russell Through Ottawa's Winter
So, you've spent the spring and summer making your Russell property look amazing with some beautiful new plants? Congratulations! Your landscaping efforts have likely paid off big time, adding lovely curb appeal and maybe even a new favourite spot to relax in your garden. It truly feels good to invest in your own slice of nature.
But now, as the leaves start to turn, it's time to think about protecting that wonderful green investment. Our Ottawa winters, as you know, aren't exactly a walk in the park – especially for plants facing their *first* one! Those gorgeous new trees, shrubs, or perennials haven't had a full season to really dig their roots in deep like their older neighbours. Whether you're right here in Russell, or nearby in communities like Embrun or Metcalfe, giving these newcomers a little extra attention *before* the snow flies is crucial.
Don't worry, it's totally doable! Think of it like tucking the kids into bed with an extra blanket. A bit of smart fall gardening prep now can make all the difference, helping your new plants survive the freeze and burst back to life strong and healthy next spring. Let's get them ready!
Why Your New Plants Need Extra TLC: Understanding Ottawa's Winter Gauntlet
Okay, let's talk about why your lovely new greenery needs a bit more coddling for its first Ottawa winter. Think of your established plants like seasoned veterans – they've been through a few campaigns, their roots run deep, and they know the drill. Your new plants? They're the rookies, still figuring things out and definitely not ready for the major leagues of a Canadian winter unprepared.
The biggest issue? Roots! Or rather, the *lack* of a deep, widespread root system. Established plants have spent years sending roots down deep and wide, anchoring them firmly and giving them access to moisture even when the surface freezes. Your newcomers, planted just this spring or summer, haven't had that time. Their roots are likely shallower and less extensive, making them much more vulnerable.
Now, add Ottawa's specific winter challenges into the mix:
- The Deep Freeze: We live in Plant Hardiness Zone 5a/5b, which basically means things get *really* cold. Check the City of Ottawa's Plant Hardiness Zone information for specific details. While you likely chose plants rated for our zone, newbies are less resilient to those frosty extremes without well-established roots providing insulation and water uptake.
- The Freeze-Thaw Shuffle: This is a big one here. Ottawa winters aren't always consistently frozen solid. We get those annoying thaw periods followed by snap freezes. This constant expansion and contraction of the soil (especially in heavier clay soils common in areas like Barrhaven, or even the loamy soils in parts of Nepean) can literally heave shallow-rooted plants right out of the ground or break their tender roots. Ouch!
- Drying Winds & Winter Sun: Frigid winds can suck moisture out of stems and leaves (especially evergreens), a process called desiccation. Combine that with bright winter sun reflecting off snow, and your plants can get a nasty "sunburn." Deeper roots help plants replenish lost moisture, but new plants struggle with this.
- Soil Matters: Whether you're gardening in the sandy loam near parts of Greely or dealing with the clay found closer to Manotick, soil type affects how water drains and how the ground freezes and thaws, directly impacting those vulnerable new roots. Preparing the ground properly involves good soil preparation techniques.
So, what does this all mean? It means your new leafy friends haven't built up the underground strength to easily withstand the pressures of freezing ground, fluctuating temperatures, and drying conditions. They need our help! Taking notes on which plants are new is a smart move; you can reference these fall garden records and planting notes next year too. Protecting them now ensures they survive and thrive, contributing to a healthy ecosystem perhaps even supporting next year's bees like those discussed in creating a Russell fall pollinator garden. A healthy garden often starts with a healthy base, and paying attention to your turfgrass is part of that bigger picture; you can find secrets to perfect Russell lawn care that contribute to overall yard vitality. Good visibility helps when you're doing this work in the shorter fall days; consider how Russell outdoor lighting enhances home security and fall tasks. If tackling winter prep feels overwhelming, remember there are professional landscaping and yard maintenance services available to give your plants the best chance against the winter gauntlet.
The Last Big Drink: Strategic Fall Watering Before the Freeze
Alright, let's talk about giving your plants one last, important drink before winter truly sets in. Think of it as sending them off to bed hydrated after a long day – it helps them rest easier! This final fall watering, especially for your new recruits, is a crucial step in helping them survive the Ottawa freeze. Skipping it is like sending them into hibernation thirsty, which nobody appreciates!
Why Bother Watering Before Everything Freezes?
It might seem a bit odd to water when it's getting cold, right? But here’s the scoop: plant roots, even dormant ones, still need moisture to survive the winter. Dry soil freezes harder and faster than moist soil. Worse, once the ground *is* frozen solid, your plants can't absorb any water, even if it snows or rains on top. This is especially tough on evergreens, which continue to lose moisture through their needles all winter long. Giving them access to water *before* the deep freeze helps prevent dehydration and winter damage. Properly hydrated roots are simply more resilient to cold snaps and those pesky freeze-thaw cycles we often see around Kars and Osgoode. For water conservation tips relevant to our area, visit the Rideau Valley Conservation Authority.
Your Pre-Freeze Watering Game Plan:
Timing is key! You want to water thoroughly *before* the ground freezes solid, usually in late October or November here in Ottawa. Keep an eye on the forecast and the soil itself.
Here’s how to give them that last big drink:
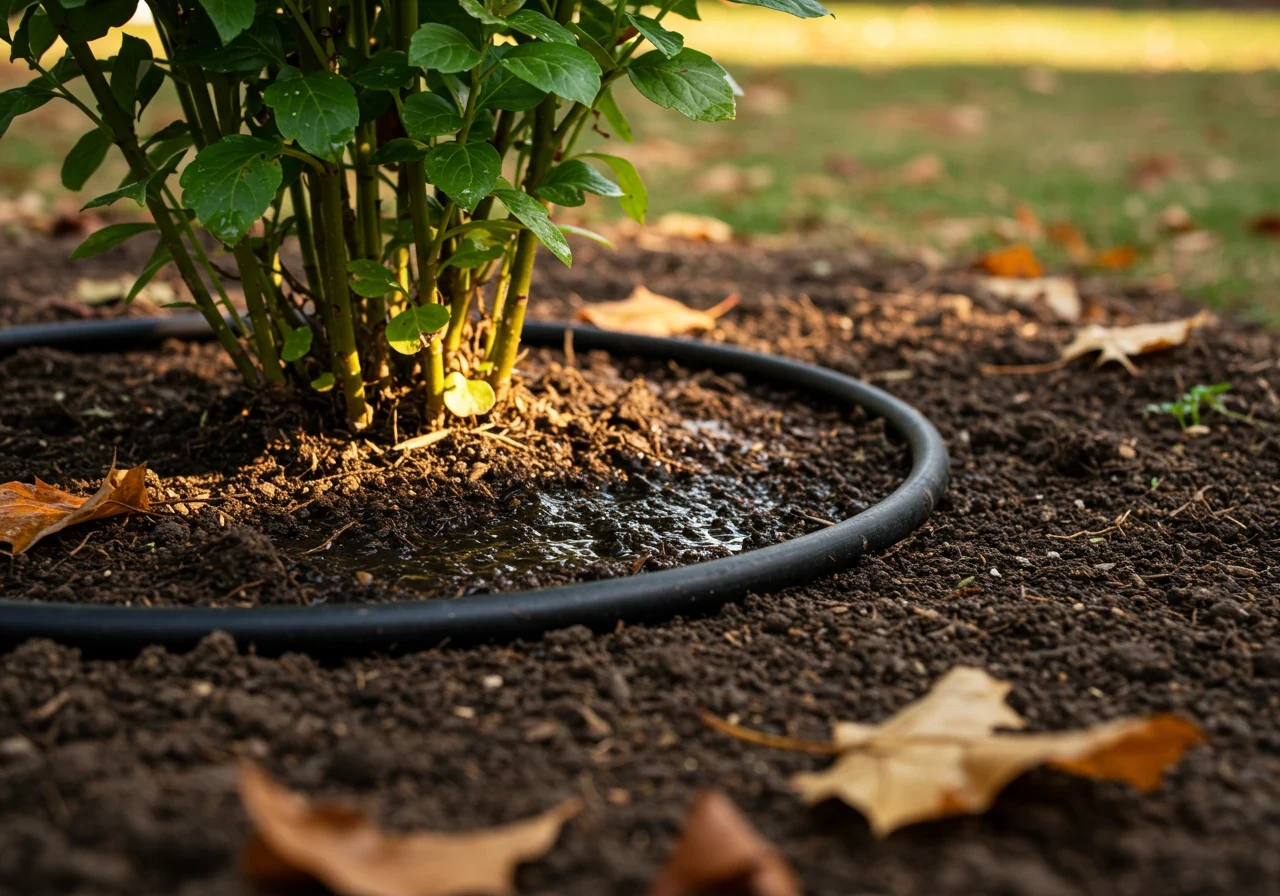
- Check the Soil: Stick your finger a few inches down near the base of your new plants. If it feels dry, it's time to water.
- Water Deeply, Not Daily: Forget light sprinkling. We want the moisture to reach the *entire* root zone. For shrubs and perennials, aim for water to penetrate 6-8 inches deep; for trees, aim for 12 inches or more.
- Slow and Steady Wins: Use a soaker hose snaked around the base or turn your regular hose on a slow trickle. This allows the water to soak in slowly and deeply, rather than running off the surface. Aim the water at the *base* of the plant, avoiding the foliage.
- Prioritize the Newbies: Focus your efforts on trees, shrubs, and perennials planted this year. Pay extra attention to evergreens (like cedars, pines, junipers) as they lose water all winter.
- Keep Going Until the Freeze: Continue this deep watering every week or two *if the soil is dry* right up until the ground freezes hard. Once it's frozen, you can hang up the hose for the winter.
This watering strategy is a simple but effective part of getting your garden ready. It complements other fall tasks, like ensuring good drainage and perhaps getting a part of a thorough Russell yard clean-up service to remove debris. If you're closer to the city core, a complete city garden clean-up service can handle this too. Remember, healthy plants contribute to overall yard health, which goes hand-in-hand with comprehensive lawn care. Don't have the time? Many companies offer professional fall landscaping services that include proper watering, and you can even find specialized help like an expert Marionville yard cleanup service if you're in that area. Give your plants that final drink – they'll thank you for it next spring!
Perennial Fall Care
Focus on crown protection. Leave healthy stems standing to trap snow. Cut back only diseased foliage. Ensure good drainage around the base. Apply mulch after the ground cools.
Shrub & Tree Fall Care
Water deeply before freeze-up. Apply mulch (donut method!). Use tree guards on young trees. Wrap sensitive evergreens with burlap. Check for and remove any dead or damaged branches before heavy snow.
Essential Fall Prep Tools
- Soaker hose or watering wand
- Mulch (bark, leaves, straw)
- Shovel/Pitchfork
- Pruning shears
- Burlap & Twine (if needed)
- Tree guards (if needed)
- Rake / Leaf Blower / Mower (for leaf management)
Having the right tools makes the job much easier! Professional property clean-up services come equipped for all tasks.
Tuck Them In: The Magic of Mulching for Winter Protection
Okay, after giving your new plants that essential final drink, it's time for the next cozy step: tucking them in with a nice layer of mulch! Think of mulch as the perfect winter blanket for your garden beds. It might seem simple, but applying mulch correctly in the fall is one of the *best* things you can do to help your precious perennials, shrubs, and young trees survive their first challenging Ottawa winter. Seriously, it's like garden magic!
So, what makes mulch so magical?
- Insulation Power: Just like insulation in your attic, mulch helps keep the soil temperature more stable. It shields roots from the harshest cold snaps and, perhaps more importantly, buffers them against those wild temperature swings during freeze-thaw cycles that can heave plants right out of the ground.
- Moisture Minder: Even though the ground might freeze, mulch helps reduce water evaporation from the soil surface *before* the deep freeze sets in, keeping that moisture you just added (remember our watering chat?) available to the roots for longer.
- Weed Warrior (Lite): A good layer of mulch can suppress any determined late-season or super-early-spring weeds that try to crash the party.
- Soil Saver: Over time, organic mulches break down, adding yummy nutrients and improving soil structure. Bonus!
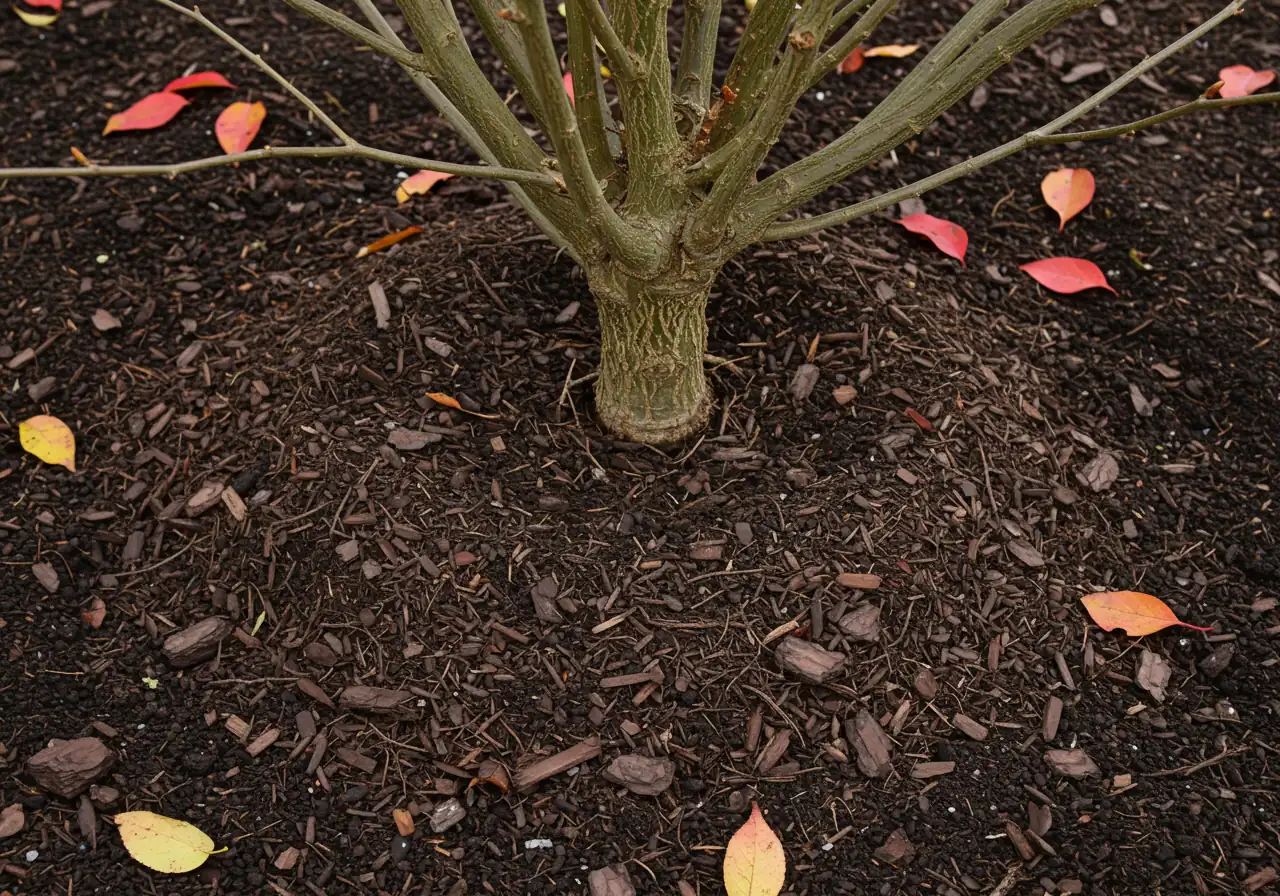
How to Tuck Them In Just Right (The Donut Method):
Applying mulch isn't rocket science, but doing it wrong can cause problems. Forget building mulch "volcanoes" piled high against stems or tree trunks – that’s a big no-no! It traps moisture against the bark, inviting rot and pests. Instead, think *donut*:
- Timing is Key: Wait until after the ground has cooled down significantly, usually after a few light frosts but *before* it freezes solid. Late October or November is often ideal around here. Mulching too early can keep the ground too warm and delay dormancy.
- Clean Up First: Remove any weeds or unwanted debris from the garden bed. Proper mulching is a vital part of getting your garden beds ready for winter, a task often included in professional Ottawa yard cleanup services.
- Spread Evenly: Apply a layer of mulch 2 to 4 inches deep over the root zone of your plants. Extend it out to the drip line (the edge of the plant's branches) if possible, especially for trees and shrubs.
- Make the Donut: Gently pull the mulch back a few inches from the base of each plant stem or tree trunk. You want to see a small, mulch-free circle right around the base – like a donut hole! This allows for air circulation and prevents moisture buildup against the plant itself.
Choosing Your Blanket (Mulch Types):
Good choices for winter protection include:
- Shredded Bark or Wood Chips: Excellent insulators, break down slowly, and look tidy.
- Straw: Light and airy, great for insulating perennials, but can blow around and may contain weed seeds.
- Shredded Leaves: Free and readily available! Run them over with a lawnmower first to chop them up; whole leaves can mat down and block air/water. Using shredded leaves gathered during a thorough fall clean-up, much like the kind offered by an expert Marionville yard cleanup service, is a fantastic, eco-friendly option.
You can often find bagged mulch at garden centres near Russell or Winchester, or buy it in bulk from local landscape suppliers. Applying mulch correctly is often part of a comprehensive Metcalfe garden clean up service if you prefer professional help. If hiring pros, always review their service scope, often detailed in their terms and conditions for landscaping services. And rest assured, when getting quotes or discussing your needs, reputable companies handle your details carefully, as outlined in their privacy policy regarding client data.
So go ahead, give your plants that cozy mulch blanket. It's a simple step that pays off big time when they emerge happy and healthy next spring!
Shields Up! Wrapping, Screening, and Staking Strategies
Okay team, sometimes mulch just isn't quite enough, especially for our delicate new plants facing the full fury of an Ottawa winter. Think of this next step as giving your green rookies some actual armour! Wrapping, screening, and occasionally staking are like deploying shields against specific winter threats. Let’s break down these defensive maneuvers.
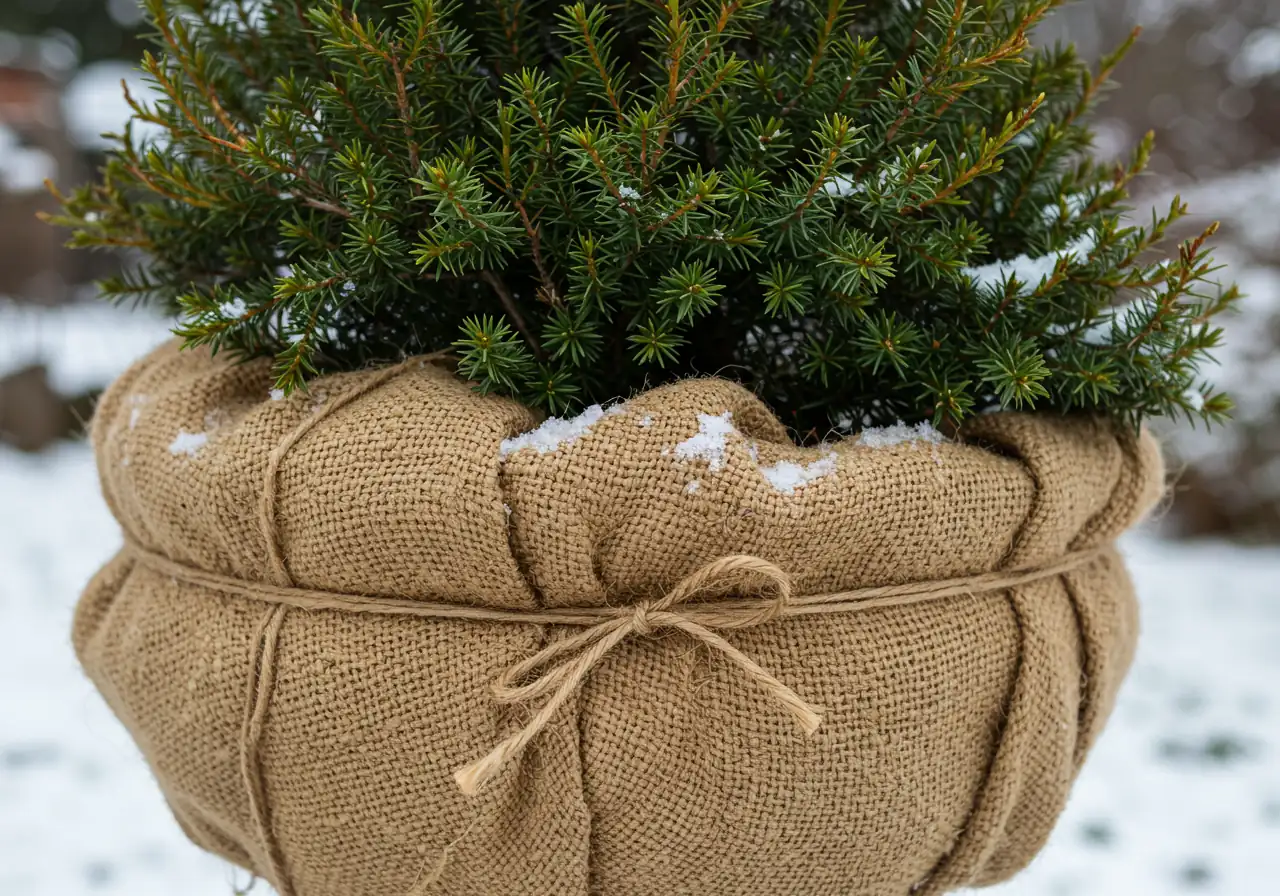
Burlap Wraps: The Cozy Sweater Approach
- What it fights: Windburn and sunscald, particularly nasty for evergreens like cedars, yews, and dwarf conifers. Frigid winds suck moisture out (windburn), and winter sun reflecting off snow can scorch needles (sunscald). This is common in exposed areas, perhaps like some newer developments in Barrhaven or properties facing open fields near Vernon.
- How to deploy: *After* the ground has started to freeze (late fall), loosely wrap the vulnerable plant with burlap. Start at the bottom and spiral upwards, overlapping layers slightly. Secure it gently with twine – *not* tight like a mummy! You want air to circulate. Critically, leave the top open for airflow and light. Think cozy scarf, not straightjacket. Removing wraps promptly in spring is vital, often done during a thorough spring clean-up similar to what an Ottawa winter yard preparation service might handle in reverse for fall prep.
- Pro Tip: Don't let the burlap touch the needles directly if possible, especially on wet days, as it can hold moisture and promote fungal issues. Creating a frame with stakes around the plant and wrapping the burlap around the stakes works great for more delicate specimens.
Screens & Windbreaks: The Bodyguard Tactic
- What it fights: Drying winds and salt spray. If your new shrubs are near a road that gets salted heavily (hello, busy Nepean streets!), or in a particularly windswept spot, a screen can be a lifesaver.
- How to deploy: Drive a few sturdy stakes into the ground *before* it freezes solid, positioned on the side facing the prevailing wind or the road. Stretch burlap between the stakes, creating a barrier. Make sure it's secure enough to withstand winter gusts. This physical barrier is a key part of protecting vulnerable areas, much like how expert mulching and edging techniques define and protect bed perimeters.
Tree Guards: The Anti-Critter Defence
- What it fights: Rodents (mice, voles, rabbits) nibbling on the tender bark of young trees during winter when food is scarce. This can girdle and kill a young tree. Deer might also browse lower branches.
- How to deploy: Place plastic spiral guards or hardware cloth (wire mesh) cylinders around the base of young trees. Ensure the guard extends from the soil line up past the expected snow depth, ideally 18-24 inches high. Make sure it's loose enough not to constrict the trunk as it grows but snug enough critters can't sneak underneath. This is essential fall prep and part of smart ongoing garden care strategies.
Staking: Use With *Extreme* Caution!
- What it fights: Theoretically, prevents wind rock in newly planted trees.
- How to deploy (if absolutely necessary): Okay, deep breath. Most properly planted trees *do not need staking*. Trees develop stronger trunks and root systems when allowed to flex naturally in the wind. Staking often does more harm than good, potentially rubbing bark or causing the tree to snap above the ties in high winds. Only consider *temporary* staking (one season max) if a tree is in an *extremely* windy location (like near the open fields surrounding Richmond) AND has an unusually large canopy for its root ball, making it genuinely unstable. Use wide, flexible straps and remove stakes as soon as possible in spring. Proper planting, including techniques used in sod installation for ground stability, is usually sufficient.
- Seriously: Avoid staking unless there's a compelling, specific reason. If unsure, getting professional advice is wise. You might discuss this when reviewing different approaches or even when providing feedback on landscaping estimates for winter prep services.
Remember to remove all wraps, screens, and guards in early spring as temperatures consistently rise above freezing. Leaving them on too long can trap moisture, overheat the plant, or constrict growth. This removal is a key task, sometimes handled by pros like a professional Metcalfe property cleanup service during their spring visits. Choose your shields wisely based on the specific threats your new plants face!
Estimated New Plant Survival Rates (Ottawa Zone 5)
*Illustrative data based on typical Ottawa conditions for moderately hardy new plantings.
Perennial TLC & Preparing Garden Beds for the Big Sleep
Alright, let's chat about getting those perennial garden beds ready for their long winter nap, especially the ones where your lovely new plants are settling in. One of the biggest debates in fall gardening is the "Great Cutback Question": Do you chop everything down, or leave the stems standing? Honestly, there’s no single right answer, but here’s the lowdown to help you decide.
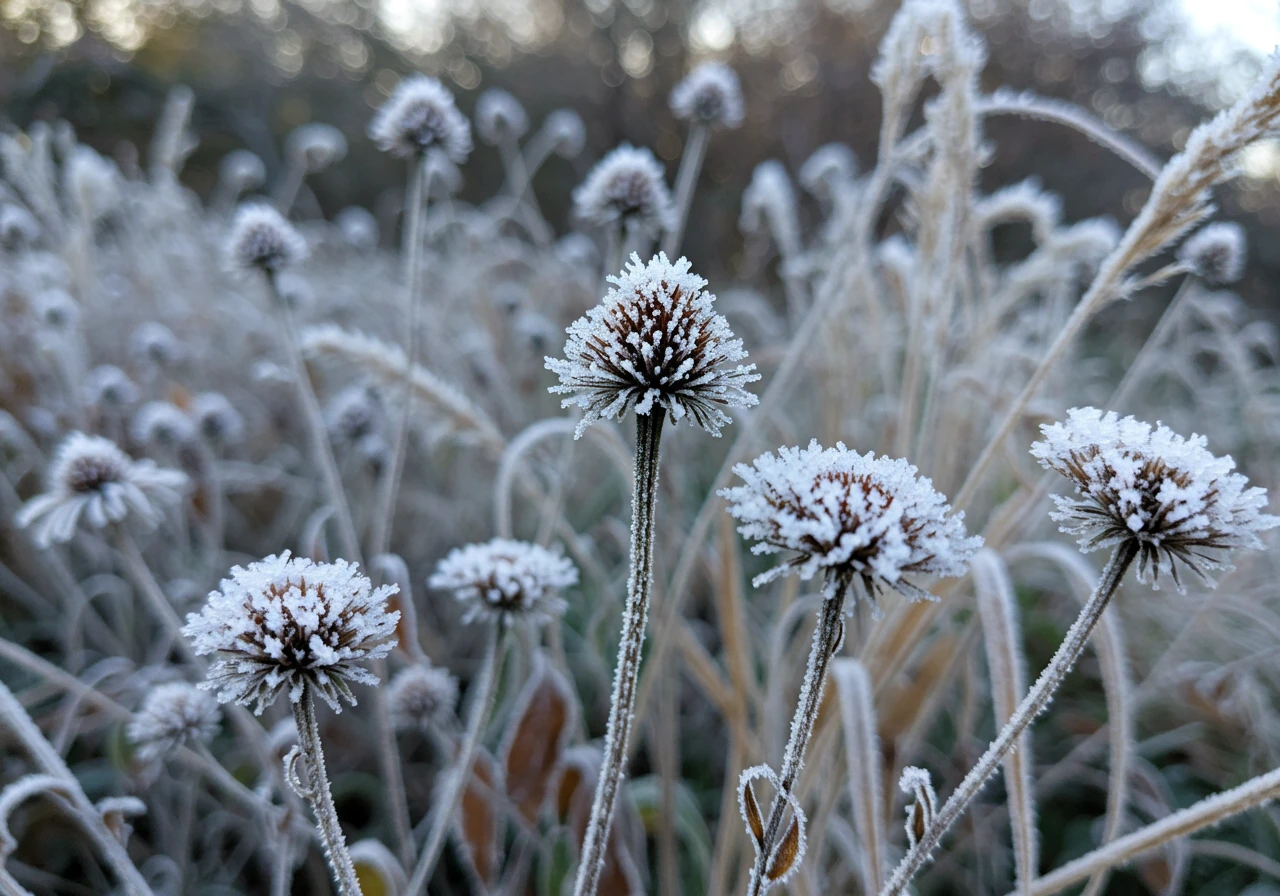
The Case for Leaving Stems Standing:
Many gardeners lean towards leaving perennials standing over winter, and for good reason:
- Winter Interest: Seed heads from plants like Coneflowers (Echinacea) or Sedum 'Autumn Joy', and the structure of ornamental grasses, can look beautiful dusted with frost or snow. It adds life to the otherwise sleepy winter landscape. Local resources like the Friends of the Central Experimental Farm often host talks or workshops covering four-season interest.
- Wildlife Cafe & Hotel: Those seed heads provide vital food for birds, and hollow stems offer shelter for beneficial insects overwintering. Think of it as a tiny B&B for the good bugs!
- Nature's Insulation: Standing stems and foliage help trap snow, which is fantastic natural insulation for the plant crowns (the part at the base where new growth emerges). This is *especially helpful* for your newly planted perennials whose roots aren't super deep yet.
- Easier Spring ID: Sometimes, leaving a bit of the old plant helps you remember exactly where things are when spring growth is just starting. Useful if you're already dreaming about next year's new garden installations.
The Case for Cutting Back:
On the other hand, cutting back has its perks:
- Tidiness Factor: Some folks just prefer a neat and tidy look going into winter. Floppy, soggy foliage (like Hostas or Daylilies after a freeze) isn't everyone's cup of tea.
- Disease & Pest Control: *This is the big one.* If any of your perennials showed signs of disease (like powdery mildew on Bee Balm or fungal spots on Peonies), *definitely* cut them back and dispose of the debris (don't compost it!). This prevents disease spores from overwintering and causing trouble next year. Cutting back can also remove overwintering sites for some pests.
- Easier Spring Cleanup: Less mess to deal with when you're eager to get gardening in the spring.
So, What Should You Do? A Balanced Approach:
For most healthy perennials, especially your *new* ones in areas like Metcalfe or Kenmore, leaning towards leaving them standing until early spring is often beneficial for that extra crown protection. However, *always* cut back anything diseased. You can also compromise: cut back the really floppy stuff (like hostas) but leave the sturdy, interesting stems (grasses, coneflowers).
Leaf Management: Be an Eco-Hero!
Resist the urge to rake every single leaf out of your garden beds! Fallen leaves are nature's mulch. Running them over with a lawnmower to shred them creates fantastic, free mulch that insulates roots and decomposes to enrich the soil. Rake leaves *off the lawn*, certainly, but use the shredded bits *in* your garden beds (applying the donut method we discussed earlier!). This approach aligns with sustainable practices; you can learn more about our commitment to eco-friendly methods on our About Us page. Complete leaf removal might be necessary in some situations, often handled by a thorough Metcalfe property cleanup service or even a broader city yard cleanup service depending on location, but try using leaves to your advantage first! We truly appreciate homeowners choosing greener options – a big thank you for considering sustainable garden care!
Timing:
Aim to do your perennial cutbacks (if any) and leaf management after a few hard frosts have knocked back the foliage, usually late October into November around here, but before the ground freezes solid or heavy snow arrives. This gives the plants time to draw energy back into their roots before going dormant.
Fall Prep Timeline
Early - Mid October
Monitor rainfall. Water new plants deeply if dry spell occurs. Plan mulch and protection needs. Review material selection if needed.
Late October
After first light frosts: Clean up diseased perennials. Rake leaves off lawn, shred for mulch. Begin deep watering schedule if needed. Install stakes for screens.
Early - Mid November
After ground cools/few hard frosts: Apply mulch (donut method!). Install tree guards. Perform final deep watering before expected hard freeze.
Mid - Late November
Before heavy snow/deep freeze: Wrap sensitive evergreens with burlap. Install burlap screens if needed. Ensure tools are cleaned and stored. Consider professional city property cleanup service if needed.
Russell Winter Prep Quick Checklist
Feeling a bit overwhelmed by winter prep for your new plants here in Russell or nearby Embrun? No worries! We get it – Ottawa winters can be tough cookies. Here’s a super quick checklist to make sure your green babies are tucked in tight before the snow flies. Think of it as their winter survival cheat sheet!
- Give 'Em a Final Guzzler: Water all your new plants deeply *before* the ground freezes hard (usually late Oct/Nov). Aim for moist soil several inches down, not just a sprinkle! Hydrated roots handle the cold way better.
- Mulch Like You Mean It (But Gently!): Spread a 2-4 inch layer of organic mulch (shredded bark, chopped leaves) over the root zone *after* a few frosts but before the deep freeze. Crucial: Keep mulch a few inches *away* from stems/trunks – make a donut, not a volcano! Need ideas on what to use? Our guide to smart landscaping material selection can offer some pointers.
- Wrap Up the Vulnerable: Protect sensitive evergreens (cedars, yews) from harsh wind and sunscald with burlap wraps (remember to leave the top open!). Guard young tree trunks against hungry critters with plastic spirals or mesh.
- Perennial Power Moves: Leave healthy perennial stems standing! They offer winter interest, shelter wildlife, and trap insulating snow. *Only* cut back plants that showed signs of disease this year to prevent problems next spring.
- Tidy the Beds (Smartly!): Rake leaves *off* the lawn, but shred them and use them *in* your garden beds as free mulch! Remove any diseased plant debris completely. If leaf management feels like a mountain, remember specialized help like an expert Marionville garden clean up service exists, or broader services like a city property cleanup service for larger scale tasks.
Taking these steps now seriously pays off. You're setting the stage for stunning spring growth and some truly rewarding garden transformations next year. From all of us who love green spaces, a big thank you for giving your new plants a fighting chance!
FAQs: Your Ottawa New Plant Winter Survival Questions Answered
You've got questions about keeping your new green buddies safe through an Ottawa winter? We've got answers! Let's tackle some common head-scratchers.
Great question! Aim for late fall – think late October into November. You want to wait until after a few good frosts have signalled to your plants it's sleepy time, but *before* the ground freezes solid like a rock. This is usually the sweet spot for applying mulch and any protective wraps without confusing the plant.
Not necessarily *all* of them, but most newcomers appreciate the extra help! Plants rated for our Zone 5 hardiness should survive, but newbies haven't established deep roots yet. Evergreens, plants in windy spots (like maybe an exposed corner in Nepean), or those borderline hardy for Ottawa definitely benefit from mulch and possibly wrapping. Established plants are usually fine on their own.
Oh, we see a few! A top one is "mulch volcanoes" – piling mulch right up against the plant stem or tree trunk. This traps moisture and invites rot and pests. Remember the donut method: keep mulch a few inches away from the base! Another common mistake is forgetting that crucial final deep watering before the ground freezes.
Salt spray is tough stuff! Your best defence is creating a physical barrier *before* winter hits. Set up stakes and wrap burlap around them (facing the road) to block the worst of the spray. Ensure good drainage so salty meltwater flows away. Come spring, a gentle rinse and tidying up the area, perhaps as part of hiring an experienced Ottawa property cleanup service, can help remove lingering residue.
Please don't! Fertilizing late in the season encourages tender new growth that hasn't got a hope of surviving the Ottawa freeze. It's like sending them out in a t-shirt in January! Save the feeding for springtime when they wake up hungry. Fall cleanup should focus on removing debris, not adding fertilizer. A good professional Ottawa garden clean up service knows to clear waste, not stimulate risky late growth.
Don't panic! Snow is actually a fantastic natural insulator. While mulching *before* snow is ideal, your plants are getting some protection. If we get a significant thaw mid-winter, you could try adding mulch then. Otherwise, make it a priority first thing in spring. If catching up feels daunting, remember pros like a reliable Metcalfe yard cleanup service or even a general city property cleanup service can help get things sorted quickly once the snow melts.
Conclusion: Set Your New Plants Up for Spring Success!
Okay, let's bring it all home! Getting your new plants ready for their first Ottawa winter might seem like a bit of fuss, but trust us, it's *so* worth it. Think of it as sending your green rookies to winter survival camp – they'll come back tougher and ready to shine next spring!
By giving them that last deep drink, tucking them in with a proper mulch blanket (remember the donut!), shielding the vulnerable ones from wind and critters, and being smart about perennial cleanup, you're doing more than just gardening chores. You're protecting your landscaping investment and setting the stage for a spectacular spring display. After all, who doesn't want to see those plants burst back to life after conquering the cold? It’s like they get bragging rights! A little effort now truly paves the way for less worry and more beauty later. Find inspiration for what's possible by checking out some garden transformations.
Feeling like winter prep is one task too many on your fall to-do list? We get it! If you're in Russell, Manotick, Greely, Winchester, Embrun, or surrounding Ottawa areas like Marionville, our team at Clean Yards can lend a professional hand with fall landscaping and yard cleanup to ensure your plants are winter-ready. Check out our Google My Business page for reviews and location details.
Got specific questions about a tricky spot in your yard or a particular plant? Don't hesitate to reach out! Contact us today for personalized advice or a free estimate – we love talking plants and helping your garden thrive!
What are your go-to winter prep tricks for new plantings? Share your tips in the comments below!
