
Russell Root Flare Check: Spot Hidden Tree Stress Now
Quick Summary: Why Check Your Tree's Base?
- The **root flare** (where trunk widens at soil level) needs air exposure.
- Burying it with soil or excess mulch suffocates the tree and causes rot.
- Signs of trouble include poor growth, yellowing leaves, dieback, or instability.
- Checking involves gently removing soil/mulch at the base to find the flare.
- Exposing a buried flare can significantly improve tree health.
Concerned about your trees? We can help diagnose and fix issues. Request a Quote Today!
Introduction: Hey Russell! Is Your Tree Secretly Suffocating?
Hey there, Russell neighbours! Ever get the feeling your favourite backyard tree is trying to tell you something? Maybe it’s not thriving like it used to, but you can’t quite put your finger on why. Well, sometimes the biggest threat to our landscape trees isn't a dramatic pest invasion, but something much quieter – they could actually be *suffocating* right under your feet!
We're talking about a surprisingly common issue: a buried *root flare*. What’s a root flare, you ask? Imagine it as the tree's 'ankles' – that slight, essential widening at the very base of the trunk where it meets the ground and transitions into the main roots. This area *needs* exposure to air. When it gets buried under too much soil, excessive mulch (a very easy gardening mistake!), or sinks over time, the tree struggles. It can't exchange gases properly, moisture gets trapped against the bark leading to decay, and the tree becomes stressed and vulnerable.
Here in the wider Ottawa area, from Greely to Embrun and right here in Russell, our sometimes heavy clay soils and freeze-thaw cycles can make trees more susceptible if their flares aren't free. Proper planting and ongoing garden maintenance are crucial. But don't panic! Identifying and fixing a buried root flare is often straightforward. Let's dig in (gently!) and learn how to spot this hidden problem and give your trees the breathing room they need to flourish. Need help checking? Consider our Russell Yard Cleanup Service for a thorough inspection.
What in the Trunk is a Root Flare? Your Tree's Unsung Hero
Okay, so we mentioned this mysterious "root flare" thingy in the intro. But seriously, *what in the trunk* is it, and why should you care? Think of the root flare – sometimes called the root collar – as the spot where your tree transitions from being a trunk above ground to roots below ground. It's that slight, graceful widening you *should* see right at the soil line. It’s not perfectly straight like a telephone pole going into the ground; there’s a natural taper, like the tree is putting on its sturdy root 'ankles' before digging into the earth.
Why is this flare such a big deal? Well, it’s basically your tree's secret life support system headquarters. This area is pretty darn important for a few key reasons:
- Breathing Room: Believe it or not, tree tissues near the ground need oxygen too! The flare is crucial for allowing essential gas exchange between the lower trunk/main roots and the atmosphere. Bury it under piles of soil or mulch, and you're essentially making your tree hold its breath. Not cool!
- Rot Prevention: Tree bark is tough, but it's designed to be exposed to air, not constant, soggy dampness. When soil, or especially excessive mulch (we're looking at you, mulch volcanoes!), gets piled up *above* the flare against the trunk, it traps moisture. This is an open invitation for decay, nasty fungi, and diseases to set up shop right where the tree is structurally vital.
- Structural Stability: This transition zone is where the tree anchors itself. Keeping the flare visible helps ensure the main structural roots develop properly near the surface and aren't buried too deep. It also helps prevent *girdling roots* – sneaky roots that can circle and strangle the trunk base when it's buried.
Here in the Ottawa region, particularly in areas with heavier clay soil like parts of Nepean or Greely, ensuring flare visibility is extra crucial. Clay soil tends to hold moisture longer, which is sometimes beneficial but can be disastrous when packed against a tree trunk above its natural flare line. Even if you're working with different soil types, maybe while planning your dream plot using Russell Veggie Garden Install Clay Soil Tips, understanding how soil interacts with all your plants, including trees, is fundamental. Burying the root flare is one of the most common, yet easily fixable, mistakes in planting and general landscaping. It stresses trees, making them weaker and more prone to problems down the road – something proper Russell Mature Plant Care & Garden Health practices aim to avoid.
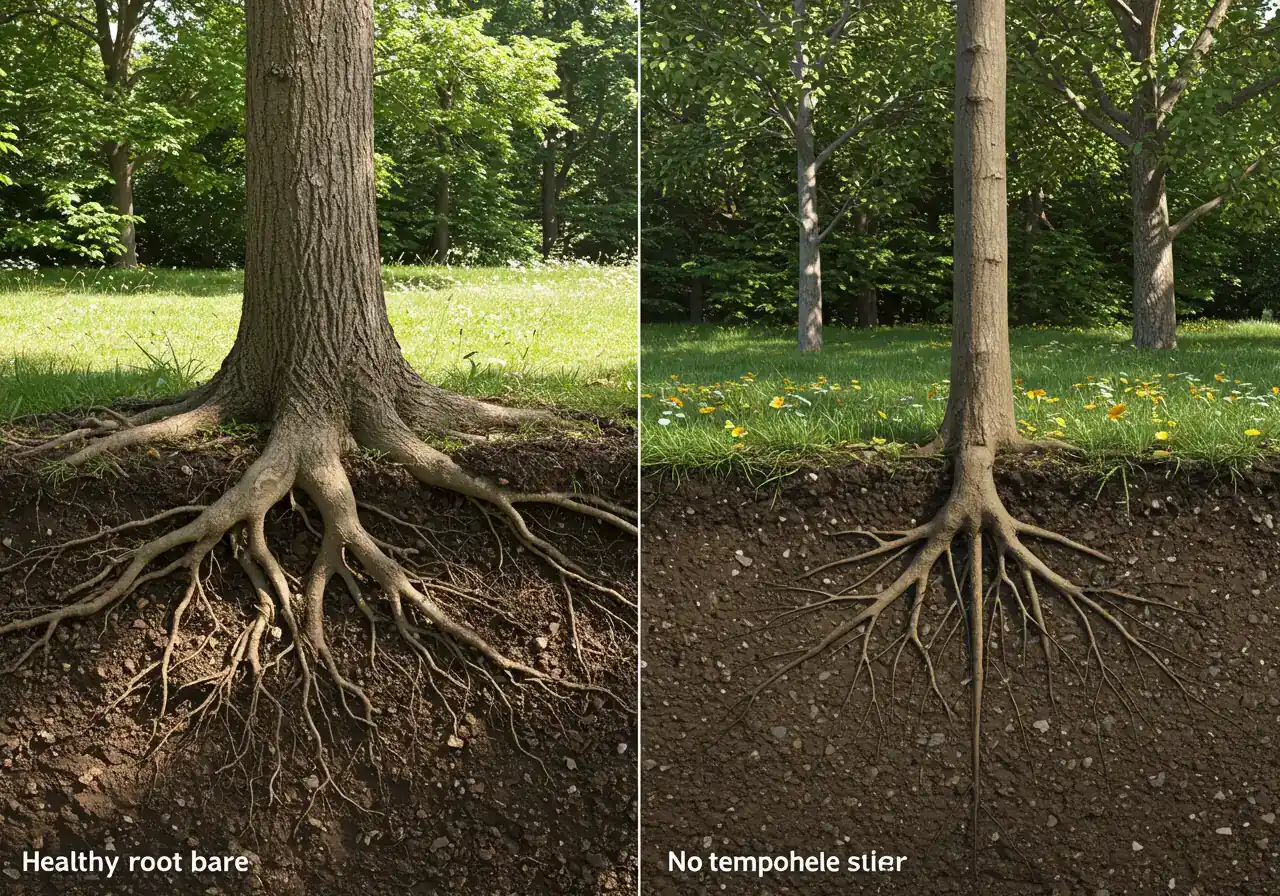
Think of it this way:
- Visible Flare: Tree looks naturally grounded, stable, like it's breathing easy. Trunk meets soil with a gentle outward slope.
- Buried Flare: Tree looks like it's being swallowed by the ground, straight like a post. Higher risk of moisture damage, suffocation, and instability.
Healthy trees contribute significantly to the overall look and feel of your property, complementing efforts you might put into achieving Secrets to Perfect Russell Lawn Care: Your Ultimate Guide. Even when you're thinking about other upgrades, like adding ambiance with Russell Outdoor Lighting Design & Safety Tips, being aware of where your tree's critical root flare and root zone are located helps prevent accidental damage during installation.
So, the big takeaway? That flare *needs* to see the light of day for a happy, healthy tree! If you're looking around your Russell yard now and thinking, "Hmm, I don't see any flares...", don't panic just yet. We'll cover how to investigate in our next section. And remember, if tackling tree care or other yard tasks feels overwhelming, professional help is available through our comprehensive Landscaping Services.
The Silent Killer: Why Buried Root Flares Spell Trouble for Ottawa Trees
Okay, let's talk about why letting your tree's root flare get buried is like sending it an engraved invitation to trouble town. It’s called the "silent killer" for a reason – the damage happens slowly, underground and out of sight, until suddenly your tree looks seriously unhappy. It’s a surprisingly common issue we see across Ottawa, from leafy streets in Manotick to newer developments in Barrhaven. Here’s the dirt on why it's so bad:
- Holding Its Breath (Oxygen Starvation): Remember how we said the flare needs air? When you pile soil or heap *too much* mulch right up against the trunk, you block that essential oxygen flow to the flare and the crucial surface roots. Think of it like trying to breathe with a pillow over your face – not pleasant, right? Trees need this gas exchange for basic survival. Cut it off, and the tissues start to suffocate and die back, weakening the entire tree over time. Proper Soil Preparation health and structure are key, but not when the soil is choking the trunk itself!
- Rotten Situation (Moisture & Decay): Tree bark is tough, but it's meant for air exposure, not constant dampness. When soil or mulch is packed against the trunk *above* the flare, it traps moisture like a soggy bandage. This is prime real estate for fungi, bacteria, and rot to move in. The bark breaks down, decay sets in at the base, and suddenly your tree's structural integrity is compromised. This is especially risky during Ottawa’s wet springs or soggy autumns, where moisture lingers. We often uncover this problem during an Ottawa Yard Cleanup Service when clearing excess buildup from garden beds.
- The Chokehold (Girdling Roots): When the flare is buried too deep, the tree can get confused. Instead of growing outwards, some roots might grow *upwards* towards the oxygen near the surface, or worse, circle around the buried trunk base. These are called girdling roots, and they literally strangle the tree, cutting off the flow of water and nutrients between the roots and the canopy. It's a slow, sneaky strangulation.
- Open Door for Pests & Disease: A tree stressed by a buried root flare is a weakened tree. And just like when we're run down, weakened trees can't fend off opportunistic attackers. Insect borers find it easier to tunnel into compromised bark, and diseases can take hold more readily in decaying tissue. What might be a minor issue for a healthy tree can become a major infestation or infection for one struggling with a buried flare. Maintaining overall plant vitality is crucial, which is why regular City Garden Maintenance Service is so beneficial for catching issues early. You can explore options for care in your specific area, like the Metcalf Garden Clean Up Service or the Marionville Garden Clean Up Service.
In areas like Manotick or Barrhaven, where we have beautiful maples, oaks, lindens, and even birch trees, burying the flare makes them much more vulnerable. When strong winds or heavy ice storms hit Ottawa, a tree with a weakened, decaying base or compromised root system is far more likely to fail, potentially causing damage. These hidden problems undermine the tree's natural strength. For local tree bylaw information, consult the City of Ottawa Tree Protection By-law page.
Identifying a buried flare often starts with noticing subtle symptoms in the canopy, but the real investigation happens at ground level. If you're tidying up your property, maybe as part of a larger Ottawa Property Cleanup Service, take a moment to check the base of your trees. Even if you're not in Russell, the principles behind our Russell Yard Cleanup Service apply everywhere – clear away debris and excess mulch from the trunk base! Spotting and addressing a buried flare is a key part of smart landscaping and ensuring your trees live long, healthy lives. If you suspect a problem or need help with excavation or overall tree care, exploring professional Landscaping Services is always a good option.
How Did This Happen? Unearthing the Causes of Buried Flares in Metcalfe and Beyond
So, you've taken a closer look at your favourite maple or oak, perhaps spurred on by some landscaping inspiration from looking at our transformations, and... huh? Where are those root flares we've been talking about? It looks like your tree is diving straight into the ground like a fence post. Don't worry, your tree didn't decide to bury itself out of spite. There are usually a few common culprits behind this hidden landscape hiccup, seen all over Ottawa, from established yards in Osgoode to newer plantings in Metcalfe. Let's unearth the reasons:
- Planting Too Deeply: This is probably the *most* common reason, often happening right from day one. Sometimes trees come from the nursery already planted too deep in their pots or burlap sacks. Other times, well-meaning gardeners or landscapers simply dig the planting hole too deep and don't adjust for the root flare, placing it well below the surrounding soil level. Oops! It's an easy mistake, especially when you're excited about getting new greenery in the ground during a garden install. *Tip:* Always identify the root flare *before* planting and make sure it sits slightly *above* the final soil grade.
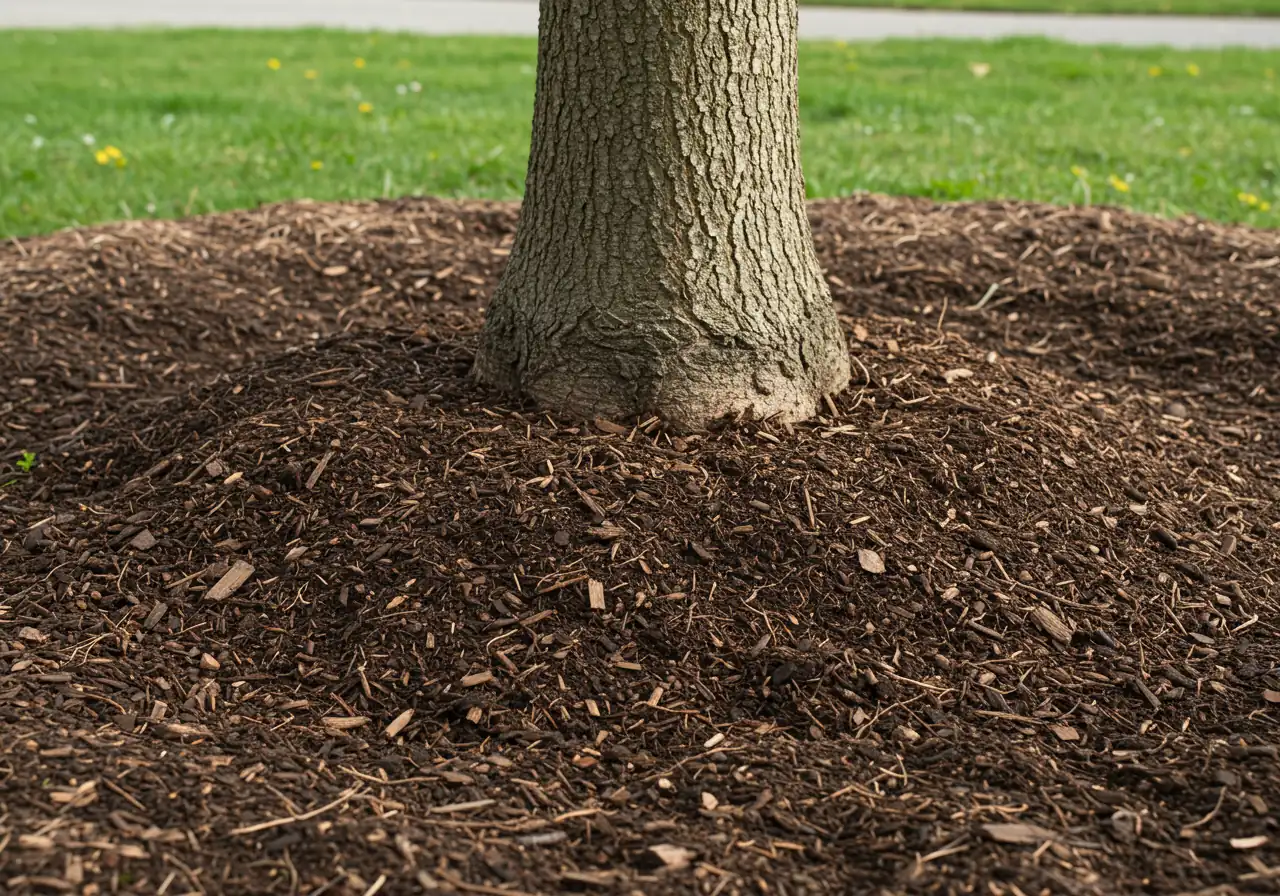
- Mulch Madness (The Dreaded Volcano): We all love mulch for suppressing weeds and retaining moisture, right? But piling it high against the tree trunk – creating that infamous "mulch volcano" – is a major no-no. While it might look tidy to some, it suffocates the flare and traps excessive moisture against the bark, inviting rot. *Eco-Friendly Tip:* Apply mulch like a donut, not a volcano! Keep it 2-3 inches deep and pull it back several inches from the actual tree trunk using proper mulching and edging techniques. This is a common issue we address during an Ottawa Property Cleanup Service or a more localized Metcalf Property Cleanup Service when refreshing garden beds.
- Creeping Grade Changes: Over time, the landscape shifts. Maybe you added topsoil to level a part of your lawn near the tree, built up a garden bed around it, or had construction done nearby (hello, new patio in Richmond!). Even subtle changes can gradually bury the root flare under inches of extra soil or fill. Sometimes, soil erosion *away* from the tree might make it seem like the tree sunk, but more often, soil gets added *around* it during various property clean up activities.
- Nature Taking Its Course (Slowly): Sometimes, it's a slower, more natural process. Soil can settle significantly after planting, especially in looser soils. In established areas like Osgoode or Metcalfe with mature trees, decades of decomposing leaf litter and organic matter can slowly build up the soil level around the base if not occasionally cleared away. Ottawa's freeze-thaw cycles can also contribute to soil heaving and settling in unpredictable ways. For community guidance, consider resources like the Ottawa Horticultural Society.
Common Causes of Buried Root Flares (Estimated)
Finding a buried flare isn't the end of the world, but it does need attention. If you suspect your tree is affected and aren't sure about tackling the excavation yourself, getting a professional opinion is a great idea. We're happy to provide estimates for corrective work – and we always appreciate hearing your thoughts via our Estimate Feedback page. Rest assured, any information you share when requesting help is handled carefully, as outlined in our Privacy Policy. Understanding the scope and details of any landscaping service is also key, which is why clear expectations are laid out in our Terms and Conditions. The good news is, carefully exposing the root flare can often give your tree a new lease on life!
Your DIY 'Russell Root Flare Rescue' Mission: A Step-by-Step Check
Okay, team! Ready to put on your detective hat and embark on your very own 'Russell Root Flare Rescue' mission? It sounds dramatic, but don't worry, this investigation is usually pretty straightforward. Checking if your tree's root flare is buried is a crucial first step in ensuring its long-term health. Let's break down how to do it, gently and safely.
Your Mission Briefing: The Root Flare Check
Think of yourself as a tree archaeologist – your goal is to carefully uncover the truth at the base of your tree without causing any harm. The best times for this mission in the Ottawa region, including areas like Kars or Vernon, are spring or fall when the ground is workable – not frozen solid or baked hard by summer sun.
Here’s your step-by-step guide (also outlined in our structured data above):
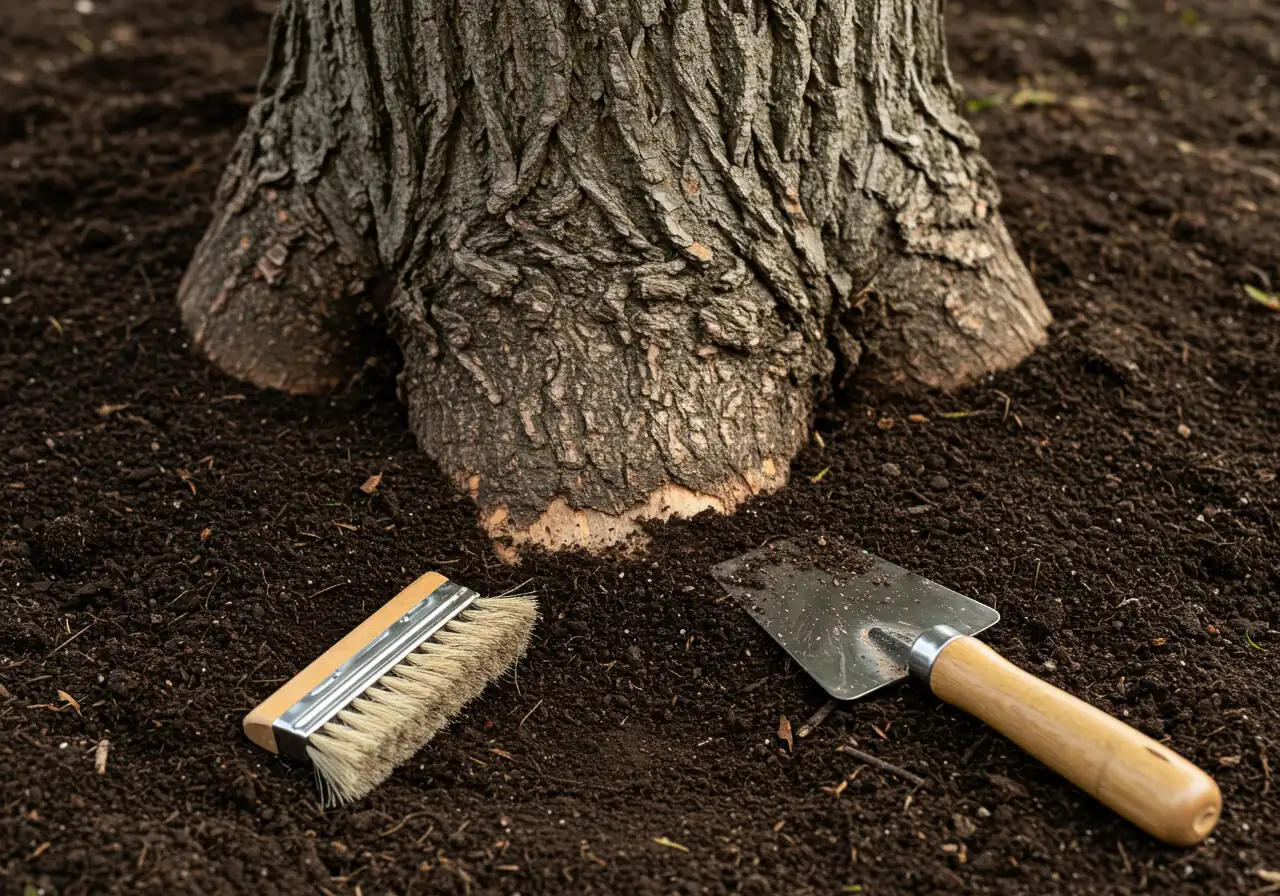
- Gear Up: You don't need heavy equipment! Grab some garden gloves, a small hand trowel (a garden cultivator or even an old sturdy spoon can work), and maybe a soft brush. The key is *gentle* tools.
- Visual Sweep: Before you dig, just *look*. Kneel down and examine where the trunk meets the ground. Does it go straight in like a telephone pole? Or can you see a slight widening or taper just above the soil line? Are there piles of mulch or soil heaped up against the bark? Sometimes, the problem is obvious right away.
- Clear the Zone: Gently pull back any mulch, leaves, grass, or loose debris from the immediate base of the trunk. Create a clear circle extending out at least 6-12 inches. *Important Tip:* Remember the "donut" rule for mulch – always keep it pulled back a few inches from the trunk itself. This is often part of routine care, like tidying up during a Metcalf Yard Cleanup Service where clearing debris from beds is standard. You might also find this included in a City Yard Cleanup Service.
- The Gentle Dig: Now, the careful part. Using your trowel, start digging *slowly* and *gently* a few inches *away* from the trunk. Scrape the soil away horizontally, moving *towards* the trunk, rather than digging straight down *at* it. You're trying to find the point where the trunk stops going straight down and starts to flare outwards into the main structural roots. Be patient! You absolutely want to avoid gouging the bark or slicing into any roots near the surface.
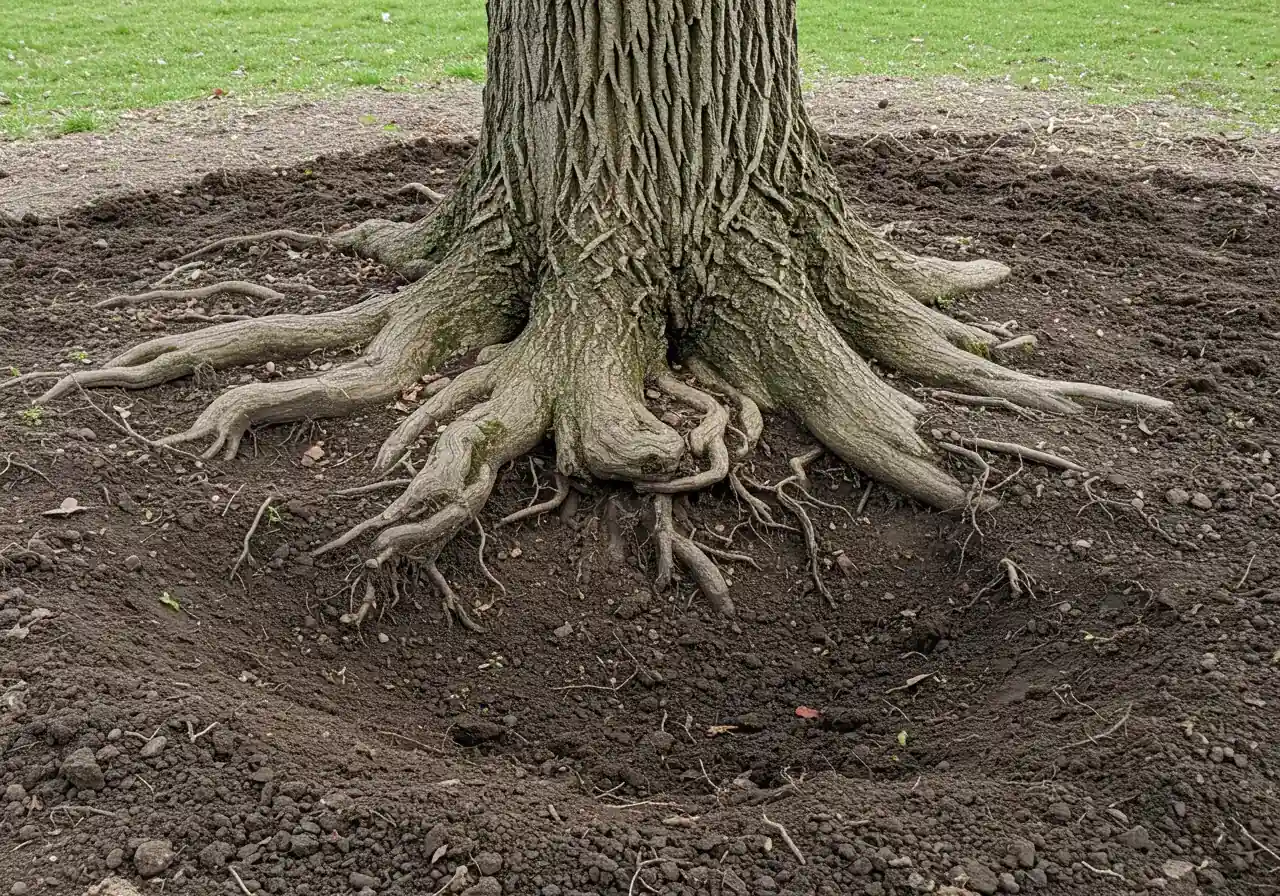
- Flare Sighting! Keep removing soil layer by layer. You're looking for that tell-tale widening, the 'ankles' of the tree. You might even uncover the very tops of the large roots radiating outwards. *Success!* You've found the flare. Note how far down you had to dig to expose it.
- Assess the Situation: Is the flare right at the soil surface or just slightly below (like, less than an inch)? Great! If you had to remove 2, 3, or even more inches of soil to find it, then you've confirmed a buried root flare issue.
- Plan Your Next Move: Just finding the buried flare is step one. The next step is *carefully excavating* the excess soil away from it permanently, creating a gentle slope away from the trunk. This might be a DIY job for minor cases, or something you might want professional help with if it's deep or involves larger roots. If you're feeling overwhelmed by garden tasks, remember that expert help for things like careful plant care is available through a city garden clean up service which focuses on detailed garden health.
Eco-Friendly Tip: Don't just toss the soil you removed! If it's decent topsoil, use it to fill low spots elsewhere in your garden or add it to your compost pile. Healthy soil is valuable, whether for maintaining your existing garden, supporting your overall lawn care efforts, or even preparing a spot for future landscaping projects like sod installation.
Taking a few minutes to perform this check can make a huge difference to your tree's future health. Good luck with your mission!
Flare Found (or Not)! What's Next for Your Winchester Willow or Embrun Elm?
Alright, intrepid tree investigator, you’ve completed your 'Russell Root Flare Rescue' check! So, what did you find down there at the base of your prized Winchester Willow or magnificent Embrun Elm? Did you strike gold (or, you know, bark)? Let’s figure out the next steps based on your findings.
Success! The Flare is Visible (or Just Under 1")
Phew! If you could easily see that gentle widening or only had to brush away less than an inch of loose material, your tree is likely breathing easy!
What to Do: Maintain the status quo. Ensure mulch forms a 'donut' shape, leaving a few inches of bare soil around the trunk base. Keep an eye on it during regular yard work. This simple step is often covered during seasonal tidying, like the kind involved in an Ottawa Garden Clean Up Service.
Found It, But It Was Buried (Minor Excavation Needed - 2 to 4 inches deep)
Okay, so you had to dig a bit (2-4 inches) to expose the flare. This is common!
What to Do (DIY Option): You *might* handle this carefully yourself. Use hand tools to *gently* scrape away excess soil *horizontally* from *on top* of the flare and main roots. Create a shallow, saucer-like depression sloping away from the trunk (12-24 inches out). Be super careful not to damage bark or roots! Proper Soil Preparation techniques apply here - loosen gently. Remove excavated soil.
Caution: If unsure, or if roots seem complex, consider professional help.
Deep Trouble (Buried 4+ inches) or Suspected Girdling Roots
Yikes! If you dug over 4 inches, hit a dense mat of fine roots, or found roots circling/crossing the trunk, **stop digging**.
What to Do (Professional Help Strongly Recommended): DIY can cause serious harm here. Call a certified arborist or experienced landscaper. They have specialized tools (like air spades) and expertise to safely excavate, assess health, and prune girdling roots without damaging the tree. This might involve careful grade adjustment similar to a targeted Garden Install around the tree base. Don't risk your tree's life! Seek expert advice, maybe from providers experienced in your area like a Marionville Yard Cleanup Service team familiar with local conditions. Consider checking reviews from local providers like Clean Yards on Google here.
Deciding whether to tackle flare exposure yourself or call for backup depends on how deep the issue is and your comfort level. For anything beyond a minor adjustment, professional advice is usually the safest bet for your tree's long-term health and stability, potentially preventing costly issues down the road.
Highlight Box: Root Flare Wisdom - Quick Tips for Ottawa Tree Lovers
Hey neighbours! Want the quick scoop on keeping your trees happy from the ground up? Understanding the root flare is key! It might sound fancy, but it’s really simple stuff that makes a *huge* difference. Here’s a little cheat sheet:
Why Flares Matter (The Cliff Notes Version):
- Tree Ankles Need Air: Think of the root flare as your tree's ankles – that spot where the trunk widens before diving into the soil. Like us, trees need to breathe there! Burying it is like making them wear socks pulled up way too high… permanently.
- No Soggy Collars, Please: Piling soil or mountains of mulch right against the trunk traps moisture. This invites rot, disease, and pests faster than you can say "timber!" It’s basically a soggy sweater that never comes off.
- Foundation for Health: A visible flare usually means the main roots are developing properly near the surface, giving your tree a strong, stable base to withstand Ottawa winds and weather. A solid start for a long life!
Quick Tips Tailored for Ottawa Yards:
- Clay Soil Caution: In areas around Ottawa with heavier clay soil, like parts of Nepean or Greely, buried flares are extra problematic because clay holds moisture. Keep the base clear! Sometimes issues are only uncovered during seasonal work, like a detailed Metcalf Property Cleanup Service focused on garden beds and tree bases.
- Embrace the Mulch Donut: Seriously, avoid the "mulch volcano"! Keep your mulch layer about 2-3 inches deep, but always pull it back a good few inches (at least 3-6) from the actual tree trunk, creating a donut shape. It might seem small, but proper technique matters for plant health, something you can learn more About Us and our approach.
- Post-Winter Peek: Our wild freeze-thaw cycles can heave soil around. Make it a habit each spring to quickly check the base of your trees, especially younger ones, to ensure the flare hasn't gotten buried over the winter. If you see potential trouble brewing and aren't sure what to do, feel free to Contact Us for advice or an assessment. For regional conservation info, check the Rideau Valley Conservation Authority.
Keeping an eye on those tree ankles is simple preventative care that pays off big time. We really Thank You for helping keep Ottawa's urban forest healthy, one root flare at a time!
Timeline: The Slow Decline of a Buried Flare
Year 0-1: Planting/Mulching Issue
Tree is planted too deep, or mulch is piled high against the trunk (volcano mulching).
Year 1-3: Hidden Stress Begins
Oxygen exchange is restricted. Moisture stays trapped against bark. Minor root suffocation starts. Tree may still look healthy above ground.
Year 3-5: Decay & Root Problems
Bark begins to decay under moist conditions. Fungi may appear. Fine roots die back. Girdling roots might start forming if planted too deep.
Year 5-10+: Visible Symptoms
Canopy thinning, yellowing leaves (chlorosis), branch dieback, smaller leaves, reduced growth. Tree becomes more susceptible to pests, disease, and drought stress.
Year 10++: Severe Decline / Failure
Significant decay at the base weakens structural integrity. Tree may become unstable and prone to falling in storms. Major canopy decline or death.
FAQ: Your Ottawa Root Flare Questions Answered
That's a great question! It's tempting to leave things be if the tree looks okay upstairs, but a buried root flare is like a hidden ticking clock. The damage – root suffocation, bark decay, potential girdling roots – happens slowly underground. Your tree might look fine for years while secretly getting weaker. Then, an Ottawa windstorm, a drought, or an insect attack comes along, and the stressed tree can't cope. Think of exposing the flare as preventative medicine for your tree, helping ensure it stays healthy for the long haul. Better to check and fix it now than wait for visible signs of trouble!
It's smart to be cautious! Hurting the roots or bark is definitely a risk if you're not careful. For just a couple of inches, you *might* manage it with gentle tools – think hand trowels, cultivators, even brushes – scraping soil *away* horizontally, not digging *down* hard. But if you're feeling nervous, hit major roots quickly, or find it's deeper than you thought, honestly, calling a professional arborist or experienced landscaper is the safest bet. They have the right tools (sometimes even cool air spades that use air pressure!) and know-how to excavate safely without harming your prized maple. Don't risk accidentally wounding your tree!
Awesome job on the excavation! The absolute best thing for the immediate area *right around* the newly exposed flare and the tops of the main roots is... mostly nothing! Allowing that area to have direct contact with the air is key. You can leave a ring of bare soil, maybe 6-12 inches wide, around the base. Further out, you can reapply mulch (remember the donut, not the volcano!) using a good quality, natural mulch like shredded bark. Keeping the soil healthy overall is important, and choosing the right amendments or mulch type depends on your specific garden needs. For ideas on what works best in our local soils, considering thoughtful Material Selection for Landscaping Projects can help you choose wisely for the rest of the garden bed.
Your neighbour might be onto something! While buried root flares are bad anywhere, Ottawa's prevalent heavy clay soil, common in areas like Barrhaven or parts of Greely, can definitely make things trickier. Clay holds moisture longer than sandy soil. When that wet clay is packed against the tree trunk above the flare, it keeps the bark constantly damp, dramatically increasing the risk of rot and decay. So yes, while it's a universal tree care principle, being extra vigilant about visible root flares is particularly wise gardening advice for those of us landscaping on clay soil.
Oh dear, the dreaded mulch volcano! Yes, you should definitely fix it, and thankfully it's usually an easy correction. While often done with good intentions (trying to look tidy), piling mulch against the trunk is harmful. Gently pull the mulch back from each tree trunk, aiming for a donut shape. You want a clear space of at least 3-6 inches between the trunk and where the mulch starts. The mulch layer itself should only be 2-3 inches deep further out. Correcting this is a simple but vital part of good tree care. If you prefer ongoing professional help, regular Garden Maintenance Programs ensure these details are handled correctly season after season. Sometimes a quick refresh, like what might be included in a Metcalf Garden Clean Up Service, is all that's needed to set things right.
Checking annually is a fantastic habit, especially in the spring after the ground thaws. It's particularly important for younger trees that might settle after planting, or any trees where you've recently done landscaping, added soil to nearby beds, or noticed significant leaf litter buildup. Older, established trees might be more stable, but a quick peek when you're doing other yard work doesn't hurt. Think of it as part of your overall property upkeep, like clearing leaves or checking gutters – routine tasks similar to those covered in a thorough Marionville Property Cleanup Service or a City Property Cleanup Service. A few minutes checking can prevent major headaches down the road!
Conclusion: Give Your Trees Room to Breathe - For a Healthier Russell and Ottawa
So, what’s the big takeaway from our deep dive into tree trunks and buried treasure (of the bark variety)? It’s simple: give your trees some breathing room! Checking for and exposing that crucial root flare isn’t just fussy gardening; it’s fundamental tree care. Think of it as loosening your belt after a big Thanksgiving dinner – ahh, much better! By ensuring your tree's flare is visible, you're helping prevent suffocation, rot, and those sneaky girdling roots, leading to stronger, healthier, and longer-living trees right here in Russell, Embrun, Osgoode, and across the wider Ottawa region.
Remember, applying mulch correctly is key; proper Expert Mulching and Edging Techniques always keep mulch away from the trunk. Spotting buried flares can often happen during routine tidying, highlighting the importance of thorough Complete Property Clean Up Solutions. It's the kind of attention to detail you'd expect from focused care, whether it's a specific Dedicated Marionville Garden Clean Up Service or ensuring best practices are followed city-wide through a reliable Ottawa City Property Cleanup Service.
Healthy trees don't just look great; they clean our air, provide shade, and boost our property values. Taking a few minutes to check those flares is a small investment with big returns for your landscape and our community. Go on, give your trees a little TLC from the ground up – they’ll thank you for it!
Call to Action: Ready to Help Your Trees Thrive?
Alright, you’ve made it! You now know more about tree root flares than you probably ever thought possible. (Don’t worry, it’s a good thing – your trees are silently thanking you!). You understand why those buried 'tree ankles' are a sneaky problem, leading to stressed, suffocating trees right here in Ottawa and surrounding areas like Russell and Metcalfe.
But knowledge is only half the battle, right? The real question is: what are you going to *do* about it? Don't let your leafy friends suffer in silence! If you suspect your tree’s flare might be playing hide-and-seek under too much soil or mulch, here are a few ways you can take action right now:
- Let Us Do the Digging (Carefully!): Feeling a bit nervous about excavating around your prized maple in Manotick or your beautiful birch in Barrhaven? Totally understandable! Damaging bark or roots is a real concern. Our experienced landscaping team offers professional Root Flare Exposure services across Ottawa, including Nepean, Greely, and Kars. We use careful techniques (and sometimes cool tools like air spades!) to safely uncover buried flares, assess tree health, and give your trees the breathing room they desperately need. *Ready for an expert eye?* Contact us today for a consultation and quote!
- Grab Your Free 'Flare Check' Pocket Guide: Want a quick reminder of the key steps and warning signs you can keep handy? While we don't have a downloadable guide right now, bookmark this page! It boils down the essentials of spotting potential issues, knowing when to DIY, and understanding when it's time to call in the pros for your landscaping needs. Think of it as your cheat sheet for happy trees.
- Share the Tree Love!:** Know someone in Osgoode, Embrun, or maybe Richmond who's passionate about their garden or worried about a specific tree? Share this information! Sometimes, all it takes is a little shared knowledge to solve a common landscaping puzzle. Helping our neighbours keep their trees healthy benefits the whole community – more shade, cleaner air, and prettier streets for everyone! Click that share button and spread the word.
Taking care of our trees is an investment in our property and our local environment. Whether it’s adjusting mulch, carefully excavating a buried flare, or just being more aware during your regular gardening, every little bit helps.
Don't wait for major symptoms to appear. Give your trees the best chance to thrive for years to come. Reach out today and let's make sure your trees are standing tall and breathing easy!
