
Winchester Pro Tips: Spring Garden Spacing for Clay Soil
Quick Guide: Clay Soil Gardening Essentials
- Ottawa's heavy clay soil retains nutrients but drains poorly and compacts easily.
- Proper plant spacing (often wider than tag recommendations) is crucial for airflow and root health in clay.
- Amend clay soil generously with organic matter (compost) to improve structure and drainage.
- Plant high (root ball level with or slightly above soil) and water deeply but less frequently.
- Need help tackling your clay soil? Request a free quote today!
Ready to Transform Your Winchester Garden?
Don't let clay soil hold you back. Get expert help with soil preparation, planting, and maintenance.
Get Your Free EstimateIntroduction: Spring Planting Fever & The Clay Soil Conundrum in Ottawa
Ah, spring in Ottawa! One minute we're navigating slushy sidewalks, the next the sun is shining, the birds are singing, and that irresistible urge to get digging in the garden hits like a tonne of bricks – or should we say, a tonne of clay? That familiar spring planting fever is contagious, inspiring visions of beautiful blooms and bountiful harvests across the city.
But let's be honest, turning those gardening dreams into reality here often means facing a common foe: heavy clay soil. If you've ever tried digging after a dry spell in areas like Winchester, you know it can feel less like gardening and more like excavating! This dense soil holds water (sometimes too well!) and can be tough for plant roots to penetrate. Add to that the puzzle of plant spacing – giving your green friends enough room to grow without overcrowding – and spring landscaping can feel a bit daunting.
Fear not, fellow Ottawa gardeners! This section is your friendly guide to understanding and working with our unique soil conditions and mastering the art of spacing. We'll dig into practical tips and tricks to help you conquer the clay and create the thriving garden or landscape you've been dreaming of. Let's get planting!
Getting Cozy (or Not!) With Clay: Understanding Your Ottawa Soil
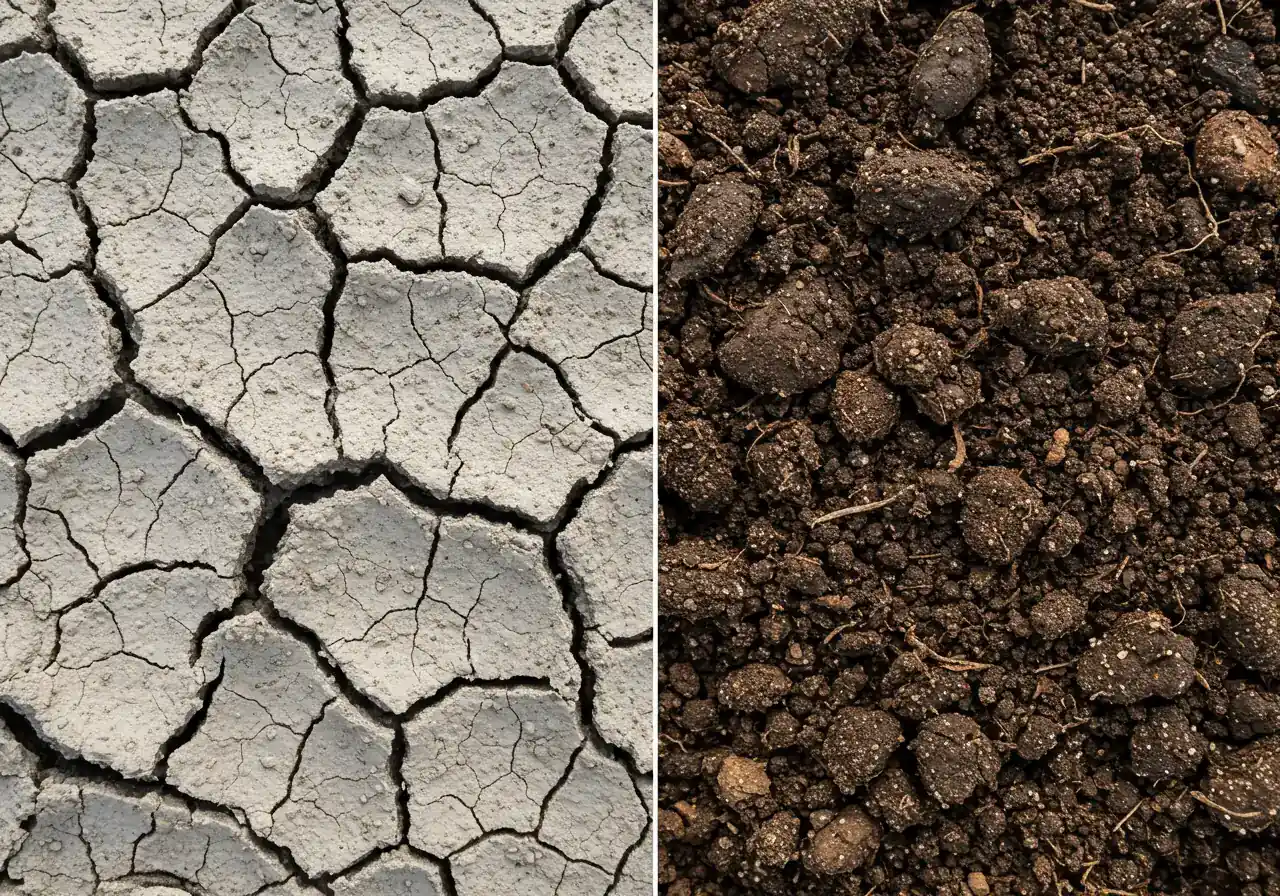
So, what *is* this infamous Ottawa clay soil we keep talking about? Imagine tiny, microscopic flat plates, all stacked tightly together. That's essentially clay soil. These tiny particles leave very little space between them, which leads to some, shall we say, interesting characteristics for gardeners.
The Good, The Bad, and The Muddy
Let's be fair, clay isn't all bad. It's actually packed with nutrients! Think of it as a nutrient goldmine for your plants... if they can access it. Its tight structure means it holds onto water like a champion sponge. This can be great during dry spells, meaning you might water less often than folks with sandy soil.
However (you knew there was a 'however'), that water-holding capacity is also its downfall. In our wet Ottawa springs, clay soil can become waterlogged, meaning poor drainage and plant roots practically needing scuba gear. When it finally dries out in the summer heat, especially noticeable in areas from Barrhaven to Winchester, it can bake harder than my grandma's forgotten fruitcake, making digging a serious workout and potentially restricting root growth. Compacted clay also lacks air pockets, which roots need to breathe. This compaction is often worsened by our freeze-thaw cycles. Poor soil structure like this can stress plants, making them more susceptible to problems and highlighting the importance of proactive care through something like a Winchester Plant Healthcare Program.
Know Your Dirt: The Ribbon Test
Curious about your specific soil? Here's a super simple test:
- Grab a handful of moist (not soaking wet, not bone dry) soil from your garden bed.
- Squeeze it in your hand. Does it hold its shape?
- Try to gently push the soil between your thumb and forefinger to form a ribbon.
- Sandy soil: Won't form a ribbon at all.
- Loamy soil: Forms a weak ribbon, maybe an inch long, that breaks easily.
- Clay soil: Forms a long, strong ribbon, often 2-3 inches or more before breaking.
If you're making a long, beautiful ribbon – congratulations, you've got clay!
Clay vs. The Dream Soil (Loam)
Here’s a quick comparison to see what makes clay different from the ideal loam most plants adore:
| Feature | Clay Soil | Loam Soil (The Ideal) |
|---|---|---|
| Texture | Fine particles, sticky when wet, hard when dry | Mix of sand, silt, clay; crumbly |
| Drainage | Slow, can get waterlogged | Good, drains well but retains moisture |
| Water Retention | High | Moderate |
| Aeration | Poor (not much air space) | Good (plenty of air pockets) |
| Nutrients | High (but sometimes hard to access) | Good |
| Workability | Difficult (heavy, sticky/hard) | Easy to dig and cultivate |
Soil Property Comparison (Relative Scale)
Poor Drainage (Clay)
Low Aeration (Clay)
Good Drainage (Loam)
Good Aeration (Loam)
Understanding your soil is the first step to working with it, not against it. Amending clay with organic matter like compost is key to improving its structure over time. This is often best done in the autumn, making it a perfect task to add to your Winchester Fall Garden Care routine. Improving soil structure is fundamental whether you're planting perennials or starting a bigger project. Proper soil preparation services are crucial for a successful Winchester Garden Design, ensuring your plants thrive from the roots up. It's even important before heavy construction; you don't want poor drainage around new structures potentially detailed in your Winchester Pergola Plans.
Dealing with heavy Ottawa clay can certainly be challenging. If improving your soil feels like too big a job, remember there are professional Landscaping Services available to help get your yard in top shape. Considering professional help? Check out our Google Reviews to see what clients say!
Struggling with Clay Soil?
Let our experts handle the hard work. We offer soil amendment, garden bed preparation, and professional planting services.
Explore Our Garden & Landscaping NeedsWhy Plants Need Personal Space: The Science of Spacing (Clay Edition!)
Okay, let's dig into why giving your plants some breathing room is super important, especially when you're gardening in that lovely Ottawa clay we know so well! Think of it like this: nobody enjoys being crammed onto a rush-hour bus, right? Plants feel the same way about being squished in the garden bed.
Why Plants Need Personal Space: The Science of Spacing (Clay Edition!)
Plants, just like us, need their own space to thrive. Giving them adequate room isn't just about making your garden look neat; it's crucial for their health, especially in our challenging clay soil conditions found from Greely to the rural south end. Here’s the dirt on why spacing matters:
- Sharing Isn't Always Caring (for Resources): Plants are competing underground for water and nutrients, and above ground for sunlight. When they're planted too close, the bigger, faster-growing ones hog all the good stuff, leaving their neighbors struggling. Think of it as survival of the fittest in your flowerbed!
- Air Circulation is Key: Imagine wearing a damp raincoat 24/7 – gross, right? Plants crowded together don't get good airflow between their leaves. In our humid Ottawa summers, this traps moisture, creating the perfect damp environment for fungal diseases like powdery mildew to take hold. Proper spacing allows air to circulate, drying leaves faster after rain or morning dew. For professional management of plant diseases, consider our specialized plant healthcare programs.
- Root Room Rumble (The Clay Challenge): This is where clay soil really ups the ante. As we know, clay soil drains slowly and can become compacted, making it tough for roots to push through and find oxygen. When plants are too close together in heavy clay:
- Water Wars: That slow drainage becomes even worse. Water pools between closely packed plants, increasing the risk of root rot because roots literally sit in waterlogged soil for too long. Giving them space allows the soil surface between plants to dry out a bit better.
- Compaction Calamity: Roots desperately trying to expand bump into each other much sooner in dense clay. This limits their ability to anchor the plant and access those nutrients clay holds onto so tightly. It stresses the plant, making it weaker overall. Tackling severe compaction might be part of a larger Ottawa property cleanup service.
Practical Tips for Perfect Plant Placement:
- Read the Tag! Seriously, those little plastic tags are your best friends. They tell you the plant's mature width and height. Space accordingly! That tiny seedling might look lonely now, but it’ll grow. Need help choosing the right plants? Our material selection advice can guide you.
- Plan for Maturity: Don't plant for the size they are now; plant for the size they *will be* in a year or two (or five!). It prevents headaches later. Overcrowding often requires tricky transplanting or even removal, sometimes needing more than just basic tools; perhaps even a thorough yard cleanup service in Winchester if things get out of hand. For help removing overgrown plants, consider our property clean up options.
- Think Roots: Some plants have wide-spreading root systems, others go deep. Consider this underground competition too. Good soil structure helps, which is also essential before thinking about projects like proper soil prep for sod installation.
- Visualize Airflow: Step back and imagine the plants fully grown. Will air be able to move easily between them?
Getting spacing right sets your garden up for success, reducing disease and competition, leading to healthier, happier plants. It might seem sparse at first, but patience pays off! If planning feels overwhelming, remember that help is available. Understanding plant needs and soil is core to what we do – you can Learn more about our approach and how we factor this into our professional landscaping services. Trust us, your plants will silently send you a thank you for giving them the elbow room they need!
The 'Elbow Room' Rule: Spacing Guidelines for Ottawa Clay Gardens
Okay, so we know *why* our plants need their personal space, especially in our sturdy Ottawa clay. Now, let's talk about *how much* space. Welcome to the "Elbow Room" Rule – giving your plants enough room to stretch out without bumping into their neighbors!
Decoding the Plant Tag (and Adding a Clay Caveat)
Those little tags that come with your plants? They're like the plant's dating profile – they tell you what it likes (sun, shade) and how big it expects to get (mature height and width). The "spacing" recommendation on the tag is usually based on that mature *width*. It assumes Goldilocks conditions – perfectly drained, lovely loam soil.
Here in Ottawa, particularly with heavy clay soil like you might find out near Metcalfe or Greely, we need to be a bit more generous. Remember how clay holds water and can be slow to drain? Giving plants *extra* space helps:
- Improve air circulation to dry leaves and fight fungal diseases.
- Reduce competition for water and nutrients in soil that’s harder for roots to explore.
- Make it easier for *you* to weed and maintain without playing plant Tetris. Regular maintenance can be handled by our City Garden Maintenance Service.
Clay Spacing Rule of Thumb:
Take the spacing recommendation on the plant tag and add about 15-25% more distance for perennials and shrubs growing in heavy clay soil.
It might look a little sparse at first, but trust us, they'll fill in, and they'll be healthier for it! Overcrowding often leads to stressed, unhappy plants, and fixing it later might mean needing a significant tidy-up, maybe even calling in a Metcalf yard cleanup service or an Ottawa garden clean up service if things get overgrown.
Putting it into Practice: Measuring Made Easy
Ready to lay out your garden bed? It's simpler than you think:
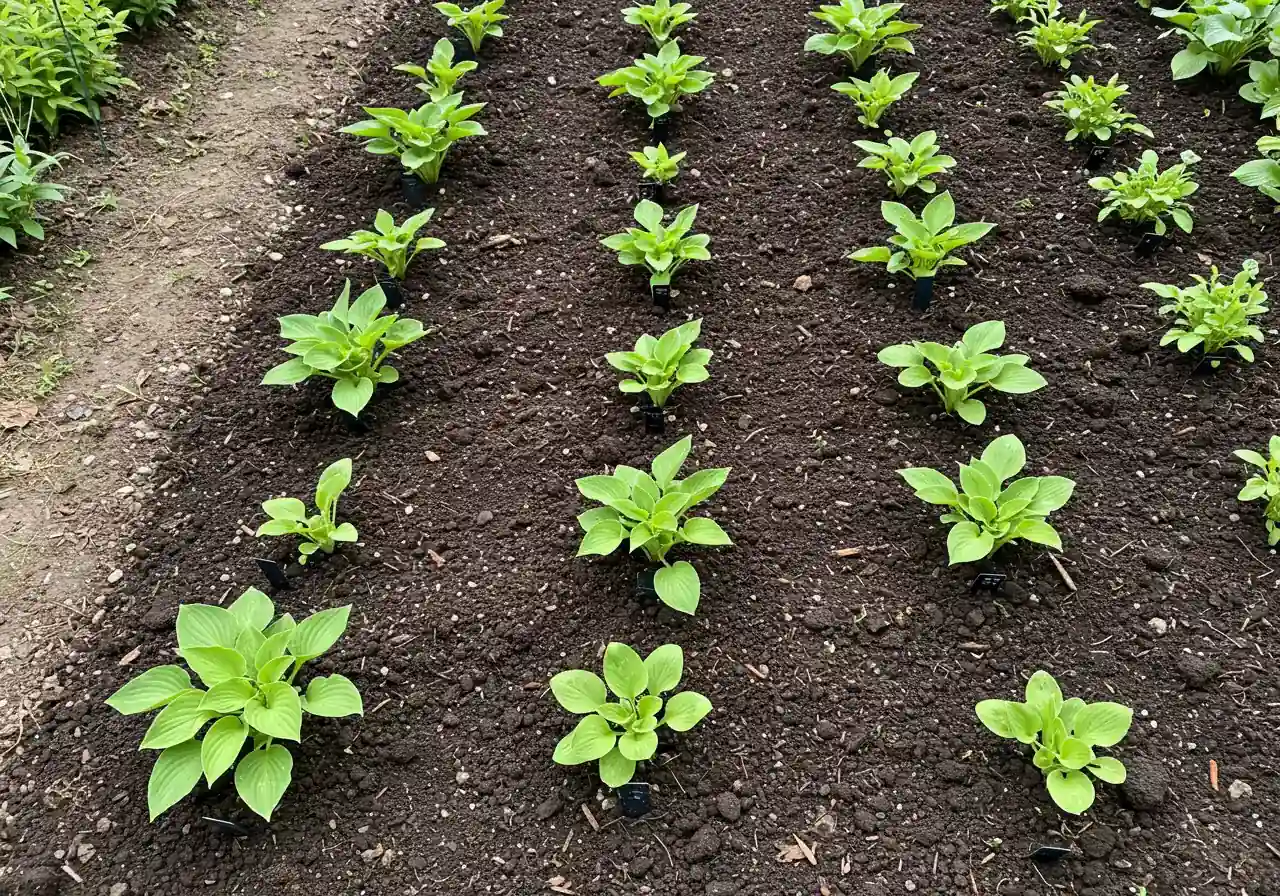
- Check the Tag: Note the mature *width* (e.g., a Hosta tag says 24 inches wide).
- Apply the Clay Rule: Add 15-25%. Let's add ~20% to 24 inches, which is about 5 inches. So, aim for roughly 29-30 inches of space.
- Measure Center-to-Center: This spacing is measured from the *center* of where one plant will be to the *center* of the next.
- Mark Your Spots: Use small stakes, landscape flags, handfuls of compost, or even empty nursery pots placed upside down to visualize the spacing *before* you dig. Adjust as needed until it looks right. This planning step is crucial whether you're planting a few perennials or mapping out a complete professional garden install. A clean slate helps, consider a Metcalf garden clean up service before major installs.
Quick Guide: Clay Spacing vs. Tag Spacing
| Plant Type | Tag Spacing (Ideal Soil) | Clay Spacing (Suggestion) | Why the Extra Room? |
|---|---|---|---|
| Medium Hosta | 18-24 inches | 24-30 inches | Better air flow, less root competition |
| Daylily | 18-24 inches | 24-30 inches | Easier division, less rot risk |
| Peony | 3 feet | 3.5 - 4 feet | Crucial air circulation for disease prevention |
| Small Shrub (e.g., Spirea) | 3-4 feet | 4-5 feet | Airflow, root space in dense soil |
| Annuals (e.g., Petunias) | 6-12 inches | 8-15 inches | Prevent overcrowding & disease mid-season |
Annuals Note: Even annuals benefit from a bit more breathing room in clay, as dampness can encourage rot.
Giving plants proper elbow room from the start saves you headaches later. It prevents the need for stressful transplanting and reduces the chances of your garden becoming an overgrown jungle requiring a major overhaul, potentially even a full city yard cleanup service. Careful spacing is also fundamental if you're preparing areas adjacent to new lawn projects; good drainage and definition between beds and grass are important for success, much like proper soil prep for sod installation. Sometimes, revitalizing a whole space, including correcting past spacing mistakes, is part of a larger Metcalf property cleanup service to get everything looking its best.
So, embrace the space! Your happy, healthy plants will thank you for it.
Laying the Groundwork: Preparing Clay Soil Beds for Happy Roots
Okay, let's roll up our sleeves and talk about turning that stubborn Ottawa clay into a welcoming home for happy plant roots. It might seem like trying to reason with a toddler sometimes – dense, unwilling to drain, and prone to hardening its stance – but with a bit of know-how, you can transform it!
Laying the Groundwork: Preparing Clay Soil Beds for Happy Roots
Let's face it, digging into untouched clay, especially in areas known for it like around Kars or Vernon, can feel less like gardening and more like archaeological excavation. But the secret isn't to fight the clay; it's to improve it. The magic ingredient? Organic matter!
Adding things like compost, well-rotted manure, shredded leaves (leaf mold), or peat moss works wonders. Think of it like adding tiny sponges and wedges between those flat clay particles. This creates air pockets, improves drainage (hallelujah!), makes the soil easier for roots to penetrate, and adds essential nutrients. Improving your soil is a key part of ongoing Garden Maintenance that pays off season after season.
Getting Down and Dirty: Amending Your Clay
Ready to give your soil a spa day? Here’s a step-by-step guide:
- Timing is Everything: Do not work clay soil when it's soaking wet! You'll just compact it further, creating brick-like clumps. Wait until it's moist but not sticky – it should crumble slightly when squeezed. In Ottawa, this often means waiting patiently after the spring melt or tackling it in the fall. Fall is actually ideal, as winter's freeze-thaw cycles help break up the soil further.
- Clear the Decks: Remove existing weeds, grass, or debris from the area you want to plant. Sometimes, if you're reclaiming a neglected spot, this initial clearing can be the biggest hurdle, perhaps even requiring a dedicated effort like a Marionville garden clean up service to get you started. For larger areas, consider a Marionville property cleanup service.
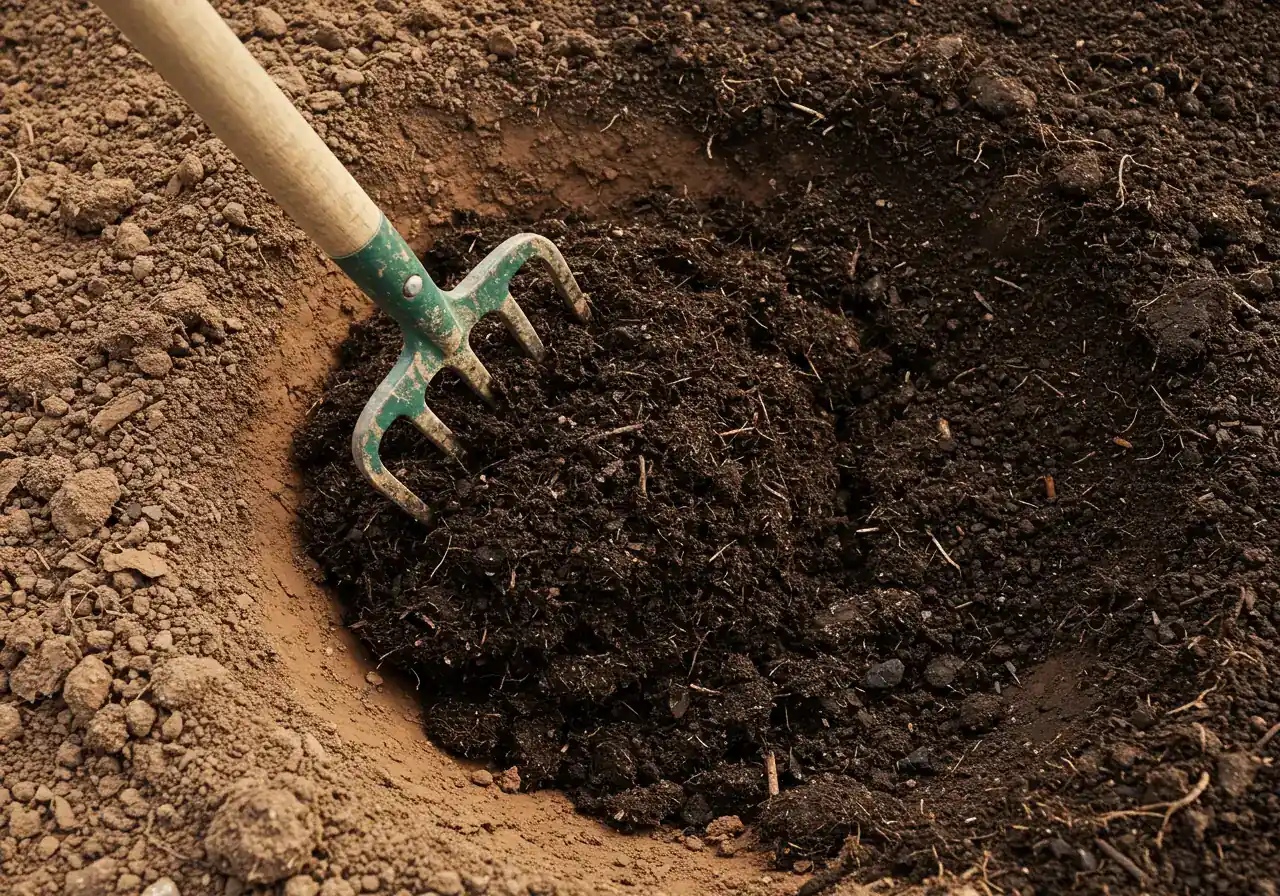
- Spread the Good Stuff: Lay down a generous layer (3-6 inches) of your chosen organic matter right on top of the existing soil. Don't be shy!
- Mix it In (Gently!): This is crucial. You want to incorporate the organic matter into the top 6-12 inches of clay. A garden fork is often better than a tiller, as aggressive tilling can destroy soil structure. Aim to lift and turn the soil, mixing the organic matter in, rather than pulverizing everything into dust. Think chunky integration, not smooth paste.
- Repeat Annually: Improving clay soil is a marathon, not a sprint. Adding a layer of compost each year will continue to enhance its structure and fertility.
Eco-Friendly Tip: Make your own compost from kitchen scraps and yard waste (check City of Ottawa resources for tips!), or create valuable leaf mold by simply letting shredded leaves decompose in a pile or bin for a year or two. It’s free soil gold!
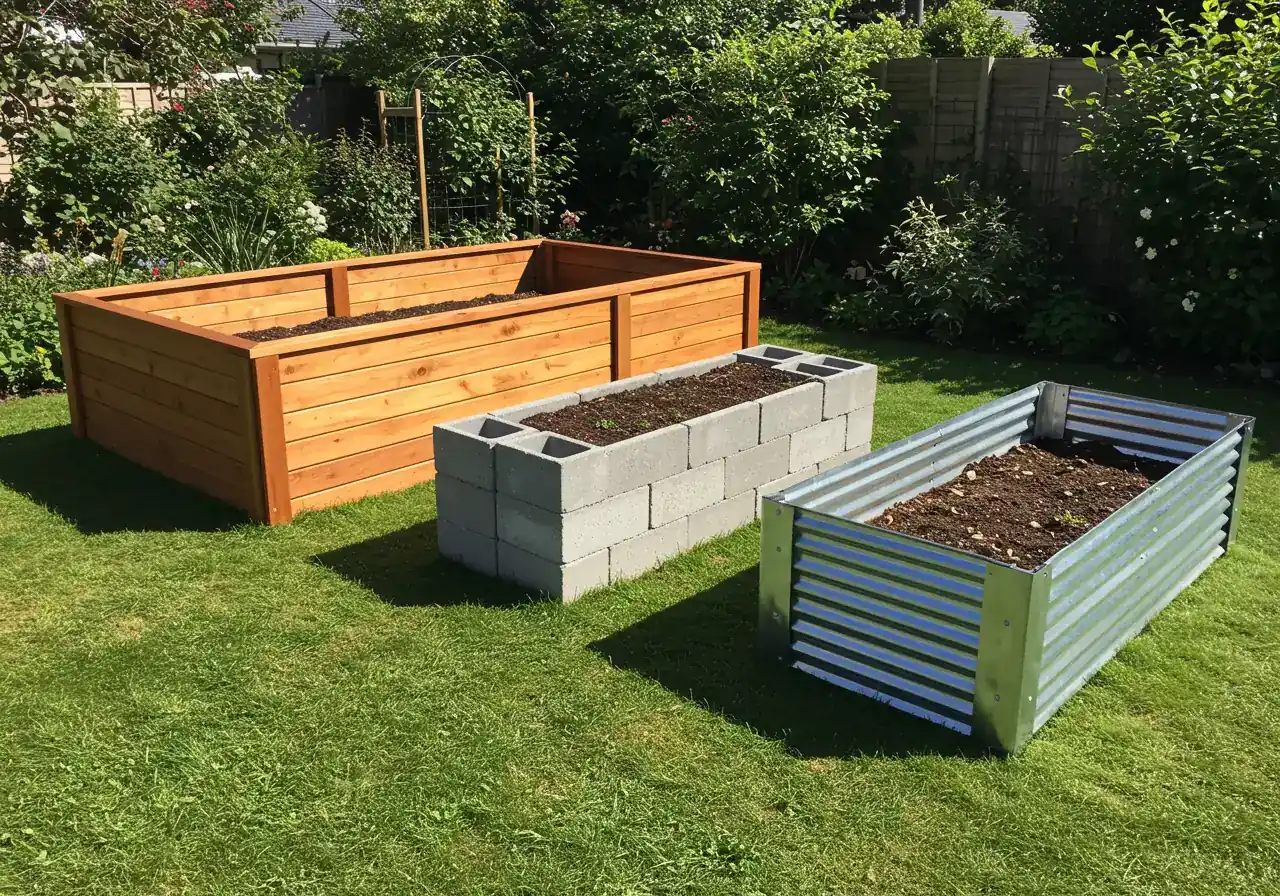
The Raised Bed Solution
Feeling overwhelmed by your clay? Or maybe your yard has serious drainage issues? Raised garden beds are a fantastic alternative. They allow you to essentially bypass the existing clay by creating a planting area filled with a perfect soil mix from the start. You get excellent drainage, prevent soil compaction (since you don't walk on the beds), and they can even save your back some strain! Plus, they offer a neat, defined look to your landscape. Building them can be a project, and getting the soil mix right is important. If preparing the site or filling beds seems like a lot, remember professional help is available. Sometimes site prep is part of a larger project, like a Metcalf property cleanup service getting the whole yard ready.
Whether amending existing soil or building raised beds, preparing the ground properly is the single most important step for successful gardening in clay. It takes effort, but your thriving plants will make it all worthwhile. If you're considering getting professional help for soil preparation or other landscaping tasks, you can easily request an estimate. We value your input on our process, so please feel free to use our Estimate Feedback form to share your thoughts. And rest assured, whenever you share information with us, we take protecting it seriously, as outlined in our Privacy Policy. Happy planting!
Clay Gardening Timeline: Key Steps
1. Assess Your Soil
Perform the ribbon test to confirm clay content. Observe drainage after rain.
2. Amend Generously
Work 3-6 inches of compost into the top 6-12 inches of soil (when moist, not wet).
3. Choose Clay-Tolerant Plants
Select species known to perform well in heavier soils. Check resources like Master Gardeners of Ottawa-Carleton.
4. Plan Spacing (Add Clay Tax!)
Read plant tags for mature width, then add 15-25% extra space.
5. Plant High & Wide
Dig hole wider than deep. Plant root ball level with or slightly above soil grade.
6. Mulch & Water Wisely
Apply 2-3" mulch (away from stem). Water deeply and infrequently once established.
Planting Power Moves: Techniques for Clay Soil Success
Okay, you've wrestled that clay soil into submission (or at least a grudging truce) by amending it like a champ. Now comes the moment of truth: actually getting your new plant babies settled into their prepared beds. Planting in clay requires a slightly different approach than in fluffier soils. Think of it as giving your plants the VIP treatment they deserve!
Planting Power Moves: Techniques for Clay Soil Success
Alright, gardener, grab your trowel (and maybe your fortitude) – let's make some planting magic happen in that Ottawa clay! Even amended clay needs careful handling during planting to give roots the best start. Here are the power moves:
- Dig Wide, Not Just Deep: This is key! Forget digging a deep, narrow hole like you're planting a fence post. In clay, that can create a "bathtub" that holds water right around the roots. Instead, dig a hole that's two to three times wider than the plant's root ball, but only as deep as the root ball itself. Think shallow basin, not deep pit. This encourages roots to spread outwards into the improved soil you prepared.
- Handle Roots with Care: Gently slide the plant out of its pot. If you see roots circling tightly around the bottom or sides (like spaghetti!), gently tease them apart with your fingers or make a few vertical cuts with a clean knife. Don't go wild, but breaking up that constricted pattern helps roots explore their new home, especially in denser soil often found in areas like Barrhaven or Nepean.
- Backfill Smartly: Place the plant in the center of your wide hole, making sure the top of its root ball is level with, or even slightly higher than, the surrounding soil surface. Never plant deeper in clay – it's a recipe for suffocation and rot. Mix the soil you removed with some extra compost or good planting mix, then use this amended soil to backfill around the root ball. Gently firm the soil with your hands – do not stomp it down! We want to avoid compaction. Proper planting now prevents headaches later, reducing the chance you'll need a major intervention like a Marionville Property Cleanup Service to remove struggling plants.
- Water Wisely: Give your newly planted friend a deep, slow drink right away. This settles the soil around the roots, eliminating air pockets. For clay soil, deep, infrequent watering is generally better than frequent shallow sprinkles once established. Let the water soak in slowly. Effective watering is a crucial part of keeping things healthy, just like regular Lawn Care complements a thriving garden. For local water conservation tips, see resources from the Rideau Valley Conservation Authority.
- Mulch is Your Friend: Apply a 2-3 inch layer of organic mulch (like shredded bark or wood chips) over the planting area, but keep it an inch or two away from the plant's stem or crown. Mulch helps retain moisture evenly, prevents the clay surface from baking into a crust, suppresses weeds, and keeps soil temperatures moderate. Plus, it keeps beds looking tidy, cutting down on future work that might otherwise require an Ottawa Yard Cleanup Service. See our Mulching and Edging service for professional application.
Remember, the main planting season in Ottawa usually kicks off after the Victoria Day long weekend, once the risk of frost has passed and the soil isn't overly saturated. Following these techniques sets your plants up for success and easier long-term care, the kind supported by a good City Garden Maintenance Service. If these steps feel daunting or you're planning a big project, getting professional help is always an option; you can share your thoughts on our quoting via our Estimate Feedback form. Happy planting!
Winchester Pro Tips: Quick Clay Spacing Cheat Sheet
Alright folks, let's get down to brass tacks – or maybe clay clods? You've amended your soil (go you!), you understand *why* plants need room, especially in our stubborn Ottawa clay, now let's make spacing simple. Consider this your go-to cheat sheet for giving your green buddies the personal space they crave right here in Winchester and surrounding areas like Greely or Nepean. No complex geometry required, promise!
The Golden Rule: Read the Tag, THEN Add the "Clay Tax"
Plant tags are your starting point. They usually list a spacing based on the plant's *mature width* in ideal soil. But we're dealing with clay, which holds moisture and makes roots work harder.
Pro Tip: For most perennials and shrubs in heavy clay, take the tag's recommended spacing and add 15-25%. Think of it as a "clay tax" – a little extra space that pays dividends in plant health!
Measuring 101: Center Stage
When we talk spacing, we mean center-to-center.
- How-To: If a plant needs 30 inches of space, measure 30 inches from the center of where the first plant will go to the center of where the next one will go. Use small stakes or even just eyeball it with a measuring tape before digging.
Quick Spacing Guide (Clay Adjusted):
Remember, these are general guidelines for typical Ottawa clay conditions. Always consider the specific variety's mature size!
- Small Perennials (e.g., Coral Bells, low Sedum):
- Tag Might Say: 10-12 inches
- Clay Spacing: Aim for 12-15 inches center-to-center.
- Why? Prevents dense mats that trap moisture.
- Medium Perennials (e.g., Hostas, Daylilies, Astilbe):
- Tag Might Say: 18-24 inches
- Clay Spacing: Aim for 24-30 inches center-to-center.
- Why? Allows crucial airflow between larger leaves, reduces root competition. A well-spaced bed avoids the kind of overcrowding that might necessitate a full Ottawa Yard Cleanup Service down the road.
- Large Perennials & Grasses (e.g., Peonies, larger Miscanthus):
- Tag Might Say: 30-36 inches
- Clay Spacing: Aim for 36-48 inches (3-4 feet) center-to-center.
- Why? Peonies especially need air circulation to avoid fungal issues. Big roots need room to roam!
- Small to Medium Shrubs (e.g., smaller Spirea, Potentilla):
- Tag Might Say: 3-4 feet
- Clay Spacing: Aim for 4-5 feet center-to-center.
- Why? Gives roots space to establish in dense soil and ensures sunlight reaches lower branches. You can see examples of well-planned shrub spacing in garden makeovers featured in our Transformations Gallery.
- Annuals (e.g., Petunias, Marigolds):
- Tag Might Say: 6-12 inches
- Clay Spacing: Aim for 8-15 inches center-to-center.
- Why? Even these temporary residents get stressed by soggy feet and poor airflow in clay. A bit more room keeps them blooming happily. Neglected, overcrowded annual beds can sometimes require a focused cleanup, like what a City Garden Clean Up Service provides.
Don't Forget Height & Shape!
Spacing isn't just about width. Consider the plant's mature *height* and *shape*. Place taller plants towards the back or center of a bed, shorter ones at the front. Mix textures and forms, but ensure everyone gets their share of sunlight and doesn't completely overshadow their neighbors. Proper planning prevents future jungle scenarios – the kind that might lead you to call for a Marionville Yard Cleanup Service if a neighboring property becomes overgrown!
Patience, Grasshopper!
Your newly planted, perfectly spaced garden might look a bit... sparse. Like a teenager's first apartment – lots of potential, slightly empty. Resist the urge to cram more plants in! Give them a season or two to grow and fill out. You'll be rewarded with healthier, more robust plants that need less fussing in the long run. Remember that plant growth and specific needs can vary; our advice is general, and you should always consider your unique site conditions (check our general site guidelines under Terms and Conditions for more on site specifics).
Stick to these tips, and your Winchester garden will be the envy of the neighborhood – spacious, healthy, and thriving despite the clay!
FAQs: Your Ottawa Clay Spacing Questions Answered
Got questions about gardening in Ottawa's unique soil? You're not alone! Wrestling with clay and figuring out plant spacing can feel like trying to solve a Rubik's cube blindfolded. Let's tackle some common queries with practical answers.
Ah, the age-old sand question! It *sounds* logical, but trust us, don't do it! Adding sand to heavy clay, like what we often see around Osgoode or Metcalfe, doesn't magically create lovely loam. Instead, it often creates something closer to concrete or brick. Yikes! The fine clay particles just fill the tiny spaces between the larger sand particles, potentially making drainage even worse. The real MVP for improving clay is organic matter – think compost, well-rotted manure, or shredded leaves. This actually helps separate the clay particles, improving structure and drainage over time. Stick with the good stuff!
We totally get it! It's super tempting when those little plants look small and lonely in their new home, maybe in a fresh bed out in Barrhaven. But hold your horses (or, uh, trowels)! Remember, you spaced them for their mature size, giving them that crucial extra elbow room needed in our Ottawa clay. They need that space for good air circulation (which helps prevent fungal diseases) and for their roots to spread out without a fight. Give them a season or two – they'll likely fill in beautifully. Overcrowding now often leads to stressed, unhappy plants later, and could even mean needing a tricky City Garden Clean Up Service to sort out the tangle down the road. Patience pays off!
Great question, because watering clay is a bit different! Since clay soil holds onto water like a champion sponge, you generally need to water less often but more deeply than in sandy soil, especially once plants are established. Instead of frequent light sprinkles, give your plants a good, long soak, allowing the water to penetrate deep down. Then, let the top inch or two of soil actually dry out before watering again. The classic "finger test" works well – stick your finger into the soil near the plant; if it feels damp an inch down, hold off. Overwatering is a common problem in clay and can lead to root rot. Proper mulching also makes a big difference in maintaining consistent moisture; check out how effective it can be on our Mulching and Edging information page.
While adding compost *only* to the planting hole is certainly better than doing nothing, it can sometimes create what gardeners call the "clay pot effect." Imagine the plant's roots loving life in that small pocket of amended soil, but then hitting the dense, unimproved clay wall and being reluctant to venture further. For the healthiest, happiest plants with strong, spreading root systems, amending the entire bed area before planting is the gold standard. This encourages roots to explore, improves overall drainage, and makes the whole area more welcoming. It's more work upfront, but pays off long-term, especially if you're dealing with challenging soil across a larger space, the kind sometimes tackled by a full City Property Cleanup Service before landscaping can even begin. If you have specific questions about your soil or need help with preparation, feel free to Contact Us.
Conclusion: Give Your Plants Room to Thrive in Your Ottawa Garden
Alright, let's wrap this up! Gardening in Ottawa's infamous clay soil definitely keeps things interesting, doesn't it? We hope these tips help you master the art of plant spacing, turning that potential frustration into a flourishing success story. Remember, giving your plants that extra "elbow room" isn't just about looks; it's crucial for beating the downsides of clay. Better air circulation fends off diseases, while giving roots space to grow means they can access water and nutrients without a wrestling match. The payoff? Healthier, happier, thriving plants that make your Ottawa garden a joy.
It takes a little patience to see spaced-out plantings fill in, but the results are worth it. If amending soil, planning layouts, or just getting your hands dirty feels overwhelming, don't sweat it! Our professional landscaping and gardening team is ready to help you create the perfect environment for your plants. We proudly serve neighbourhoods across the region, including:
- Manotick
- Osgoode
- Greely
- Nepean
- Metcalfe
- Richmond
- Winchester
- Kars
- Vernon
- Kenmore
- Russell
- Embrun
- Barrhaven
Find detailed service information for your area, such as our Winchester Yard Cleanup Service or Metcalf Yard Cleanup Service on our website.
Ready to Give Your Plants the Space to Succeed?
Let Clean Yards help you create a beautiful, healthy garden that thrives in Ottawa's conditions. Contact us for a consultation!
Make My Garden Thrive!