
Expert Embrun Spring Plant Care Plan for Clay Soil Success
Quick Guide to Clay Soil Success:
- Clay soil drains slowly but holds nutrients well.
- Avoid working clay soil when it’s very wet or bone dry.
- Improve structure and drainage by adding ample organic matter (compost) annually.
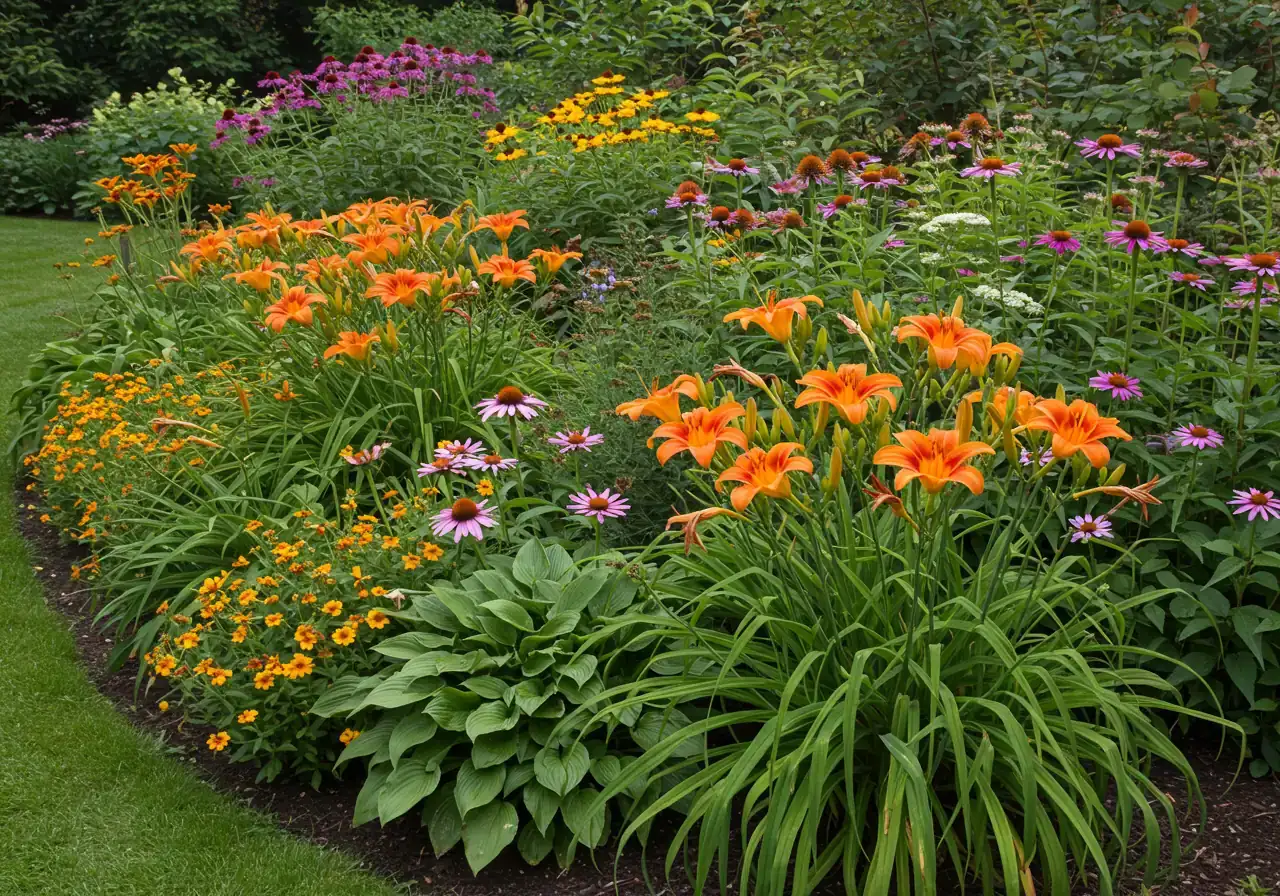
- Choose plants known to tolerate clay conditions (e.g., Daylilies, Coneflowers, Dogwood).
- When planting, dig holes wider than deep and plant slightly high.
- Use organic mulch to conserve moisture and improve soil over time.
Ready to tackle your spring garden but need a hand with that Embrun clay? Request a free quote today!
Introduction: Spring Has Sprung in Embrun! (But Oh, That Clay…)
Hey Embrun! Can you feel it? That unmistakable buzz in the air means spring has *finally* sprung across the Ottawa Valley! The snow piles have vanished (mostly!), the birds are back singing their tunes, and if you’re anything like us, you’re itching to swap snow shovels for garden spades. Thoughts of colourful flower beds, lush green lawns, and maybe even a little vegetable patch are starting to bloom in our minds. It’s the perfect time to start planning your landscaping projects with expert soil preparation techniques!
But hold on a second… before we get *too* carried away, let’s have a friendly chat about the ground beneath our feet. Here in Embrun, and our neighbours in places like Russell know it too, we’ve got a special kind of earth: good old clay soil. Especially after the typically wet springs we get around Ottawa, our soil can feel less like fluffy garden loam and more like, well, a sticky lump that could double as pottery material. Trying to dig when it’s wet? Prepare for heavy clumps! Trying when it’s bone dry? You might need a pickaxe!
It’s a bit of a *sticky situation*, right? Don’t worry, you’re not alone, and it doesn’t mean your gardening dreams are dashed. While clay soil definitely needs a little extra love and attention, it’s far from impossible to work with. In fact, with the right approach, you can turn that challenging clay into a fantastic foundation for a beautiful garden. We’re here to share some practical, actionable tips to help you understand and improve your soil, making gardening in our lovely corner of the world a whole lot easier. Let’s dig in!
For more general spring gardening advice from the City of Ottawa, check out their gardening and plants resources.
Understanding Embrun’s Clay: More Than Just Mud Pies
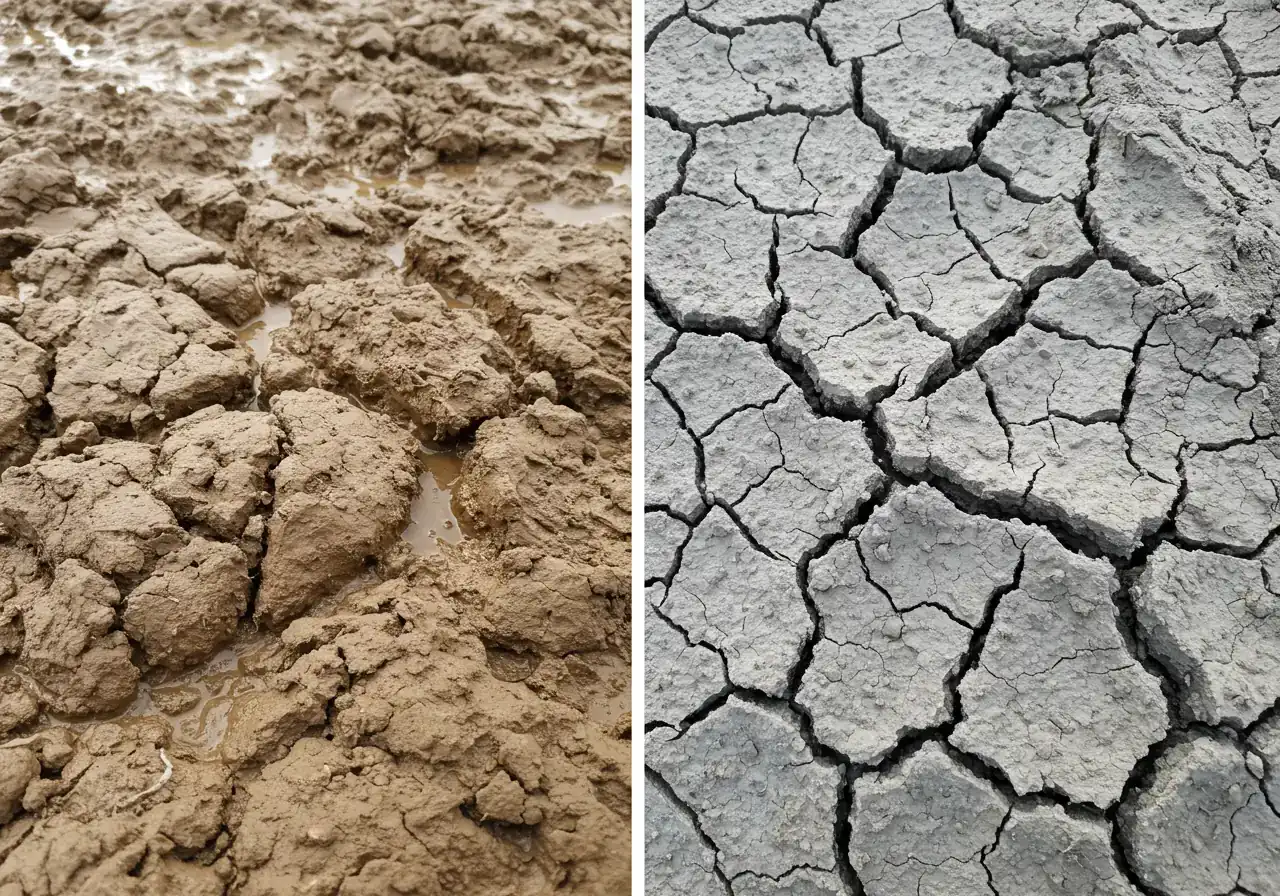
Alright, let’s talk dirt! Specifically, the clay soil that’s pretty common around Embrun, Metcalfe, and many parts of the Ottawa region. If you’ve ever tried digging after a spring rain, you know exactly what we mean – it’s less like soil and more like trying to sculpt with stubborn, sticky plasticine. Seriously, you could probably make actual mud pies that hold their shape! Then, come a dry spell, it can bake harder than a forgotten brick, making digging feel like you’re attempting archaeological excavation work!
What gives clay this, shall we say, *firm* personality? It all comes down to the incredibly *tiny* size of its particles. Imagine sand grains are like beach balls, silt particles are like marbles, and clay particles are like grains of flour. Because clay particles are so fine and flat, they pack together *really* tightly, leaving very little space between them.
This tight packing creates a unique set of pros and cons for gardeners and landscapers:
Clay Soil: The Good Stuff (Pros)
- Nutrient Powerhouse: Those tiny particles are champs at holding onto essential nutrients that plants need to thrive. Think of your clay soil like a well-stocked pantry for your garden beds – it doesn’t let the goodies wash away easily.
- Water Retention Champion: Clay holds moisture extremely well. While sometimes *too* well (more on that below), it means plants are less likely to dry out during hot, rain-free summer stretches.
Clay Soil: The Challenges (Cons)
- Drainage Dramas: That tight structure means water drains *very slowly*. After heavy rain or snowmelt – a classic Ottawa spring scenario – you might get standing water and soggy roots, which most plants hate. Dealing with these conditions makes following expert spring garden care tips for areas like Osgoode even more important.
- Compaction Calamity: Clay compacts easily, especially when wet. Walking on it or using heavy equipment can squeeze out the air pockets roots need to breathe and grow, making the soil dense and hard. This compaction can be a real headache for establishing healthy lawns and gardens. Check out our Google My Business page for client testimonials on tackling tough yard issues.
- Slowpoke Warming: Dense, wet clay takes much longer to warm up in the spring compared to lighter, sandier soils. This often means a later start for planting seeds and tender annuals here in Embrun. You might find yourself enjoying crisp evenings longer, perhaps gathered around a Metcalfe fire pit design perfect for Ottawa fall evenings, while waiting for the soil to become workable.
Understanding these basic characteristics is the vital first step to success. While clay presents unique landscaping challenges, especially with spring planting and avoiding compaction, it’s definitely not a gardening deal-breaker. Knowing your soil helps you plan smarter, whether you’re dreaming of vibrant flower beds, sturdy foundation plantings, or exploring creative techniques like those mentioned in these Manotick fall espalier pruning and garden art tips. Tackling soil improvement during drier times, such as incorporating advice from guides like these Greely garden revival expert fall cleanup tips, can set you up for better results next season. And hey, if wrestling with heavy clay feels like too much hard work, remember that professional landscaping and garden maintenance services are available to help you create the yard you envision.
Waking Up Your Garden Beds: The Spring Clay Soil Prep Playbook
Okay, fellow Ottawa Valley gardeners, let’s roll up our sleeves and talk about transforming that stubborn spring clay into garden gold! Waking up your garden beds after a long winter, especially with clay soil, requires a bit of strategy, but trust me, the payoff is huge. Here’s your step-by-step playbook:
Step 1: Patience is a Virtue (Especially with Clay!)
First things first: *resist the urge to dig too early!* This is the golden rule of clay soil prep. Working clay when it’s too wet is like playing with cement – you’ll squeeze out all the air, create rock-hard clumps, and seriously damage the soil structure (hello, compaction!). Working it when it’s bone dry? Good luck getting your shovel in without a fight!
The Squeeze Test: Grab a handful of soil and squeeze it gently.
- If water drips out or it forms a sticky, muddy ball: Too wet! Let it dry out more.
- If it crumbles easily when poked: Perfect! It’s time to work.
- If it’s rock hard and dusty: Too dry! Wait for some rain or water lightly a day or two *before* you plan to work it.
Timing is everything here. Rushing it will only create more work later.
Step 2: Tidy Up Time
Before you start improving the soil, clear the decks. Remove any leftover leaves, dead plant stalks, winter mulch that’s matted down, and *definitely* any early-bird weeds trying to get a head start. Think of it as giving your garden bed a fresh slate. If winter left behind more debris than you bargained for across your property, getting professional help might be the way to go. Residents needing assistance can look into options like a Russell property cleanup service or a similar Metcalfe property cleanup service to handle the big stuff, leaving you free to focus on the fun part – the gardening! Even specific tasks like getting the beds themselves ready fall under specialized help, like a dedicated Metcalfe garden clean-up service.
Step 3: The Magic Ingredient – Organic Matter!
This is the *absolute key* to improving clay soil. Organic matter (think compost, well-rotted manure, leaf mold, or shredded leaves) works wonders. When you add it to clay:
- It helps separate those tiny clay particles, creating larger spaces (improving drainage and aeration).
- It encourages beneficial soil life like earthworms, which further improve structure.
- It adds essential nutrients.
- It acts like a sponge, holding moisture but also allowing excess water to drain.
Be generous! Spread a good 2-4 inches (5-10 cm) of your chosen organic amendment over the entire bed surface. For the eco-conscious gardener, locally sourced compost or your own homemade compost are fantastic choices. You can also get a soil test done (available through various labs or garden centres) to see if your soil needs specific nutrient adjustments beyond general organic matter. Consider our material selection guide for help choosing compost.
Step 4: To Till or Not to Till?
Here’s where opinions sometimes differ:
- Tilling/Digging In: Gently incorporating the organic matter into the top 6-8 inches (15-20 cm) of soil can give you faster initial results. Use a garden fork or spade, lifting and turning the soil *only when it’s at the right moisture level*. Avoid over-tilling, which can destroy that precious soil structure you’re trying to build. A light incorporation is usually enough.
- No-Till/Top-Dressing: Simply layering the organic matter on top and letting worms and weather work it in gradually is another great option. This method is excellent for preserving existing soil structure and promoting healthy soil biology. It takes a bit longer to see deep improvements, but it’s less disruptive. Many gardeners find this approach better for long-term soil health.
For heavy clay, a *minimal* initial incorporation followed by annual top-dressing often works well.
Step 5: Consider Going Up! (Raised Beds)
If wrestling with heavy clay feels overwhelming, or you want perfect soil conditions right away (especially for root vegetables!), consider building raised beds. You can fill them with a high-quality soil mix specifically designed for gardening, bypassing your native clay issues altogether. It’s an investment upfront but can save a lot of heavy digging. You can see some amazing impressive garden transformations that often involve strategic use of raised beds or significantly improved soil.
Preparing clay soil takes effort, especially that first time, but by adding organic matter consistently each year, you’ll see massive improvements in workability and plant health. Your back (and your plants) will thank you! And remember, if the task feels too big, professional landscaping and garden maintenance services are always an option to help get your Ottawa garden beds ready for a spectacular growing season. You can also review our terms and conditions for service details.
Plant Power! Choosing Champions for Embrun’s Clay
Alright, you’ve wrestled with the soil prep (or maybe you smartly called in reinforcements!), and now comes the fun part: choosing the plants! But wait, you might be thinking, “Will anything *actually* grow in this Embrun clay, besides maybe super-weeds?” Absolutely! While our local soil can be a bit demanding, plenty of fantastic plants are tough enough to handle it – some even prefer it. You just need to pick the right *clay warriors*.
Choosing plants suited to our conditions here in Embrun, and neighbouring areas like Osgoode or Kars, is crucial for landscaping success. Forget those delicate divas that faint at the sight of heavy soil; we’re looking for sturdy champions that will thrive and bring beauty to your yard through services like garden installation.
Here are some reliable performers known to tolerate clay soil and our Ottawa climate:
Perennial Powerhouses (Come back year after year!)
These guys form the backbone of many garden beds.
- Daylilies (Hemerocallis): Talk about tough! They come in countless colours, tolerate full sun to part shade, and aren’t fussy about soil, including clay. They handle occasional wet feet but prefer well-drained spots once established.
- Hostas: The champions of shade! While they love moisture, good drainage is still key to avoid crown rot in heavy clay. Amend the planting hole well. They offer fantastic foliage variety.
- Coneflowers (Echinacea): Native superstar! These beauties love sun, are drought-tolerant once established, and their strong roots penetrate clay well. Bonus: pollinators love them!
- Black-Eyed Susans (Rudbeckia hirta): Another cheerful native favourite! Full sun lovers that bring bright yellow colour and tolerate clay like champs.
- Switchgrass (Panicum virgatum): A tall, elegant native grass that adds movement and winter interest. Very adaptable to different soil types, including clay, and handles both wet and dry periods. Prefers sun.
Sturdy Shrubs (Structure and seasonal interest)
Shrubs add structure and long-term presence to your landscape.
- Potentilla: These workhorses bloom for ages, come in various colours (yellow, white, pink, orange), and thrive in full sun. They are very tolerant of poor soils, including clay.
- Dogwood (Cornus species): Many dogwoods, especially native ones like Red Osier Dogwood (Cornus sericea), tolerate moist clay soils well. They offer multi-season interest with flowers, berries, and colourful winter stems. Sun to part shade.
- Serviceberry (Amelanchier species): A fantastic native small tree or large shrub. Offers spring flowers, summer berries (edible!), and great fall colour. Tolerant of clay and adaptable to sun or part shade.
- Ninebark (Physocarpus opulifolius): Native and tough as nails! Known for its interesting foliage (green, gold, or burgundy) and peeling bark. Adapts well to clay soils and various conditions. Full sun brings out the best leaf colour.
Tough Trees (Long-term investment)
Planting the right tree is a long-term win.
- Maples (Acer species): Many maples, including native Red Maple (Acer rubrum) and Silver Maple (Acer saccharinum), tolerate heavier, moist soils. Be mindful of mature size! Freeman Maple (Acer x freemanii) is a popular hybrid known for adaptability.
- Oak (Quercus species): Native oaks like Bur Oak (Quercus macrocarpa) develop deep root systems that can handle clay. They are majestic, long-lived trees needing full sun and space.
- Eastern White Cedar (Thuja occidentalis): Native and often used for hedging. Tolerates moist clay soils better than many other evergreens. Prefers full sun to light shade.
Quick Tips for Planting in Clay:
- Amend the Planting Hole: Mix compost generously into the soil you remove from the hole before backfilling.
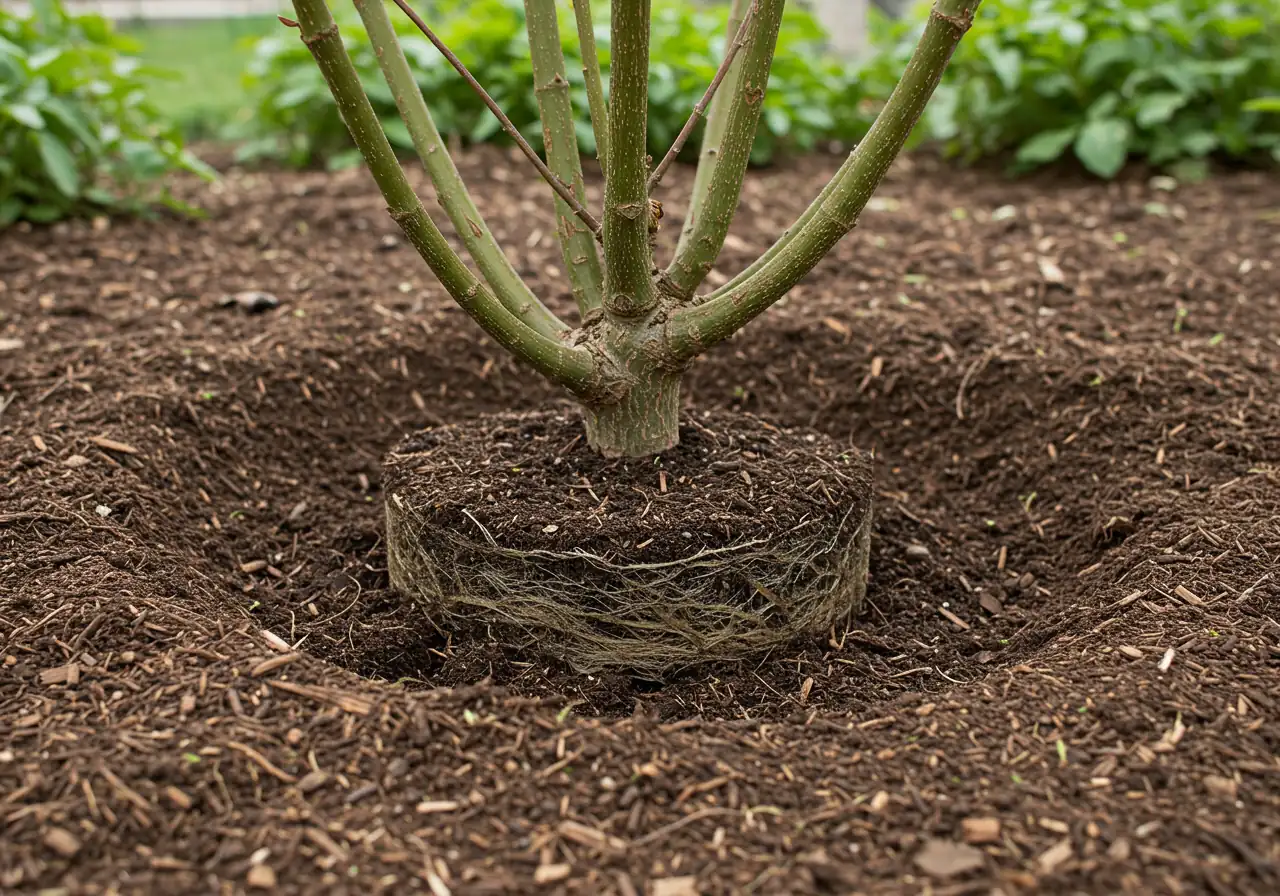
- Plant Slightly High: Position the top of the root ball slightly above the surrounding soil level to improve drainage around the base.
- Mulch Magic: Apply a layer of organic mulch (wood chips, shredded bark) around plants to conserve moisture, suppress weeds, and gradually improve the soil as it breaks down. Avoid piling mulch against stems. Learn more about mulching and edging best practices.
Choosing the right plants makes all the difference. Imagine transforming your challenging clay patch into a vibrant garden – you can see some truly impressive garden transformations in our online portfolio for inspiration! If you’re planning a larger planting project or feel overwhelmed by the choices, getting professional advice is a great idea. You can easily request feedback on your ideas or get a quote; check out our simple estimate feedback form. Don’t let clay soil deter you from creating the beautiful Embrun landscape you envision. And if clearing the area before you start planting seems like a major task, remember that help is available through services like general property clean-up or a comprehensive Ottawa yard cleanup service to get your space ready. Browse through our project gallery to see what’s possible!
Planting Day Pointers: Avoiding the ‘Clay Coffin’
Okay, planting day has arrived! Your garden beds are prepped, your chosen clay-tolerant champions are waiting patiently in their pots, and you’re armed with a shovel. Exciting stuff! But hold your horses (or maybe your earthworms) for just a sec. Planting in our lovely Ottawa clay, whether you’re in Embrun or over in Barrhaven, requires a slightly different technique to avoid accidentally creating what we affectionately call the ‘clay coffin’. Sounds grim, right? It basically means digging a hole in dense clay, popping the plant in, and creating a virtually waterproof pot where water collects, drowning the poor plant’s roots. Not quite the welcoming home you intended!
Here’s how to give your new plants the best start and keep them out of that watery grave:
- Dig Wide, Not Just Deep: This is rule number one! Resist the urge to just dig a hole the exact size of the plant pot. Instead, dig the hole *two to three times wider* than the root ball, but only *as deep* as the root ball itself. Think saucer shape, not a deep bucket. Why? Because dense clay surrounds the hole. A wider hole allows the roots to spread more easily into loosened, amended soil *laterally*, rather than hitting a hard clay wall right away. It also helps prevent that bathtub effect by giving water more area to slowly seep away.
- Amend the Backfill: Don’t just plop the pure clay you dug out back into the hole! Mix the soil you removed roughly 50/50 with good quality compost or other organic matter. This improves drainage and aeration right around the establishing roots. *Crucially*, use the *native soil* in the mix. You want the roots to eventually adapt to your garden’s conditions, not stay confined to a pocket of super-rich potting mix. Our team knows the importance of this balance.
- Plant Slightly High: Gently place your plant in the hole so the top of its root ball sits about an inch (2.5 cm) *above* the surrounding soil level. This little elevation helps prevent water from pooling directly around the base of the stem or crown, which can lead to rot, especially in slow-draining clay. Backfill with your amended soil mixture, gently firming it around the roots to remove large air pockets (but don’t stomp it down!).
- Water Wisely (The Slow Soak): Clay soil absorbs water slowly, but holds onto it tightly. Immediately after planting, water deeply and *slowly*. Let the water soak in gradually to ensure it reaches the entire root zone. A trickle from the hose for a longer period is better than a fast blast. For the first few weeks, check the soil moisture before watering again – stick your finger a couple of inches down. If it feels damp, wait! Overwatering is a major risk in clay. Aim for less frequent, deep soakings rather than little sprinkles. Consistent care makes all the difference, and if life gets busy, looking into professional garden maintenance can keep your investments thriving.
- Mulch is Your Friend: Apply a 2-3 inch (5-7 cm) layer of organic mulch, like shredded bark, wood chips, or composted leaves, around the base of the plant (but not touching the stem!). Mulch is fantastic for clay soils: it conserves moisture, prevents the soil surface from baking and cracking, suppresses weeds, and slowly breaks down, adding more organic matter over time. Seeing beautifully mulched gardens in our project gallery shows the polished look it provides.
Planting in clay takes a bit more thought, but getting it right avoids major headaches later. If you’re tackling a large planting project and the thought of digging all those wide holes makes your back ache preemptively, remember help is available. Getting professionals involved can save time and ensure it’s done right; you can easily book a free estimate to discuss your project. And hey, if the planting process leaves your yard looking like a construction zone, remember services like a Marionville yard cleanup service or a general Ottawa property cleanup service can handle the tidying up! Happy planting!
Your Embrun Early Spring Garden Checklist (March-May)
Okay Embrun (and hello neighbours in Russell!), the snow is retreating, and it’s time to gently nudge our gardens awake. Working with clay soil in early spring requires patience, but here’s a handy timeline checklist to guide you through March, April, and May without making your soil grumpy.
March: Observe & Plan
Stay off soggy soil! Lightly remove large debris. Assess winter damage. Sharpen tools. Plan new additions and consider material selection for compost/mulch.
Early April: Gentle Cleanup
As soil dries slightly, cut back dead perennials (leave some stalks for bees!). Rake leaves carefully. Consider professional help like property cleanup services in Marionville if needed. Prune summer-flowering shrubs.
Late April: Weed Watch & Edging
Start early weeding while roots are small. Define garden bed edges carefully if soil isn’t too wet. Keep an eye on emerging growth.
May: Get Planting & Mulching!
Top-dress beds with compost. Apply organic mulch once soil warms. Prime time for planting clay-tolerant species. Stay vigilant with weeding. Manage services via our customer portal (check our privacy policy).
Following these steps helps ensure a healthy start for your Embrun garden. Remember, consistent care throughout the season is key. If keeping up with tasks feels daunting, consider ongoing professional garden maintenance to keep things looking great without the stress. Happy Spring Gardening!
For watershed-specific information, the Rideau Valley Conservation Authority offers valuable resources for local property owners.
Highlight Box: Clay Soil Quick Tips!
Wrangling clay soil in Ottawa can feel like preparing for a mud-wrestling match, especially after a wet spring! Don’t throw in the trowel just yet. Here are a few *golden rules* to turn that stubborn clay into a happy home for your plants:
- Feed the Beast (with Compost!): Clay loves organic matter more than squirrels love unguarded bird feeders. Make adding compost or well-rotted manure an annual ritual. Spread it generously over your beds each year. This is *the* number one way to improve drainage and soil structure over time. If the initial bed prep feels like too much digging, remember help is available for tasks like a thorough Ottawa garden clean up service to get you started.
- Timing is Everything (No Mudslinging!): Remember the *squeeze test*? If you grab a handful of soil and it drips water or forms a sticky ribbon, step away! Working wet clay compacts it into bricks. Wait until it crumbles slightly. Trying to dig when it’s concrete-dry isn’t much fun either. Patience, grasshopper!
- Plant High and Wide: Avoid the dreaded ‘clay coffin’! Dig planting holes 2-3 times *wider* than the root ball, but only as deep. Mix compost into the soil you removed before backfilling. *Crucially*, plant the root ball about an inch *higher* than the surrounding soil level to help water drain away from the plant’s crown.
- Mulch Like You Mean It: A 2-3 inch layer of organic mulch (like shredded bark or wood chips) is your secret weapon. It keeps moisture in during dry spells, prevents the clay from baking into a crust, suppresses weeds, and slowly breaks down to add *more* organic matter. Proper mulching and edging not only helps your plants but also gives your garden beds a fantastic, finished look.
- When In Doubt, Ask or Get Help! Tackling heavy clay, especially on a larger property like those sometimes found out near Marionville, can be daunting. If clearing winter debris or managing tough soil feels overwhelming, professional help like a Marionville property cleanup service can handle the heavy lifting. Still have questions about your specific clay challenges in Ottawa or Barrhaven? Don’t hesitate to contact us – we’re happy to chat!
Clay Soil Management Techniques
Improving Clay with Organic Matter
The single most effective way to improve heavy clay soil is by regularly adding organic matter. Compost, well-rotted manure, leaf mold, and shredded leaves work wonders.
- Improves drainage by creating larger soil aggregates.
- Increases aeration, allowing roots to breathe.
- Provides slow-release nutrients.
- Encourages beneficial soil organisms like earthworms.
Aim to add a layer of 1-2 inches annually, either lightly incorporated or used as a top dressing. This long-term approach gradually transforms clay into richer, more workable loam. Essential for good soil preparation.
Smart Watering for Clay Soils
Clay holds water tightly, meaning you need to adjust your watering habits compared to sandier soils.
- Water less frequently, but more deeply.
- Use slow watering methods (soaker hoses, drip irrigation, or a slow trickle from a hose) to allow water to penetrate without running off.
- Always check soil moisture before watering – stick your finger 2-3 inches deep. If it feels damp, wait!
- Water early in the morning to minimize evaporation and allow foliage to dry, reducing disease risk.
Consistent, deep watering encourages plants to develop deeper, more resilient root systems, crucial for thriving in clay. Proper lawn care also involves smart watering.
Preventing Soil Compaction
Clay soil is highly susceptible to compaction, especially when wet. Compacted soil restricts root growth, water infiltration, and air circulation.
- Avoid walking on garden beds, especially when the soil is wet. Use designated paths or stepping stones.
- Minimize the use of heavy equipment like wheelbarrows on wet soil.
- Incorporate organic matter regularly; it helps build a more resilient soil structure.
- Consider core aeration for lawn areas suffering from compaction.
Maintaining good soil structure is vital for plant health in clay environments. Avoiding compaction is a key part of successful garden maintenance.
Effectiveness of Soil Amendments Over Time (Illustrative)
Chart illustrates potential improvement in soil workability/drainage with consistent annual addition of organic matter.
FAQ: Your Embrun & Ottawa Clay Questions Answered
Got questions about gardening in our special Embrun and Ottawa area clay? You’re not alone! It can be a bit tricky, but totally manageable. Here are some common questions we hear:
It sure sounds like it! Clay soil drains very slowly, which is why you might see puddles lingering after snowmelt or heavy rain in Ottawa. Improving drainage by amending the soil with compost over time can help. For ongoing issues, consider aeration as part of a regular lawn care routine. Proper site preparation is also vital if you’re thinking about putting in a new lawn; it’s a key step for professional sod installation.
Oh goodness, *please don’t* just dump sand onto your clay! It sounds logical, but mixing sand directly into heavy clay often creates a substance closer to concrete – yikes! The absolute best way to improve clay structure is by consistently adding organic matter like compost, aged manure, or leaf mould. Think fluffy, not gritty!
Absolutely! It takes a bit more effort, though. Thoroughly amending the soil with lots of compost is key to loosen it up and improve drainage. Many gardeners also find success with raised beds, filling them with a good quality garden mix. Getting your plot ready might involve significant tidying, similar to what a Marionville garden clean up service handles before planting begins.
Soil texture can definitely vary, even within the Ottawa region, and areas near rivers might have denser deposits. The cracking happens when heavy clay dries out completely. The best defence is adding plenty of organic matter annually to improve structure and water retention. Applying a good layer of organic mulch also works wonders to keep moisture in and prevent that hard crust from forming. Fall cleanup, like that offered by a Metcalf yard cleanup service, is a great time to add amendments too.
Clay holds water well, so you usually need to water *less often* than in sandy soil, but more *deeply* when you do. Check the soil moisture by sticking your finger down a couple of inches. If it feels damp, hold off! Aim for a good, slow soaking that allows water to penetrate, rather than frequent light sprinklings. This encourages deeper root growth. Proper watering is crucial after services like garden installation.
Quick Reference: Clay Tolerant Plants
| Plant Type | Example | Light Needs | Notes |
|---|---|---|---|
| Perennial | Daylily (Hemerocallis) | Full Sun / Part Shade | Very adaptable, many colours. |
| Perennial | Coneflower (Echinacea) | Full Sun | Native, drought tolerant, attracts pollinators. |
| Perennial | Hosta | Part Shade / Shade | Needs good drainage despite loving moisture. Great foliage. |
| Shrub | Red Osier Dogwood (Cornus sericea) | Sun / Part Shade | Native, tolerates moist soil, colourful winter stems. |
| Shrub | Ninebark (Physocarpus) | Full Sun | Native, very tough, interesting foliage/bark. |
| Tree | Bur Oak (Quercus macrocarpa) | Full Sun | Native, deep roots handle clay, needs space. |
| Tree | Eastern White Cedar (Thuja occidentalis) | Full Sun / Light Shade | Native, good for hedging, tolerates moist clay. |
This is just a small sample! Many other plants can succeed with proper soil preparation and care. Consider visiting our about us page to learn more about our expertise.
Conclusion: Cultivating Your Clay Soil Dream Garden in Embrun
So there you have it! Gardening in Embrun’s signature clay soil might seem like a sticky challenge at first, but as we’ve explored, it’s far from impossible. Think of it less as a problem, and more as soil with *character*! Remember the golden rules: be patient and avoid working wet soil, become best friends with compost and organic matter, plant smart by digging wide and planting slightly high, and choose those tough, clay-tolerant plant champions that thrive in our Ottawa climate.
With a little know-how and consistent effort – mostly involving that magic ingredient, organic matter! – you absolutely *can* transform your patch of stubborn earth into the lush, beautiful garden you’ve been dreaming of. It’s all about understanding your soil and giving it what it needs.
Ready to turn that clay into garden gold but feeling a bit overwhelmed by the digging, planning, or maintenance? We get it! If you’re in Embrun, Russell, Metcalfe, or the surrounding Ottawa areas and need a hand with garden bed preparation, planting, property cleanup, or ongoing garden maintenance, we’re here to help.
- Ready for professional help? Contact us today for a free estimate on your landscaping or garden maintenance project! You can even use our online booking form.
- Want more plant ideas? Ask us about our free downloadable guide: “Clay Busters: Top Plants for Thriving Ottawa Gardens” when you reach out! We want to say thank you for considering us.
Don’t let the clay hold you back. Happy gardening, Embrun!
