
Kars Rain Garden Maintenance: Spring Prep for Peak Flow
Is your Kars rain garden ready to handle the spring melt and showers? Ensure it's performing at its best with proper spring maintenance. Need help getting started? Request a free estimate today!
Spring Rain Garden Prep Essentials:
- Inspect: Check structure, drainage points, soil, plants, and mulch.
- Clean: Remove winter debris, especially from inlets/outlets.
- Soil & Mulch: Address compaction, add compost, top up mulch to 2-3 inches.
- Plants: Prune dead growth, replace dead plants, weed diligently.
Introduction: Wake Up Your Kars Rain Garden! Spring Prep for a Thirsty Season
Hey there, Kars neighbours! Phew, we made it through another *character-building* Canadian winter! Now that the snowdrifts are retreating and the ground is (mostly!) thawed, it's prime time to give your rain garden a little spring wake-up call. Not sure what a rain garden is? It's simply a shallow, specially designed garden bed – a bit of smart landscaping – that acts like a natural sponge for rainwater runoff from your roof, driveway, or lawn. Think of it as your yard’s personal water filter, helping keep our local Ottawa-area rivers clean, like the nearby Rideau! You can find useful resources about watershed health from the Rideau Valley Conservation Authority (RVCA).
But after the freeze-thaw cycles and winter debris, your garden might be a bit groggy. Spring maintenance is crucial, especially here near the Rideau River, to make sure it's ready to handle spring showers and the thirsty summer season ahead. Compacted soil, sneaky weeds, or winter-weary plants can prevent it from soaking up water effectively. This guide will walk you through the essential gardening steps to get your Kars rain garden refreshed, functional, and ready to flourish. Let's wake it up!
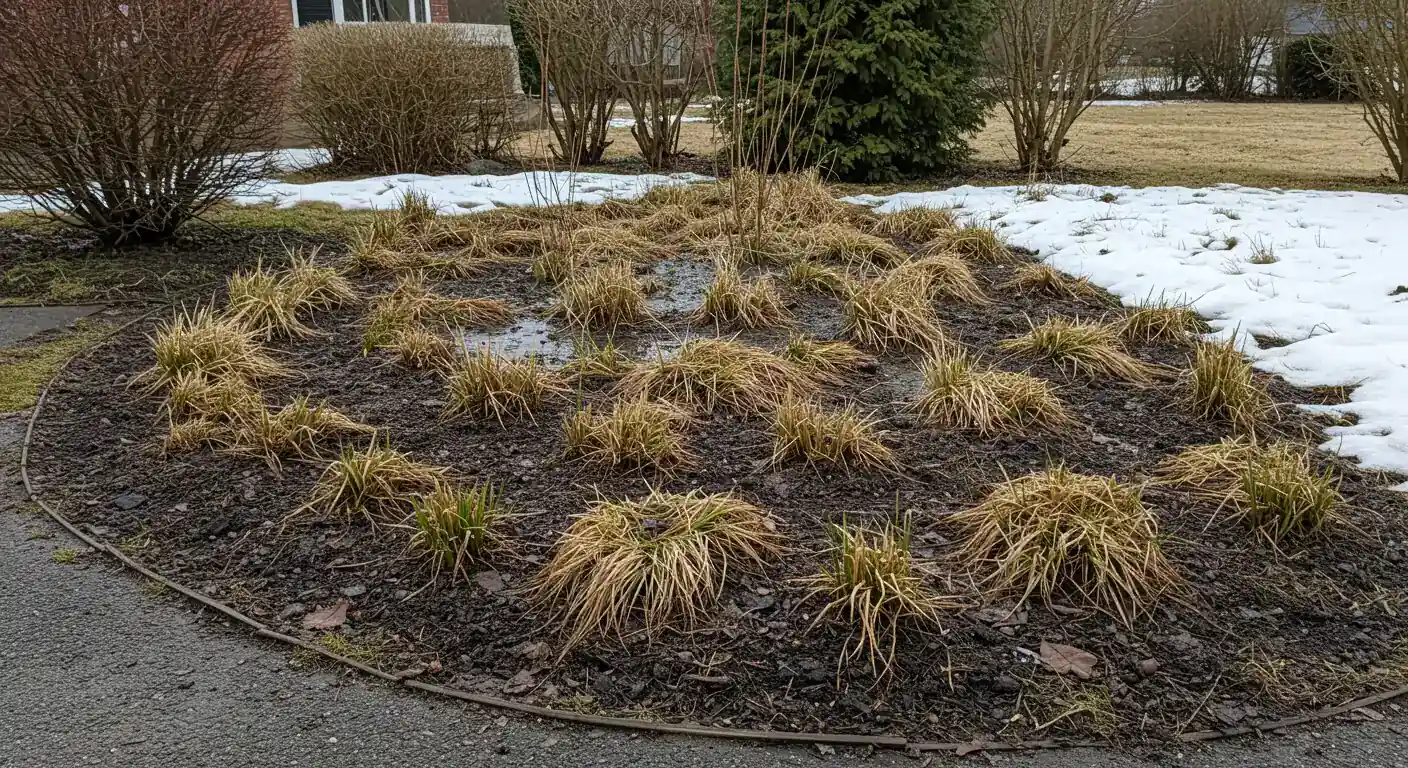
Step 1: The Post-Winter Walkthrough - Inspecting Your Rain Garden Like a Pro
Okay, grab your favourite spring jacket (you know, the one that’s optimistic about the temperature) and let’s get down to business! Winter can be tough on our Ottawa landscapes, and your rain garden is no exception. Think of this first step as a gentle check-up after a long hibernation. We're not doing heavy lifting yet, just playing detective.
Alright, time to put on your inspector hat! After a winter of snow, ice, and those lovely freeze-thaw cycles, your rain garden needs a good look-over to make sure it’s ready for spring showers. It's like checking your car's tires before a road trip – essential for performance! Here’s what to look for:
- Check the Edges and Shape: Walk around the perimeter. Did winter heave any edging stones out of place? Is the berm (the raised edge that holds water) still intact, or has it eroded? Keeping the shape right is key, much like planning the layout in Osgoode garden design creating your dream space ensures everything works together. Note any areas that look slumped or washed out.
- Inspect the Inlet and Outlet: Where does water enter your rain garden (the inlet)? Is it blocked by leaves, compacted snow melt gunk, or maybe leftover decorations from who-knows-when? Make sure it's clear so water can actually get in. Check the overflow outlet too (if you have one) – it should also be free of debris. Blockages can cause runoff to go where you don't want it.
- Look at the Soil Level: Has soil washed away, leaving plant roots exposed? Or, conversely, has sediment washed in, potentially smothering smaller plants or making the garden too shallow? Ottawa's freeze-thaw cycles can really mess with soil structure, causing compaction or erosion. Gently poke the soil in a few places – is it rock hard or reasonably loose (once thawed, of course!)? Addressing soil issues is a core part of good upkeep, similar to the tasks covered in Osgoode garden maintenance expert spring care tips.
- Assess Plant Health: Don't panic if things look a bit brown and sad – many perennials die back in winter. Look for broken stems from heavy snow load. Check the base of plants for signs of rot (mushy bits) or animal damage (chewed stems). If your garden is near a road, especially in areas like Nepean or Barrhaven, look for white crusty residue on plants near the edge – a sign of potential salt damage from road spray. We'll tackle pruning and replacing plants later, but note which ones look iffy.
- Mulch Check & Debris Scan: Is the mulch layer thin or washed away in spots? Mulch helps prevent erosion and weeds. Also, scan for winter debris – fallen branches, windblown trash, excessive leaf litter. A clean start prevents problems, much like the importance of a thorough fall cleanup detailed in these Greely garden revival expert fall cleanup tips. Sometimes a simple tidy-up makes a world of difference. Remember, the initial structure you planned, perhaps inspired by ideas for Manotick garden design creating your dream backyard, relies on these basic elements being in good shape.
Jot down anything that looks amiss. This initial inspection gives you a clear "to-do" list for the next steps. If you notice significant erosion, structural damage, or just feel overwhelmed, remember that professional help is available. You can always explore Clean Yards Landscaping Services for tasks like major repairs or soil amendment. For now, though, just focus on taking good notes!
Step 2: Spring Cleaning - Clearing the Way for Peak Flow
Okay, inspection complete! You’ve got your notes from Step 1, and now it’s time to roll up those sleeves for the actual spring cleaning. Think of this as decluttering your garden’s workspace so it can do its job properly – managing that spring runoff like a champ! Letting debris pile up is like trying to drain a bathtub with the plug half in; things just won't flow smoothly.
Now for the satisfying part: clearing out the winter gunk! This isn't just about making things look pretty (though that's a bonus); it’s crucial for ensuring water can actually soak into the soil where your thirsty plants need it, especially before those heavy Ottawa spring showers hit.
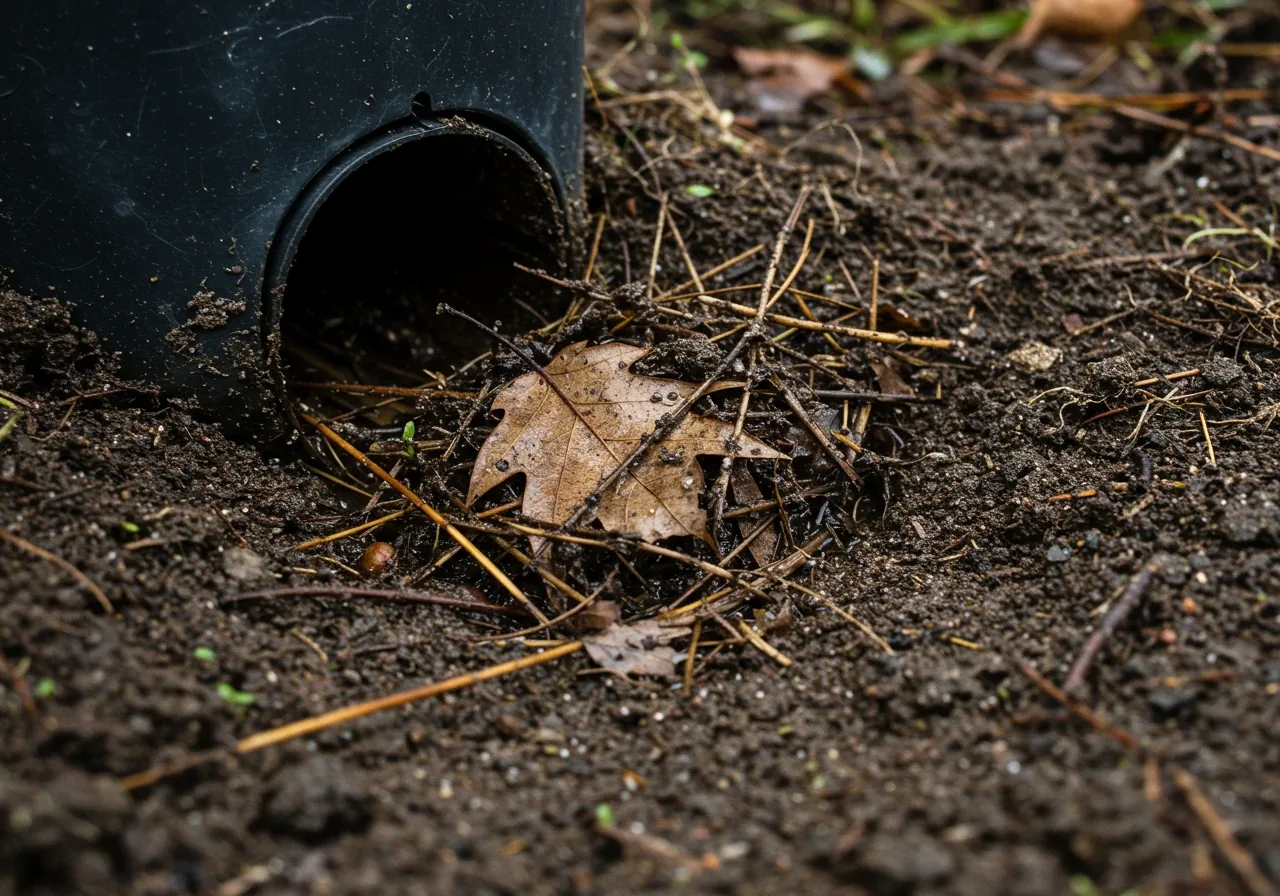
- Remove the Big Stuff: Start with the obvious offenders. Gently rake or pick out fallen branches, twigs, windblown trash, or any other large debris that winter kindly left behind. Be careful not to compact the soil by walking all over it, especially if it's still damp.
- Tackle the Leaf Litter (Carefully!): Winter leaves can form a thick, soggy mat that prevents water from infiltrating the soil and can smother emerging plants. Gently rake or lift away excessive leaf buildup. However, a thin layer (an inch or less) of shredded leaves can act as beneficial organic matter, feeding the soil. The key is excessive or matted leaves – those need to go. Think compost, not suffocating blanket!
- Clear the Entry and Exit Points: Pay special attention to the inlet (where water flows in) and the overflow outlet (if you have one). These must be clear. Use a trowel or your hands (gloves recommended!) to scoop out accumulated leaves, sediment, grit, or any other blockages. This is probably the most critical cleaning step to ensure your rain garden functions correctly and doesn't just become a mini-pond with water backing up towards your house.
- Address Sediment Build-up: Did your inspection reveal areas where sand, silt, or fine gravel washed in? This sediment can clog the soil pores, reducing water absorption and potentially harming plants. Carefully scrape or scoop away excessive sediment layers. If you find significant buildup, especially if it's mixed with road salt residue common in areas like Nepean or near busy roads, it might require more extensive work. Dealing with heavy sediment might be a job for the pros, similar to the tasks handled by a Metcalf property cleanup service.
- A Quick Weed Patrol: While you're cleaning, gently pull any obvious weeds that managed to survive winter or are just starting to sprout. Getting them now saves you bigger headaches later!
Eco-Friendly Disposal: What to do with all that yard waste? Most leaves, small twigs, and dead plant matter can go straight into your compost bin or the City of Ottawa's Green Bin program. You can check collection schedules and accepted items on the City of Ottawa's website. Avoid plastic bags! For larger branches, check the City's collection guidelines.
This cleaning process sets the stage for a healthy, functional rain garden. If the cleanup feels like too much, or you uncovered more significant issues during your inspection, remember that help is available. Professional teams offer comprehensive Clean Yards Landscaping Services across the region. Whether you need a thorough Richmond garden clean up service or assistance further out, like a Marionville garden clean up service, getting expert help can ensure your garden is truly ready. Even for general tidying across the capital, options like an Ottawa property cleanup service exist.
With the debris gone and pathways clear, your rain garden is breathing easier and ready for the next step!
Step 3: Soil and Mulch Management - Feeding the Foundation
Alright, we've cleared the clutter (Step 2), now let's talk about the real foundation of your rain garden: the soil and its trusty sidekick, mulch! Think of the soil as the garden's stomach – it needs to digest that rainwater effectively so your plants can drink it up. Mulch is like its protective layer, keeping things comfortable and preventing problems. Getting this combo right is crucial for a happy, functional rain garden that doesn’t just look good but works hard too.
Getting Hands-On with Your Soil:
After a long winter nap, especially with Ottawa's famous freeze-thaw cycles playing games, soil can get seriously squished down, or compacted. This is a common headache in areas with heavier clay soil, like around Osgoode or Greely. Compacted soil is bad news because it acts like a barrier, preventing rainwater from soaking in. Instead of infiltrating, water might just sit on top or run off elsewhere – kind of defeating the whole point of your lovely rain garden!
- How to Check for Compaction: Once the ground has thawed and isn't a muddy mess, try the simple screwdriver test. Grab a long screwdriver and try pushing it into the soil in a few different spots within the rain garden. Does it slide in relatively easily for several inches? Great! Does it feel like you're trying to poke through concrete? Uh oh, you likely have compaction. Another clue is seeing water pool on the surface for more than a day after a decent rain.
- Loosening Things Up (Gently!): If you do find compacted spots, don't panic and definitely don't bring out the heavy rototiller! That can actually damage the soil structure needed for a rain garden. Instead, gently loosen just the top few inches using a garden fork. Wiggle it back and forth carefully, trying not to churn everything up or disturb plant roots too much.
- The Magic of Compost: The best long-term fix for compaction and overall soil health is adding organic matter. Spread a layer of good quality compost, about 1-2 inches thick, over the soil surface. You don't even need to dig it in aggressively! Earthworms and tiny soil critters (nature's little helpers!) will gradually work it down into the soil for you, improving drainage and adding vital nutrients. Applying compost is often a key part of a thorough Ottawa garden clean up service, getting the beds fed and ready after tidying up. If you discover significant soil issues requiring more serious amendment, it might even be part of larger property transformations to overhaul the garden bed. Find out more about our approach to soil preparation.
Mulch Matters More Than You Think:
Mulch isn't just a pretty top dressing; it’s a multi-tasking superstar in the garden! A good layer of organic mulch helps to:
- Keep weeds down (Hooray! Less pulling for you!)
- Hold moisture in the soil, meaning happier plants during dry spells.
- Prevent the soil surface from washing away during heavy Ottawa spring rains (erosion control!).
- Keep soil temperatures more stable – cooler in summer, warmer in winter.
- Giving Your Mulch a Check-Up: Take a walk around the rain garden. How does the mulch look? Are there thin or completely bare patches where you can see soil? Has the old mulch broken down into fine bits? Ideally, you want a layer of organic mulch about 2-3 inches deep. Too much deeper can actually prevent water from reaching the soil easily or might smother the crowns (base) of your plants. Too thin, and you lose the moisture-retaining and weed-blocking benefits.
- Time for a Top-Up?: If your mulch layer is looking thin or decomposed, it's time to refresh it. Add new mulch to bring the depth back up to that sweet spot of 2-3 inches. Gently spread it around your plants, making sure to pull it back just a little bit (an inch or so) from the actual stems or base of each plant. This prevents moisture buildup right against the plant, which can lead to rot. Keeping mulch fresh is a standard part of good garden maintenance, ensuring beds stay healthy and look tidy. Remember, garden bed needs are different from your grass; proper mulching is key here, unlike the focus of specific lawn care practices. Learn more about our mulching and edging services.
Choosing Your Mulch Wisely:
What kind of mulch is best? For rain gardens, you want something that ideally stays put, lets water filter through easily, and breaks down over time to feed the soil. Here are a couple of good options suitable for our area:
Shredded Bark (Hardwood or Pine)
- Pros: Mats together well so it doesn't easily wash away, allows good water penetration, decomposes relatively slowly. Looks tidy. Good for general purpose use and slope stability.
- Cons: Can sometimes float away in very heavy, fast-moving water, especially when freshly applied to steep slopes.
- Best For: Most typical rain gardens, including those with gentle slopes. A very popular and effective choice.
Compost (Used as Mulch)
- Pros: Directly adds nutrients and improves soil structure right at the surface as it breaks down. Great for giving plants an extra boost, especially in newer gardens.
- Cons: Breaks down faster than bark, so you'll need to reapply it more often (maybe even mid-season). Can sometimes contain viable weed seeds depending on the source.
- Best For: Gardens where you really want to focus on improving the soil quality quickly, or for top-dressing around heavy-feeding plants.
Taking these steps to manage your soil and mulch sets your rain garden up for success. Healthy soil and a proper mulch layer mean less work for you and a garden that's ready to effectively soak up that spring rain. If dealing with bags of compost or spreading mulch over a large area feels like a chore you'd rather skip, remember that getting help is always an option. Professional crews offering an Ottawa property cleanup service can often handle soil amendment and mulching efficiently, leaving your garden foundation strong and ready to thrive!
Step 4: Plant Power - Pruning, Planting, and Perfecting Your Green Infrastructure
Okay, let's get to the fun part – the plants! After all the cleaning and soil TLC, it's time to give your green team the attention they deserve. This step is all about getting your plant power back up to full strength through smart pruning, maybe some new additions, and generally perfecting your living, breathing green infrastructure.
Your rain garden plants are the workhorses, soaking up water and adding beauty. Spring is when we give them a little spa treatment – a trim, a check-up, and maybe even introduce some new friends!
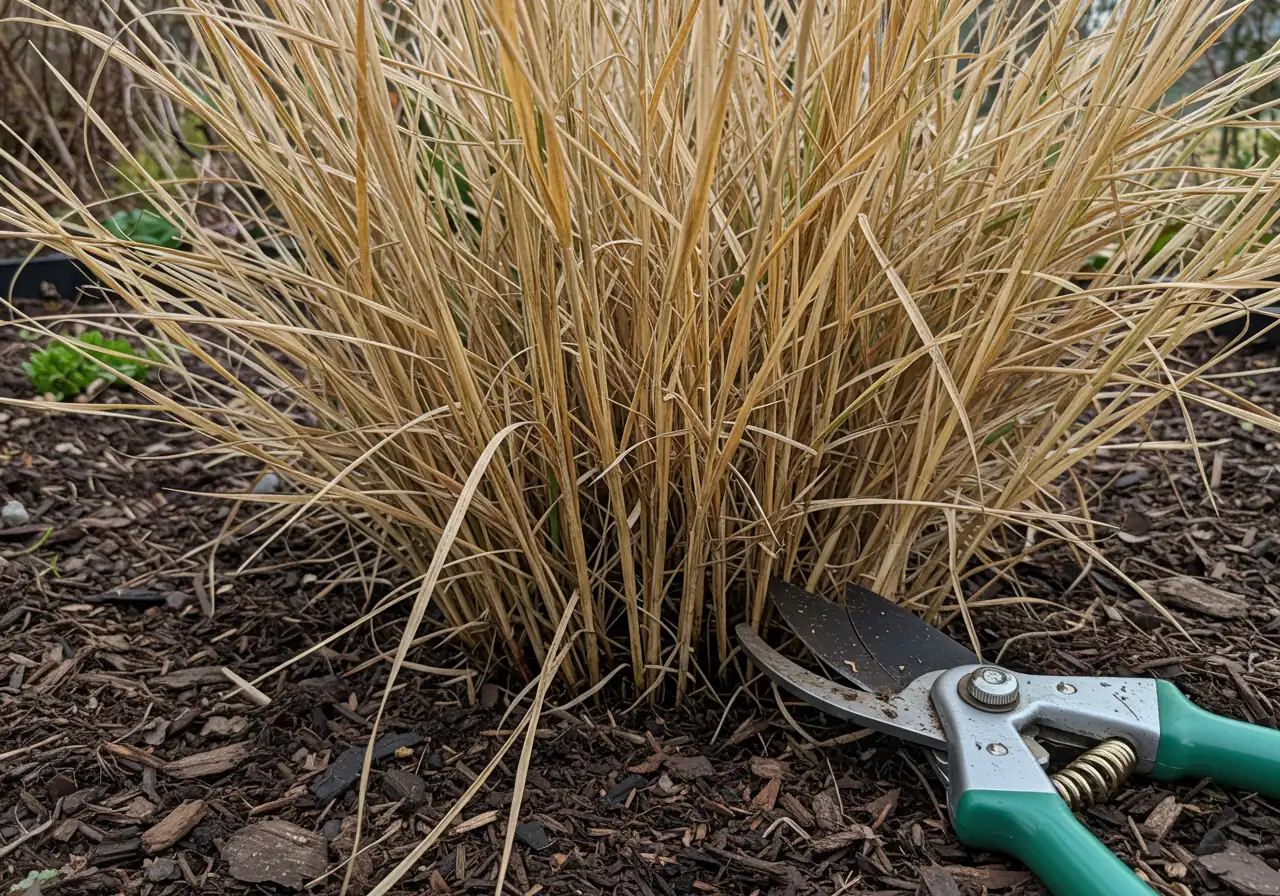
Become a Plant Hairdresser (aka Pruning Time!)
Many rain garden stars are perennials or ornamental grasses that die back over winter, leaving behind brown stems and leaves. While leaving some standing through winter provides habitat for beneficial insects, spring is the time for a tidy-up.
- Perennials (Flowers & Foliage Plants): For plants like Coneflowers (Echinacea), Black-Eyed Susans (Rudbeckia), Joe Pye Weed (Eutrochium), or Blue Flag Iris, cut back the dead stems and foliage from last year. Use clean, sharp pruners or garden shears. Cut them down close to the base, usually leaving just an inch or two, but be careful not to snip any new green shoots emerging from the crown (the base of the plant). Think of it as clearing the stage for this year's performance!
- Ornamental Grasses: Grasses like Switchgrass (Panicum) or Little Bluestem (Schizachyrium) also need a spring haircut. Cut the old, brown blades back to about 4-6 inches above the ground *before* the new green growth starts pushing up strongly. Cutting them too late can damage the new shoots. Don't shear them right to the ground; leaving a bit helps protect the crown.
- Shrubs: If you have shrubs like Red Osier Dogwood (Cornus sericea) or Elderberry (Sambucus canadensis), spring is a good time for light pruning. Remove any dead, damaged, or crossing branches. For dogwoods known for colourful winter stems, you might remove about a third of the oldest stems right down to the base to encourage vibrant new growth. Avoid heavy shearing unless you're aiming for a very formal look (which is less common in rain gardens).
Plant Health Check-Up
As you prune, keep an eye out for plant health issues you noted in Step 1.
- Mushy Crowns or Roots? Gently poke around the base. If it feels soft and rotten, the plant might not have survived the winter wetness or cold. Poor drainage can be a killer.
- No Signs of Life? Give plants time! Some, especially those native to our Ottawa Zone 5a/b climate, are fashionably late to the spring party. But if by mid-to-late May, you see zero new growth while neighbours are flourishing, it might be time to consider a replacement.
- Salt Damage: Plants near roadsides, common in areas like Barrhaven or Nepean, might show white crusty residue or burnt-looking edges from winter salt spray. Some are more tolerant than others.
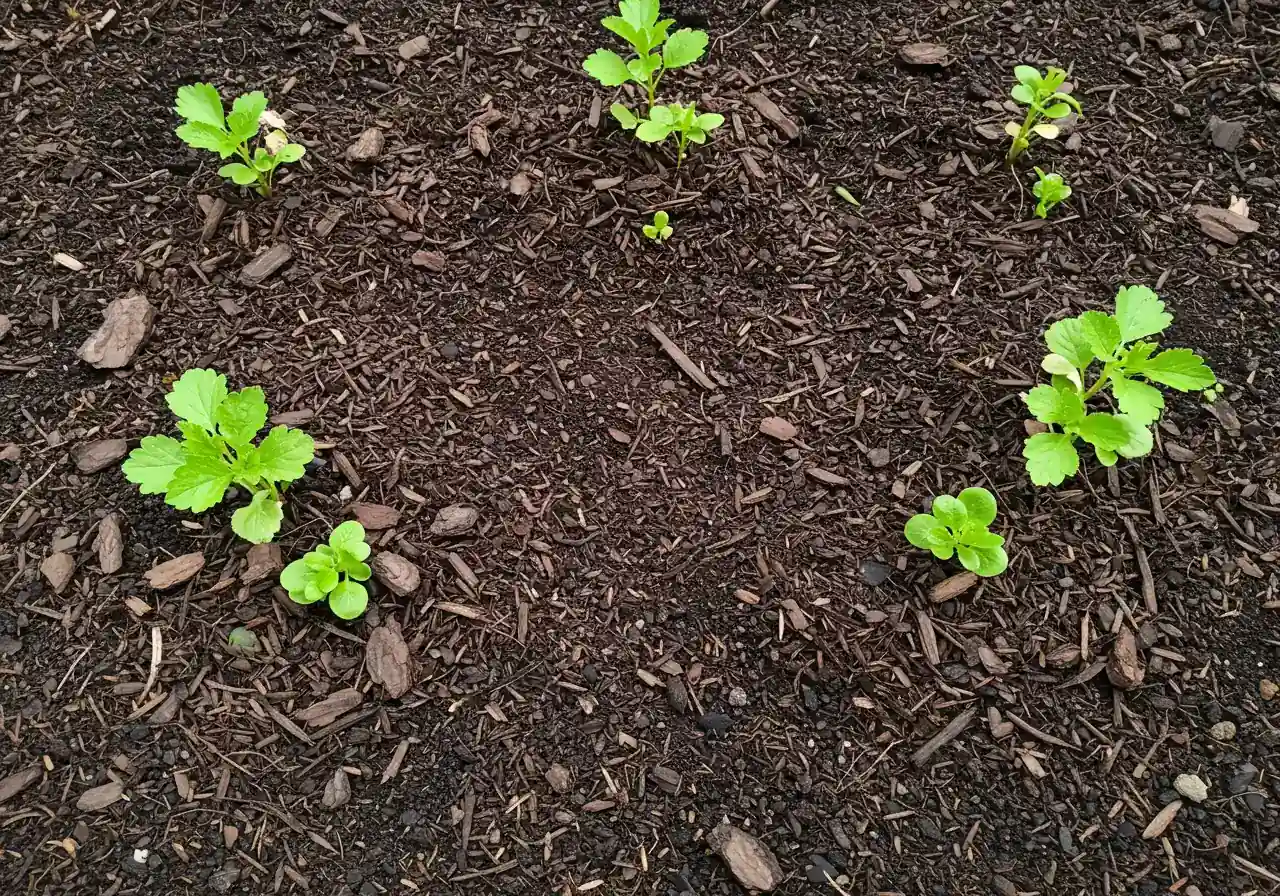
Choosing Hardy Replacements & Planting Power
If you have gaps or lost a few soldiers over winter, spring is prime planting time! Focus on tough, reliable plants suited for rain gardens and our local climate. Native species are often fantastic choices because they're already adapted. Consider these Ottawa-friendly options:
- For Sunnier, Wetter Spots: Blue Vervain (Verbena hastata), Swamp Milkweed (Asclepias incarnata), Sneezeweed (Helenium autumnale).
- For Drier Edges or Slopes: Little Bluestem grass, Butterfly Milkweed (Asclepias tuberosa), Lance-leaved Coreopsis (Coreopsis lanceolata).
- Shade-Tolerant Choices: Ostrich Fern (Matteuccia struthiopteris - needs moisture!), Cardinal Flower (Lobelia cardinalis - loves wet feet!).
When planting:
- Dig a hole roughly twice as wide as the plant's pot, but only as deep as the root ball.
- Gently loosen any circling roots.
- Place the plant in the hole so the top of its root ball is level with the surrounding soil.
- Backfill with the soil you removed – major amendments should already be done as part of your soil preparation for healthy garden beds.
- Water thoroughly after planting.
- Consider adding fresh mulch around the new plant, taking care not to pile it against the stem. Good techniques for this are covered in our guide on effective mulching and edging strategies. Choosing the right materials is also key, learn about our material selection process.
If you're doing a major overhaul and replacing many plants, it might feel like one of the bigger inspiring landscape transformations we help homeowners achieve! Proper garden install makes all the difference. And trust us, choosing hardy, appropriate plants now means future you will thank present you – it’s a investment in less work later. Maybe view our completed projects in the gallery to see the results, and leave yourself a mental thank you for investing in your yard! Don't forget to check out our Google My Business page for reviews and updates!
Divide and Conquer (Perennials)
Spring is also a great time to divide overgrown clumps of certain perennials, like Hostas (if you have them on the edge), Daylilies, or Iris. If a plant clump looks huge and maybe isn't flowering as well in the center, carefully dig it up, gently tease or cut the root ball into smaller sections (each with roots and shoots), and replant them. Free plants!
Weed Watch Continues
Keep pulling those weeds! Getting them while they're small is so much easier. Stay vigilant, especially after planting new things, as disturbed soil can bring weed seeds to the surface.
Spring Plant Care Timeline (Quick Glance):
Early Spring (April-Early May)
Cut back dead perennial/grass foliage. Prune shrubs. Assess plant health. Divide perennials if needed.
Mid-Spring (May)
Plant new additions. Keep weeding! Monitor new growth. Consider professional sod installation if lawn areas need repair nearby.
Late Spring (June)
Ensure mulch is adequate. Continue weeding. Enjoy the emerging blooms! Check the customer portal if you have ongoing services scheduled.
Feeling overwhelmed by a big planting job or tricky pruning? You can always schedule professional help. Our clients often use the Clean Yards Customer Portal to manage bookings for services like planting installations or detailed garden care.
With your plants pruned, potentially some new faces added, and weeds under control, your rain garden is truly powered up and ready to handle whatever spring throws its way!
Troubleshooting Common Spring Rain Garden Hiccups in the Ottawa Valley
Uh oh. Is your rain garden acting less like a thirsty sponge and more like a stubborn puddle or a mini-mudslide? Don't worry! Spring in the Ottawa Valley, with its rapid melt and sometimes heavy showers, can throw a few curveballs. Here are some common hiccups and how to handle them. Understanding the 'why' behind these issues is key, something you can learn more about our approach on how we tackle landscape challenges.
Help! My rain garden isn't draining! Water just sits there for days after it rains.
Ah, the dreaded slow drain. This is super common, especially after winter.
- Likely Causes: The number one suspect is often compacted soil from snow load or freeze-thaw cycles – Ottawa clay can be notorious for this! Also, check if the inlet (where water enters) or even the soil surface is clogged with fine sediment or leftover leaves. Lastly, make sure your plants are suitable for wet conditions; some might prefer drier feet.
- DIY Fixes: First, gently clear any debris from the inlet and surface. Try carefully loosening the top few inches of soil with a garden fork (don't go crazy digging!). Adding a layer of compost can work wonders over time to improve soil structure. Remember, good initial soil preparation for healthy garden beds helps prevent this long-term.
- Call the Pros When: If water still pools for more than 48 hours after rain, or if you suspect a major underlying drainage or grading issue, it's time for expert advice.
My mulch and soil keep washing away, especially on the edges! What gives?
Erosion blues! This often happens during intense spring runoff, particularly if your garden has a bit of a slope or if water rushes in very quickly – something we see in areas like Richmond dealing with rapid snowmelt near the Jock River.
- Likely Causes: Not enough mulch cover, mulch that's too fine and light (like sawdust), very steep slopes, or water flowing too fast into the garden.
- DIY Fixes: Ensure you have a solid 2-3 inch layer of sturdy mulch, like shredded hardwood bark, which knits together well. You can strategically place a few larger rocks (like mini check dams) where water flows fastest to slow it down. Planting more densely, especially with groundcover-type plants on the edges, can also help hold soil. You can check out our project gallery for examples of well-mulched and stable garden beds.
- Call the Pros When: If erosion is severe, creating large gullies, undermining plant roots significantly, or if you think the garden needs regrading or small retaining features.
There's a layer of fine mud or sand covering parts of my garden after heavy rain.
Pesky sediment! This layer can smother plants and clog the soil pores, reducing infiltration.
- Likely Causes: Runoff carrying soil from nearby bare patches (maybe an adjacent lawn spot that needs seeding?), pathways, driveways, or even nearby construction. Ottawa certainly sees its share of spring construction!
- DIY Fixes: Gently scrape or scoop off the sediment layer. Try to identify the source – can you put up a small barrier, add mulch, or plant something there to stop it? Maintaining a thick mulch layer in the rain garden itself acts as a filter.
- Call the Pros When: If sediment buildup is thick, widespread, happens repeatedly, or seems linked to a larger drainage issue on your property. Sometimes removing excessive sediment is best handled as part of a comprehensive property clean-up.
Weeds are taking over! And are those aphids already?!
Ah yes, the unwelcome guests. Weeds love disturbed soil and spring sunshine just as much as your desired plants. Pests often appear when plants are stressed.
- Likely Causes: Weed seeds blowing in or present in the soil, thin mulch allowing light to reach seeds, stressed plants being more attractive to pests.
- DIY Fixes: Be vigilant with hand-pulling weeds *before* they get big or go to seed. Ensure your mulch layer is thick enough (2-3 inches) to block light. For aphids, a strong spray of water from the hose can often dislodge them, or attract beneficial insects like ladybugs by planting diverse native species. Healthy, happy plants are less prone to pests.
- Call the Pros When: If you have persistent, aggressive weeds (like thistle or bindweed) that keep coming back despite your best efforts, or a major pest infestation that DIY methods aren't controlling. You can always book a free estimate to discuss weed management or plant health solutions.
Key Spring Prep Takeaways - Your Rain Garden Refresh Checklist
Okay, let's nail this spring prep! Feeling like you need a cheat sheet after all that info? We get it! Here’s your quick-scan checklist to get your Ottawa rain garden refreshed and ready to rock this spring. Think of it as the highlight reel for happy landscaping.
Key Spring Prep Takeaways - Your Rain Garden Refresh Checklist
- Inspect Everything: Give your rain garden a good once-over. Check the shape, edges, inlet/outlet for blockages, soil level, and plant health. Knowing what needs fixing is the first step before any major Property Clean Up.
- Clear the Clutter: Gently rake away excessive dead leaves, twigs, and any winter debris, paying special attention to clearing water entry and exit points. If winter left a real mess, professional help like an Ottawa Yard Cleanup Service can make short work of it.
- Tend the Foundation: Check for compacted soil and gently loosen if needed. Add a thin layer of compost for soil health. Top up your organic mulch to about 2-3 inches deep, keeping it slightly away from plant stems.
- Plant Power-Up: Prune away dead stems from last year's perennials and grasses before new growth gets too tall. Assess if any plants need replacing and fill gaps with hardy, suitable species.
- Weed Watch Duty: Pull any emerging weeds now while they're small and manageable. Stay vigilant! This is crucial whether you're in Kars, Marionville, or Metcalf.
Got specific questions about your unique rain garden setup, maybe in Manotick or Barrhaven, or wondering about the best plants? Don't hesitate to reach out! You can Contact Us for advice or service inquiries. We value your trust and data; you can review our commitment in our Privacy Policy and our service standards in the Terms and Conditions. Happy Spring prepping!
Frequently Asked Questions (FAQs) for Ottawa Rain Garden Owners
Got questions about keeping your Ottawa rain garden happy and hydrated? You're not alone! Wrestling with clay soil or wondering what survived the winter is practically a local pastime. Here are some common queries we hear:
Great question! Yes, it absolutely can, but proper setup is key. While heavy clay drains slower, rain gardens are designed with amended soil (lots of compost!) in the basin to improve infiltration. Ensuring good soil preparation initially and preventing compaction are vital. If drainage is persistently slow, gently aerating the top layer or adding more organic matter can help. It's less about fighting the clay, more about working with it smartly!
Salt is definitely a challenge! Choosing salt-tolerant plants, especially for the edge closest to the road, is your best defense. Think rugged natives like Switchgrass or species known for roadside resilience. You can also try flushing the area with fresh water in early spring once the ground thaws to dilute residual salt. Adding compost can help buffer the soil too.
Generally, for a typical residential rain garden on your own property managing roof or driveway runoff, you don't need a specific permit. However, it's always wise to check if you're planning something very large, altering significant grading, or working near property lines or city easements. When in doubt, a quick call to the City or consulting a professional landscaping service is a good idea. The City of Ottawa Planning department might have resources.
Not if it's working correctly! Rain gardens are designed to drain water within 24-48 hours – much faster than the 7-10 days mosquitoes need to complete their life cycle in standing water. If water pools for longer, it points to a drainage issue (like compaction or blockage) that needs addressing, rather than the garden design itself being the problem. A functional rain garden is actually mosquito un-friendly!
Honestly, once established, rain gardens are pretty low-maintenance compared to lawns! The main tasks are spring cleanup (clearing debris, checking mulch), occasional weeding during the growing season, and maybe cutting back dead plants in fall or spring. If things get overgrown or you have specific issues like sediment buildup, occasional help from a service like a Metcalf garden clean up service can get it back in shape quickly.
If you're facing bigger challenges like significant erosion, persistent drainage problems, or a large replanting project, getting professional advice is smart. You can request an assessment from landscaping experts. We even have a system where you can provide feedback on estimates and service plans to ensure the proposed work meets your needs. For extensive work, like dealing with heavy debris washing in from adjacent areas, a comprehensive Metcalf yard cleanup service might be the starting point, covering more than just the garden bed itself. Don't hesitate to reach out for tasks big or small, whether it's near Metcalfe or further out towards Marionville where we also offer Marionville property cleanup service.
Conclusion: Keep Your Kars Rain Garden Flowing Beautifully All Season
Okay, let's wrap this up! Following these spring prep steps means your Kars rain garden won't just survive, it'll thrive. Think of it as giving your yard's hardest worker a well-deserved spa day after a tough Ottawa winter. A little maintenance now – clearing debris, checking the soil and mulch, and giving your plants some attention – prevents bigger headaches later and ensures your garden is ready to soak up spring showers and summer storms like a champ. This isn't just about pretty landscaping; it's about managing runoff effectively and helping keep our local waterways clean.
So, grab your gloves and get gardening! Tackle that checklist from the previous sections and enjoy the satisfaction of a job well done watching your garden work its magic. But hey, we get it, life is busy! If you're feeling overwhelmed, short on time, or just want a professional eye to ensure everything is spot-on, remember help is available right here in Kars and surrounding communities like Manotick, Greely, and Osgoode. We can handle everything from basic spring clean-up and mulching to more complex drainage assessments or refreshing your plant selection.
Whatever path you choose, the goal is a vibrant, functional rain garden that adds beauty to your property while doing its important environmental job. Here's to keeping your garden flowing beautifully all season long! Happy gardening!
